一. 前言
虽然网上针对整体加固和抽取加固已经有不少文章讨论如何实现以及脱壳,也有很多成熟的加固方案
但是在学习这方面技术时发现涉及到的理论知识很多,不能局限于基本流程和代码实现而不明白底层原理
身为初学者最大的痛苦是知识体系庞大不知道如何下手,所以希望本文能抛砖引玉,对于入门Android加固的师傅有所帮助
本文主要内容如下:
- Android加固涉及的理论知识 包括Java反射机制,ClassLoader机制,Android应用程序启动流程等
- 整体加固和抽取加固的自动化 整体加固的落地和不落地加载,抽取加固的代码抽取与回填
由于涉及的知识较多,分为了3部分:
- 相关理论基础知识简介
- 一代到三代加固的实现
- 相关理论基础知识详解
阅读本文的正确姿势:
-
刚开始不要试图把握每一个细节,先把握整体再逐步学习细节部分,可以多看看流程图
-
了解相关理论基础知识后,再看一到三代加固的实现,如果部分原理和代码不明白则阅读详解部分
-
原理部分强烈推荐阅读Android进阶解密和Andorid系统源码
附件attachments.zip (31.7MB)内容如下:
-
AndroidShell
Android壳程序项目,包括一代到三代加固的代理类,其中整体加固已注释,默认为三代抽取加固
-
ReadDex
Dex文件解析器项目,支持抽取指定dex文件所有DexClassDef的代码,过滤系统类
-
ShellScripts
一代到三代的加壳程序自动化脚本
ShellScripts\tools目录下提供以下工具
- apktool 提供APK的解包和打包功能
- uber-apk-signer-1.3.0.jar 提供APK的签名功能
- ReadDex.exe 提供Dex文件代码抽取功能
-
JavaReflectionDemo
java反射的demo
-
LoadDexDemo
加载dex文件并调用其中指定类的demo
-
ShellTestResults.zip (76.7MB 单独压缩)
一代到三代加固的测试文件,包括源程序,壳程序,加壳后的程序
附件链接: AndroidShell https://pan.baidu.com/s/14jry11WpTlzWI6JW3r4HTw?pwd=qsyw
References: 列举了本文参考的部分资料,常用脱壳工具和第四代加固——Dex2C和DexVMP相关项目
由于本人知识水平有限,如有不足之处望各位师傅指出
二. Android壳简介
-
加密壳
- 一代 动态加载型 DexClassLoader 落地加载
- 二代 动态加载型 InMemoryDexClassLoader 不落地加载
- 三代 代码抽取型 Dex代码抽取与回填 落地加载
落地指释放Dex文件到文件系统,不落地则不释放Dex文件,直接在内存中加载
-
四代壳
DexVMP Dex2C
-
混淆壳
OLLVM
在学习Android加固之前,一定要了解以下知识:
- Java反射机制
- ClassLoader机制
- Android应用程序启动流程
- Dex文件结构
三. Java反射机制
参考 java反射技术学习 和 Java反射机制-十分钟搞懂
示例文件: attachments\JavaReflectionDemo\ReflectionDemo.java
反射机制简介
反射的原理:
-
Java反射机制的核心是在程序运行时动态加载类并获取类的详细信息,从而操作类或对象的属性和方法
本质是JVM得到class对象之后,再通过class对象进行反编译,从而获取对象的各种信息
-
Java属于先编译再运行的语言
程序中对象的类型在编译期就确定下来了,而当程序在运行时可能需要动态加载某些类,这些类因为之前用不到,所以没有被加载到JVM.通过反射,可以在运行时动态地创建对象并调用其属性,不需要提前在编译期知道运行的对象是谁.
-
反射是实现动态加载的技术之一
反射的优缺点:
-
优点
在运行时获得类的各种内容,进行反编译,对于Java这种先编译再运行的语言,能够让我们很方便的创建灵活的代码,这些代码可以在运行时装配,无需在组件之间进行源代码的链接,更加容易实现面向对象.
-
缺点
反射会消耗一定的系统资源,因此,如果不需要动态地创建一个对象,那么就不需要用反射;
反射调用方法时可以忽略权限检查,因此可能会破坏封装性而导致安全问题.
反射的作用: 反射机制在实现壳程序动态加载被保护程序时非常关键,它可以突破默认的权限访问控制,访问安卓系统默认情况下禁止用户代码访问的以及不公开的部分.
反射的本质
正常类的加载过程:
- 执行Student student=new Student(),向JVM请求创建student实例
- JVM寻找Student.class文件并加载到内存中
- JVM创建Student对应的Class对象(一个类只对应一个Class对象)
- JVM创建student实例
对于同一个类而言,无论有多少个实例,都只对应一个Class对象
Java反射的本质: 获取Class对象后,反向访问实例对象

反射的入口-Class类
反射相关文件
1
2
3
4
5
|
Java.lang.Class;
Java.lang.reflect.Constructor;
Java.lang.reflect.Field;
Java.lang.reflect.Method;
Java.lang.reflect.Modifier;
|
JDK中,主要由以下类来实现Java反射机制,这些类都位于java.lang.reflect包中
-
Class类: 代表一个类
-
Constructor 类: 代表类的构造方法
-
Field 类: 代表类的成员变量(属性)
-
Method类: 代表类的成员方法
反射的入口-Class类:
-
Class类的对象称为类对象
-
Class类是Java反射机制的起源和入口
-
用于获取与类相关的各种信息
-
提供了获取类信息的相关方法
-
Class类继承自Object类
-
Class类是所有类的共同的图纸
-
每个类有自己的对象,好比图纸和实物的关系
-
每个类也可看做是一个对象,有共同的图纸Class,存放类的结构信息,比如类的名字、属性、方法、构造方法、父类和接口,能够通过相应方法取出相应信息
示例类,用于后续操作
 1
 2
 3
 4
 5
 6
 7
 8
 9
10
11
12
13
14
15
16
17
18
19
20
21
22
23
24
25
26
27
28
29
30
|
// 示例类
class Person implements Runnable{
    public String name;
    private int age;

    //默认构造函数和有参构造函数
    public Person() {}
    private Person(String str){
        System.out.println("Private constructor:"+str);
    }
    public Person(String name, int age) {
        this.name = name;
        this.age = age;
    }

    // 不同访问权限的方法
    public void introduce() {
        System.out.println("我是" + name + ",年龄" + age);
    }

    private void privateMethod(String name,int age) {

        System.out.println("这是Person的私有方法,"+"name="+name+","+"age="+age);
    }

    @Override
    public void run() {
        System.out.println("Hello World");
    }
}
|
反射获取Class
非动态加载时,可通过.class属性或实例.getClass()方法获取Class类
动态加载时,可使用Class.forName()和ClassLoader.loadClass()加载并获取类对象
 1
 2
 3
 4
 5
 6
 7
 8
 9
10
11
12
13
14
15
16
17
18
19
20
21
|
        //1. 获取类对象
        // 动态加载
        Class<?> clazz= Class.forName("MyUnidbgScripts.Person"); // 通过类的完整名加载
        Class<?> clazz2=ClassLoader.getSystemClassLoader().loadClass("MyUnidbgScripts.Person");// 通过classloader加载
        // 非动态加载
        Class<?> clazz3=Person.class;
        Class<?> clazz4=new Person().getClass();
        System.out.println("Load Class:");
        System.out.println(clazz);
        System.out.println(clazz2);
        System.out.println(clazz3);
        System.out.println(clazz4);
        System.out.println();

        //2. 从类对象获取类的各种信息
        System.out.println("Class info:");
        System.out.println(clazz.getName());       // 完整类名
        System.out.println(clazz.getSimpleName()); // 类名
        System.out.println(clazz.getSuperclass()); // 父类类对象
        System.out.println(Arrays.toString(clazz.getInterfaces()));    //接口类对象数组
        System.out.println();
|
输出如下
 1
 2
 3
 4
 5
 6
 7
 8
 9
10
11
|
Load Class:
class MyUnidbgScripts.Person
class MyUnidbgScripts.Person
class MyUnidbgScripts.Person
class MyUnidbgScripts.Person

Class info:
MyUnidbgScripts.Person
Person
class java.lang.Object
[interface java.lang.Runnable]
|
反射获取Constructor
- class.getConstructor(Class… ParameterTypes) 获取class类指定参数类型的public构造方法
- class.getConstructors() 获取class类中的所有public权限的构造方法
- class.getDeclaredConstructor(Class… ParameterTypes) 获取class类中的任意构造方法
- class.getDeclaredConstructors() 获取class类中的所有构造方法
 1
 2
 3
 4
 5
 6
 7
 8
 9
10
11
12
13
14
15
16
17
18
19
20
21
22
23
24
25
|
        //3. 获取构造方法
        // 获取无参构造方法(默认构造方法)
        System.out.println("Get constructor:");
        Constructor<?> constructor=clazz.getConstructor();
        System.out.println(constructor);
        System.out.println();

        // 获取public构造方法
        System.out.println("Get public constructors:");
        Constructor<?>[] constructors=clazz.getConstructors();
        System.out.println(Arrays.toString(constructors));
        System.out.println();

        // 获取所有构造方法
        System.out.println("Get all constructors:");
        constructors=clazz.getDeclaredConstructors();
        System.out.println(Arrays.toString(constructors));
        System.out.println("Print All Constructors:");
        for(Constructor<?> cons:constructors){
            System.out.println("constructor: "+cons);
            System.out.println("\tname: "+cons.getName()+
                    "\n\tModifiers: "+Modifier.toString(cons.getModifiers())+
                    "\n\tParameterTypes: "+Arrays.toString(cons.getParameterTypes()));
        }
        System.out.println();
|
输出如下
 1
 2
 3
 4
 5
 6
 7
 8
 9
10
11
12
13
14
15
16
17
18
19
20
21
|
Get constructor:
public MyUnidbgScripts.Person()

Get public constructors:
[public MyUnidbgScripts.Person(java.lang.String,int), public MyUnidbgScripts.Person()]

Get all constructors:
[public MyUnidbgScripts.Person(java.lang.String,int), private MyUnidbgScripts.Person(java.lang.String), public MyUnidbgScripts.Person()]
Print All Constructors:
constructor: public MyUnidbgScripts.Person(java.lang.String,int)
	name: MyUnidbgScripts.Person
	Modifiers: public
	ParameterTypes: [class java.lang.String, int]
constructor: private MyUnidbgScripts.Person(java.lang.String)
	name: MyUnidbgScripts.Person
	Modifiers: private
	ParameterTypes: [class java.lang.String]
constructor: public MyUnidbgScripts.Person()
	name: MyUnidbgScripts.Person
	Modifiers: public
	ParameterTypes: []
|
反射获取Field
- class.getField(FieldName) 获取class类中的带public声明的FieldName变量
- class.getFields() 获取class类中的带public声明的所有变量
- class.getDeclaredField(FieldName) 获取class类中的FieldName变量
- class.getDeclaredFields() 获取class类中的所有变量
 1
 2
 3
 4
 5
 6
 7
 8
 9
10
11
12
13
14
15
16
17
18
19
20
21
22
23
24
25
26
|
        //3. 获取属性
        // 获取所有public属性
        System.out.println("Get public fields:");
        Field[] fields=clazz.getFields();
        System.out.println(Arrays.toString(fields));
        System.out.println();

        // 获取所有属性
        System.out.println("Get all fields:");
        fields=clazz.getDeclaredFields();
        System.out.println(Arrays.toString(fields));
        System.out.println("Print all fields:");
        for(Field field:fields){
            System.out.println("field: "+field);
            System.out.println("\ttype: "+field.getType()+
                    "\n\tname: "+field.getName());
        }
        System.out.println();

        System.out.println("Get specific field:");
        // 获取public权限的指定属性
        Field field=clazz.getField("name");
        System.out.println(field);
        // 获取任意权限的指定属性
        field=clazz.getDeclaredField("age");
        System.out.println(field);
|
输出如下
 1
 2
 3
 4
 5
 6
 7
 8
 9
10
11
12
13
14
15
16
|
Get public fields:
[public java.lang.String MyUnidbgScripts.Person.name]

Get all fields:
[public java.lang.String MyUnidbgScripts.Person.name, private int MyUnidbgScripts.Person.age]
Print all fields:
field: public java.lang.String MyUnidbgScripts.Person.name
	type: class java.lang.String
	name: name
field: private int MyUnidbgScripts.Person.age
	type: int
	name: age

Get specific field:
public java.lang.String MyUnidbgScripts.Person.name
private int MyUnidbgScripts.Person.age
|
反射获取Method
- class.getMethod(MethodName,…ParameterTypes) 获取指定方法名和指定参数的public方法
- class.getMethods() 获取class类中所有public方法
- class.getDeclaredMethod(MethodName,…ParameterTypes) 获取class类中指定方法名和指定参数的任意方法
- class.getDeclaredMethods() 获取class类的所有方法
 1
 2
 3
 4
 5
 6
 7
 8
 9
10
11
12
13
14
15
16
17
18
19
20
21
22
23
24
25
26
27
|
        //4. 获取方法
        System.out.println("Get public methods:");
        Method[] methods=clazz.getMethods();   // 注意会获取所实现接口的public方法
        System.out.println(Arrays.toString(methods));
        System.out.println();

        System.out.println("Get all methods:");
        methods=clazz.getDeclaredMethods();    // 获取所有声明的方法
        System.out.println(Arrays.toString(methods));
        System.out.println();

        System.out.println("Print all methods:");
        for(Method method:methods){
            System.out.println("method: "+method);
            System.out.println("\tname: "+method.getName());
            System.out.println("\treturnType: "+method.getReturnType());
            System.out.println("\tparameterTypes: "+Arrays.toString(method.getParameterTypes()));
        }
        System.out.println();

        // 获取public的指定方法
        Method method=clazz.getMethod("introduce");
        System.out.println(method);
        // 获取任意权限的指定方法
        method=clazz.getDeclaredMethod("privateMethod",String.class,int.class);
        System.out.println(method);
        System.out.println();
|
输出如下
 1
 2
 3
 4
 5
 6
 7
 8
 9
10
11
12
13
14
15
16
17
18
19
20
21
22
|
Get public methods:
[public void MyUnidbgScripts.Person.run(), public void MyUnidbgScripts.Person.introduce(), public final void java.lang.Object.wait(long,int) throws java.lang.InterruptedException, public final void java.lang.Object.wait() throws java.lang.InterruptedException, public final native void java.lang.Object.wait(long) throws java.lang.InterruptedException, public boolean java.lang.Object.equals(java.lang.Object), public java.lang.String java.lang.Object.toString(), public native int java.lang.Object.hashCode(), public final native java.lang.Class java.lang.Object.getClass(), public final native void java.lang.Object.notify(), public final native void java.lang.Object.notifyAll()]

Get all methods:
[public void MyUnidbgScripts.Person.run(), public void MyUnidbgScripts.Person.introduce(), private void MyUnidbgScripts.Person.privateMethod(java.lang.String,int)]

Print all methods:
method: public void MyUnidbgScripts.Person.run()
	name: run
	returnType: void
	parameterTypes: []
method: public void MyUnidbgScripts.Person.introduce()
	name: introduce
	returnType: void
	parameterTypes: []
method: private void MyUnidbgScripts.Person.privateMethod(java.lang.String,int)
	name: privateMethod
	returnType: void
	parameterTypes: [class java.lang.String, int]

public void MyUnidbgScripts.Person.introduce()
private void MyUnidbgScripts.Person.privateMethod(java.lang.String,int)
|
反射创建对象
- 通过Class.newInstance() 调用无参构造方法创建实例 不能传递参数
- 通过Constructor.newInstance() 调用指定构造方法创建实例 可传递参数
 1
 2
 3
 4
 5
 6
 7
 8
 9
10
11
12
13
14
15
16
17
|
        //5. 反射创建对象
        System.out.println("Create instance by reflection:");
        //5.1 Class.newInstance() 要求Class对象对应类有无参构造方法,执行无参构造方法创建实例
        System.out.println("Create instance by Class.newInstance():");
        Object obj=clazz.newInstance();
        System.out.println(obj.toString());
        System.out.println();

        //5.2 Constructor.newInstance() 通过Class获取Constructor,再创建对象,可使用指定构造方法
        System.out.println("Create instance by Constructor.newInstance():");
        Constructor<?> cons=clazz.getConstructor();// 获取无参构造方法
        obj=cons.newInstance();
        System.out.println(obj.toString());
        cons=clazz.getDeclaredConstructors()[0];// 获取有参构造方法
        obj=cons.newInstance("张三",18);
        System.out.println(obj.toString());
        System.out.println();
|
输出如下
1
2
3
4
5
6
7
|
Create instance by reflection:
Create instance by Class.newInstance():
MyUnidbgScripts.Person@30dae81

Create instance by Constructor.newInstance():
MyUnidbgScripts.Person@1b2c6ec2
MyUnidbgScripts.Person@4edde6e5
|
反射操作属性
- Class.getField(FieldName) 获取指定名称的public属性
- Class.getDeclaredField(FieldName) 获取指定名称的任意属性
- Field.get(Object obj) 获取指定实例的值
- Field.set(Object obj,Object value) 设置指定实例的值
- Field.setAccessible(true) 突破属性权限控制
1
2
3
4
5
6
7
8
9
|
       //6. 反射操作属性
        System.out.println("Access field by reflection:");
        Field nameField=clazz.getField("name");
        nameField.set(obj,"王五");    // 修改指定对象的指定属性
        Field ageField=clazz.getDeclaredField("age");
        ageField.setAccessible(true);// 突破权限控制
        ageField.set(obj,20);
        System.out.println(nameField.get(obj));// get方法获取字段值
        System.out.println(ageField.get(obj));
|
输出如下
1
2
3
|
Access field by reflection:
王五
20
|
反射调用方法
- Class.getMethod(String name,Class… parameterTypes) 获取指定名称和参数类型的public方法
- Class.getDeclaredMethod(String name,Class… parameterTypes) 获取指定名称和参数类型的方法
- Method.setAccessible(true) 突破访问权限控制
- Method.invoke(Object obj,Object… args) 调用指定实例的方法,可传递参数
1
2
3
4
5
6
7
|
       //7. 反射调用方法
        System.out.println("Run method by reflection:");
        Method introduceMethod=clazz.getMethod("introduce");
        introduceMethod.invoke(obj); //person.introduce()
        Method privateMethod=clazz.getDeclaredMethod("privateMethod",String.class,int.class);// person.privateMethod("赵四",19)
        privateMethod.setAccessible(true);
        privateMethod.invoke(obj,"赵四",19);
|
输出如下
1
2
3
|
Run method by reflection:
我是王五,年龄20
这是Person的私有方法,name=赵四,age=19
|
封装反射类
封装Reflection.java反射类便于后续使用,提供以下功能:
- 调用静态/实例方法
- 访问静态/实例字段
 1
 2
 3
 4
 5
 6
 7
 8
 9
10
11
12
13
14
15
16
17
18
19
20
21
22
23
24
25
26
27
28
29
30
31
32
33
34
35
36
37
38
39
40
41
42
43
44
45
46
47
48
49
50
51
52
53
54
55
56
57
58
59
60
61
62
63
64
65
66
67
68
69
70
71
72
73
74
75
76
77
78
79
80
81
82
83
84
85
86
87
88
|
package com.example.androidshell;

import android.util.Log;

import java.lang.reflect.Field;
import java.lang.reflect.Method;

public class Reflection {
    private static final String TAG="glass";
    public static Object invokeStaticMethod(String class_name,String method_name,Class<?>[] parameterTypes,Object[] parameterValues){
        try {
            Class<?> clazz = Class.forName(class_name); //反射获取Class类对象
            Method method = clazz.getMethod(method_name,parameterTypes);//反射获取方法
            method.setAccessible(true);//突破权限访问控制
            return method.invoke(null,parameterValues);//反射调用,静态方法无需指定所属实例,直接传参即可
        }catch (Exception e){
            Log.d(TAG, e.toString());
            return null;
        }
    }

    public static Object invokeMethod(String class_name,String method_name,Object obj,Class<?>[] parameterTypes,Object[] parameterValues)
    {
        try {
            Class<?> clazz = Class.forName(class_name);
            Method method = clazz.getMethod(method_name,parameterTypes);
            method.setAccessible(true);//突破权限访问控制
            return method.invoke(obj,parameterValues);// 反射调用,动态方法需要指定所属实例
        }catch (Exception e)
        {
            Log.d(TAG, e.toString());
            return null;
        }
    }

    public static Object getField(String class_name,Object obj,String field_name)
    {
        try {
            Class<?> clazz = Class.forName(class_name);
            Field field = clazz.getDeclaredField(field_name);
            field.setAccessible(true);
            return field.get(obj);  //获取实例字段,需要指定实例对象
        }catch(Exception e)
        {
            Log.d(TAG, e.toString());
            return null;
        }
    }

    public static Object getStaticField(String class_name,String field_name)
    {
        try {
            Class<?> clazz = Class.forName(class_name);
            Field field = clazz.getDeclaredField(field_name);
            field.setAccessible(true);
            return field.get(null);
        }catch (Exception e)
        {
            Log.d(TAG, e.toString());
            return null;
        }
    }

    public static void setField(String class_name,String field_name,Object obj,Object value)
    {
        try {
            Class<?> clazz = Class.forName(class_name);
            Field field = clazz.getDeclaredField(field_name);
            field.setAccessible(true);
            field.set(obj,value);
        }catch (Exception e)
        {
            Log.d(TAG, e.toString());
        }
    }

    public static void setStaticField(String class_name,String field_name,Object value)
    {
        try {
            Class<?> clazz = Class.forName(class_name);
            Field field = clazz.getDeclaredField(field_name);
            field.setAccessible(true);
            field.set(null,value);
        }catch (Exception e){
            Log.d(TAG, e.toString());
        }
    }
}
|
四. ClassLoader机制
热修复和插件化技术依赖于ClassLoader,JVM虚拟机运行class文件,而Dalvik/ART运行dex文件,所以它们的ClassLoader有部分区别
Java中的ClassLoader
ClassLoader的类型
Java的ClassLoader分为两种:
-
系统类加载器
BootstrapClassLoader, ExtensionsClassLoader, ApplicationClassLoader
-
自定义类加载器
Custom ClassLoader, 通过继承java.lang.ClassLoader实现
具体分析如下
-
Bootstrap ClassLoader (引导类加载器)
是使用C/C++实现的加载器(不能被Java代码访问),用于加载JDK的核心类库,例如java.lang和java.util等系统类
会加载JAVA_HOME/jre/lib和-Xbootclasspath参数指定的目录
JVM虚拟机的启动就是通过BootstrapClassLoader创建的初始类完成的
可通过如下代码得出其加载的目录(java8)
1
2
3
4
5
|
public class Test0 {
        public static void main(String[] args) {
            System.out.println(System.getProperty("sun.boot.class.path"));
        }
}
|
效果如下

-
Extensions ClassLoader (拓展类加载器)
该类在Java中的实现类为ExtClassLoader,用于加载java的拓展类,提供除系统类之外的额外功能
用于加载JAVA_HOME/jre/lib/ext和java.ext.dir指定的目录
以下代码可以打印ExtClassLoader的加载目录
1
2
3
4
5
|
public class JavaClassLoaderTest {
        public static void main(String[] args) {
            System.out.println(System.getProperty(java.ext.dirs));
        }
}
|

-
Application ClassLoader (应用程序类加载器)
对应的实现类为AppClassLoader,又可以称作System ClassLoader(系统类加载器),因为它可以通过ClassLoader.getSystemClassLoader()方法获取
用于加载程序的Classpath目录和系统属性java.class.path指定的目录
-
Custom ClassLoader (自定义加载器)
除了以上3个系统提供的类加载器之外,还可以通过继承java.lang.ClassLoader实现自定义类加载器
Extensions和Application ClassLoader也继承了该类
ClassLoader的继承关系
运行一个Java程序需要几种类型的类加载器呢?可以使用如下代码验证
1
2
3
4
5
6
7
8
9
|
public class JavaClassLoaderTest {
        public static void main(String[] args) {
            ClassLoader loader=JavaClassLoaderTest.class.getClassLoader();
            while(loader!=null){
              System.out.println(loader);
              loader=loader.getParent();
            }
        }
}
|
打印出了AppClassLoader和ExtClassLoader,由于BootstrapClassLoader由C/C++编写,并非Java类,所以无法在Java中获取它的引用

注意:
-
系统提供的类加载器有3种类型,但是系统提供的ClassLoader不止3个
-
并且,AppClassLoader的父类加载器为ExtClassLoader,不代表AppClassLoader继承自ExtClassLoader
ClassLoader的继承关系如图所示:
-
ClassLoader 是一个抽象类,定义了ClassLoader的主要功能
-
SecureClassLoader 继承自ClassLoader,但并不是ClassLoader的实现类,而是拓展并加入了权限管理方面的功能,增强了安全性
-
URLClassLoader 继承自SecureClassLoader 可通过URL路径从jar文件和文件夹中加载类和资源
-
ExtClassLoader和AppClassLoader都继承自URLClassLoader
它们都是Launcher的内部类,而Launcher是JVM虚拟机的入口应用,所以ExtClassLoader和AppClassLoader都在Launcher中初始化

ClassLoader的双亲委托机制
类加载器查找Class采用了双亲委托模式:
- 先判断该Class是否加载,如果没有则先委托父类加载器查找,并依次递归直到顶层的Bootstrap ClassLoader
- 如果Bootstrap ClassLoader找到了则返回该Class,否则依次向下查找
- 如果所有父类都没找到Class则调用自身findClass进行查找
双亲委托机制的优点:
-
避免重复加载
如果已经加载过Class则无需重复加载,只需要读取加载的Class即可
-
更加安全
保证无法使用自定义的类替代系统类,并且只有两个类名一致并且被同一个加载器加载的类才会被认为是同一个类

ClassLoader.loadClass方法源码如下(Java17)
-
注释1处 检查传入的类是否被加载, 如果已经加载则不执行后续代码
-
注释2处 若父类加载器不为null则调用父类loadClass方法加载Class
-
注释3处 如果父类加载器为null则调用findBootstrapClassOrNull方法
该方法内部调用了Native方法findBootstrapClass,最终用Bootstrap ClassLoader检查该类是否被加载
注意: 在Android中,该方法直接返回null,因为Android中没有BootstrapClassLoader
-
注释4处 调用自身的findClass查找类
 1
 2
 3
 4
 5
 6
 7
 8
 9
10
11
12
13
14
15
16
17
18
19
20
21
22
23
24
25
26
27
28
29
30
31
32
33
34
35
36
|
    protected Class<?> loadClass(String name, boolean resolve)
        throws ClassNotFoundException
    {
        synchronized (getClassLoadingLock(name)) {
            Class<?> c = findLoadedClass(name);//1
            if (c == null) {
                long t0 = System.nanoTime();
                try {
                    if (parent != null) {
                        c = parent.loadClass(name, false);//2.
                    } else {
                        c = findBootstrapClassOrNull(name);//3
                    }
                } catch (ClassNotFoundException e) {
                    // ClassNotFoundException thrown if class not found
                    // from the non-null parent class loader
                }

                if (c == null) {
                    // If still not found, then invoke findClass in order
                    // to find the class.
                    long t1 = System.nanoTime();
                    c = findClass(name);//4

                    // this is the defining class loader; record the stats
                    PerfCounter.getParentDelegationTime().addTime(t1 - t0);
                    PerfCounter.getFindClassTime().addElapsedTimeFrom(t1);
                    PerfCounter.getFindClasses().increment();
                }
            }
            if (resolve) {
                resolveClass(c);
            }
            return c;
        }
    }
|
以上流程示意图如下

Android中的ClassLoader
Java中的ClassLoader可以加载jar和class文件(本质都是加载class文件)
而在Android中,无论DVM还是ART加载的文件都是dex文件,所以需要重新设计ClassLoader的相关类.
Android中的ClassLoader分为系统类加载器和自定义加载器:
-
系统类加载器
包括 BootClassLoader, PathClassLoader, DexClassLoader等
-
自定义加载器
通过继承BaseDexClassLoader实现,它们的继承关系如图所示:

各个ClassLoader的作用:
-
ClassLoader
抽象类,定义了ClassLoader的主要功能.
-
BootClassLoader
继承自ClassLoader,用于Android系统启动时预加载常用类.
-
SecureClassLoader
继承自ClassLoader扩展了类权限方面的功能,加强了安全性.
-
URLClassLoader
继承自SecureClassLoader,用于通过URL路径加载类和资源.
-
BaseDexClassLoader
继承自ClassLoader,是抽象类ClassLoader的具体实现类.
-
InMemoryDexClassLoader(Android8.0新增)
继承自BaseDexClassLoader,用于加载内存中的dex文件.
-
PathClassLoader
继承自BaseDexClassLoader,用于加载已安装的apk的dex文件.
-
DexClassLoader
继承自BaseDexClassLoader,用于加载已安装的apk的dex文件,以及从SD卡中加载未安装的apk的dex文件.
实现Android加固时,壳程序动态加载被保护程序的dex文件主要使用以下3个类加载器:
-
DexClassLoader 可以加载未安装apk的dex文件
它是一代加固——整体加固(落地加载)的核心之一
-
InMemoryDexClassLoader 可以加载内存中的dex文件
它是二代加固——整体加固(不落地加载)的核心之一
-
BaseDexClassLoader是ClassLoader的具体实现类
实际上DexClassLoader,PathClassLoader以及InMemoryDexClassLoader加载类时,均通过委托BaseDexClassLoader实现
ClassLoader加载Dex流程简介
Dex文件的加载依赖于前文提到的PathClassLoader,DexClassLoader和InMemoryDexClassLoader
加载Dex文件的功能均通过委托父加载器BaseDexClassLoader实现.其中PathClassLoader和DexClassLoader调用相同的BaseDexClassLoader构造函数,InMemoryDexClassLoader调用另一个构造函数.
最终通过ArtDexFileLoader::OpenCommon方法在ART虚拟机中创建DexFile::DexFile对象,该对象是Dex文件在内存中的表示,用于安卓程序运行时加载类以及执行方法代码,也是后续第三代加固——代码抽取加固,进行指令回填时的关键对象.
三种ClassLoader加载Dex文件的流程如下(基于Android10.0):
-
Java层
PathClassLoader和DexClassLoader委托BaseDexClassLoader最终执行JNI方法DexFile.openDexFileNative进入Native层.
而InMemoryDexClassLoader委托BaseDexClassLoader后则执行DexFile.openInMemoryDexFiles进入Native层.

-
Native层
PathClassLoader和DexClassLoader这条委托链会根据不同情况,调用ArtDexFileLoader::Open的不同重载,或者调用OpenOneDexFileFromZip.
InMemoryDexClassLoader调用ArtDexFileLoader::Open的第3种重载.
无论是调用哪个函数,最终都会调用ArtDexFileLoader::OpenCommon.

经过以上调用流程后进入ArtDexFileLoader::OpenCommon,经过DexFile的初始化和验证操作后便成功创建了DexFile对象:

创建DexFile对象后,Class对应的文件便被加载到ART虚拟机中
ClassLoader加载Class流程简介
前文通过ClassLoader.loadClass讲解了双亲委托机制,那么一个Class具体是如何被加载到JVM中的呢?
首先,继承自BaseDexClassLoader的3种ClassLoader调用自身loadClass方法时,委托父类查找,委托到ClassLoader.loadClass时返回.
BaseDexClassLoader.findClass调用DexPathList.findClass,其内部调用Element.findClass,最终调用DexFile.loadClassBinaryName进入DexFile中,该流程如图所示:

进入DexFile后,主要执行以下操作:
-
DexFile
通过JNI函数defineClassNative进入Native层.
-
DexFile_defineClassNative
通过FindClassDef枚举DexFile的所有DexClassDef结构并使用ClassLinker::DefineClass创建对应的Class对象.
之后调用ClassLinker::InsertDexFileInToClassLoader将对应的DexFile对象添加到ClassLoader的ClassTable中.
-
ClassLinker::DefineClass
调用LoadField加载类的相关字段,之后调用LoadMethod加载方法,再调用LinkCode执行方法代码的链接.
该流程如图所示:

综上所述,ClassLoader最终通过ClassLinker::DefineClass创建Class对象,并完成Field和Method的加载以及Code的链接.
调用链中有一个核心函数——ClassLinker::LoadMethod,通过该函数可以获取方法字节码在DexFile中的偏移值code_off,它是实现指令回填的核心之一
LoadDexDemo
参考动态加载示例
示例文件: attachments\LoadDexDemo
经过前文的介绍,我们知道Android中可使用ClassLoader加载dex文件,并调用其保存的类的方法
创建空项目,编写一个测试类用于打印信息,编译后提取apk文件和该类所在的dex文件并推送至手机的tmp目录
1
2
3
4
5
6
7
|
package com.example.emptydemo;
import android.util.Log;
public class TestClass{
    public void print(){
        Log.d("glass","com.example.emptydemo.print is called!");
    }
}
|
创建另一个项目,通过DexClassLoader加载apk和提取的dex文件并反射执行print方法
-
创建私有目录用于创建DexClassLoader
分别是odex和lib目录
-
创建DexClassLoader
-
加载指定类
-
反射加载并执行类的方法
 1
 2
 3
 4
 5
 6
 7
 8
 9
10
11
12
13
14
15
16
17
18
19
20
21
22
23
24
25
26
27
28
29
30
31
32
33
34
35
36
37
38
39
40
41
42
43
44
45
46
47
48
49
50
51
52
53
54
55
56
57
58
59
60
61
62
63
|
package com.example.testdemo;

import android.content.Context;
import android.os.Bundle;

import androidx.appcompat.app.AppCompatActivity;

import java.io.File;
import java.lang.reflect.InvocationTargetException;
import java.lang.reflect.Method;

import dalvik.system.DexClassLoader;


public class MainActivity extends AppCompatActivity {

    @Override
    protected void onCreate(Bundle savedInstanceState) {
        super.onCreate(savedInstanceState);
        setContentView(R.layout.activity_main);
        Context appContext = getApplicationContext();
        //com.example.emptydemo
        loadDexClassAndExecuteMethod(appContext, "/data/local/tmp/classes3.dex"); //直接加载dex文件
        loadDexClassAndExecuteMethod(appContext, "/data/local/tmp/EmptyDemo.apk"); //加载apk文件 本质还是加载dex
    }
    public void loadDexClassAndExecuteMethod(Context context, String strDexFilePath) {
        //1.创建优化私有目录app_opt_dex和app_lib_dex,用于ClassLoader
        File optFile = context.getDir("opt_dex", 0);// /data/user/0/com.example.testdemo/app_opt_dex
        File libFile = context.getDir("lib_dex", 0);// /data/user/0/com.example.testdemo/app_lib_dex


        //2.创建ClassLoader用于加载Dex文件 依次指定dex文件路径 Odex目录 lib库目录 父类加载器
        DexClassLoader dexClassLoader = new DexClassLoader(
                strDexFilePath,
                optFile.getAbsolutePath(),
                libFile.getAbsolutePath(),
                MainActivity.class.getClassLoader());
        Class<?> clazz = null;
        try {
            //3.通过创建的DexClassLoader加载dex文件的指定类
            clazz = dexClassLoader.loadClass("com.example.emptydemo.TestClass");

            if (clazz != null) {
                try {
                    //3.反射获取并调用类的方法
                    Object obj = clazz.newInstance();
                    Method method = clazz.getDeclaredMethod("print");
                    method.invoke(obj);
                } catch (InvocationTargetException e) {
                    e.printStackTrace();
                } catch (NoSuchMethodException e) {
                    e.printStackTrace();
                } catch (IllegalAccessException e) {
                    e.printStackTrace();
                } catch (InstantiationException e) {
                    e.printStackTrace();
                }
            }
        } catch (ClassNotFoundException e) {
            e.printStackTrace();
        }
    }
}
|
效果如下

DexClassLoader构造函数如下
 1
 2
 3
 4
 5
 6
 7
 8
 9
10
11
12
13
|
/*
	参数一: String dexPath, Dex文件路径
	参数二: String optimizedDirectory, 优化后的dex即Odex目录
	Android中内存中不会出现上述参数一的Dex文件, 会先优化,然后运行,优化后为.odex文件
	参数三: String librarySearchPath, lib库搜索路径
	参数四: ClassLoader parent, 父类加载器
*/
public class DexClassLoader extends BaseDexClassLoader {
    public DexClassLoader(String dexPath, String optimizedDirectory, String librarySearchPath, ClassLoader parent) {
        super((String)null, (File)null, (String)null, (ClassLoader)null);
        throw new RuntimeException("Stub!");
    }
}
|
五. Android应用程序启动流程
Android应用程序启动流程相关知识是实现壳程序加载被保护程序的核心,只有了解该机制,才能理解壳程序的工作原理
Android应用程序启动涉及4个进程: Zygote进程,Launcher进程,AMS所在进程(SystemServer进程),应用程序进程
总体流程如下:
- 点击桌面应用图标后,Launcher进程使用Binder通信,向SystemServer进程的AMS发起startActivity请求创建根Activity
- AMS接收Launcher请求后,判断应用程序进程是否存在,不存在则通过Socket通信,调用zygoteSendArgsAndGetResult请求Zygote创建应用程序进程
- Zygote进程接收AMS的Socket请求后,通过forkAndSpecialize创建应用程序进程,之后进行初始化工作
- 应用程序进程启动后,AMS通过ApplicationThread代理类与应用程序进程的ApplicationThread进行Binder通信,发送scheduleLaunchActivity请求
- 应用程序进程的Binder线程ApplicationThread接受请求后,通过sendMessage与主线程ActivityThread进行Handler通信,发送LAUNCH_ACTIVITY消息
- 主线程ActivityThread接收消息后,调用handleLaunchActivity,通过反射机制创建Activity实例后调用Activity.onCreate方法
调用Activity.onCreate后便进入应用程序的生命周期,至此,成功启动应用程序

以上流程的核心可总结为三个部分,后续将围绕这三部分展开:
- 创建应用程序进程
- 创建Application
- 启动根Activity
创建应用程序进程简介
要想启用一个Android应用程序,要保证该程序所需的应用程序进程存在.
当点击应用程序图标后,触发Launcher.onClick方法,经过一系列方法调用后,在ActivityStackSupervisor.startSpecificActivityLocked中会判断当前应用程序进程是否存在.
若不存在则调用AMS代理类ActivityManagerProxy的startProcessLocked请求AMS创建应用程序进程,AMS接收Launcher的请求后又向Zygote发送请求.
这一过程可分为两部分:
- AMS向Zygote发送启动应用程序进程的请求
- Zygote接收AMS的请求并创建应用程序进程.
AMS向Zygote发送启动应用程序进程的请求的流程如下:
Launcher请求AMS,AMS请求Zygote,通过ZygoteInit.main进入Zygote

Zygote接收AMS的请求并创建应用程序进程的流程如下:
-
在进行一系列处理后进入ZygoteConnection.handleChildProc,该函数内部配置子进程的初始环境后并调用ZygoteInit.zygoteInit初始化应用程序进程.
-
ZygoteInit.zygoteInit中调用ZygoteInit.nativeZygoteInit启动了应用程序进程的Binder线程池,使得进程可以进行Binder通讯,之后调用RuntimeInit.applicationInit.
-
RuntimeInit调用invokeStaticMain并抛出Zygote.MethodAndArgsCaller异常,经过异常处理清空设置过程中的堆栈帧后,调用主线程管理类ActivityThread的main方法,至此,应用程序进程被成功创建.

创建Application简介
ActivityThread.main进行部分初始化配置后,创建并启动主线程消息循环管理类Looper用于进行消息处理,并且调用attach方法通知AMS附加自身ApplicationThread类.
AMS中通过ApplicationThread的代理类IApplicationThread发送BIND_APPLICATION消息到应用程序的消息队列.
之后应用程序主线程管理类ActivityThread的handleMessage处理该消息,并调用handleBindApplication创建Application并绑定,主要执行以下4个步骤:
-
ActivityThread.getPackageInfoNoCheck
创建LoadedApk对象,设置ApplicationInfo和ClassLoader并加入mPackages中,该对象是应用程序apk包的管理类
-
ContextImpl.createAppContext
创建应用程序的上下文环境Context类
-
LoadedApk.makeApplication
创建Application,并调用Application.attachBaseContext方法
-
Instrumentation.callApplicationOnCreate
调用Application.onCreate方法
至此,Application创建完成,以上流程如图所示:

启动根Activity简介
经过以上步骤后,创建了应用程序进程和对应的Application,回到Launcher请求AMS过程,在ActivityStackSupervisor.startSpecificActivityLocked中调用了ActivityStackSupervisor.realStartActivityLocked,其内部通过调用ApplicationThread.scheduleLaunchActivity通知应用程序启动Activity.
ApplicationThread通过sendMessage向H类(应用程序进程中主线程的消息管理类)发送H.LAUNCH_ACTIVITY消息,H.handleMessage接收到消息后调用ActivityThread.handleLaunchActivity将控制权转移给ActivityThread.
handleLaunchActivity调用performLaunchActivity执行启动Activity的步骤:
-
获取Activity信息类ActivityInfo
-
获取Apk文件描述类LoadedApk
-
为Activity创建上下文环境
-
获取Activity完整类名并通过ClassLoader创建Activity实例
-
调用LoadedApk.makeApplication
这一步需要解释,Application类是Android的应用程序描述类,每个应用程序只有一个全局单例的Application.
此处调用makeApplication时,由于ActivityThread.main中已经创建Application,所以会直接返回已创建的Application.
而performLaunchActivity用于启动任意Activity,根Activity必定使用ActivityThread.main创建的Application,但其他Activity可能在子进程中运行,所以此处的调用主要用于处理一般Activity.
-
调用Activity.attach初始化Activity
-
调用Instrumentation.callActivityOnCreate启动Activity
以上流程如图所示:

经过以上步骤后,安卓应用程序正式启动(根Activity启动),其中最值得关注的便是ActivityThread,Application和LoadedApk类.
-
ActivityThread是安卓应用程序进程的主线程管理类
保存了很多关键信息,通过该类可以反射获取应用程序进程的Application和LoadedApk.
-
Application用于描述当前的应用程序
应用程序启动过程中,Application实例是最先创建的,早于应用程序启动以及任何Activity或Service,它的生命周期是整个应用程序中最长的,等于应用程序的生命周期.
安卓应用程序开发时,可通过继承该类并重写attachBaseContext和onCreate方法进行部分资源的初始化配置.如果被保护程序没有指定自定义的Application,使用系统创建的默认Application即可;如果存在自定义的Application,则脱壳程序需要替换.
-
LoadedApk用于描述当前应用程序对应的APK文件
其mClassLoader字段保存了当前APK对应的类加载器,mApplication字段保存了当前Application.
六. Dex文件结构和代码抽取
关于Dex文件结构和解析器,由于篇幅限制此处不展开,可参考我的另一篇文章Dex文件结构-ReadDex解析器实现
在解析功能的基础之上,添加代码抽取功能,支持抽取指定dex文件的所有方法代码,并输出classes.dex置空指令后的.patched文件和字节码.codes文件.
原理:
- DexClassDef结构定义了一个ART虚拟机中的Class对象,其classDataOff字段,指向DexClassData结构.
- DexClassData结构保存了类的数据,字段和方法的数据由4个按顺序连续排列的字段和方法数组保存,DexClassDataHeader结构的header保存了4个数组结构的大小.值得注意的是DexClassData除header之外的成员不一定有效,只有当header中指定了对应结构体数组的大小才有效.
- DexMethod.codeOff字段指向了DexCode结构,是代码抽取的关键结构,该结构的insnsSize和insns字段分别保存了指令码的个数和指令码数组.

代码抽取的步骤如下:
- 遍历所有DexClassDef,通过classDataOff访问对应DexClassData结构.
- 对于每个DexClassData,解析header,确定DexField和DexMethod的大小,忽略DexField结构数组后解析DexMethod结构数组.
- 对于每个DexMethod结构,通过其codeOff字段访问DexCode的insnsSize和insns,执行代码抽取并将原始的insns内容设置为空指令NOP(字节码0x0000).
对应ReadDex项目中的关键函数如下:
-
extractAllClassDefCodes
功能: 抽取所有DexClassDef的代码.
逻辑: 遍历所有DexClassDef并过滤系统类,并解析对应DexClassData结构从而抽取代码.
-
extractClassDataCodes
功能: 抽取单个DexClassData的代码.
逻辑: 先通过readAndGetSizeUleb128读取获取DexClassDataHeader结构的staticFieldsSize,instanceFieldsSize,directMethodsSize和virtualMethodsSize.
再计算DexField数组占据的长度得到偏移值,最后访问DexMethod数组并进行代码抽取.
-
extractDexMethodArrayCodes
功能: 抽取DexMethod结构体数组的代码.
逻辑: 遍历DexMethod数组,对于每个DexMethod结构,通过DexFile基地址加codeOff得到DexCode的引用,之后根据insnsSize指定的大小抽取insns数组保存的指令字节码,每个DexCode抽取后保存为CodeItem并写入文件.自定义CodeItem结构用于后续代码回填时解析codes文件.
经过代码抽取后的Dex文件示意图如下:

详情可参考ReadDex项目,编译为ReadDex.exe后供加壳程序调用,通过-file参数指定dex文件路径,-extractAllCodes参数指定抽取所有代码.
七. 一代加固-整体加固(落地加载)
一代加固是所有加固的基础,了解一代加固的基本思路有助于理解后续加固技术的演进
原理
主要涉及三个对象:
- 待加固的源程序APK
- (脱)壳程序APK 负责加载,解密和执行被保护的源程序
- 加壳程序 负责解析源程序并利用壳程序对其进行加固保护,将壳程序和源程序合并为新的程序

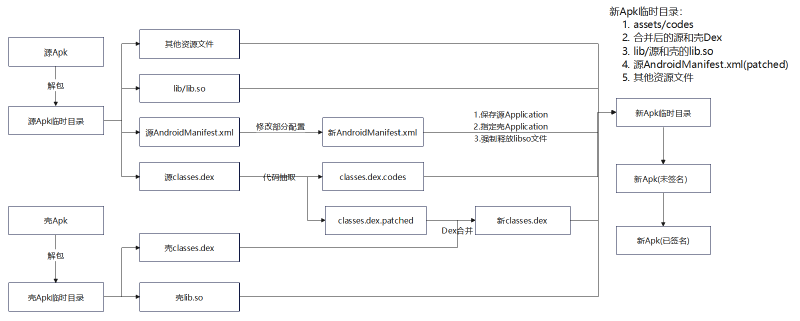
加壳程序:
-
解包壳程序和源程序
得到壳程序的dex以及源程序的AndroidManifest.xml和资源文件等
-
复制源程序解包后的文件到新apk临时目录(忽略部分文件)
-
处理源程序AndroidManifest.xml 写入新apk临时目录
判断是否存在application标签的name属性指定了自定义Application
若存在则添加meta-data标签保存原始application
无论是否存在都要指定name值为壳的Application
-
合并壳dex和源程序apk 写入新apk临时目录
-
重打包新的Apk
-
对新Apk签名
-
删除临时目录
加壳后的壳Dex文件示意图如下

最终新APK中包括以下内容:
- 修改过的AndroidManifest.xml
- 由壳dex和源APK合并而来的classes.dex
- 源APK的所有其他资源文件(包括lib,assets,resources等)
(脱)壳程序:
- 在壳程序dex末尾追加源程序所有dex
- 在壳程序Application的attachBaseContext方法释放源程序所有dex并替换mClassLoader
- 在壳程序Application的onCreate方法注册源程序Application并开始生命周期
源程序
源程序即一般的用户程序,我们的主要目的是对源程序进行加固保护,所以需要注意源程序可能涉及到的技术点:
-
源程序自定义Application
Application.attachBaseContext是app进程真正的入口点
如果源程序没有使用自定义Application,则可以直接复用壳程序Application
如果源程序有自定义Application,必定在AndroidManifest.xml文件中由**<application android:name="">**标签声明指定,可以替换属性值为壳application,同时添加meta-data标签保存源程序application
-
Native
源程序使用NDK开发时会生成lib文件夹和对应so文件,需要进行处理
主要是创建lib库的释放文件夹,提供给新的ClassLoader
源程序主要包括以下文件:
- MainActivity.java
- MyApplication.java
- native-lib.cpp
- AndroidManifest.xml
- activity_main.xml
注意关闭Multidex支持,保证只编译出一个Dex文件
MainActivity.java
主要功能:
- Java层组件TextView
- Native层JNI函数调用
注意点:
- MainActivity继承自Activity类而非AppCompatActivity,这一步是为了方便资源处理
- 使用到了native函数,所以要处理lib文件
- 关闭MultiDex支持,只生成一个dex文件便于处理
 1
 2
 3
 4
 5
 6
 7
 8
 9
10
11
12
13
14
15
16
17
18
19
20
21
22
23
24
25
26
27
|
package com.example.nativedemo;

import android.app.Activity;
import android.os.Bundle;
import android.util.Log;
import android.widget.TextView;

public class MainActivity extends Activity {

    static {
        System.loadLibrary("nativedemo");
    }
    public native String stringFromJNI();
    public native int add(int x,int y);
    public native int sub(int x,int y);

    @Override
    protected void onCreate(Bundle savedInstanceState) {
        super.onCreate(savedInstanceState);
        setContentView(R.layout.activity_main);
        // Example of a call to a native method
        TextView tv = findViewById(R.id.sample_text) ;
        String result=stringFromJNI()+" add(111,222)="+add(111,222)+" sub(999,333)="+sub(999,333);
        tv.setText(result);
        Log.d("glass","Run source MainActivity.onCreate "+this);
    }
}
|
MyApplication.java
主要功能: log输出便于定位执行流程
注意:
-
程序执行的顺序为Application.attachBaseContext->Application.onCreate->MainActivity.onCreate
-
该类主要用于模拟存在自定义Application的情况
如果源程序不存在自定义Application则使用默认的Application即可,否则需要解析源Application并进行创建和替换
 1
 2
 3
 4
 5
 6
 7
 8
 9
10
11
12
13
14
15
16
17
18
19
|
package com.example.nativedemo;

import android.app.Application;
import android.content.Context;
import android.util.Log;

public class MyApplication extends Application {

    @Override
    protected void attachBaseContext(Context base) {
        super.attachBaseContext(base);
        Log.d("glass", "Run source MyApplication.attachBaseContext "+this);
    }
    @Override
    public void onCreate() {
        super.onCreate();
        Log.d("glass", "Run source MyApplication.onCreate "+this);
    }
}
|
native-lib.cpp
定义了静态注册的方法stringFromJNI和动态注册的方法add,sub
 1
 2
 3
 4
 5
 6
 7
 8
 9
10
11
12
13
14
15
16
17
18
19
20
21
22
23
24
25
26
27
28
29
30
31
32
33
34
35
36
37
38
39
40
41
42
43
44
|
#include <jni.h>
#include <string>

// 静态注册
extern "C" JNIEXPORT jstring JNICALL
Java_com_example_nativedemo_MainActivity_stringFromJNI(
        JNIEnv* env,
        jobject /* this */) {
    std::string hello = "Hello from C++";
    return env->NewStringUTF(hello.c_str());
}

//native函数对应的java方法所属类
static const char *ClassName="com/example/nativedemo/MainActivity";

jint add(JNIEnv* env,jobject obj,jint x,jint y){
    return x+y;
}
jint sub(JNIEnv* env,jobject obj,jint x,jint y){
    return x-y;
}

//定义本地方法数组 建立映射关系
//JNINativeMethod结构体成员为函数名,函数签名,函数指针
static JNINativeMethod methods[]={
        {"add","(II)I",(void*)add},
        {"sub","(II)I",(void*)sub}
};

//编写加载注册方法
jint JNI_OnLoad(JavaVM* vm,void* reserved){
    JNIEnv* env=nullptr;//获取JNIEnv对象
    if(vm->GetEnv((void**)&env,JNI_VERSION_1_6)!=JNI_OK)
        return -1;
    //获取对应java方法所属的类对象
    jclass clazz=env->FindClass(ClassName);
    //调用RegisterNatives注册方法
    if(clazz){
        env->RegisterNatives(clazz,methods,sizeof(methods)/sizeof(methods[0]));
        return JNI_VERSION_1_6;//注意必须返回JNI版本
    }
    else
        return -1;
}
|
AndroidManifest.xml
主要功能:
- 指定根activity为MainActivity
- 指定android:name为MyApplication
 1
 2
 3
 4
 5
 6
 7
 8
 9
10
11
12
13
14
15
16
17
18
19
20
21
22
23
24
25
26
|
<?xml version="1.0" encoding="utf-8"?>
<manifest xmlns:android="http://schemas.android.com/apk/res/android"
    xmlns:tools="http://schemas.android.com/tools">

    <application
        android:allowBackup="true"
        android:dataExtractionRules="@xml/data_extraction_rules"
        android:fullBackupContent="@xml/backup_rules"
        android:icon="@mipmap/ic_launcher"
        android:label="@string/app_name"
        android:roundIcon="@mipmap/ic_launcher_round"
        android:supportsRtl="true"
        android:theme="@style/Theme.NativeDemo"
        tools:targetApi="29"
        android:name=".MyApplication"
        >
        <activity
            android:name=".MainActivity"
            android:exported="true">
            <intent-filter>
                <action android:name="android.intent.action.MAIN" />
                <category android:name="android.intent.category.LAUNCHER" />
            </intent-filter>
        </activity>
    </application>
</manifest>
|
activity_main.xml
LinearLayout
 1
 2
 3
 4
 5
 6
 7
 8
 9
10
11
12
13
14
15
16
17
18
19
|
<?xml version="1.0" encoding="utf-8"?>
<LinearLayout xmlns:android="http://schemas.android.com/apk/res/android"
    xmlns:app="http://schemas.android.com/apk/res-auto"
    xmlns:tools="http://schemas.android.com/tools"
    android:layout_width="match_parent"
    android:layout_height="match_parent"
    android:gravity="center"
    tools:context="com.example.nativedemo.MainActivity"
    >

    <TextView
        android:id="@+id/sample_text"
        android:layout_width="wrap_content"
        android:layout_height="wrap_content"
        android:text="Hello World!"
        android:textAlignment="center"
        />

</LinearLayout>
|
加壳程序
加壳程序主要需要完成以下工作:
-
解包壳程序和源程序
得到壳程序的dex以及源程序的AndroidManifest.xml和资源文件等
-
复制源程序解包后的文件到新apk临时目录(忽略部分文件)
-
处理源程序AndroidManifest.xml 写入新apk临时目录
判断是否存在application标签的name属性指定了自定义Application
若存在则添加meta-data标签保存原始application
无论是否存在都要指定name值为壳的Application
-
合并壳dex和源程序apk 写入新apk临时目录
-
重打包新的Apk
-
对新Apk签名
-
删除临时目录
FirstShell.py代码如下
-
封装Paths类,保存全局使用到的路径 主要是apk路径和临时目录
-
封装Apktool类,通过apktool提供apk解包和打包功能,通过uber-apk-signer提供apk签名功能
-
封装ManifeseEditor类,提供ManifestEditor解析功能,支持获取和修改标签属性,添加新标签
-
combineShellDexAndSrcApk 合并壳dex和源apk
将原apk加密后填充到壳dex后方,并添加4字节标识apk大小
新dex=壳dex+加密后的源APK+源APK大小
-
handleManifest 处理AndroidManifest
分别提取源apk和壳的manifest文件,以源manifest为基准
根据源apk是否指定自定义application确定是否添加meta-data标签保存
最后修改application:name为壳application
-
start 完整的处理函数
  1
  2
  3
  4
  5
  6
  7
  8
  9
 10
 11
 12
 13
 14
 15
 16
 17
 18
 19
 20
 21
 22
 23
 24
 25
 26
 27
 28
 29
 30
 31
 32
 33
 34
 35
 36
 37
 38
 39
 40
 41
 42
 43
 44
 45
 46
 47
 48
 49
 50
 51
 52
 53
 54
 55
 56
 57
 58
 59
 60
 61
 62
 63
 64
 65
 66
 67
 68
 69
 70
 71
 72
 73
 74
 75
 76
 77
 78
 79
 80
 81
 82
 83
 84
 85
 86
 87
 88
 89
 90
 91
 92
 93
 94
 95
 96
 97
 98
 99
100
101
102
103
104
105
106
107
108
109
110
111
112
113
114
115
116
117
118
119
120
121
122
123
124
125
126
127
128
129
130
131
132
133
134
135
136
137
138
139
140
141
142
143
144
145
146
147
148
149
150
151
152
153
154
155
156
157
158
159
160
161
162
163
164
165
166
167
168
169
170
171
172
173
174
175
176
177
178
179
180
181
182
183
184
185
186
187
188
189
190
191
192
193
194
195
196
197
198
199
200
201
202
203
204
205
206
207
208
209
210
211
212
213
214
215
216
217
218
219
220
221
222
223
224
225
226
227
228
229
230
231
232
233
234
235
236
237
238
239
240
241
242
243
244
245
246
247
248
249
250
251
252
253
254
255
256
257
258
259
260
261
|
from zlib import adler32
from hashlib import sha1
from binascii import unhexlify
from lxml import etree
import subprocess
import shutil
from pathlib import Path
import argparse
# 封装path类,保存全局用到的路径
class Paths:
    def __init__(self, srcApk:Path, shellApk:Path, outputApk:Path):
        # Apk file paths
        self.srcApkPath= srcApk.resolve() # 解析为绝对路径
        self.shellApkPath= shellApk.resolve()
        self.newApkPath= outputApk.resolve()

        # Temp directories default python file path
        self.tmpdir= Path(__file__).parent/'temp'
        self.srcApkTempDir=  self.tmpdir/ 'srcApkTemp'
        self.shellApkTempDir= self.tmpdir/'shellApkTemp'
        self.newApkTempDir= self.tmpdir/ 'newApkTemp'


# Apktool类 提供解包,打包,签名功能
class Apktool:
    def __init__(self):
        self.apktool_path= Path(__file__).parent/'tools/apktool/apktool.bat'
        self.signer_path=Path(__file__).parent/'tools/uber-apk-signer-1.3.0.jar'

    def signApk(self,unsignedApkPath:Path):
        self.runCommand(['java','-jar', self.signer_path, '--apk',unsignedApkPath])

    # 使用apktool解包apk 只解包资源不解包dex
    def extractApk(self,apkPath:Path, outputDir:Path):
        self.runCommand([self.apktool_path, '-s', 'd' , apkPath, '-o', outputDir])

    # 重打包apk
    def repackApk(self,inputDir:Path, outApk:Path):
        self.runCommand([self.apktool_path, 'b' , inputDir, '-o', outApk])

    def runCommand(self,args):
        subprocess.run(args,stdout=subprocess.DEVNULL) #仅调用工具,不需要输出,重定向stdout到os.devnull
        # 参数列表 捕获输出 输出转为字符串
        #print(subprocess.run(args,  capture_output=True,text=True).stdout)

# AndroidManifest.xml的editor 用于获取和修改标签属性,以及添加标签
class ManifestEditor:
    def __init__(self, xml_content: bytes):
        self.ns = {'android': 'http://schemas.android.com/apk/res/android'}
        self.tree = etree.fromstring(xml_content)

    # 获取指定标签的android属性值 examples: get_attr('application', 'name') get_attr('activity', 'name')
    def getTagAttribute(self, tag_name: str, attr_name: str):
        if tag_name == 'manifest':  # 根标签特殊处理
            elem = self.tree
            if elem is not None:
                return elem.get(f'{attr_name}')  # 寻找标签的属性
        else:
            elem = self.tree.find(f'.//{tag_name}', namespaces=self.ns)
            if elem is not None:
                return elem.get(f'{{{self.ns["android"]}}}{attr_name}')  # 根标签之外的属性位于android命名空间下
        return None

    # 设置指定标签的属性值 example:set_attr('application','name',"com.example.ProxyApplication")
    def setTagAttribute(self, tag_name: str, attr_name: str, new_value: str):
        if tag_name == 'manifest':  # 根标签特殊处理
            elem = self.tree
            if elem is not None:
                return elem.set(f'{attr_name}', new_value)  # 设置属性值
        else:
            elem = self.tree.find(f'.//{tag_name}', namespaces=self.ns)
            if elem is not None:
                elem.set(f'{{{self.ns["android"]}}}{attr_name}', new_value)
                return True
        return False

    # 在指定父标签下添加新子标签 example: add_tag('application',"meta-data",{'name': 'android.permission.CAMERA','value':'hello'})
    def addTagWithAttributes(self, parent_tag: str, new_tag: str, attrs: dict):
        if parent_tag == 'manifest':
            parent = self.tree
            if parent is not None:
                new_elem = etree.SubElement(parent, new_tag)
                for k, v in attrs.items():  # 支持一次给添加的标签设置多个属性
                    new_elem.set(f'{k}', v)
                return True
        else:
            parent = self.tree.find(f'.//{parent_tag}', namespaces=self.ns)
            if parent is not None:
                new_elem = etree.SubElement(parent, new_tag)
                for k, v in attrs.items():
                    new_elem.set(f'{{{self.ns["android"]}}}{k}', v)
                return True
        return False

    # 不以壳manifest为基准操作则用不到该函数,以源apk的manifest为基准自带,无需额外设置
    def getMainActivity(self):
        activities = self.tree.findall('.//activity', namespaces=self.ns)
        for activity in activities:
            intent_filters = activity.findall('.//intent-filter', namespaces=self.ns)
            for intent_filter in intent_filters:
                action = intent_filter.find('.//action[@android:name="android.intent.action.MAIN"]', namespaces=self.ns)
                category = intent_filter.find('.//category[@android:name="android.intent.category.LAUNCHER"]',
                                              namespaces=self.ns)
                if action is not None and category is not None:
                    return activity.get(f'{{{self.ns["android"]}}}name')
        return None

    def getApplication(self):
        return self.getTagAttribute('application', 'name')

    def setApplication(self, application: str):
        self.setTagAttribute('application', 'name', application)

    def addMetaData(self, name: str, value: str):
        self.addTagWithAttributes('application', 'meta-data', {'name': name, 'value': value})

    def getManifestData(self):
        """返回XML字符串"""
        return etree.tostring(self.tree, pretty_print=True, encoding='utf-8', xml_declaration=True).decode()

# 合并壳dex和源apk
def combineShellDexAndSrcApk(sourceApkPath:Path, shellApkTempDir:Path, newApkTempDir:Path):
    def fixCheckSum(dexBytesArray):
        # dexfile[8:12]
        # 小端存储
        value = adler32(bytes(dexBytesArray[12:]))
        valueArray = bytearray(value.to_bytes(4, 'little'))
        for i in range(len(valueArray)):
            dexBytesArray[8 + i] = valueArray[i]

    def fixSignature(dexBytesArray):
        # dexfile[12:32]
        sha_1 = sha1()
        sha_1.update(bytes(dexBytesArray[32:]))
        value = sha_1.hexdigest()
        valueArray = bytearray(unhexlify(value))
        for i in range(len(valueArray)):
            dexBytesArray[12 + i] = valueArray[i]

    def fixFileSize(dexBytesArray, fileSize):
        # dexfile[32:36]
        # 小端存储
        fileSizeArray = bytearray(fileSize.to_bytes(4, "little"))
        for i in range(len(fileSizeArray)):
            dexBytesArray[32 + i] = fileSizeArray[i]

    def encrypto(file):
        for i in range(len(file)):
            file[i] ^= 0xff
        return file

    # 获取源apk
    with open(sourceApkPath, 'rb') as f:
        SourceApkArray=bytearray(f.read())
    # 获取shelldex
    with open(shellApkTempDir/'classes.dex', 'rb') as f:
        shellDexArray=bytearray(f.read())

    SourceApkLen = len(SourceApkArray)
    shellDexLen = len(shellDexArray)

    # 新的dex文件长度
    newDexLen = shellDexLen + SourceApkLen + 4
    # 加密源文件
    enApkArray = encrypto(SourceApkArray)
    # 新的dex文件内容 = 壳dex + 加密的源apk + 四字节标识加密后源apk大小长度
    newDexArray = shellDexArray + enApkArray + bytearray(SourceApkLen.to_bytes(4, 'little'))

    # 修改filesize
    fixFileSize(newDexArray, newDexLen)
    # 修改signature
    fixSignature(newDexArray)
    # 修改checksum
    fixCheckSum(newDexArray)
    # 导出文件
    with open(newApkTempDir/'classes.dex', 'wb') as f:
        f.write(newDexArray)

# 提取源apk的Manifest文件,修改application为壳application(可能添加meta-data标签),输出新的Manifest文件
def handleManifest( srcApkTempDir:Path,shellApkTempDir:Path,newApkTempDir:Path):
    # 从源apk提取AndroidManifest.xml
    with open(srcApkTempDir/'AndroidManifest.xml', 'r') as f:
        srcManifestEditor=ManifestEditor(f.read().encode())
    srcApplication=srcManifestEditor.getApplication()

    # 从壳apk提取AndroidManifest.xml
    with open(shellApkTempDir/'AndroidManifest.xml', 'r') as f:
        shellManifestEditor=ManifestEditor(f.read().encode())
    print('ShellApplication:',shellManifestEditor.getApplication())

    # 修改源AndroidManifest.xml的application为壳的代理application
    srcManifestEditor.setApplication(shellManifestEditor.getApplication())

    # 写入meta-data标签 保存源apk的原始application
    if srcApplication != None:
        print('Source application:',srcApplication)
        srcManifestEditor.addMetaData('APPLICATION_CLASS_NAME',srcApplication)

    # 输出新的AndroidManifest.xml
    with open(newApkTempDir/'AndroidManifest.xml', 'w') as f:
        f.write(srcManifestEditor.getManifestData())

def start(paths:Paths):
    apktool=Apktool()
    # 1.分别解包源文件和壳文件到临时目录
    print('Extracting source and shell apk...')
    apktool.extractApk(paths.srcApkPath,paths.srcApkTempDir)
    print('Extract source apk success!')

    print('Extracting shell apk...')
    apktool.extractApk(paths.shellApkPath,paths.shellApkTempDir)
    print('Extract shell apk success!')

    # 2.复制源apk所有文件到新apk临时目录中
    print('Copying source apk files to new apk temp dir...')
    shutil.copytree(paths.srcApkTempDir,paths.newApkTempDir )
    print('Copy source apk files success!')

    # 3.处理AndroidManifest.xml
    print('Handling AndroidManifest.xml...')
    handleManifest(paths.srcApkTempDir,paths.shellApkTempDir,paths.newApkTempDir)
    print('Handle AndroidManifest.xml success!')

    # 4.合并壳dex和源apk并导出文件
    print('Combining shell dex and source apk...')
    combineShellDexAndSrcApk(paths.srcApkPath,paths.shellApkTempDir,paths.newApkTempDir)
    print('Combine shell dex and source apk success!')

    # 5.重打包apk
    print('Repacking apk...')
    apktool.repackApk(paths.newApkTempDir,paths.newApkPath)
    print('Repack apk success!')

    # 6.签名apk
    print('Signing apk...')
    apktool.signApk(paths.newApkPath)
    print('Resign apk success!')

    # 7.删除临时目录
    print('Deleting temp directories...')
    shutil.rmtree(paths.tmpdir) # 删除临时目录
    print('Delete temp directories success!')

def main():
    parser = argparse.ArgumentParser(description="Android APK Packer")
    parser.add_argument('-src','--src-apk', required=True, type=Path, help='Path to source APK file')
    parser.add_argument('-shell','--shell-apk', required=True, type=Path, help='Path to shell APK file')
    parser.add_argument('-o','-out','--output-apk',type=Path,help='Output path for packed APK (Default: ./out/<src-apk>_protected.apk)')
    args = parser.parse_args()
    if args.output_apk == None:
        args.output_apk = Path('./out')/(args.src_apk.stem+'_protected.apk') # 默认新apk名称及输出路径
    paths = Paths(args.src_apk, args.shell_apk, args.output_apk)

    print('Source APK:', paths.srcApkPath)
    print('Shell APK:', paths.shellApkPath)
    print('Output APK:', paths.newApkPath)
    start(paths)


if __name__=="__main__":
    main()
|
脱壳程序
FirstProxyApplication.java
注意关闭Multidex支持,保证只生成一个Dex文件
attachBaseContext中执行以下操作
-
创建私有目录,用于保存释放的dex,lib,源apk
-
调用readDexFromApk,从壳apk中提取壳dex文件,保存为字节数组
-
调用extractSrcApkFromShellDex 从壳dex文件提取源程序apk文件 解包lib文件到lib私有目录
-
调用replaceClassLoader替换壳程序的ClassLoader
新的ClassLoader指定了源apk dex文件,lib文件,odex路径 也就是前面释放的源apk和源lib
onCreate调用了replaceApplication
-
判断manifest文件是否通过meta-data标签保存了源apk的application
如果源apk未指定application则使用默认的application(即壳applicaiton)
-
如果源apk指定了自定义application则创建对应实例,替换掉壳的application,之后调用onCreate方法
  1
  2
  3
  4
  5
  6
  7
  8
  9
 10
 11
 12
 13
 14
 15
 16
 17
 18
 19
 20
 21
 22
 23
 24
 25
 26
 27
 28
 29
 30
 31
 32
 33
 34
 35
 36
 37
 38
 39
 40
 41
 42
 43
 44
 45
 46
 47
 48
 49
 50
 51
 52
 53
 54
 55
 56
 57
 58
 59
 60
 61
 62
 63
 64
 65
 66
 67
 68
 69
 70
 71
 72
 73
 74
 75
 76
 77
 78
 79
 80
 81
 82
 83
 84
 85
 86
 87
 88
 89
 90
 91
 92
 93
 94
 95
 96
 97
 98
 99
100
101
102
103
104
105
106
107
108
109
110
111
112
113
114
115
116
117
118
119
120
121
122
123
124
125
126
127
128
129
130
131
132
133
134
135
136
137
138
139
140
141
142
143
144
145
146
147
148
149
150
151
152
153
154
155
156
157
158
159
160
161
162
163
164
165
166
167
168
169
170
171
172
173
174
175
176
177
178
179
180
181
182
183
184
185
186
187
188
189
190
191
192
193
194
195
196
197
198
199
200
201
202
203
204
205
206
207
208
209
210
211
212
213
214
215
216
217
218
219
220
221
222
223
224
225
226
227
228
229
230
231
232
233
234
235
236
237
238
239
240
241
242
243
244
245
246
247
248
249
250
251
252
253
254
255
256
257
258
259
260
261
262
263
264
265
266
267
268
269
270
271
272
273
274
275
276
277
278
279
280
281
282
283
284
285
286
287
288
289
290
291
292
|
package com.example.androidshell;

import android.app.Application;
import android.app.Instrumentation;
import android.content.Context;
import android.content.pm.ApplicationInfo;
import android.content.pm.PackageManager;
import android.os.Bundle;
import android.util.ArrayMap;
import android.util.Log;

import java.io.BufferedInputStream;
import java.io.ByteArrayOutputStream;
import java.io.File;
import java.io.FileInputStream;
import java.io.FileOutputStream;
import java.io.IOException;
import java.lang.ref.WeakReference;
import java.nio.ByteBuffer;
import java.nio.ByteOrder;
import java.util.ArrayList;
import java.util.Iterator;
import java.util.zip.ZipEntry;
import java.util.zip.ZipInputStream;

import dalvik.system.DexClassLoader;

public class FirstProxyApplication extends  Application {
     private static final String TAG="glass";
     private String apkPath;
     private String dexPath;
     private String libPath;
     public void log(String message){Log.d(TAG,message);}
    @Override
    protected void attachBaseContext(Context base) {
        super.attachBaseContext(base);
        log("FirstProxyApplication.attachBaseContext() running!");
        try {
            //1.创建私有目录,保存dex,lib和源apk 具体路径为data/user/0/<package_name>/app_tmp_dex
            File dex = getDir("tmp_dex", MODE_PRIVATE);
            File lib = getDir("tmp_lib", MODE_PRIVATE);
            dexPath = dex.getAbsolutePath();
            libPath = lib.getAbsolutePath();
            apkPath = dex.getAbsolutePath() + File.separator + "Source.apk";
            log("dexPath: " + dexPath);
            log("libPath: " + libPath);
            log("apkPath: " + apkPath);

            // 根据文件路径创建File对象
            File apkFile = new File(apkPath);
            // 只有首次运行时需要创建相关文件
            if (!apkFile.exists()) {
                // 根据路径创建文件
                apkFile.createNewFile();
                //读取Classes.dex文件
                byte[] shellDexData = readDexFromApk();
                //从中分离出源apk文件
                extractSrcApkFromShellDex(shellDexData);
            }
            //配置加载源程序的动态环境,即替换mClassLoader
            replaceClassLoader();
        } catch (Exception e) {
            Log.getStackTraceString(e);
        }
    }
    // 从当前程序的apk读取dex文件并存储为字节数组
    private byte[] readDexFromApk() throws IOException {
        //1.获取当前应用程序的源码路径(apk),一般是data/app目录下,该目录用于存放用户安装的软件
        String sourceDir = this.getApplicationInfo().sourceDir;
        log("this.getApplicationInfo().sourceDir: " +sourceDir);

        //2.创建相关输入流
        FileInputStream fileInputStream = new FileInputStream(sourceDir);
        BufferedInputStream bufferedInputStream = new BufferedInputStream(fileInputStream);
        ZipInputStream zipInputStream = new ZipInputStream(bufferedInputStream); //用于解析apk文件

        ByteArrayOutputStream byteArrayOutputStream = new ByteArrayOutputStream(); //用于存放dex文件

        //3.遍历apk的所有文件并提取dex文件
        ZipEntry zipEntry;
        while((zipEntry = zipInputStream.getNextEntry()) != null){ //存在下一个文件
            // 将classes.dex文件存储到bytearray中 壳dex和源apk合并后只保留一个dex便于处理
            if (zipEntry.getName().equals("classes.dex")){
                byte[] bytes = new byte[1024];
                int num;
                while((num = zipInputStream.read(bytes))!=-1){      //每次读取1024byte,返回读取到的byte数
                    byteArrayOutputStream.write(bytes,0, num); //存放到开辟的byteArrayOutputStream中
                }
            }
            zipInputStream.closeEntry(); //关闭当前文件
        }
        zipInputStream.close();

        log("Read dex from apk succeed!");
        return byteArrayOutputStream.toByteArray(); //将读取到的dex文件以字节数组形式返回
    }

    // 从壳dex文件中提取源apk并解析
    private void extractSrcApkFromShellDex(byte[] shellDexData) throws IOException {
        int shellDexLen = shellDexData.length;
        //开始解析dex文件
        //1.读取源apk的大小
        byte[] srcApkSizeBytes = new byte[4];
        System.arraycopy(shellDexData, shellDexLen - 4, srcApkSizeBytes,0,4);
        int srcApkSize =ByteBuffer.wrap(srcApkSizeBytes).order(ByteOrder.LITTLE_ENDIAN).getInt();//转成bytebuffer,方便4 bytes转int 将bytes转成int,加壳时,长度按小端存储

        //2.读取源apk
        byte[] sourceApkData = new byte[srcApkSize];
        System.arraycopy(shellDexData, shellDexLen - srcApkSize - 4, sourceApkData, 0, srcApkSize);//注意减4

        //3.解密源apk
        sourceApkData = decrypt(sourceApkData);
        //写入新建的apk文件中
        File apkfile = new File(apkPath);
        try {
            FileOutputStream apkfileOutputStream = new FileOutputStream(apkfile);
            apkfileOutputStream.write(sourceApkData);
            apkfileOutputStream.close();
        }catch (IOException e){
            throw new IOException(e);
        }

        //分析源apk,取出so文件放入libPath目录中
        FileInputStream fileInputStream = new FileInputStream(apkfile);
        BufferedInputStream bufferedInputStream = new BufferedInputStream(fileInputStream);
        ZipInputStream zipInputStream = new ZipInputStream(bufferedInputStream);
        ZipEntry nextEntry;
        while ((nextEntry=zipInputStream.getNextEntry())!=null){
            String name = nextEntry.getName();
            if (name.startsWith("lib/") && name.endsWith(".so")){
                //获取文件名并创建相应文件
                String[] nameSplit = name.split("/");
                String soFileStorePath = libPath + File.separator + nameSplit[nameSplit.length - 1];
                File storeFile = new File(soFileStorePath);
                storeFile.createNewFile();

                //读数据到相应so文件中
                FileOutputStream fileOutputStream = new FileOutputStream(storeFile);
                byte[] bytes = new byte[1024];
                int num;
                while((num = zipInputStream.read(bytes))!=-1){
                    fileOutputStream.write(bytes,0,num);
                }
                fileOutputStream.flush();
                fileOutputStream.close();
            }
            zipInputStream.closeEntry();
        }
        zipInputStream.close();
    }

    // 解密函数
    private byte[] decrypt(byte[] data) {
        for (int i = 0; i < data.length; i++){
            data[i] ^= (byte) 0xff;
        }
        return data;
    }

    // 替换壳App的ClassLoader为源App的ClassLoader
    private void replaceClassLoader() {
        //1.获取当前的classloader
        ClassLoader classLoader = this.getClassLoader();
        log("Current ClassLoader: " + classLoader.toString());
        log("Parent ClassLoader: " + classLoader.getParent().toString());

        //2.反射获取ActivityThread
        Object sCurrentActivityThreadObj = Reflection.getStaticField("android.app.ActivityThread","sCurrentActivityThread");
        log("ActivityThread.sCurrentActivity: " + sCurrentActivityThreadObj.toString());

        //3.反射获取LoadedApk
        //获取当前ActivityThread实例的mPackages字段 类型为ArrayMap<String, WeakReference<LoadedApk>>, 里面存放了当前应用的LoadedApk对象
        ArrayMap mPackagesObj = (ArrayMap) Reflection.getField("android.app.ActivityThread",sCurrentActivityThreadObj,"mPackages");
        log( "mPackagesObj: " + mPackagesObj.toString());

        //获取mPackages中的当前应用包名
        String currentPackageName = this.getPackageName();
        log("currentPackageName: " + currentPackageName);

        // 获取loadedApk实例也有好几种,mInitialApplication mAllApplications mPackages
        // 通过包名获取当前应用的loadedApk实例
        WeakReference weakReference = (WeakReference) mPackagesObj.get(currentPackageName);
        Object loadedApkObj = weakReference.get();
        log( "LoadedApk: " + loadedApkObj.toString());

        //4.替换ClassLoader
        DexClassLoader dexClassLoader = new DexClassLoader(apkPath,dexPath,libPath, classLoader.getParent()); //动态加载源程序的dex文件,以当前classloader的父加载器作为parent
        Reflection.setField("android.app.LoadedApk","mClassLoader",loadedApkObj,dexClassLoader); //替换当前loadedApk实例中的mClassLoader字段
        log("New DexClassLoader: " + dexClassLoader);
    }

    //替换壳程序LoadedApk的Application为源程序Application,并调用其onCreate方法
    public boolean replaceApplication(){
        // Application实例存在于: LoadedApk.mApplication
        // 以及ActivityThread的mInitialApplication和mAllApplications和mBoundApplication

        //判断源程序是否使用自定义Application 若使用则需要进行替换,若未使用则直接返回,使用壳的默认Application即可

        String appClassName = null; //源程序的Application类名
        try {
            //获取AndroidManifest.xml 文件中的 <meta-data> 元素
            ApplicationInfo applicationInfo = getPackageManager().getApplicationInfo(this.getPackageName(), PackageManager.GET_META_DATA);
            Bundle metaData = applicationInfo.metaData;
            //获取xml文件声明的Application类
            if (metaData != null && metaData.containsKey("APPLICATION_CLASS_NAME")){
                appClassName = metaData.getString("APPLICATION_CLASS_NAME");
            } else {
                log("源程序中没有自定义Application");
                return false; //如果不存在直接返回,使用壳的application即可
            }
        } catch (PackageManager.NameNotFoundException e) {
            log(Log.getStackTraceString(e));
        }

        //源程序存在自定义application类,开始替换
        log("Try to replace Application");

        //1.反射获取ActivityThread实例
        Object sCurrentActivityThreadObj = Reflection.getStaticField("android.app.ActivityThread","sCurrentActivityThread");
        log("ActivityThread: " + sCurrentActivityThreadObj.toString());

        //2.获取并设置LoadedApk
        //获取mBoundApplication (AppBindData对象)
        Object mBoundApplicationObj = Reflection.getField("android.app.ActivityThread",sCurrentActivityThreadObj,"mBoundApplication") ;
        log("mBoundApplication: "+mBoundApplicationObj.toString());
        //获取mBoundApplication.info (即LoadedApk)
        Object infoObj = Reflection.getField("android.app.ActivityThread$AppBindData",mBoundApplicationObj,"info");
        log( "LoadedApk: " + infoObj.toString());
        //把LoadedApk的mApplication设置为null,这样后续才能调用makeApplication() 否则由于已存在Application,无法进行替换
        Reflection.setField("android.app.LoadedApk","mApplication",infoObj,null);

        //3.获取ActivityThread.mInitialApplication 即拿到旧的Application(对于要加载的Application来讲)
        Object mInitialApplicationObj = Reflection.getField("android.app.ActivityThread",sCurrentActivityThreadObj,"mInitialApplication");
        log("mInitialApplicationObj: " + mInitialApplicationObj.toString());

        //4.获取ActivityThread.mAllApplications并删除旧的application
        ArrayList<Application> mAllApplicationsObj = (ArrayList<Application>) Reflection.getField("android.app.ActivityThread",sCurrentActivityThreadObj,"mAllApplications");
        mAllApplicationsObj.remove(mInitialApplicationObj);
        log("mInitialApplication 从 mAllApplications 中移除成功");

        //5.重置相关类的Application类名 便于后续创建Application
        //获取LoadedApk.mApplicationInfo
        ApplicationInfo applicationInfo = (ApplicationInfo) Reflection.getField("android.app.LoadedApk",infoObj,"mApplicationInfo");
        log( "LoadedApk.mApplicationInfo: " + applicationInfo.toString());
        //获取mBoundApplication.appInfo
        ApplicationInfo appinfoInAppBindData = (ApplicationInfo) Reflection.getField("android.app.ActivityThread$AppBindData",mBoundApplicationObj,"appInfo");
        log("ActivityThread.mBoundApplication.appInfo: " + appinfoInAppBindData.toString());
        //此处通过引用修改值,虽然后续没有使用,但是实际上是修改其指向的LoadedApk相关字段的值
        //设置两个appinfo的classname为源程序的application类名,以便后续调用makeApplication()创建源程序的application
        applicationInfo.className = appClassName;
        appinfoInAppBindData.className = appClassName;
        log("Source Application name: " + appClassName);


        //6.反射调用makeApplication方法创建源程序的application
        Application application = (Application) Reflection.invokeMethod("android.app.LoadedApk","makeApplication",infoObj,new Class[]{boolean.class, Instrumentation.class},new Object[]{false,null}); //使用源程序中的application
        //Application app = (Application)ReflectionMethods.invokeMethod("android.app.LoadedApk","makeApplication",infoObj,new Class[]{boolean.class, Instrumentation.class},new Object[]{true,null}); //使用自定义的application 强制为系统默认
        log("Create source Application succeed: "+application);

        //7.重置ActivityThread.mInitialApplication为新的Application
        Reflection.setField("android.app.ActivityThread","mInitialApplication",sCurrentActivityThreadObj,application);
        log("Reset ActivityThread.mInitialApplication by new Application succeed!");

        //8.ContentProvider会持有代理的Application,需要特殊处理一下
        ArrayMap mProviderMap = (ArrayMap) Reflection.getField("android.app.ActivityThread",sCurrentActivityThreadObj,"mProviderMap");
        log("ActivityThread.mProviderMap: " + mProviderMap);

        //获取所有provider,装进迭代器中遍历
        Iterator iterator = mProviderMap.values().iterator();
        while(iterator.hasNext()){
            Object providerClientRecord = iterator.next();
            //获取ProviderClientRecord.mLocalProvider,可能为空
            Object mLocalProvider = Reflection.getField("android.app.ActivityThread$ProviderClientRecord",providerClientRecord,"mLocalProvider") ;
            if(mLocalProvider != null){
                log("ProviderClientRecord.mLocalProvider: " + mLocalProvider);
                //获取ContentProvider中的mContext字段,设置为新的Application
                Reflection.setField("android.content.ContentProvider","mContext",mLocalProvider,application);
            }
        }

        log( "Run Application.onCreate" );
        application.onCreate(); //源程序,启动!
        return true;
    }
    @Override
    public void onCreate() {
        super.onCreate();
        log("ProxyApplication.onCreate() is running!");
        if(replaceApplication())
            log("Replace application succeed!");
    }
}
|
Reflection.java
封装的反射类,用于获取/设置指定类的成员变量,调用指定类的方法
 1
 2
 3
 4
 5
 6
 7
 8
 9
10
11
12
13
14
15
16
17
18
19
20
21
22
23
24
25
26
27
28
29
30
31
32
33
34
35
36
37
38
39
40
41
42
43
44
45
46
47
48
49
50
51
52
53
54
55
56
57
58
59
60
61
62
63
64
65
66
67
68
69
70
71
72
73
74
75
76
77
78
79
80
81
82
83
84
85
86
87
88
|
package com.example.androidshell;

import android.util.Log;

import java.lang.reflect.Field;
import java.lang.reflect.Method;

public class Reflection {
    private static final String TAG="glass";
    public static Object invokeStaticMethod(String class_name,String method_name,Class<?>[] parameterTypes,Object[] parameterValues){
        try {
            Class<?> clazz = Class.forName(class_name); //反射获取Class类对象
            Method method = clazz.getMethod(method_name,parameterTypes);//反射获取方法
            method.setAccessible(true);//突破权限访问控制
            return method.invoke(null,parameterValues);//反射调用,静态方法无需指定所属实例,直接传参即可
        }catch (Exception e){
            Log.d(TAG, e.toString());
            return null;
        }
    }

    public static Object invokeMethod(String class_name,String method_name,Object obj,Class<?>[] parameterTypes,Object[] parameterValues)
    {
        try {
            Class<?> clazz = Class.forName(class_name);
            Method method = clazz.getMethod(method_name,parameterTypes);
            method.setAccessible(true);//突破权限访问控制
            return method.invoke(obj,parameterValues);// 反射调用,动态方法需要指定所属实例
        }catch (Exception e)
        {
            Log.d(TAG, e.toString());
            return null;
        }
    }

    public static Object getField(String class_name,Object obj,String field_name)
    {
        try {
            Class<?> clazz = Class.forName(class_name);
            Field field = clazz.getDeclaredField(field_name);
            field.setAccessible(true);
            return field.get(obj);  //获取实例字段,需要指定实例对象
        }catch(Exception e)
        {
            Log.d(TAG, e.toString());
            return null;
        }
    }

    public static Object getStaticField(String class_name,String field_name)
    {
        try {
            Class<?> clazz = Class.forName(class_name);
            Field field = clazz.getDeclaredField(field_name);
            field.setAccessible(true);
            return field.get(null);
        }catch (Exception e)
        {
            Log.d(TAG, e.toString());
            return null;
        }
    }

    public static void setField(String class_name,String field_name,Object obj,Object value)
    {
        try {
            Class<?> clazz = Class.forName(class_name);
            Field field = clazz.getDeclaredField(field_name);
            field.setAccessible(true);
            field.set(obj,value);
        }catch (Exception e)
        {
            Log.d(TAG, e.toString());
        }
    }

    public static void setStaticField(String class_name,String field_name,Object value)
    {
        try {
            Class<?> clazz = Class.forName(class_name);
            Field field = clazz.getDeclaredField(field_name);
            field.setAccessible(true);
            field.set(null,value);
        }catch (Exception e){
            Log.d(TAG, e.toString());
        }
    }
}
|
AndroidManifest.xml
通过name属性指定application
 1
 2
 3
 4
 5
 6
 7
 8
 9
10
11
12
13
14
15
16
17
18
|
<?xml version="1.0" encoding="utf-8"?>
<manifest xmlns:android="http://schemas.android.com/apk/res/android"
    xmlns:tools="http://schemas.android.com/tools">

    <application
        android:allowBackup="true"
        android:dataExtractionRules="@xml/data_extraction_rules"
        android:fullBackupContent="@xml/backup_rules"
        android:icon="@mipmap/ic_launcher"
        android:label="@string/app_name"
        android:roundIcon="@mipmap/ic_launcher_round"
        android:supportsRtl="true"
        android:theme="@style/Theme.AndroidShell"
        tools:targetApi="29"
        android:name="com.example.androidshell.FirstProxyApplication"
        >
    </application>
</manifest>
|
总结
整体加固-落地加载的核心思路是将源程序apk和壳dex进行合并,运行时动态解密并执行相关环境处理操作重新执行源apk的代码
优点: 易于实现
缺点: 由于文件落地释放,所以非常容易在文件系统中获取到源程序apk;两次加载源程序apk到内存,效率低
八. 二代加固-整体加固(不落地加载)
原理
针对落地加载的部分问题,引申出了不落地加载的思路: 即直接加载内存中的dex字节码,避免释放文件
如何在内存中加载dex?Android 8及以上系统中,可以使用系统提供的InMemoryDexClassLoader实现内存加载,Android7及以下则需要手动实现
另外需要针对第一代加固不支持Multidex进行优化:
源apk每个dex文件前添加4字节标识其大小,之后全部合并成一个文件再合并到壳dex,最后添加4字节标识文件总大小
结构如下

源程序
同一代加固,可开启Multidex支持,其他部分不变
加壳程序
主要改动如下:
-
调用combineShellAndSourceDexs合并壳dex和源dex
内部调用readAndCombineDexs读取并合并源apk的多个dex为一个文件
-
复制源apk文件时忽略Manifest和dex文件
1
|
shutil.copytree(paths.srcApkTempDir,paths.newApkTempDir,ignore=shutil.ignore_patterns('AndroidManifest.xml','classes*.dex'))
|
-
ManifeseEditor
添加getEtractNativeLibs,获取application标签的android:extractNativeLibs属性值
添加resetExtractNativeLibs,重置extractNativeLibs=true 强制释放lib文件
-
handleManifest
判断源程序Manifest是否设置了android:extractNativeLibs=“true”,若为false(默认)则改为true
  1
  2
  3
  4
  5
  6
  7
  8
  9
 10
 11
 12
 13
 14
 15
 16
 17
 18
 19
 20
 21
 22
 23
 24
 25
 26
 27
 28
 29
 30
 31
 32
 33
 34
 35
 36
 37
 38
 39
 40
 41
 42
 43
 44
 45
 46
 47
 48
 49
 50
 51
 52
 53
 54
 55
 56
 57
 58
 59
 60
 61
 62
 63
 64
 65
 66
 67
 68
 69
 70
 71
 72
 73
 74
 75
 76
 77
 78
 79
 80
 81
 82
 83
 84
 85
 86
 87
 88
 89
 90
 91
 92
 93
 94
 95
 96
 97
 98
 99
100
101
102
103
104
105
106
107
108
109
110
111
112
113
114
115
116
117
118
119
120
121
122
123
124
125
126
127
128
129
130
131
132
133
134
135
136
137
138
139
140
141
142
143
144
145
146
147
148
149
150
151
152
153
154
155
156
157
158
159
160
161
162
163
164
165
166
167
168
169
170
171
172
173
174
175
176
177
178
179
180
181
182
183
184
185
186
187
188
189
190
191
192
193
194
195
196
197
198
199
200
201
202
203
204
205
206
207
208
209
210
211
212
213
214
215
216
217
218
219
220
221
222
223
224
225
226
227
228
229
230
231
232
233
234
235
236
237
238
239
240
241
242
243
244
245
246
247
248
249
250
251
252
253
254
255
256
257
258
259
260
261
262
263
264
265
266
267
268
269
270
271
272
273
274
275
276
277
278
279
280
281
282
283
284
285
286
|
from zlib import adler32
from hashlib import sha1
from binascii import unhexlify
from lxml import etree
import subprocess
import shutil
from pathlib import Path
import argparse
# 封装path类,保存全局用到的路径
class Paths:
    def __init__(self, srcApk:Path, shellApk:Path, outputApk:Path):
        # Apk file paths
        self.srcApkPath= srcApk.resolve() # 解析为绝对路径
        self.shellApkPath= shellApk.resolve()
        self.newApkPath= outputApk.resolve()

        # Temp directories default python file path
        self.tmpdir= Path(__file__).parent/'temp'
        self.srcApkTempDir=  self.tmpdir/ 'srcApkTemp'
        self.shellApkTempDir= self.tmpdir/'shellApkTemp'
        self.newApkTempDir= self.tmpdir/ 'newApkTemp'


# Apktool类 提供解包,打包,签名功能
class Apktool:
    def __init__(self):
        self.apktool_path= Path(__file__).parent/'tools/apktool/apktool.bat'
        self.signer_path=Path(__file__).parent/'tools/uber-apk-signer-1.3.0.jar'

    def signApk(self,unsignedApkPath:Path):
        self.runCommand(['java','-jar', self.signer_path, '--apk',unsignedApkPath])

    # 使用apktool解包apk 只解包资源不解包dex
    def extractApk(self,apkPath:Path, outputDir:Path):
        self.runCommand([self.apktool_path, '-s', 'd' , apkPath, '-o', outputDir])

    # 重打包apk
    def repackApk(self,inputDir:Path, outApk:Path):
        self.runCommand([self.apktool_path, 'b' , inputDir, '-o', outApk])

    def runCommand(self,args):
        subprocess.run(args,stdout=subprocess.DEVNULL) #仅调用工具,不需要输出,重定向stdout到os.devnull
        # 参数列表 捕获输出 输出转为字符串
        #print(subprocess.run(args,  capture_output=True,text=True).stdout)

# AndroidManifest.xml的editor 用于获取和修改标签属性,以及添加标签
class ManifestEditor:
    def __init__(self, xml_content: bytes):
        self.ns = {'android': 'http://schemas.android.com/apk/res/android'}
        self.tree = etree.fromstring(xml_content)

    # 获取指定标签的android属性值 examples: get_attr('application', 'name') get_attr('activity', 'name')
    def getTagAttribute(self, tag_name: str, attr_name: str):
        if tag_name == 'manifest':  # 根标签特殊处理
            elem = self.tree
            if elem is not None:
                return elem.get(f'{attr_name}')  # 寻找标签的属性
        else:
            elem = self.tree.find(f'.//{tag_name}', namespaces=self.ns)
            if elem is not None:
                return elem.get(f'{{{self.ns["android"]}}}{attr_name}')  # 根标签之外的属性位于android命名空间下
        return None

    # 设置指定标签的属性值 example:set_attr('application','name',"com.example.ProxyApplication")
    def setTagAttribute(self, tag_name: str, attr_name: str, new_value: str):
        if tag_name == 'manifest':  # 根标签特殊处理
            elem = self.tree
            if elem is not None:
                return elem.set(f'{attr_name}', new_value)  # 设置属性值
        else:
            elem = self.tree.find(f'.//{tag_name}', namespaces=self.ns)
            if elem is not None:
                elem.set(f'{{{self.ns["android"]}}}{attr_name}', new_value)
                return True
        return False

    # 在指定父标签下添加新子标签 example: add_tag('application',"meta-data",{'name': 'android.permission.CAMERA','value':'hello'})
    def addTagWithAttributes(self, parent_tag: str, new_tag: str, attrs: dict):
        if parent_tag == 'manifest':
            parent = self.tree
            if parent is not None:
                new_elem = etree.SubElement(parent, new_tag)
                for k, v in attrs.items():  # 支持一次给添加的标签设置多个属性
                    new_elem.set(f'{k}', v)
                return True
        else:
            parent = self.tree.find(f'.//{parent_tag}', namespaces=self.ns)
            if parent is not None:
                new_elem = etree.SubElement(parent, new_tag)
                for k, v in attrs.items():
                    new_elem.set(f'{{{self.ns["android"]}}}{k}', v)
                return True
        return False

    # 不以壳manifest为基准操作则用不到该函数,以源apk的manifest为基准自带,无需额外设置
    def getMainActivity(self):
        activities = self.tree.findall('.//activity', namespaces=self.ns)
        for activity in activities:
            intent_filters = activity.findall('.//intent-filter', namespaces=self.ns)
            for intent_filter in intent_filters:
                action = intent_filter.find('.//action[@android:name="android.intent.action.MAIN"]', namespaces=self.ns)
                category = intent_filter.find('.//category[@android:name="android.intent.category.LAUNCHER"]',
                                              namespaces=self.ns)
                if action is not None and category is not None:
                    return activity.get(f'{{{self.ns["android"]}}}name')
        return None

    def getApplication(self):
        return self.getTagAttribute('application', 'name')

    def setApplication(self, application: str):
        self.setTagAttribute('application', 'name', application)

    def addMetaData(self, name: str, value: str):
        self.addTagWithAttributes('application', 'meta-data', {'name': name, 'value': value})

    def getManifestData(self):
        """返回XML字符串"""
        return etree.tostring(self.tree, pretty_print=True, encoding='utf-8', xml_declaration=True).decode()

    def getEtractNativeLibs(self):
        """返回是否释放so文件"""
        return self.getTagAttribute('application', 'extractNativeLibs')

    def resetExtractNativeLibs(self):
        """重置etractNativeLibs属性为true"""
        self.setTagAttribute('application', 'extractNativeLibs', 'true')


# 合并壳dex和源apk的dex
def combineShellAndSourceDexs(shellApkTempDir:Path,srcApkTempDir:Path,newApkTempDir:Path):

    def fixCheckSum(dexBytesArray):
        # dexfile[8:12]
        # 小端存储
        value = adler32(bytes(dexBytesArray[12:]))
        valueArray = bytearray(value.to_bytes(4, 'little'))
        for i in range(len(valueArray)):
            dexBytesArray[8 + i] = valueArray[i]

    def fixSignature(dexBytesArray):
        # dexfile[12:32]
        sha_1 = sha1()
        sha_1.update(bytes(dexBytesArray[32:]))
        value = sha_1.hexdigest()
        valueArray = bytearray(unhexlify(value))
        for i in range(len(valueArray)):
            dexBytesArray[12 + i] = valueArray[i]

    def fixFileSize(dexBytesArray, fileSize):
        # dexfile[32:36]
        # 小端存储
        fileSizeArray = bytearray(fileSize.to_bytes(4, "little"))
        for i in range(len(fileSizeArray)):
            dexBytesArray[32 + i] = fileSizeArray[i]

    def encrypto(file):
        for i in range(len(file)):
            file[i] ^= 0xff
        return file

    def readAndCombineDexs(unpackedApkDir:Path):
        # 读取解包后的apk的所有dex文件,并合并为一个dex文件
        combinedDex = bytearray()
         # glob方法返回包含所有匹配文件的生成器
        for dex in unpackedApkDir.glob('classes*.dex'):
            print('Source Apk Dex file:', dex)
            with open(dex, 'rb') as f:
                data = bytearray(f.read())
                combinedDex+=bytearray(len(data).to_bytes(4, 'little'))  # dex文件的长度,小端序
                combinedDex+=data # dex文件内容
        return combinedDex

    # 获取shelldex
    with open(shellApkTempDir/'classes.dex', 'rb') as f:
        shellDexArray=bytearray(f.read())

    # 获取源apk的dex文件
    srcDexArray = readAndCombineDexs(srcApkTempDir)
    # 新的dex文件长度
    newDexLen = len(srcDexArray) + len(shellDexArray) + 4
    # 加密源文件
    encSrcDexArray = encrypto(srcDexArray)
    # 新的dex文件内容 = 壳dex + 加密的源dex + 四字节标识加密后源dex大小长度
    newDexArray = shellDexArray + encSrcDexArray  + bytearray(len(encSrcDexArray).to_bytes(4, 'little'))

    # 修改filesize
    fixFileSize(newDexArray, newDexLen)
    # 修改signature
    fixSignature(newDexArray)
    # 修改checksum
    fixCheckSum(newDexArray)
    # 导出文件
    with open(newApkTempDir/'classes.dex', 'wb') as f:
        f.write(newDexArray)

# 提取源apk的Manifest文件,修改application为壳application(可能添加meta-data标签),输出新的Manifest文件
def handleManifest( srcApkTempDir:Path,shellApkTempDir:Path,newApkTempDir:Path):
    # 从源apk提取AndroidManifest.xml
    with open(srcApkTempDir/'AndroidManifest.xml', 'r') as f:
        srcManifestEditor=ManifestEditor(f.read().encode())
    srcApplication=srcManifestEditor.getApplication()
    srcExtractNativeLibs=srcManifestEditor.getEtractNativeLibs()
    print('SourceApplication:',srcApplication)
    print('SourceExtractNativeLibs:',srcExtractNativeLibs)

    # 从壳apk提取AndroidManifest.xml
    with open(shellApkTempDir/'AndroidManifest.xml', 'r') as f:
        shellManifestEditor=ManifestEditor(f.read().encode())
    print('ShellApplication:',shellManifestEditor.getApplication())

    # 修改源AndroidManifest.xml的application为壳的代理application
    srcManifestEditor.setApplication(shellManifestEditor.getApplication())

    # 写入meta-data标签 保存源apk的原始application
    if srcApplication != None:
        print('Source application:',srcApplication)
        srcManifestEditor.addMetaData('APPLICATION_CLASS_NAME',srcApplication)

    # 如果源apk的manifest中默认设置etractNativeLibs=false,则重置为true,确保释放lib文件
    if srcExtractNativeLibs=='false':
        srcManifestEditor.resetExtractNativeLibs()

    # 输出新的AndroidManifest.xml
    with open(newApkTempDir/'AndroidManifest.xml', 'w') as f:
        f.write(srcManifestEditor.getManifestData())

def start(paths:Paths):
    apktool=Apktool()
    # 1.分别解包源文件和壳文件到临时目录
    print('Extracting source and shell apk...')
    apktool.extractApk(paths.srcApkPath,paths.srcApkTempDir)
    print('Extract source apk success!')

    print('Extracting shell apk...')
    apktool.extractApk(paths.shellApkPath,paths.shellApkTempDir)
    print('Extract shell apk success!')

    # 2.复制源apk所有文件到新apk临时目录中,忽略源dex和manifest文件
    print('Copying source apk files to new apk temp dir...')
    shutil.copytree(paths.srcApkTempDir,paths.newApkTempDir,ignore=shutil.ignore_patterns('AndroidManifest.xml','classes*.dex'))
    print('Copy source apk files success!')

    # 3.处理AndroidManifest.xml
    print('Handling AndroidManifest.xml...')
    handleManifest(paths.srcApkTempDir,paths.shellApkTempDir,paths.newApkTempDir)
    print('Handle AndroidManifest.xml success!')

    # 4.合并壳dex和源apk并导出文件
    print('Combining shell dex and source dexs...')
    combineShellAndSourceDexs(paths.shellApkTempDir,paths.srcApkTempDir,paths.newApkTempDir)
    print('Combine shell dex and source dexs success!')

    # 5.重打包apk
    print('Repacking apk...')
    apktool.repackApk(paths.newApkTempDir,paths.newApkPath)
    print('Repack apk success!')

    # 6.签名apk
    print('Signing apk...')
    apktool.signApk(paths.newApkPath)
    print('Resign apk success!')

    # 7.删除临时目录
    print('Deleting temp directories...')
    shutil.rmtree(paths.tmpdir) # 删除临时目录
    print('Delete temp directories success!')

def main():
    parser = argparse.ArgumentParser(description="Android APK Packer")
    parser.add_argument('-src','--src-apk', required=True, type=Path, help='Path to source APK file')
    parser.add_argument('-shell','--shell-apk', required=True, type=Path, help='Path to shell APK file')
    parser.add_argument('-o','-out','--output-apk',type=Path,help='Output path for packed APK (Default: ./out/<src-apk>_protected.apk)')
    args = parser.parse_args()
    if args.output_apk == None:
        args.output_apk = Path('./out')/(args.src_apk.stem+'_protected.apk') # 默认新apk名称及输出路径
    paths = Paths(args.src_apk, args.shell_apk, args.output_apk)

    print('Source APK:', paths.srcApkPath)
    print('Shell APK:', paths.shellApkPath)
    print('Output APK:', paths.newApkPath)
    start(paths)


if __name__=="__main__":
    main()
|
脱壳程序
SecondProxyApplication.java相比FirstProxyApplication.java改动如下:
-
attachBaseContext
读取壳dex文件后,提取源程序dex文件,之后替换ClassLoader
没有设置私有目录和释放文件等操作
-
extractDexFilesFromShellDex
替代splitSourceApkFromShellDex,从壳dex提取源程序dex文件并存储为ByteBuffer[]
-
replaceClassLoader
一代加固使用DexClassLoader从文件加载,二代加固使用InMemoryDexClassLoader
注意:
  1
  2
  3
  4
  5
  6
  7
  8
  9
 10
 11
 12
 13
 14
 15
 16
 17
 18
 19
 20
 21
 22
 23
 24
 25
 26
 27
 28
 29
 30
 31
 32
 33
 34
 35
 36
 37
 38
 39
 40
 41
 42
 43
 44
 45
 46
 47
 48
 49
 50
 51
 52
 53
 54
 55
 56
 57
 58
 59
 60
 61
 62
 63
 64
 65
 66
 67
 68
 69
 70
 71
 72
 73
 74
 75
 76
 77
 78
 79
 80
 81
 82
 83
 84
 85
 86
 87
 88
 89
 90
 91
 92
 93
 94
 95
 96
 97
 98
 99
100
101
102
103
104
105
106
107
108
109
110
111
112
113
114
115
116
117
118
119
120
121
122
123
124
125
126
127
128
129
130
131
132
133
134
135
136
137
138
139
140
141
142
143
144
145
146
147
148
149
150
151
152
153
154
155
156
157
158
159
160
161
162
163
164
165
166
167
168
169
170
171
172
173
174
175
176
177
178
179
180
181
182
183
184
185
186
187
188
189
190
191
192
193
194
195
196
197
198
199
200
201
202
203
204
205
206
207
208
209
210
211
212
213
214
215
216
217
218
219
220
221
222
223
224
225
226
227
228
229
230
231
232
233
234
235
236
237
238
239
240
241
242
243
244
245
246
247
248
249
250
251
252
253
254
255
256
257
258
259
260
261
262
263
264
265
266
267
268
269
270
271
272
273
274
275
276
|
package com.example.androidshell;

import android.app.Application;
import android.app.Instrumentation;
import android.content.Context;
import android.content.pm.ApplicationInfo;
import android.content.pm.PackageManager;
import android.os.Build;
import android.os.Bundle;
import android.util.ArrayMap;
import android.util.Log;

import java.io.BufferedInputStream;
import java.io.ByteArrayOutputStream;
import java.io.FileInputStream;
import java.io.IOException;
import java.lang.ref.WeakReference;
import java.nio.ByteBuffer;
import java.nio.ByteOrder;
import java.util.ArrayList;
import java.util.Iterator;
import java.util.zip.ZipEntry;
import java.util.zip.ZipInputStream;

import dalvik.system.InMemoryDexClassLoader;

public class SecondProxyApplication extends Application {
    private final String TAG="glass";
    public void log(String message){Log.d(TAG,message);}
    @Override
    protected void attachBaseContext(Context base) {
        super.attachBaseContext(base);
        log("SecondProxyApplication.attachBaseContext is running!");
        try {
            byte[] shellDexData = readDexFromApk();
            log("成功从源APK中读取classes.dex");
            //从中分理出源dex文件
            ByteBuffer[] byteBuffers = extractDexFilesFromShellDex(shellDexData);
            log("成功分离出源dex集合");
            //配置加载源程序的动态环境,即替换mClassLoader
            replaceClassLoader(byteBuffers);
        } catch (Exception e) {
            log( Log.getStackTraceString(e));
        }
    }
    @Override
    public void onCreate() {
        super.onCreate();
        log("SecondProxyApplication.onCreate is running!");
        if(replaceApplication())
            log("替换Application成功");
    }
    // 从壳dex文件中提取源apk的dex并封装为ByteBuffer
    private ByteBuffer[] extractDexFilesFromShellDex(byte[] shellDexData) throws IOException {
        int shellDexlength = shellDexData.length;
        //开始解析dex文件
        byte[] sourceDexsSizeByte = new byte[4];
        //读取源dexs的大小
        System.arraycopy(shellDexData,shellDexlength - 4, sourceDexsSizeByte,0,4);
        //转成bytebuffer,方便4byte转int
        ByteBuffer wrap = ByteBuffer.wrap(sourceDexsSizeByte);
        //将byte转成int, 加壳时,长度按小端存储
        int sourceDexsSizeInt = wrap.order(ByteOrder.LITTLE_ENDIAN).getInt();
        Log.d(TAG, "源dex集合的大小: " + sourceDexsSizeInt);
        //读取源dexs
        byte[] sourceDexsData = new byte[sourceDexsSizeInt];
        System.arraycopy(shellDexData,shellDexlength - sourceDexsSizeInt - 4, sourceDexsData, 0, sourceDexsSizeInt);
        //解密源dexs
        sourceDexsData = decrypt(sourceDexsData);

        //更新部分
        //从源dexs中分离dex
        ArrayList<byte[]> sourceDexList = new ArrayList<>();
        int pos = 0;
        while(pos < sourceDexsSizeInt){
            //先提取四个字节,描述当前dex的大小
            //开始解析dex文件
            byte[] singleDexSizeByte = new byte[4];
            //读取源dexs的大小
            System.arraycopy(sourceDexsData, pos, singleDexSizeByte,0,4);
            //转成bytebuffer,方便4byte转int
            ByteBuffer singleDexwrap = ByteBuffer.wrap(singleDexSizeByte);
            int singleDexSizeInt = singleDexwrap.order(ByteOrder.LITTLE_ENDIAN).getInt();
            Log.d(TAG, "当前singleDex的大小: " + singleDexSizeInt);
            //读取单独dex
            byte[] singleDexData = new byte[singleDexSizeInt];
            System.arraycopy(sourceDexsData,pos + 4, singleDexData, 0, singleDexSizeInt);
            //加入到dexlist中
            sourceDexList.add(singleDexData);
            //更新pos
            pos += 4 + singleDexSizeInt;
        }

        //将dexlist包装成ByteBuffer
        int dexNum = sourceDexList.size();
        Log.d(TAG, "源dex的数量: " + dexNum);
        ByteBuffer[] dexBuffers = new ByteBuffer[dexNum];
        for (int i = 0; i < dexNum; i++){
            dexBuffers[i] = ByteBuffer.wrap(sourceDexList.get(i));
        }

        return dexBuffers;

    }
    // 从apk读取dex文件并返回dex对应字节数组
    // 从当前程序的apk读取dex文件并存储为字节数组
    private byte[] readDexFromApk() throws IOException {
        //1.获取当前应用程序的源码路径(apk),一般是data/app目录下,该目录用于存放用户安装的软件
        String sourceDir = this.getApplicationInfo().sourceDir;
        log("this.getApplicationInfo().sourceDir: " +sourceDir);

        //2.创建相关输入流
        FileInputStream fileInputStream = new FileInputStream(sourceDir);
        BufferedInputStream bufferedInputStream = new BufferedInputStream(fileInputStream);
        ZipInputStream zipInputStream = new ZipInputStream(bufferedInputStream); //用于解析apk文件

        ByteArrayOutputStream byteArrayOutputStream = new ByteArrayOutputStream(); //用于存放dex文件

        //3.遍历apk的所有文件并提取dex文件
        ZipEntry zipEntry;
        while((zipEntry = zipInputStream.getNextEntry()) != null){ //存在下一个文件
            // 将classes.dex文件存储到bytearray中 壳dex和源apk合并后只保留一个dex便于处理
            if (zipEntry.getName().equals("classes.dex")){
                byte[] bytes = new byte[1024];
                int num;
                while((num = zipInputStream.read(bytes))!=-1){      //每次读取1024byte,返回读取到的byte数
                    byteArrayOutputStream.write(bytes,0, num); //存放到开辟的byteArrayOutputStream中
                }
            }
            zipInputStream.closeEntry(); //关闭当前文件
        }
        zipInputStream.close();

        log("Read dex from apk succeed!");
        return byteArrayOutputStream.toByteArray(); //将读取到的dex文件以字节数组形式返回
    }
    private byte[] decrypt(byte[] sourceApkdata) {
        for (int i = 0; i < sourceApkdata.length; i++){
            sourceApkdata[i] ^= (byte) 0xff;
        }
        return sourceApkdata;

    }
    //替换壳程序LoadedApk的Application为源程序Application,并调用其onCreate方法
    public boolean replaceApplication(){
        // Application实例存在于: LoadedApk.mApplication
        // 以及ActivityThread的mInitialApplication和mAllApplications和mBoundApplication

        //判断源程序是否使用自定义Application 若使用则需要进行替换,若未使用则直接返回,使用壳的默认Application即可

        String appClassName = null; //源程序的Application类名
        try {
            //获取AndroidManifest.xml 文件中的 <meta-data> 元素
            ApplicationInfo applicationInfo = getPackageManager().getApplicationInfo(this.getPackageName(), PackageManager.GET_META_DATA);
            Bundle metaData = applicationInfo.metaData;
            //获取xml文件声明的Application类
            if (metaData != null && metaData.containsKey("APPLICATION_CLASS_NAME")){
                appClassName = metaData.getString("APPLICATION_CLASS_NAME");
            } else {
                log("源程序中没有自定义Application");
                return false; //如果不存在直接返回,使用壳的application即可
            }
        } catch (PackageManager.NameNotFoundException e) {
            log(Log.getStackTraceString(e));
        }

        //源程序存在自定义application类,开始替换
        log("Try to replace Application");

        //1.反射获取ActivityThread实例
        Object sCurrentActivityThreadObj = Reflection.getStaticField("android.app.ActivityThread","sCurrentActivityThread");
        log("ActivityThread: " + sCurrentActivityThreadObj.toString());

        //2.获取并设置LoadedApk
        //获取mBoundApplication (AppBindData对象)
        Object mBoundApplicationObj = Reflection.getField("android.app.ActivityThread",sCurrentActivityThreadObj,"mBoundApplication") ;
        log("mBoundApplication: "+mBoundApplicationObj.toString());
        //获取mBoundApplication.info (即LoadedApk)
        Object infoObj = Reflection.getField("android.app.ActivityThread$AppBindData",mBoundApplicationObj,"info");
        log( "LoadedApk: " + infoObj.toString());
        //把LoadedApk的mApplication设置为null,这样后续才能调用makeApplication() 否则由于已存在Application,无法进行替换
        Reflection.setField("android.app.LoadedApk","mApplication",infoObj,null);

        //3.获取ActivityThread.mInitialApplication 即拿到旧的Application(对于要加载的Application来讲)
        Object mInitialApplicationObj = Reflection.getField("android.app.ActivityThread",sCurrentActivityThreadObj,"mInitialApplication");
        log("mInitialApplicationObj: " + mInitialApplicationObj.toString());

        //4.获取ActivityThread.mAllApplications并删除旧的application
        ArrayList<Application> mAllApplicationsObj = (ArrayList<Application>) Reflection.getField("android.app.ActivityThread",sCurrentActivityThreadObj,"mAllApplications");
        mAllApplicationsObj.remove(mInitialApplicationObj);
        log("mInitialApplication 从 mAllApplications 中移除成功");

        //5.重置相关类的Application类名 便于后续创建Application
        //获取LoadedApk.mApplicationInfo
        ApplicationInfo applicationInfo = (ApplicationInfo) Reflection.getField("android.app.LoadedApk",infoObj,"mApplicationInfo");
        log( "LoadedApk.mApplicationInfo: " + applicationInfo.toString());
        //获取mBoundApplication.appInfo
        ApplicationInfo appinfoInAppBindData = (ApplicationInfo) Reflection.getField("android.app.ActivityThread$AppBindData",mBoundApplicationObj,"appInfo");
        log("ActivityThread.mBoundApplication.appInfo: " + appinfoInAppBindData.toString());
        //此处通过引用修改值,虽然后续没有使用,但是实际上是修改其指向的LoadedApk相关字段的值
        //设置两个appinfo的classname为源程序的application类名,以便后续调用makeApplication()创建源程序的application
        applicationInfo.className = appClassName;
        appinfoInAppBindData.className = appClassName;
        log("Source Application name: " + appClassName);


        //6.反射调用makeApplication方法创建源程序的application
        Application application = (Application) Reflection.invokeMethod("android.app.LoadedApk","makeApplication",infoObj,new Class[]{boolean.class, Instrumentation.class},new Object[]{false,null}); //使用源程序中的application
        //Application app = (Application)ReflectionMethods.invokeMethod("android.app.LoadedApk","makeApplication",infoObj,new Class[]{boolean.class, Instrumentation.class},new Object[]{true,null}); //使用自定义的application 强制为系统默认
        log("Create source Application succeed: "+application);

        //7.重置ActivityThread.mInitialApplication为新的Application
        Reflection.setField("android.app.ActivityThread","mInitialApplication",sCurrentActivityThreadObj,application);
        log("Reset ActivityThread.mInitialApplication by new Application succeed!");

        //8.ContentProvider会持有代理的Application,需要特殊处理一下
        ArrayMap mProviderMap = (ArrayMap) Reflection.getField("android.app.ActivityThread",sCurrentActivityThreadObj,"mProviderMap");
        log("ActivityThread.mProviderMap: " + mProviderMap);

        //获取所有provider,装进迭代器中遍历
        Iterator iterator = mProviderMap.values().iterator();
        while(iterator.hasNext()){
            Object providerClientRecord = iterator.next();
            //获取ProviderClientRecord.mLocalProvider,可能为空
            Object mLocalProvider = Reflection.getField("android.app.ActivityThread$ProviderClientRecord",providerClientRecord,"mLocalProvider") ;
            if(mLocalProvider != null){
                log("ProviderClientRecord.mLocalProvider: " + mLocalProvider);
                //获取ContentProvider中的mContext字段,设置为新的Application
                Reflection.setField("android.content.ContentProvider","mContext",mLocalProvider,application);
            }
        }

        log( "Run Application.onCreate" );
        application.onCreate(); //源程序,启动!
        return true;
    }
    // 替换壳App的ClassLoader为源App的ClassLoader
    private void replaceClassLoader(ByteBuffer[] byteBuffers) throws Exception{
        //1.获取当前的classloader
        ClassLoader classLoader = this.getClassLoader();
        log("Current ClassLoader: " + classLoader.toString());
        log("Parent ClassLoader: " + classLoader.getParent().toString());

        //2.反射获取ActivityThread
        Object sCurrentActivityThreadObj = Reflection.getStaticField("android.app.ActivityThread","sCurrentActivityThread");
        log("ActivityThread.sCurrentActivity: " + sCurrentActivityThreadObj.toString());

        //3.反射获取LoadedApk
        //获取当前ActivityThread实例的mPackages字段 类型为ArrayMap<String, WeakReference<LoadedApk>>, 里面存放了当前应用的LoadedApk对象
        ArrayMap mPackagesObj = (ArrayMap) Reflection.getField("android.app.ActivityThread",sCurrentActivityThreadObj,"mPackages");
        log( "mPackagesObj: " + mPackagesObj.toString());

        //获取mPackages中的当前应用包名
        String currentPackageName = this.getPackageName();
        log("currentPackageName: " + currentPackageName);

        // 获取loadedApk实例也有好几种,mInitialApplication mAllApplications mPackages
        // 通过包名获取当前应用的loadedApk实例
        WeakReference weakReference = (WeakReference) mPackagesObj.get(currentPackageName);
        Object loadedApkObj = weakReference.get();
        log( "LoadedApk: " + loadedApkObj.toString());

        //动态加载源程序的dex文件
        if(Build.VERSION.SDK_INT>=29){
            Log.d(TAG,"Library path:"+this.getApplicationInfo().nativeLibraryDir);
            InMemoryDexClassLoader dexClassLoader=new InMemoryDexClassLoader(byteBuffers,this.getApplicationInfo().nativeLibraryDir,classLoader.getParent());
            Log.d(TAG, "New InMemoryDexClassLoader: " + dexClassLoader);
            //替换当前loadedApk实例中的mClassLoader字段
            Reflection.setField("android.app.LoadedApk","mClassLoader",loadedApkObj,dexClassLoader);
        }
        else{

            Log.d(TAG,"不支持Android 8.0以下版本");
        }
    }
}
|
总结
二代加固使用不落地加载技术,可在内存中直接加载dex,实际上是对落地加载的更新
第一代和第二代加固统称为整体加固,在部分资料中将他们合称为一代加固,将代码抽取加固称为二代加固
优点: 相对一代加固更加高效,不容易从文件系统获取dex文件从而得到关键代码
缺点: 兼容性问题: 源程序的libso处理起来比较复杂;低版本需要手动实现InMemoryDexClassLoader
九. 三代加固-抽取加固
基于整体加固遇到的部分问题,引申出了三代加固: 代码抽取加固
思路: 将关键方法的指令抽空,替换为nop指令,运行时动态回填指令执行, 回填的核心是对Android系统核心函数进行hook
-
Hook点
常用的Hook点有ClassLinker::LoadMethod和ClassLinker::DefineClass,二者都可以获取DexFile对象
LoadMethod: 可获取Method对象,从而获取codeOff,方便回填处理,但兼容性差
DefineClass: 可获取ClassDef对象,需要解析得到codeOff,更复杂但兼容性好,变化不大
-
如何抽取代码(参考前文Dex文件结构和代码抽取部分)
Dex文件结构中DexClassDef结构定义了各个类的信息,其中的DexClassData结构记录了类的字段和方法数据
方法由DexMethod结构保存,其codeOff成员保存了方法的字节码数据在文件中的偏移,根据该偏移可以进行抽取
LoadMethod声明如下
 1
 2
 3
 4
 5
 6
 7
 8
 9
10
11
12
13
14
15
16
17
18
19
20
21
|
//Android 7及以前
  void LoadMethod(Thread* self,
                  const DexFile& dex_file,
                  const ClassDataItemIterator& it,
                  Handle<mirror::Class> klass, ArtMethod* dst)
//Android 8-9
  void LoadMethod(const DexFile& dex_file,
                  const ClassDataItemIterator& it,
                  Handle<mirror::Class> klass, ArtMethod* dst)
//Android 10-14
	void LoadMethod(const DexFile& dex_file,
                  const ClassAccessor::Method& method,
                  Handle<mirror::Class> klass,
                  ArtMethod* dst)

//Android 15
  void LoadMethod(const DexFile& dex_file,
                  const ClassAccessor::Method& method,
                  ObjPtr<mirror::Class> klass,
                  /*inout*/ MethodAnnotationsIterator* mai,
                  /*out*/ ArtMethod* dst)
|
DefineClass声明如下
 1
 2
 3
 4
 5
 6
 7
 8
 9
10
11
12
13
14
15
16
17
18
19
20
21
22
23
24
25
26
27
28
29
30
31
32
33
34
35
36
37
38
39
40
41
42
43
44
45
46
47
48
49
50
51
|
// Android 5.0 Level 21 及之前使用该声明
static void* (*g_originDefineClassV21)(void* thiz,
                                       const char* descriptor,
                                       void* class_loader,
                                       const void* dex_file,
                                       const void* dex_class_def);
/*
//原始声明
mirror::Class* DefineClass(const char* descriptor,
                            Handle<mirror::ClassLoader> class_loader,
                            const DexFile& dex_file,
                            const DexFile::ClassDef& dex_class_def)
*/

// Android 5.1-14 Level22-34使用该声明
static void* (*g_originDefineClassV22)(void* thiz,
                                       void* self,
                                       const char* descriptor,
                                       size_t hash,
                                       void* class_loader,
                                       const void* dex_file,
                                       const void* dex_class_def);
/*
//原始声明
ObjPtr<mirror::Class> DefineClass(Thread* self,
                                  const char* descriptor,
                                  size_t hash,
                                  Handle<mirror::ClassLoader> class_loader,
                                  const DexFile& dex_file,
                                  const dex::ClassDef& dex_class_def)
*/

//Android 15 Level 35 以后使用该声明
static void* (*g_originDefineClassV35)(void* thiz,
                                       void* self,
                                       const char* descriptor,
                                       size_t descriptor_length,
                                       size_t hash,
                                       void* class_loader,
                                       const void* dex_file,
                                       const void* dex_class_def);
//原始声明
/*
ObjPtr<mirror::Class> DefineClass(Thread* self,
                                  const char* descriptor,
                                  size_t descriptor_length,
                                  size_t hash,
                                  Handle<mirror::ClassLoader> class_loader,
                                  const DexFile& dex_file,
                                  const dex::ClassDef& dex_class_def)
*/
|
原理
源程序
主要包括3个技术点(同上):
- Native层NDK开发
- Multidex
- 自定义Application
加壳程序
加壳程序主要分为3个模块
- Apk处理模块: 提供解包Apk,打包Apk,签名Apk的功能
- Xml处理模块: 提供读取标签,修改标签,添加标签的功能
- Dex处理模块: 提供合并多Dex,加密Dex,代码抽取,文件修复的功能

加壳程序工作基本流程图如下

加壳程序工作流程总览图如下:

相对于SecondShell.py的改动如下:
-
start
解包源apk后调用extractAllDexFiles抽取所有dex文件的代码
另外复制了壳apk的lib库到新apk的临时目录(hook和代码回填逻辑在native层)
-
extractAllDexFiles
遍历指定目录的所有dex文件,调用ReadDex抽取代码,得到对应的.patched和.codes文件
修复patch后的dex文件并覆写原dex文件,将codes移动到assets目录下
  1
  2
  3
  4
  5
  6
  7
  8
  9
 10
 11
 12
 13
 14
 15
 16
 17
 18
 19
 20
 21
 22
 23
 24
 25
 26
 27
 28
 29
 30
 31
 32
 33
 34
 35
 36
 37
 38
 39
 40
 41
 42
 43
 44
 45
 46
 47
 48
 49
 50
 51
 52
 53
 54
 55
 56
 57
 58
 59
 60
 61
 62
 63
 64
 65
 66
 67
 68
 69
 70
 71
 72
 73
 74
 75
 76
 77
 78
 79
 80
 81
 82
 83
 84
 85
 86
 87
 88
 89
 90
 91
 92
 93
 94
 95
 96
 97
 98
 99
100
101
102
103
104
105
106
107
108
109
110
111
112
113
114
115
116
117
118
119
120
121
122
123
124
125
126
127
128
129
130
131
132
133
134
135
136
137
138
139
140
141
142
143
144
145
146
147
148
149
150
151
152
153
154
155
156
157
158
159
160
161
162
163
164
165
166
167
168
169
170
171
172
173
174
175
176
177
178
179
180
181
182
183
184
185
186
187
188
189
190
191
192
193
194
195
196
197
198
199
200
201
202
203
204
205
206
207
208
209
210
211
212
213
214
215
216
217
218
219
220
221
222
223
224
225
226
227
228
229
230
231
232
233
234
235
236
237
238
239
240
241
242
243
244
245
246
247
248
249
250
251
252
253
254
255
256
257
258
259
260
261
262
263
264
265
266
267
268
269
270
271
272
273
274
275
276
277
278
279
280
281
282
283
284
285
286
287
288
289
290
291
292
293
294
295
296
297
298
299
300
301
302
303
304
305
306
307
308
309
310
311
312
313
314
315
316
317
318
319
320
321
322
323
324
325
326
327
328
329
330
331
332
333
334
335
336
337
338
339
340
341
342
343
344
345
|
from zlib import adler32
from hashlib import sha1
from binascii import unhexlify
from lxml import etree
import subprocess
import shutil
from pathlib import Path
import argparse

# Paths类,管理全局用到的路径
class Paths:
    def __init__(self, srcApk:Path, shellApk:Path, outputApk:Path):
        # 相关APK文件路径
        self.srcApkPath= srcApk.resolve() # 解析为绝对路径
        self.shellApkPath= shellApk.resolve()
        self.newApkPath= outputApk.resolve()

        # 临时目录 以该脚本文件父目录为根目录
        self.tmpdir= Path(__file__).parent/'temp'
        self.srcApkTempDir=  self.tmpdir/ 'srcApkTemp'
        self.shellApkTempDir= self.tmpdir/'shellApkTemp'
        self.newApkTempDir= self.tmpdir/ 'newApkTemp'

# Apktool类,通过subprocess调用其他工具 提供解包,打包,签名,抽取代码功能
class Apktool:
    def __init__(self):
        self.apktool_path= Path(__file__).parent/'tools/apktool/apktool.bat'
        self.signer_path=Path(__file__).parent/'tools/uber-apk-signer-1.3.0.jar'
        self.readDex_path=Path(__file__).parent/'tools/ReadDex.exe'

    # 为apk签名
    def signApk(self,unsignedApkPath:Path):
        self.runCommand(['java','-jar', self.signer_path, '--apk',unsignedApkPath])

    # 使用apktool解包apk 只解包资源得到AndroidManifest.xml 不需要解包dex文件得到smali
    def unpackApk(self,apkPath:Path, outputDir:Path):
        self.runCommand([self.apktool_path, '-s', 'd' , apkPath, '-o', outputDir])

    # 重打包apk
    def repackApk(self,inputDir:Path, outApk:Path):
        self.runCommand([self.apktool_path, 'b' , inputDir, '-o', outApk])

    # 抽取指定dex文件的代码
    def extractDexCodes(self,dexPath:Path):
        # 调用ReadDex.exe抽取dex文件代码,输出到同级目录 例如classes.dex抽取后生成classes.dex.patched和classes.dex.codes
        self.runCommand([self.readDex_path,'-file',  dexPath, '-extractCodes'])

    # 执行命令
    def runCommand(self,args):
        #subprocess.run(args)
        subprocess.run(args,stdout=subprocess.DEVNULL) #仅调用工具,不需要额外输出,重定向stdout到os.devnull
        # 参数列表 捕获输出 输出转为字符串
        #print(subprocess.run(args,  capture_output=True,text=True).stdout)

# AndroidManifest.xml的editor 用于获取和修改标签属性,以及添加标签
class ManifestEditor:
    def __init__(self, xml_content: bytes):
        self.ns = {'android': 'http://schemas.android.com/apk/res/android'}
        self.tree = etree.fromstring(xml_content)

    # 获取指定标签的android属性值 examples: get_attr('application', 'name') get_attr('activity', 'name')
    def getTagAttribute(self, tag_name: str, attr_name: str):
        if tag_name == 'manifest':  # 根标签特殊处理
            elem = self.tree
            if elem is not None:
                return elem.get(f'{attr_name}')  # 寻找标签的属性
        else:
            elem = self.tree.find(f'.//{tag_name}', namespaces=self.ns)
            if elem is not None:
                return elem.get(f'{{{self.ns["android"]}}}{attr_name}')  # 根标签之外的属性位于android命名空间下
        return None

    # 设置指定标签的属性值 example:s et_attr('application','name',"com.example.ProxyApplication")
    def setTagAttribute(self, tag_name: str, attr_name: str, new_value: str):
        if tag_name == 'manifest':  # 根标签特殊处理
            elem = self.tree
            if elem is not None:
                return elem.set(f'{attr_name}', new_value)  # 设置属性值
        else:
            elem = self.tree.find(f'.//{tag_name}', namespaces=self.ns)
            if elem is not None:
                elem.set(f'{{{self.ns["android"]}}}{attr_name}', new_value)
                return True
        return False

    # 在指定父标签下添加新子标签 example: add_tag('application',"meta-data",{'name': 'android.permission.CAMERA','value':'hello'})
    def addTagWithAttributes(self, parent_tag: str, new_tag: str, attrs: dict):
        if parent_tag == 'manifest':
            parent = self.tree
            if parent is not None:
                new_elem = etree.SubElement(parent, new_tag)
                for k, v in attrs.items():  # 支持一次给添加的标签设置多个属性
                    new_elem.set(f'{k}', v)
                return True
        else:
            parent = self.tree.find(f'.//{parent_tag}', namespaces=self.ns)
            if parent is not None:
                new_elem = etree.SubElement(parent, new_tag)
                for k, v in attrs.items():
                    new_elem.set(f'{{{self.ns["android"]}}}{k}', v)
                return True
        return False

    # 不以壳manifest为基准操作则用不到该函数,以源apk的manifest为基准自带,无需额外设置
    def getMainActivity(self):
        activities = self.tree.findall('.//activity', namespaces=self.ns)
        for activity in activities:
            intent_filters = activity.findall('.//intent-filter', namespaces=self.ns)
            for intent_filter in intent_filters:
                action = intent_filter.find('.//action[@android:name="android.intent.action.MAIN"]', namespaces=self.ns)
                category = intent_filter.find('.//category[@android:name="android.intent.category.LAUNCHER"]',
                                              namespaces=self.ns)
                if action is not None and category is not None:
                    return activity.get(f'{{{self.ns["android"]}}}name')
        return None


    # 获取application标签的name属性值
    def getApplicationName(self):
        return self.getTagAttribute('application', 'name')

    # 设置application标签的name属性值
    def setApplicationName(self, application: str):
        self.setTagAttribute('application', 'name', application)

    # 添加meta-data标签,并设置name和value属性值
    def addMetaData(self, name: str, value: str):
        self.addTagWithAttributes('application', 'meta-data', {'name': name, 'value': value})

    # 获取AndroidManifest.xml的字符串
    def getManifestData(self):
        """返回XML字符串"""
        return etree.tostring(self.tree, pretty_print=True, encoding='utf-8', xml_declaration=True).decode()

    # 获取application标签的extractNativeLibs属性值
    def getEtractNativeLibs(self):
        return self.getTagAttribute('application', 'extractNativeLibs')

    # 设置application标签的extractNativeLibs属性值为true
    def resetExtractNativeLibs(self):
        self.setTagAttribute('application', 'extractNativeLibs', 'true')

# 工具函数,注意修复时顺序为: fileSize->signature->checksum
# 修复dex文件的checksum
def fixCheckSum(dexBytes:bytearray):
    # dexfile[8:12] 小端序4字节
    value = adler32(bytes(dexBytes[12:]))
    valueArray = bytearray(value.to_bytes(4, 'little'))
    for i in range(len(valueArray)):
        dexBytes[8 + i] = valueArray[i]

# 修复dex文件的signature
def fixSignature(dexBytes:bytearray):
    # dexfile[12:32] 小端序20字节
    sha_1 = sha1()
    sha_1.update(bytes(dexBytes[32:]))
    value = sha_1.hexdigest()
    valueArray = bytearray(unhexlify(value))
    for i in range(len(valueArray)):
        dexBytes[12 + i] = valueArray[i]

# 修复dex文件的filesize
def fixFileSize(dexBytes:bytearray, fileSize):
    # dexfile[32:36] 小端存储
    fileSizeArray = bytearray(fileSize.to_bytes(4, "little"))
    for i in range(len(fileSizeArray)):
        dexBytes[32 + i] = fileSizeArray[i]

# 加密函数,使用异或
def encrypt(data:bytearray):
    # todo:使用aes/sm4等加密算法替代
    for i in range(len(data)):
        data[i] ^= 0xff
    return data

# 抽取指定目录下的所有dex文件的代码 patch所有dex文件并修复,将codes文件移动到assets目录下
def extractAllDexFiles(directory:Path):
    apktool=Apktool()
    # 1.遍历目录下的所有dex文件,并抽取对应代码
    for dex in directory.glob('classes*.dex'):
        apktool.extractDexCodes(dex) # 抽取dex文件代码 得到classes*.dex.patched和classes*.dex.codes

    # 2.修复抽取后的文件并覆写原dex文件
    for patchedDex in directory.glob('classes*.dex.patched'):
        newDexName = str(patchedDex).replace('.patched', '') # 重命名
        # 读取文件内容
        with open(patchedDex, 'rb') as f:
            data = bytearray(f.read())
            # 修复signature和checksum,注意先后顺序
            fixSignature(data)
            fixCheckSum(data)
            # 修复后的文件覆写原dex文件
            with open(newDexName, 'wb') as newf:
                newf.write(data)

    # 3.删除patched文件
    for patchedDex in directory.glob('classes*.dex.patched'):
        patchedDex.unlink()

    # 4.移动.codes文件到assets目录下
    # 如果没有assets目录则创建
    if not (directory/'assets').exists():
        (directory/'assets').mkdir(parents=True)

    for codes in directory.glob('classes*.dex.codes'):
        shutil.move(codes,directory/'assets'/codes.name) # 移动到assets目录下

# 合并壳dex和源apk的dex,支持多dex文件,合并为一个dex
def combineShellAndSourceDexs(shellApkTempDir:Path,srcApkTempDir:Path,newApkTempDir:Path):
    # 读取解包后的apk的所有dex文件,并合并为一个dex文件
    def readAndCombineDexs(unpackedApkDir:Path):
        combinedDex = bytearray()
         # glob方法返回包含所有匹配文件的生成器
        for dex in unpackedApkDir.glob('classes*.dex'):
            print('Source Apk Dex file:', dex)
            with open(dex, 'rb') as f:
                data = bytearray(f.read())
                combinedDex+=bytearray(len(data).to_bytes(4, 'little'))  # dex文件的长度,小端序
                combinedDex+=data # dex文件内容
        return combinedDex

    # 获取shelldex
    with open(shellApkTempDir/'classes.dex', 'rb') as f:
        shellDexArray=bytearray(f.read())

    # 获取源apk的dex文件
    srcDexArray = readAndCombineDexs(srcApkTempDir)
    # 新的dex文件长度
    newDexLen = len(srcDexArray) + len(shellDexArray) + 4
    # 加密源文件
    encSrcDexArray = encrypt(srcDexArray)
    # 新的dex文件内容 = 壳dex + 加密的源dex + 四字节标识加密后源dex大小长度
    newDexArray = shellDexArray + encSrcDexArray  + bytearray(len(encSrcDexArray).to_bytes(4, 'little'))

    # 修改filesize
    fixFileSize(newDexArray, newDexLen)
    # 修改signature
    fixSignature(newDexArray)
    # 修改checksum
    fixCheckSum(newDexArray) # 注意先后顺序,先修改signature,再修改checksum

    # 导出文件
    with open(newApkTempDir/'classes.dex', 'wb') as f:
        f.write(newDexArray)

# 提取源apk的Manifest文件,修改application为壳application(可能添加meta-data标签),输出新的Manifest文件
def handleManifest(srcApkTempDir:Path,shellApkTempDir:Path,newApkTempDir:Path):
    # 从源apk提取AndroidManifest.xml
    with open(srcApkTempDir/'AndroidManifest.xml', 'r') as f:
        srcManifestEditor=ManifestEditor(f.read().encode())
    srcApplication=srcManifestEditor.getApplicationName()           # 获取application:name,确定是否存在自定义Application类
    srcExtractNativeLibs=srcManifestEditor.getEtractNativeLibs()    # 获取application:extractNativeLibs,判断是否释放lib文件
    print('SourceApplication:',srcApplication)
    print('SourceExtractNativeLibs:',srcExtractNativeLibs)

    # 从壳apk提取AndroidManifest.xml
    with open(shellApkTempDir/'AndroidManifest.xml', 'r') as f:
        shellManifestEditor=ManifestEditor(f.read().encode())
    print('ShellApplication:',shellManifestEditor.getApplicationName())

    # 修改源AndroidManifest.xml的application为壳的代理application
    srcManifestEditor.setApplicationName(shellManifestEditor.getApplicationName())

    # 写入meta-data标签 保存源apk的原始application
    if srcApplication != None:
        print('Source application:',srcApplication)
        srcManifestEditor.addMetaData('APPLICATION_CLASS_NAME',srcApplication)

    # 如果源apk的manifest中默认设置etractNativeLibs=false,则重置为true,确保释放lib文件
    if srcExtractNativeLibs=='false':
        srcManifestEditor.resetExtractNativeLibs()

    # 输出新的AndroidManifest.xml
    with open(newApkTempDir/'AndroidManifest.xml', 'w') as f:
        f.write(srcManifestEditor.getManifestData())

# 执行加固流程
def start(paths:Paths):
    apktool=Apktool()
    # 1.分别解包源文件和壳文件到临时目录
    print('Extracting source and shell apk...')
    apktool.unpackApk(paths.srcApkPath,paths.srcApkTempDir)
    print('Extract source apk success!')

    print('Extracting shell apk...')
    apktool.unpackApk(paths.shellApkPath,paths.shellApkTempDir)
    print('Extract shell apk success!')

    # 2.抽取源dex文件代码
    print('Exrtracting dex files codes...')
    extractAllDexFiles(paths.srcApkTempDir)
    print('Extract dex files codes success!')

    # 3.复制源apk所有文件到新apk临时目录中 忽略源dex和manifest文件
    print('Copying source apk files to new apk temp dir...')
    shutil.copytree(paths.srcApkTempDir,paths.newApkTempDir,ignore=shutil.ignore_patterns('AndroidManifest.xml','classes*.dex'))
    print('Copy source apk files success!')

    # 4.复制壳apk的lib库文件到新apk临时目录中 (壳的代码回填逻辑在lib中实现)
    print('Copying shell apk lib files to new apk temp dir...')
    shutil.copytree(paths.shellApkTempDir/'lib',paths.newApkTempDir/'lib',dirs_exist_ok=True) # dirs_exist_ok=True 如果目标目录已存在,则覆盖
    print('Copy shell apk lib files success!')

    # 5.处理AndroidManifest.xml
    print('Handling AndroidManifest.xml...')
    handleManifest(paths.srcApkTempDir,paths.shellApkTempDir,paths.newApkTempDir)
    print('Handle AndroidManifest.xml success!')

    # 6.合并壳dex和源apk的dex并导出文件
    print('Combining shell dex and source dexs...')
    combineShellAndSourceDexs(paths.shellApkTempDir,paths.srcApkTempDir,paths.newApkTempDir)
    print('Combine shell dex and source dexs success!')

    # 7.重打包apk
    print('Repacking apk...')
    apktool.repackApk(paths.newApkTempDir,paths.newApkPath)
    print('Repack apk success!')

    # 8.签名apk
    print('Signing apk...')
    apktool.signApk(paths.newApkPath)
    print('Resign apk success!')

    # 9.删除临时目录
    print('Deleting temp directories...')
    shutil.rmtree(paths.tmpdir)
    print('Delete temp directories success!')

def main():
    parser = argparse.ArgumentParser(description="Android APK Packer")
    parser.add_argument('-src','--src-apk', required=True, type=Path, help='Path to source APK file')
    parser.add_argument('-shell','--shell-apk', required=True, type=Path, help='Path to shell APK file')
    parser.add_argument('-o','-out','--output-apk',type=Path,help='Output path for packed APK (Default: ./out/<src-apk>_protected.apk)')
    args = parser.parse_args()
    if args.output_apk == None:
        args.output_apk = Path('./out')/(args.src_apk.stem+'_protected.apk') # 默认新apk名称及输出路径
    paths = Paths(args.src_apk, args.shell_apk, args.output_apk)

    print('Source APK:', paths.srcApkPath)
    print('Shell APK:', paths.shellApkPath)
    print('Output APK:', paths.newApkPath)
    start(paths)

if __name__=="__main__":
    main()
|
脱壳程序
脱壳程序主要分为2个模块:
- Java层: 提供环境初始化,替换ClassLoader,替换Application的功能
- Native层: 提供禁用Dex2Oat,设置Dex文件可写,代码回填,代码文件解析的功能

经过前文加壳程序的处理后,源程序AndroidManifest.xml文件的application标签的name属性指定壳的Application,由于Application是安卓应用程序真正的入口类,所以启动加壳后的程序时控制权在壳的代理Application中.
在壳的代理Application中主要执行以下操作:
-
初始化操作
设置相关文件路径,解析相关文件用于后续处理.
-
替换ClassLoader
替换壳程序的ClassLoader为被保护程序的ClassLoader.
-
替换Application
若被保护程序存在自定义Application则创建实例并替换.
-
加载壳so
调用System.loadLibrary()主动加载即可,后续在Native层执行代码回填.
示意图如下

环境初始化
主要执行以下操作:
-
设置相关私有目录,供后续释放文件以及设置DexClassLoader
-
从壳apk文件提取并解析被保护程序的dex文件,写入私有目录
调用 readDexFromApk从当前Apk文件中提取classes.dex,再调用extractDexFilesFromShellDex从中提取并分离源程序Dex文件,最后调用writeByteBuffersToDirectory将多个Dex文件依次写入私有目录.
-
从assets目录提取codes文件写入私有目录
调用copyClassesCodesFiles执行该操作.
-
拼接源程序所有dex文件的路径
用“:”分隔,拼接源程序所有dex文件路径,供后续DexClassLoader加载使用.
示意图如下

替换ClassLoader
主要执行以下操作:
-
获取当前ClassLoader
调用this.getClassLoader()获取.
-
反射获取ActivityThread实例
通过反射直接获取ActivityThread.sCurrentActivityThread字段,即当前程序对应的ActivityThread实例.
-
反射获取LoadedApk实例
首先反射获取ActivityThread.mPackages字段,再根据当前程序的包名从中查找获取对应LoadedApk实例.
-
创建并替换ClassLoader
将环境初始化工作中创建的lib和dex文件的私有目录路径以及当前ClassLoader作为参数,新建DexClassLoader,该ClassLoader可用于加载之前释放的源程序Dex文件和libso文件.
最后通过反射修改LoadedApk.mClassLoader实例完成替换.

替换Application
主要执行以下操作:
- 获取自定义Application完整类名
访问3.2.2节中加壳程序为AndroidManifest.xml添加的meta-data标签,其中保存了源程序自定义的Application类名.
- 反射获取ActivityThread实例(同3.3.2)
- 反射获取LoadedApk实例,并设置mApplication为空
获取LoadedApk实例同3.3.2,设置mApplication为空的原因是调用LoadedApk.makeApplication时,如果mApplication不为空,则直接返回当前的Application实例.所以想要替换Application必须先置空再创建.
- 获取ActivityThread.mInitialApplication并删除壳Application
- 反射调用LoadedApk.makeApplication创建源Application
- 重置ActivityThread.mInitialApplication为源Application
- 处理ContentProvider持有的代理Application
- 调用Application.onCreate 源程序,启动!
流程图如下

Native层
调用System.loadLibrary主动加载了壳的SO文件,首先调用init函数,其中依次执行以下Hook操作(劫持对应函数):
-
Hook execve
在hook后添加判断逻辑,匹配到调用dex2oat系统调用时直接返回.
dex2oat是ART将所有Dex文件优化为一个OAT文件(本质为ELF文件)的操作,目的是加快指令执行速度,但这会影响加固工具执行指令回填.
-
Hook mmap
在mmap映射内存时添加写权限,保证可修改DexFile进行指令回填.
-
Hook LoadMethod
LoadMethod有两个关键参数: DexFile* dexFile和Method* method.
通过dexFile获取方法所在的Dex文件路径,从而判断是否为源程序被抽取了代码的Dex文件,如果是则判断是否进行过文件解析.
若没有解析过则调用parseExtractedCodeFiles函数解析Dex文件对应的codes文件后,便成功创建了一组CodeMap(保存codeOff和CodeItem映射).
之后调用目标方法时,根据Method.codeOff从CodeMap中提取对应CodeItem并执行指令回填,dexFile.begin+Method.codeOff即为insns[]指令字节数组的位置.
其中Hook主要使用Bhook和Dobby
-
Dobby
参考https://github.com/luoyesiqiu/dpt-shell/blob/main/shell/src/main/cpp/CMakeLists.txt和https://www.52pojie.cn/thread-1779984-1-1.html
源码编译似乎有点麻烦,静态导入dobby
 1
 2
 3
 4
 5
 6
 7
 8
 9
10
11
12
|
include_directories(
        dobby
)
add_library(local_dobby STATIC IMPORTED)
set_target_properties(local_dobby PROPERTIES IMPORTED_LOCATION ${CMAKE_CURRENT_SOURCE_DIR}/../../../libs/${ANDROID_ABI}/libdobby.a)
target_link_libraries(dpt
            ${log-lib}
        MINIZIP::minizip
        local_dobby
        bytehook
        ${android-lib}
        )
|
-
Bhook
参考https://github.com/bytedance/bhook/blob/main/README.zh-CN.md
build.gradle添加bhook依赖
1
2
3
4
5
6
7
8
9
|
android {
    buildFeatures {
        prefab true
    }
}

dependencies {
    implementation 'com.bytedance:bytehook:1.1.1'
}
|
CMakeLists.txt添加如下设置
1
2
3
4
|
//其中mylib 表示需要使用bhook的模块名,也就是将这些模块和bytehook链接
find_package(bytehook REQUIRED CONFIG)  // 获取bytehook包
add_library(mylib SHARED mylib.c)		//用户模块
target_link_libraries(mylib bytehook::bytehook)	//链接用户模块和bytehook
|
Hook后的LoadMethod主要工作如下

ThirdProxyApplication.java
相对FirstProxyApplication.java改动如下:
-
System.loadLibrary(“androidshell”)
主动加载壳程序的so,设置hook
-
writeByteBuffersToDirectory
用于将壳dex中提取的源dex字节数组写为文件
-
copyClassesCodesFiles
用于将dex文件对应的codes文件复制到和dex相同的私有目录
  1
  2
  3
  4
  5
  6
  7
  8
  9
 10
 11
 12
 13
 14
 15
 16
 17
 18
 19
 20
 21
 22
 23
 24
 25
 26
 27
 28
 29
 30
 31
 32
 33
 34
 35
 36
 37
 38
 39
 40
 41
 42
 43
 44
 45
 46
 47
 48
 49
 50
 51
 52
 53
 54
 55
 56
 57
 58
 59
 60
 61
 62
 63
 64
 65
 66
 67
 68
 69
 70
 71
 72
 73
 74
 75
 76
 77
 78
 79
 80
 81
 82
 83
 84
 85
 86
 87
 88
 89
 90
 91
 92
 93
 94
 95
 96
 97
 98
 99
100
101
102
103
104
105
106
107
108
109
110
111
112
113
114
115
116
117
118
119
120
121
122
123
124
125
126
127
128
129
130
131
132
133
134
135
136
137
138
139
140
141
142
143
144
145
146
147
148
149
150
151
152
153
154
155
156
157
158
159
160
161
162
163
164
165
166
167
168
169
170
171
172
173
174
175
176
177
178
179
180
181
182
183
184
185
186
187
188
189
190
191
192
193
194
195
196
197
198
199
200
201
202
203
204
205
206
207
208
209
210
211
212
213
214
215
216
217
218
219
220
221
222
223
224
225
226
227
228
229
230
231
232
233
234
235
236
237
238
239
240
241
242
243
244
245
246
247
248
249
250
251
252
253
254
255
256
257
258
259
260
261
262
263
264
265
266
267
268
269
270
271
272
273
274
275
276
277
278
279
280
281
282
283
284
285
286
287
288
289
290
291
292
293
294
295
296
297
298
299
300
301
302
303
304
305
306
307
308
309
310
311
312
313
314
315
316
317
318
319
320
321
322
323
324
325
326
327
328
329
330
331
332
333
334
335
336
337
338
339
340
341
342
343
344
345
346
347
348
349
350
351
352
353
354
355
356
357
358
359
360
361
362
363
364
365
366
367
368
369
370
371
|
package com.example.androidshell;

import android.app.Application;
import android.app.Instrumentation;
import android.content.Context;
import android.content.pm.ApplicationInfo;
import android.content.pm.PackageManager;
import android.content.res.AssetManager;
import android.os.Bundle;
import android.util.ArrayMap;
import android.util.Log;

import java.io.BufferedInputStream;
import java.io.BufferedOutputStream;
import java.io.ByteArrayOutputStream;
import java.io.File;
import java.io.FileInputStream;
import java.io.FileOutputStream;
import java.io.IOException;
import java.io.InputStream;
import java.lang.ref.WeakReference;
import java.nio.ByteBuffer;
import java.nio.ByteOrder;
import java.util.ArrayList;
import java.util.Iterator;
import java.util.zip.ZipEntry;
import java.util.zip.ZipInputStream;

import dalvik.system.DexClassLoader;

public class ThirdProxyApplication extends Application {
    private final String TAG="glass";
    private String dexPath;
    private String odexPath;
    private String libPath;
    public void log(String message){Log.d(TAG,message);}

    @Override
    protected void attachBaseContext(Context base) {
        super.attachBaseContext(base);
        log("ThirdProxyApplication.attachBaseContext is running!");
        System.loadLibrary("androidshell");     //主动加载so,设置hook,进行指令回填
        log("Load libandroidshell.so succeed!");
        try {
            //初始化相关环境
            initEnvironments();
            //配置加载源程序的动态环境,即替换mClassLoader
            replaceClassLoader();
        } catch (Exception e) {
            log( Log.getStackTraceString(e));
        }
    }
    @Override
    public void onCreate() {
        super.onCreate();
        log("ThirdProxyApplication.onCreate is running!");
        if(replaceApplication())
            log("Replace Application succeed!");
    }

    private void initEnvironments() throws IOException {
        //1.设置相关目录和路径
        File dex = getDir("tmp_dex", MODE_PRIVATE);     // 私有目录,存放dex文件
        //File lib = getDir("tmp_lib", MODE_PRIVATE);       // lib可使用默认目录
        //libPath = lib.getAbsolutePath();
        odexPath = dex.getAbsolutePath();
        libPath=this.getApplicationInfo().nativeLibraryDir; //默认lib路径
        dexPath =this.getApplicationInfo().sourceDir;   //当前base.apk路径
        //2.从当前base.apk读取classes.dex并读取为字节数组
        byte[] shellDexData = readDexFromApk();
        log("Get classes.dex from base.apk succeed!");
        //3.从壳dex文件中分离出源dex文件
        ByteBuffer[] byteBuffers = extractDexFilesFromShellDex(shellDexData);
        //4.将源dex文件依次写入私有目录
        writeByteBuffersToDirectory(byteBuffers, odexPath);
        //5.将codes文件依次写入私有目录
        copyClassesCodesFiles(this, odexPath);
        //6.拼接dex目录字符串,设置dex文件路径 DexClassLoader支持传递多个dex文件路径以加载多个dex文件,通过':'分隔路径
        StringBuffer dexFiles=new StringBuffer();
        for(File file:dex.listFiles()){
            if(file.getName().contains(".codes"))
                continue;
            dexFiles.append(file.getAbsolutePath());
            dexFiles.append(":");
        }
        dexPath=dexFiles.toString();
    }
    private void writeByteBuffersToDirectory(ByteBuffer[] byteBuffers, String directoryPath) throws IOException {
        // 创建目录对象
        File directory = new File(directoryPath);
        // 检查目录是否存在,不存在则创建
        if (!directory.exists()) {
            if (!directory.mkdirs()) {
                throw new IOException("无法创建目录: " + directoryPath);
            }
        }

        // 遍历 ByteBuffer 数组
        for (int i = 0; i < byteBuffers.length; i++) {
            // 生成文件名
            String fileName;
            if (i == 0) {
                fileName = "classes.dex";
            } else {
                fileName = "classes" + (i + 1) + ".dex";
            }
            // 构建文件对象
            File file = new File(directory, fileName);
            // 创建文件输出流
            try (FileOutputStream fos = new FileOutputStream(file)) {
                // 获取 ByteBuffer 中的字节数组
                ByteBuffer buffer = byteBuffers[i];
                byte[] bytes = new byte[buffer.remaining()];
                buffer.get(bytes);
                // 将字节数组写入文件
                fos.write(bytes);
            }
        }
    }
    private void copyClassesCodesFiles(Context context, String targetDirectoryPath) {
        AssetManager assetManager = context.getAssets();
        try {
            // 获取 assets 目录下的所有文件和文件夹
            String[] files = assetManager.list("");
            if (files != null) {
                // 创建目标目录
                File targetDirectory = new File(targetDirectoryPath);
                if (!targetDirectory.exists()) {
                    if (!targetDirectory.mkdirs()) {
                        throw new IOException("无法创建目标目录: " + targetDirectoryPath);
                    }
                }
                for (String fileName : files) {
                    // 筛选以 classes 开头且以 .codes 结尾的文件
                    if (fileName.startsWith("classes") && fileName.endsWith(".codes")) {
                        try (InputStream inputStream = assetManager.open(fileName);
                             BufferedInputStream bis = new BufferedInputStream(inputStream);
                             FileOutputStream fos = new FileOutputStream(new File(targetDirectory, fileName));
                             BufferedOutputStream bos = new BufferedOutputStream(fos)) {

                            byte[] buffer = new byte[1024];
                            int bytesRead;
                            while ((bytesRead = bis.read(buffer)) != -1) {
                                bos.write(buffer, 0, bytesRead);
                            }
                        } catch (IOException e) {
                            e.printStackTrace();
                        }
                    }
                }
            }
        } catch (IOException e) {
            e.printStackTrace();
        }
    }

    // 从壳dex文件中提取源apk的dex并封装为ByteBuffer
    private ByteBuffer[] extractDexFilesFromShellDex(byte[] shellDexData) {
        int shellDexlength = shellDexData.length;
        //开始解析dex文件
        byte[] sourceDexsSizeByte = new byte[4];
        //读取源dexs的大小
        System.arraycopy(shellDexData,shellDexlength - 4, sourceDexsSizeByte,0,4);
        //转成bytebuffer,方便4byte转int
        ByteBuffer wrap = ByteBuffer.wrap(sourceDexsSizeByte);
        //将byte转成int, 加壳时,长度按小端存储
        int sourceDexsSizeInt = wrap.order(ByteOrder.LITTLE_ENDIAN).getInt();
        Log.d(TAG, "源dex集合的大小: " + sourceDexsSizeInt);
        //读取源dexs
        byte[] sourceDexsData = new byte[sourceDexsSizeInt];
        System.arraycopy(shellDexData,shellDexlength - sourceDexsSizeInt - 4, sourceDexsData, 0, sourceDexsSizeInt);
        //解密源dexs
        sourceDexsData = decrypt(sourceDexsData);

        //更新部分
        //从源dexs中分离dex
        ArrayList<byte[]> sourceDexList = new ArrayList<>();
        int pos = 0;
        while(pos < sourceDexsSizeInt){
            //先提取四个字节,描述当前dex的大小
            //开始解析dex文件
            byte[] singleDexSizeByte = new byte[4];
            //读取源dexs的大小
            System.arraycopy(sourceDexsData, pos, singleDexSizeByte,0,4);
            //转成bytebuffer,方便4byte转int
            ByteBuffer singleDexwrap = ByteBuffer.wrap(singleDexSizeByte);
            int singleDexSizeInt = singleDexwrap.order(ByteOrder.LITTLE_ENDIAN).getInt();
            Log.d(TAG, "当前Dex的大小: " + singleDexSizeInt);
            //读取单独dex
            byte[] singleDexData = new byte[singleDexSizeInt];
            System.arraycopy(sourceDexsData,pos + 4, singleDexData, 0, singleDexSizeInt);
            //加入到dexlist中
            sourceDexList.add(singleDexData);
            //更新pos
            pos += 4 + singleDexSizeInt;
        }

        //将dexlist包装成ByteBuffer
        int dexNum = sourceDexList.size();
        Log.d(TAG, "源dex的数量: " + dexNum);
        ByteBuffer[] dexBuffers = new ByteBuffer[dexNum];
        for (int i = 0; i < dexNum; i++){
            dexBuffers[i] = ByteBuffer.wrap(sourceDexList.get(i));
        }

        return dexBuffers;

    }
    // 从当前程序的apk读取dex文件并存储为字节数组
    private byte[] readDexFromApk() throws IOException {
        //1.获取当前应用程序的源码路径(apk),一般是data/app目录下,该目录用于存放用户安装的软件
        String sourceDir = this.getApplicationInfo().sourceDir;
        log("this.getApplicationInfo().sourceDir: " +sourceDir);

        //2.创建相关输入流
        FileInputStream fileInputStream = new FileInputStream(sourceDir);
        BufferedInputStream bufferedInputStream = new BufferedInputStream(fileInputStream);
        ZipInputStream zipInputStream = new ZipInputStream(bufferedInputStream); //用于解析apk文件

        ByteArrayOutputStream byteArrayOutputStream = new ByteArrayOutputStream(); //用于存放dex文件

        //3.遍历apk的所有文件并提取dex文件
        ZipEntry zipEntry;
        while((zipEntry = zipInputStream.getNextEntry()) != null){ //存在下一个文件
            // 将classes.dex文件存储到bytearray中 壳dex和源apk合并后只保留一个dex便于处理
            if (zipEntry.getName().equals("classes.dex")){
                byte[] bytes = new byte[1024];
                int num;
                while((num = zipInputStream.read(bytes))!=-1){      //每次读取1024byte,返回读取到的byte数
                    byteArrayOutputStream.write(bytes,0, num); //存放到开辟的byteArrayOutputStream中
                }
            }
            zipInputStream.closeEntry(); //关闭当前文件
        }
        zipInputStream.close();

        log("Read dex from apk succeed!");
        return byteArrayOutputStream.toByteArray(); //将读取到的dex文件以字节数组形式返回
    }
    // 解密
    private byte[] decrypt(byte[] data) {
        for (int i = 0; i < data.length; i++){
            data[i] ^= (byte) 0xff;
        }
        return data;

    }
    //替换壳程序LoadedApk的Application为源程序Application,并调用其onCreate方法
    private boolean replaceApplication(){
        // Application实例存在于: LoadedApk.mApplication
        // 以及ActivityThread的mInitialApplication和mAllApplications和mBoundApplication

        //判断源程序是否使用自定义Application 若使用则需要进行替换,若未使用则直接返回,使用壳的默认Application即可

        String appClassName = null; //源程序的Application类名
        try {
            //获取AndroidManifest.xml 文件中的 <meta-data> 元素
            ApplicationInfo applicationInfo = getPackageManager().getApplicationInfo(this.getPackageName(), PackageManager.GET_META_DATA);
            Bundle metaData = applicationInfo.metaData;
            //获取xml文件声明的Application类
            if (metaData != null && metaData.containsKey("APPLICATION_CLASS_NAME")){
                appClassName = metaData.getString("APPLICATION_CLASS_NAME");
            } else {
                log("源程序中没有自定义Application");
                return false; //如果不存在直接返回,使用壳的application即可
            }
        } catch (PackageManager.NameNotFoundException e) {
            log(Log.getStackTraceString(e));
        }

        //源程序存在自定义application类,开始替换
        log("Try to replace Application");

        //1.反射获取ActivityThread实例
        Object sCurrentActivityThreadObj = Reflection.getStaticField("android.app.ActivityThread","sCurrentActivityThread");
        log("ActivityThread: " + sCurrentActivityThreadObj.toString());

        //2.获取并设置LoadedApk
        //获取mBoundApplication (AppBindData对象)
        Object mBoundApplicationObj = Reflection.getField("android.app.ActivityThread",sCurrentActivityThreadObj,"mBoundApplication") ;
        log("mBoundApplication: "+mBoundApplicationObj.toString());
        //获取mBoundApplication.info (即LoadedApk)
        Object infoObj = Reflection.getField("android.app.ActivityThread$AppBindData",mBoundApplicationObj,"info");
        log( "LoadedApk: " + infoObj.toString());
        //把LoadedApk的mApplication设置为null,这样后续才能调用makeApplication() 否则由于已存在Application,无法进行替换
        Reflection.setField("android.app.LoadedApk","mApplication",infoObj,null);

        //3.获取ActivityThread.mInitialApplication 即拿到旧的Application(对于要加载的Application来讲)
        Object mInitialApplicationObj = Reflection.getField("android.app.ActivityThread",sCurrentActivityThreadObj,"mInitialApplication");
        log("mInitialApplicationObj: " + mInitialApplicationObj.toString());

        //4.获取ActivityThread.mAllApplications并删除旧的application
        ArrayList<Application> mAllApplicationsObj = (ArrayList<Application>) Reflection.getField("android.app.ActivityThread",sCurrentActivityThreadObj,"mAllApplications");
        mAllApplicationsObj.remove(mInitialApplicationObj);
        log("mInitialApplication 从 mAllApplications 中移除成功");

        //5.重置相关类的Application类名 便于后续创建Application
        //获取LoadedApk.mApplicationInfo
        ApplicationInfo applicationInfo = (ApplicationInfo) Reflection.getField("android.app.LoadedApk",infoObj,"mApplicationInfo");
        log( "LoadedApk.mApplicationInfo: " + applicationInfo.toString());
        //获取mBoundApplication.appInfo
        ApplicationInfo appinfoInAppBindData = (ApplicationInfo) Reflection.getField("android.app.ActivityThread$AppBindData",mBoundApplicationObj,"appInfo");
        log("ActivityThread.mBoundApplication.appInfo: " + appinfoInAppBindData.toString());
        //此处通过引用修改值,虽然后续没有使用,但是实际上是修改其指向的LoadedApk相关字段的值
        //设置两个appinfo的classname为源程序的application类名,以便后续调用makeApplication()创建源程序的application
        applicationInfo.className = appClassName;
        appinfoInAppBindData.className = appClassName;
        log("Source Application name: " + appClassName);

        //6.反射调用makeApplication方法创建源程序的application
        Application application = (Application) Reflection.invokeMethod("android.app.LoadedApk","makeApplication",infoObj,new Class[]{boolean.class, Instrumentation.class},new Object[]{false,null}); //使用源程序中的application
        //Application app = (Application)ReflectionMethods.invokeMethod("android.app.LoadedApk","makeApplication",infoObj,new Class[]{boolean.class, Instrumentation.class},new Object[]{true,null}); //使用自定义的application 强制为系统默认
        log("Create source Application succeed: "+application);

        //7.重置ActivityThread.mInitialApplication为新的Application
        Reflection.setField("android.app.ActivityThread","mInitialApplication",sCurrentActivityThreadObj,application);
        log("Reset ActivityThread.mInitialApplication by new Application succeed!");

        //8.ContentProvider会持有代理的Application,需要特殊处理一下
        ArrayMap mProviderMap = (ArrayMap) Reflection.getField("android.app.ActivityThread",sCurrentActivityThreadObj,"mProviderMap");
        log("ActivityThread.mProviderMap: " + mProviderMap);

        //获取所有provider,装进迭代器中遍历
        Iterator iterator = mProviderMap.values().iterator();
        while(iterator.hasNext()){
            Object providerClientRecord = iterator.next();
            //获取ProviderClientRecord.mLocalProvider,可能为空
            Object mLocalProvider = Reflection.getField("android.app.ActivityThread$ProviderClientRecord",providerClientRecord,"mLocalProvider") ;
            if(mLocalProvider != null){
                log("ProviderClientRecord.mLocalProvider: " + mLocalProvider);
                //获取ContentProvider中的mContext字段,设置为新的Application
                Reflection.setField("android.content.ContentProvider","mContext",mLocalProvider,application);
            }
        }

        log( "Run Application.onCreate" );
        application.onCreate(); //源程序,启动!
        return true;
    }
    // 替换壳App的ClassLoader为源App的ClassLoader
    private void replaceClassLoader() {
        //1.获取当前的classloader
        ClassLoader classLoader = this.getClassLoader();
        log("Current ClassLoader: " + classLoader.toString());
        log("Parent ClassLoader: " + classLoader.getParent().toString());

        //2.反射获取ActivityThread
        Object sCurrentActivityThreadObj = Reflection.getStaticField("android.app.ActivityThread","sCurrentActivityThread");
        log("ActivityThread.sCurrentActivityThread: " + sCurrentActivityThreadObj.toString());

        //3.反射获取LoadedApk
        //获取当前ActivityThread实例的mPackages字段 类型为ArrayMap<String, WeakReference<LoadedApk>>, 里面存放了当前应用的LoadedApk对象
        ArrayMap mPackagesObj = (ArrayMap) Reflection.getField("android.app.ActivityThread",sCurrentActivityThreadObj,"mPackages");
        log( "mPackagesObj: " + mPackagesObj.toString());

        //获取mPackages中的当前应用包名
        String currentPackageName = this.getPackageName();
        log("currentPackageName: " + currentPackageName);

        // 获取loadedApk实例也有好几种,mInitialApplication mAllApplications mPackages
        // 通过包名获取当前应用的loadedApk实例
        WeakReference weakReference = (WeakReference) mPackagesObj.get(currentPackageName);
        Object loadedApkObj = weakReference.get();
        log( "LoadedApk: " + loadedApkObj.toString());

        //4.替换ClassLoader
        DexClassLoader dexClassLoader = new DexClassLoader(dexPath, odexPath,libPath, classLoader.getParent()); //动态加载源程序的dex文件,以当前classloader的父加载器作为parent
        Reflection.setField("android.app.LoadedApk","mClassLoader",loadedApkObj,dexClassLoader); //替换当前loadedApk实例中的mClassLoader字段
        log("New DexClassLoader: " + dexClassLoader);
    }
}
|
shell.cpp
主要提供以下功能:
-
hook execve
主要目的是禁止dex2oat,防止dex文件被优化
-
hook mmap
使dex文件可写,用于后续指令回填
-
hook LoadMethod
loadmethod用于加载dex文件的方法,可获取dex文件引用和codeoff
hook劫持后执行codes文件解析和指令回填
  1
  2
  3
  4
  5
  6
  7
  8
  9
 10
 11
 12
 13
 14
 15
 16
 17
 18
 19
 20
 21
 22
 23
 24
 25
 26
 27
 28
 29
 30
 31
 32
 33
 34
 35
 36
 37
 38
 39
 40
 41
 42
 43
 44
 45
 46
 47
 48
 49
 50
 51
 52
 53
 54
 55
 56
 57
 58
 59
 60
 61
 62
 63
 64
 65
 66
 67
 68
 69
 70
 71
 72
 73
 74
 75
 76
 77
 78
 79
 80
 81
 82
 83
 84
 85
 86
 87
 88
 89
 90
 91
 92
 93
 94
 95
 96
 97
 98
 99
100
101
102
103
104
105
106
107
108
109
110
111
112
113
114
115
116
117
118
119
120
121
122
123
124
125
126
127
128
129
130
131
132
133
134
135
136
137
138
139
140
141
142
143
144
145
146
147
148
149
150
151
152
153
154
155
156
157
158
159
160
161
162
163
164
165
166
167
168
169
170
171
172
173
174
175
176
177
178
179
180
181
182
183
184
185
186
187
188
189
190
191
192
193
194
195
196
197
198
199
200
201
202
203
204
205
206
207
208
209
210
211
212
213
214
215
216
217
218
219
220
221
222
223
224
225
226
227
228
229
230
231
232
233
234
235
236
237
238
239
240
241
242
243
244
245
246
247
248
249
250
251
252
253
254
255
256
257
258
259
260
261
262
263
264
265
266
267
268
269
270
271
272
273
274
275
276
277
278
279
280
281
282
283
284
285
286
287
288
289
290
291
292
293
294
295
296
297
298
299
300
301
302
303
304
305
306
307
308
309
310
311
312
313
314
315
316
317
318
319
320
321
322
323
324
325
326
327
328
329
330
331
332
333
334
335
336
|
#include <jni.h>
#include <string>
#include <unistd.h>
#include <map>
#include <fstream>
#include <stdlib.h>
#include <elf.h>
#include <dlfcn.h>
#include "android/log.h"
#include "sys/mman.h"
#include "bytehook.h"
#include "dobby/dobby.h"
#include "dex/DexFile.h"
#include "dex/CodeItem.h"
#include "dex/class_accessor.h"
#define TAG "glass"
#define logd(...) __android_log_print(ANDROID_LOG_DEBUG, TAG, __VA_ARGS__);
#define logi(...) __android_log_print(ANDROID_LOG_INFO , TAG, __VA_ARGS__);
#define loge(...) __android_log_print(ANDROID_LOG_ERROR, TAG, __VA_ARGS__);

// sdk版本,用于兼容适配
int APILevel;
// 函数声明
void hook();
void hookExecve();
void hookMmap();
void hook_LoadMethod();

// 抽取代码文件,与源.dex在同一私有目录
std::string codeFilePostfix = ".codes";

//dex文件名->codeOff->CodeItem 每个dex文件对应一个map,每个map内的codeoff对应一个CodeItem
std::map<std::string,std::map<uint32_t, CodeItem>> codeMapList;

//art/runtime/class_linker.h
// 函数声明
static void (*g_originLoadMethod)(void* thiz,
                                  const DexFile* dex_file,
                                  ClassAccessor::Method* method,
                                  void* klass,
                                  void* dst);
/*//Android 10-14 原型如下
void LoadMethod(const DexFile& dex_file,
                const ClassAccessor::Method& method,
                Handle<mirror::Class> klass,
                ArtMethod* dst);
*/


// Tool functions

// 以二进制形式读取整个文件,返回字节数组并返回文件长度
uint8_t* readFileToBytes(const std::string fileName,size_t* readSize) {
    FILE *file = fopen(fileName.c_str(), "rb");
    if (file == NULL) {
        logd("Error opening file");
        fclose(file);
        return NULL;
    }
    fseek(file, 0,SEEK_END);
    size_t fileSize = ftell(file);
    fseek(file, 0,SEEK_SET);
    uint8_t *buffer = (uint8_t *) malloc(fileSize);
    if (buffer == NULL) {
        logd("Error allocating memory\n");
        fclose(file);
        return NULL;
    }
    size_t bytesRead = fread(buffer, 1, fileSize, file);
    if(bytesRead!=fileSize) {
        logd("Read bytes not equal file size!\n");
        free(buffer);
        fclose(file);
        return NULL;
    }
    fclose(file);
    if(readSize)
        *readSize=bytesRead;
    return buffer;
}

// 4字节数组转uint32_t
uint32_t bytes2uint32(unsigned char * bytes){
    uint32_t retnum = 0;
    for(int i = 3;i >=0;i--){
        retnum <<= 8;
        retnum |= bytes[i];
    }
    return retnum;
}

const char * getArtLibPath() {
    if(APILevel < 29) {
        return "/system/lib64/libart.so";
    } else if(APILevel == 29) {
        return "/apex/com.android.runtime/lib64/libart.so";
    } else {
        return "/apex/com.android.art/lib64/libart.so";
    }
}

const char * getArtBaseLibPath() {
    if(APILevel == 29) {
        return "/apex/com.android.runtime/lib64/libartbase.so";
    } else {
        return "/apex/com.android.art/lib64/libartbase.so";
    }
}

const char* find_symbol_in_elf_file(const char *elf_file,int keyword_count,...) {
    FILE *elf_fp = fopen(elf_file, "r");
    if (elf_fp) {
        // 获取elf文件大小
        fseek(elf_fp, 0L, SEEK_END);
        size_t lib_size = ftell(elf_fp);
        fseek(elf_fp, 0L, SEEK_SET);
        // 读取elf文件数据
        char *data = (char *) calloc(lib_size, 1);
        fread(data, 1, lib_size, elf_fp);
        char *elf_bytes_data = data;
        // elf头
        Elf64_Ehdr *ehdr = (Elf64_Ehdr *) elf_bytes_data;
        // 节头
        Elf64_Shdr *shdr = (Elf64_Shdr *) (((uint8_t *) elf_bytes_data) + ehdr->e_shoff);
        va_list kw_list;
        // 遍历节
        for (int i = 0; i < ehdr->e_shnum; i++) {
            // 字符串表
            if (shdr->sh_type == SHT_STRTAB) {
                const char *str_base = (char *) ((uint8_t *) elf_bytes_data + shdr->sh_offset);
                char *ptr = (char *) str_base;
                // 遍历字符串表
                for (int k = 0; ptr < (str_base + shdr->sh_size); k++) {
                    const char *item_value = ptr;
                    size_t item_len = strnlen(item_value, 128);
                    ptr += (item_len + 1);
                    if (item_len == 0) {
                        continue;
                    }
                    int match_count = 0;
                    va_start(kw_list, keyword_count);
                    for (int n = 0; n < keyword_count; n++) {
                        const char *keyword = va_arg(kw_list, const char*);
                        if (strstr(item_value, keyword)) {
                            match_count++;
                        }
                    }
                    va_end(kw_list);
                    if (match_count == keyword_count) {
                        return item_value;
                    }
                }
                break;
            }
            shdr++;
        }
        fclose(elf_fp);
        free(data);
    }
    return nullptr;
}

const char * getClassLinkerDefineClassLibPath(){
    return getArtLibPath();
}


const char * getClassLinkerDefineClassSymbol() {
    const char * sym = find_symbol_in_elf_file(getClassLinkerDefineClassLibPath(),2,"ClassLinker","DefineClass");
    return sym;
}


const char * getClassLinkerLoadMethodLibPath(){
    return getArtLibPath();
}

//获取ClassLinker::LoadMethod真实符号名
const char * getClassLinkerLoadMethodSymbol() {
    const char * sym = find_symbol_in_elf_file(getClassLinkerLoadMethodLibPath(),2,"ClassLinker","LoadMethod");
    return sym;
}

//获取libart真实名称
const char * getArtLibName() {
    //Android 10及以后变为libartbase.so
    return APILevel >= 29 ? "libartbase.so" : "libart.so";
}

// 禁用dex2oat
int fakeExecve(const char *pathname, char *const argv[], char *const envp[]) {
    BYTEHOOK_STACK_SCOPE();
    // 禁用dex2oat
    if (strstr(pathname, "dex2oat") != nullptr) {
        errno = EACCES;
        return -1;
    }
    return BYTEHOOK_CALL_PREV(fakeExecve, pathname, argv, envp);
}

void hookExecve(){
    bytehook_stub_t stub = bytehook_hook_single(
            getArtLibName(),
            "libc.so",
            "execve",
            (void *) fakeExecve,
            nullptr,
            nullptr);
    if (stub != nullptr) {
        logd("hook execve done");
    }
}

//为dex文件添加可写权限
void* fakeMmap(void * __addr, size_t __size, int __prot, int __flags, int __fd, off_t __offset){
    BYTEHOOK_STACK_SCOPE();
    int prot = __prot;
    int hasRead = (__prot & PROT_READ) == PROT_READ;
    int hasWrite = (__prot & PROT_WRITE) == PROT_WRITE;
    // 添加写权限
    if(hasRead && !hasWrite) {
        prot |= PROT_WRITE;
    }
    void * addr = BYTEHOOK_CALL_PREV(fakeMmap, __addr, __size, prot, __flags, __fd, __offset);
    return addr;
}

void hookMmap(){
    bytehook_stub_t stub = bytehook_hook_single(
            getArtLibName(),
            "libc.so",
            "mmap",
            (void *) fakeMmap,
            nullptr,
            nullptr);
    if(stub != nullptr){
        logd("hook mmap done");
    }
}

// 解析抽取代码文件,每个dex.codes只解析一次
void parseExtractedCodeFiles(const std::string& dexPath){
    //1.读取代码文件为字节数组
    std::string codeFilePath=dexPath+codeFilePostfix;
    logd("Code File Path: %s",codeFilePath.c_str());
    size_t codeBytesLen = 0;
    uint8_t* codeBytes = readFileToBytes(codeFilePath, &codeBytesLen);
    if(codeBytes == nullptr || codeBytesLen == 0) {
        logd("Code file not found!")
        return;
    }
    logd("CodeFile: %s Len:%#llx", codeFilePath.c_str(),codeBytesLen);

    // 2.解析代码字节数组
    size_t offset=0;
    while(offset<codeBytesLen){
        uint8_t* pointer = codeBytes + offset;  //每个结构的起点指针
        uint32_t codeOff = bytes2uint32(pointer); // 4字节CodeOff和4字节InsnSize
        uint32_t insnSize = bytes2uint32(pointer+4);
        if(codeOff == 0 || insnSize == 0){
            logd("CodeOff or InsnSize equals 0!")
            break;
        }
        logd("CodeOff: %#x InsnSize: %#x", codeOff, insnSize);
        // 创建抽取代码对象
        CodeItem codeItem = CodeItem(insnSize, pointer+8);
        // 添加一组CodeOff:CodeItem映射
        codeMapList[dexPath].insert(std::pair<uint32_t, CodeItem>(codeOff, codeItem));
        logd("CodeItem codeOff: %#x insnSize: %#x has created!", codeOff, insnSize);
        offset += 8 + insnSize*2; //跳过CodeOff,InsnSize和Insn[]
    }
}

// 回填dex的方法代码,每次只回填一个Method
void innerLoadMethod(void* thiz, const DexFile* dexFile, ClassAccessor::Method* method, void* klass, void* dest){
    // dex文件路径
    std::string location = dexFile->location_;
    //logd("Load Dex File Location: %s",location.c_str())
    // 判断是否为解密释放的dex文件,位于私有目录内
    if(location.find("app_tmp_dex") == std::string::npos){
        return;
    }
    // 如果未解析过dexCodes文件则进行解析,每个dex文件只解析一次,创建对应的map<CodeOff,CodeItem>映射
    if(codeMapList.find(location)==codeMapList.end()){
        logd("Parse dex file %s codes",location.c_str());
        codeMapList[location]=std::map<uint32_t,CodeItem>(); //创建新的codeMap
        parseExtractedCodeFiles(location);
    }
    // 不存在DexCode 直接跳过
    if(method->code_off_==0){
        return;
    }
    // 指令地址
    uint8_t* codeAddr = (uint8_t*)(dexFile->begin_ + method->code_off_ + 16); //insn结构前面有16字节

    //logd("MethodCodeOff: %d",method->code_off_);
    // 回填指令
    std::map<uint32_t,CodeItem> codeMap=codeMapList[location];
    // 似乎没有走到回填指令处 (注意c++浅拷贝问题,不能随意delete)
    if(codeMap.find(method->code_off_) != codeMap.end()){
        CodeItem codeItem = codeMap[method->code_off_];
        memcpy(codeAddr,codeItem.getInsns(),codeItem.getInsnsSize()*2); //注意指令为u2类型,长度需要*2
    }
}

void newLoadMethod(void* thiz, const DexFile* dex_file, ClassAccessor::Method* method, void* klass, void* dest){
    if(g_originLoadMethod!= nullptr){
        // 先回填指令,再调用
        innerLoadMethod(thiz,dex_file,method,klass,dest);
        g_originLoadMethod(thiz,dex_file,method, klass, dest);
    }
    return;
}

void hook_LoadMethod(){
    void * loadMethodAddress =  DobbySymbolResolver(getClassLinkerLoadMethodLibPath(),getClassLinkerLoadMethodSymbol());
    DobbyHook(loadMethodAddress, (void *) newLoadMethod, (void **) &g_originLoadMethod);
    logd("hook LoadMethod done");
}

// 初始函数,实现hook
extern "C"
void _init(){
    APILevel = android_get_device_api_level();
    logd("Android API Level: %d", APILevel)
    logd("Setting hook...")
    hook();
}
// hook
void hook(){
    bytehook_init(BYTEHOOK_MODE_AUTOMATIC, false);
    hookExecve();   // 禁用dex2oat
    hookMmap();     // 使dex文件可写
    //hook_DefineClass(); //需手动解析ClassDef
    hook_LoadMethod();  // 加载方法时回填指令
}
|
十. 加固工具测试
主要测试第三代加固,其中包括了动态加载和代码抽取与回填
使用frida-dexdump和blackdex尝试脱壳
加壳程序代码文件: ThirdAndroidShell.py
参数:
执行命令后,自动执行相关操作,成功时输出如下,加壳合并测试程序NativeDemo.apk和壳程序ThirdShell.apk为NewApk.apk:
1
|
python ThirdAndroidShell.py -src <源程序Apk路径> -shell <壳程序Apk路径> -out <加壳后的Apk路径>
|

安装并运行输出的NewApk.apk,查看logcat日志结果如下:
-
运行到壳代理类ThirdProxyApplication的attachBaseContext中时,由于主动调用了System.loadLibrary加载壳so,所以先执行了so的init函数并进行hook,此时由于没有执行源程序相关Java层代码所以没有触发Dex指令回填

-
首先从base.apk提取壳Dex进而提取源Dex,最后替换ClassLoader
-
之后需要进行替换Application等操作,由于执行源程序的Java层代码所以触发了Dex指令回填,进行codes文件解析并创建CodeItem对象

-
代码回填和替换Application结束后,成功运行源程序Application的attachBaseContext和onCreate方法,最终运行MainActivity.onCreate进入源程序生命周期

Jadx分析被保护程序结果如下:
- 由于动态加载Dex,无法直接查看关键类

- 代码抽取效果如下,方法体为空

- 方法体smali代码全部置为nop指令

另外经测试frida-dexdump和blackdex得到的是被抽空的Dex文件,暂不清楚为什么没有进行内存搜索,也可能脱壳姿势不对
十一. ClassLoader加载Dex流程详解
Dex文件的加载依赖于Android的ClassLoader,共有3个相关的ClassLoader:

完整流程图如下

以下分析基于Android 10.0.0_r47
Path/DexClassLoader Java层
调用链如下
1
2
3
4
5
6
7
8
|
BaseDexClassLoader()
 ├─ new DexPathList
 │  └─ DexPathList.makeDexElements
 │      └─ DexPathList.loadDexFile
 │          └─ new DexFile
 │ 			└─ DexFile::loadDex
 │              └─ DexFile.openDexFile
 └─────────────────└─ DexFile.openDexFileNative
|
BaseDexClassLoader
 1
 2
 3
 4
 5
 6
 7
 8
 9
10
11
12
13
14
15
16
17
18
19
20
21
22
23
24
25
|
//libcore/dalvik/src/main/java/dalvik/system/DexClassLoader.java
public class DexClassLoader extends BaseDexClassLoader {
    public DexClassLoader(String dexPath, String optimizedDirectory,
            String librarySearchPath, ClassLoader parent) {
        super(dexPath, null, librarySearchPath, parent);
    }
}

//libcore/dalvik/src/main/java/dalvik/system/PathClassLoader.java
public class PathClassLoader extends BaseDexClassLoader {
    public PathClassLoader(String dexPath, ClassLoader parent) {
        super(dexPath, null, null, parent);
    }

    public PathClassLoader(String dexPath, String librarySearchPath, ClassLoader parent) {
        super(dexPath, null, librarySearchPath, parent);
    }

    @libcore.api.CorePlatformApi
    public PathClassLoader(
            String dexPath, String librarySearchPath, ClassLoader parent,
            ClassLoader[] sharedLibraryLoaders) {
        super(dexPath, librarySearchPath, parent, sharedLibraryLoaders);
    }
}
|
DexClassLoader和PathClassLoader都继承自BaseDexClassLoader,并且都调用这个4参数的构造方法重载
该构造方法内部主要是创建了DexPathList类
 1
 2
 3
 4
 5
 6
 7
 8
 9
10
|
//libcore/dalvik/src/main/java/dalvik/system/BaseDexClassLoader.java
public BaseDexClassLoader(String dexPath, File optimizedDirectory,
                          String librarySearchPath, ClassLoader parent) {
    super(parent);
    this.pathList = new DexPathList(this, dexPath, librarySearchPath, null);

    if (reporter != null) {
        reporter.report(this.pathList.getDexPaths());
    }
}
|
DexPathList::DexPathList
DexPathList构造方法代码如下,可以发现这条调用链中,optimizedDirectory=null,isTrusted=false
调用makeDexElements
 1
 2
 3
 4
 5
 6
 7
 8
 9
10
11
12
13
14
15
16
17
18
19
20
21
22
23
24
25
26
27
28
29
30
31
32
33
34
35
36
37
38
39
40
41
|
//libcore/dalvik/src/main/java/dalvik/system/DexPathList.java
	@UnsupportedAppUsage
    public DexPathList(ClassLoader definingContext, String dexPath,
            String librarySearchPath, File optimizedDirectory) {
        this(definingContext, dexPath, librarySearchPath, optimizedDirectory, false);
    }

    DexPathList(ClassLoader definingContext, String dexPath,
            String librarySearchPath, File optimizedDirectory, boolean isTrusted) {
		// 部分检测逻辑
		......

        this.definingContext = definingContext;

        ArrayList<IOException> suppressedExceptions = new ArrayList<IOException>();
        // save dexPath for BaseDexClassLoader
        this.dexElements = makeDexElements(splitDexPath(dexPath), optimizedDirectory,
                                           suppressedExceptions, definingContext, isTrusted);

        // Native libraries may exist in both the system and
        // application library paths, and we use this search order:
        //
        //   1. This class loader's library path for application libraries (librarySearchPath):
        //   1.1. Native library directories
        //   1.2. Path to libraries in apk-files
        //   2. The VM's library path from the system property for system libraries
        //      also known as java.library.path
        //
        // This order was reversed prior to Gingerbread; see http://b/2933456.
        this.nativeLibraryDirectories = splitPaths(librarySearchPath, false);
        this.systemNativeLibraryDirectories =
                splitPaths(System.getProperty("java.library.path"), true);
        this.nativeLibraryPathElements = makePathElements(getAllNativeLibraryDirectories());

        if (suppressedExceptions.size() > 0) {
            this.dexElementsSuppressedExceptions =
                suppressedExceptions.toArray(new IOException[suppressedExceptions.size()]);
        } else {
            dexElementsSuppressedExceptions = null;
        }
    }
|
DexPathList::makeDexElements
遍历所有文件,寻找dex文件并调用loadDexFile加载dex文件
 1
 2
 3
 4
 5
 6
 7
 8
 9
10
11
12
13
14
15
16
17
18
19
20
21
22
23
24
25
26
27
28
29
30
31
32
33
34
35
36
37
38
39
40
41
42
43
44
45
46
47
48
49
50
51
52
53
54
55
56
57
58
59
60
61
62
63
64
65
66
67
68
69
70
71
72
|
//libcore/dalvik/src/main/java/dalvik/system/DexPathList.java
	@UnsupportedAppUsage
    private static Element[] makeDexElements(List<File> files, File optimizedDirectory,
            List<IOException> suppressedExceptions, ClassLoader loader) {
        return makeDexElements(files, optimizedDirectory, suppressedExceptions, loader, false);
    }


    private static Element[] makeDexElements(List<File> files, File optimizedDirectory,
            List<IOException> suppressedExceptions, ClassLoader loader, boolean isTrusted) {
      Element[] elements = new Element[files.size()];
      int elementsPos = 0;
      /*
       * Open all files and load the (direct or contained) dex files up front.
       */
       // 遍历传入的所有文件
      for (File file : files) {
          if (file.isDirectory()) {//文件夹
              // We support directories for looking up resources. Looking up resources in
              // directories is useful for running libcore tests.
              elements[elementsPos++] = new Element(file);
          } else if (file.isFile()) {//文件
              String name = file.getName();

              DexFile dex = null;
              if (name.endsWith(DEX_SUFFIX)) {//通过后缀DEX_SUFFIX=".dex"判断dex文件
                  // Raw dex file (not inside a zip/jar).
                  try {
                      // 调用loadDexFile直接加载dex文件
                      dex = loadDexFile(file, optimizedDirectory, loader, elements);
                      if (dex != null) {
                          elements[elementsPos++] = new Element(dex, null);
                      }
                  } catch (IOException suppressed) {
                      System.logE("Unable to load dex file: " + file, suppressed);
                      suppressedExceptions.add(suppressed);
                  }
              } else {
                  try {
                      //尝试调用loadDexFile加载zip文件中的dex
                      dex = loadDexFile(file, optimizedDirectory, loader, elements);
                  } catch (IOException suppressed) {
                      // zip文件中没有dex文件
                      /*
                       * IOException might get thrown "legitimately" by the DexFile constructor if
                       * the zip file turns out to be resource-only (that is, no classes.dex file
                       * in it).
                       * Let dex == null and hang on to the exception to add to the tea-leaves for
                       * when findClass returns null.
                       */
                      suppressedExceptions.add(suppressed);
                  }

                  // 将文件添加至elements数组
                  if (dex == null) {
                      elements[elementsPos++] = new Element(file);
                  } else {
                      elements[elementsPos++] = new Element(dex, file);
                  }
              }
              if (dex != null && isTrusted) {
                dex.setTrusted();
              }
          } else {
              System.logW("ClassLoader referenced unknown path: " + file);
          }
      }
      if (elementsPos != elements.length) {
          elements = Arrays.copyOf(elements, elementsPos);
      }
      return elements;
    }
|
DexFile::loadDexFile
Android系统中,如果应用程序是首次启动,则对dex文件优化,并在cache/dalvik-cache目录下生成缓存文件,加快应用启动速度
optimizedDirectory即缓存文件所在路径,默认为cache/dalvik-cache目录
如果没有对应缓存文件,则调用DexFile解析dex文件(并进行优化)
如果有缓存文件,则调用DexFile.loadDex解析缓存文件
 1
 2
 3
 4
 5
 6
 7
 8
 9
10
11
12
13
14
|
//libcore/dalvik/src/main/java/dalvik/system/DexPathList.java
	@UnsupportedAppUsage
    private static DexFile loadDexFile(File file, File optimizedDirectory, ClassLoader loader,
                                       Element[] elements)
            throws IOException {
        if (optimizedDirectory == null) {
            // 没有优化后的缓存文件,调用DexFile进行解析并优化dex
            return new DexFile(file, loader, elements);
        } else {
            // 存在优化后的缓存文件,调用DexFile.loadDex解析并加载缓存文件
            String optimizedPath = optimizedPathFor(file, optimizedDirectory);
            return DexFile.loadDex(file.getPath(), optimizedPath, 0, loader, elements);
        }
    }
|
DexFile::DexFile
内部调用openDexFile方法
 1
 2
 3
 4
 5
 6
 7
 8
 9
10
11
12
13
|
//libcore/dalvik/src/main/java/dalvik/system/DexFile.java
 	DexFile(File file, ClassLoader loader, DexPathList.Element[] elements)
            throws IOException {
        this(file.getPath(), loader, elements);
    }

	DexFile(String fileName, ClassLoader loader, DexPathList.Element[] elements)
            throws IOException {
        mCookie = openDexFile(fileName, null, 0, loader, elements);
        mInternalCookie = mCookie;
        mFileName = fileName;
        //System.out.println("DEX FILE cookie is " + mCookie + " fileName=" + fileName);
    }
|
另外存在一个接收ByteBuffer[]的重载,内部调用openInMemoryDexFiles,应是用于InMemoryDexClassLoader加载dex
以及一个5参数的重载,内部也是调用openDexFile
 1
 2
 3
 4
 5
 6
 7
 8
 9
10
11
12
13
14
15
16
|
    DexFile(ByteBuffer[] bufs, ClassLoader loader, DexPathList.Element[] elements)
            throws IOException {
        mCookie = openInMemoryDexFiles(bufs, loader, elements);
        mInternalCookie = mCookie;
        mFileName = null;
    }
   private DexFile(String sourceName, String outputName, int flags, ClassLoader loader,
            DexPathList.Element[] elements) throws IOException {
        if (outputName != null) {
			......
        }
        mCookie = openDexFile(sourceName, outputName, flags, loader, elements);
        mInternalCookie = mCookie;
        mFileName = sourceName;
        //System.out.println("DEX FILE cookie is " + mCookie + " sourceName=" + sourceName + " outputName=" + outputName);
    }
|
DexFile::loadDex
内部调用了DexFile,之后的流程同上,最终调用openDexFile
 1
 2
 3
 4
 5
 6
 7
 8
 9
10
11
12
|
//libcore/dalvik/src/main/java/dalvik/system/DexFile.java
	@Deprecated
    static public DexFile loadDex(String sourcePathName, String outputPathName,
        int flags) throws IOException {
        return loadDex(sourcePathName, outputPathName, flags, null, null);
    }

    @UnsupportedAppUsage
    static DexFile loadDex(String sourcePathName, String outputPathName,
        int flags, ClassLoader loader, DexPathList.Element[] elements) throws IOException {
        return new DexFile(sourcePathName, outputPathName, flags, loader, elements);
    }
|
DexFile::openDexFile
最终调用openDexFileNative这个Native方法
 1
 2
 3
 4
 5
 6
 7
 8
 9
10
11
12
|
    @UnsupportedAppUsage
    private static Object openDexFile(String sourceName, String outputName, int flags,
            ClassLoader loader, DexPathList.Element[] elements) throws IOException {
        // Use absolute paths to enable the use of relative paths when testing on host.
        return openDexFileNative(new File(sourceName).getAbsolutePath(),
                                 (outputName == null)
                                     ? null
                                     : new File(outputName).getAbsolutePath(),
                                 flags,
                                 loader,
                                 elements);
    }
|
另外有openInMemoryDexFiles和openInMemoryDexFilesNative代码如下
 1
 2
 3
 4
 5
 6
 7
 8
 9
10
11
12
13
14
15
16
17
18
|
    private static Object openInMemoryDexFiles(ByteBuffer[] bufs, ClassLoader loader,
            DexPathList.Element[] elements) throws IOException {
        // Preprocess the ByteBuffers for openInMemoryDexFilesNative. We extract
        // the backing array (non-direct buffers only) and start/end positions
        // so that the native method does not have to call Java methods anymore.
        byte[][] arrays = new byte[bufs.length][];
        int[] starts = new int[bufs.length];
        int[] ends = new int[bufs.length];
        for (int i = 0; i < bufs.length; ++i) {
            arrays[i] = bufs[i].isDirect() ? null : bufs[i].array();
            starts[i] = bufs[i].position();
            ends[i] = bufs[i].limit();
        }
        return openInMemoryDexFilesNative(bufs, arrays, starts, ends, loader, elements);
    }

    private static native Object openInMemoryDexFilesNative(ByteBuffer[] bufs, byte[][] arrays,
            int[] starts, int[] ends, ClassLoader loader, DexPathList.Element[] elements);
|
Path/DexClassLoader Native层
无论是PathClassLoader还是DexClassLoader,最终调用JNI函数DexFile::openDexFileNative
Native层对应函数为art/runtime/native/dalvik_system_DexFile.cc的DexFile_openDexFileNative
调用链如下
 1
 2
 3
 4
 5
 6
 7
 8
 9
10
11
|
DexFile_openDexFileNative()
 ├─ OpenDexFilesFromOat
 │  └─ ArtDexFileLoader::Open
 │      └─ OpenAndReadMagic
 │         OpenWithMagic
 │          └─ ArtDexFileLoader::OpenFile
 │              └─ ArtDexFileLoader::OpenCommon
 │                  └─ DexFileLoader::OpenCommon
 │                       magic == "dex\n" new StandardDexFile
 │                       magic == "cdex"  new CompactDexFile
 └———————————————————————└─ DexFile::DexFile()
|
DexFile_openDexFileNative
关键为调用OatFileManager.OpenDexFilesFromOat(),打开OAT文件
 1
 2
 3
 4
 5
 6
 7
 8
 9
10
11
12
13
14
15
16
17
18
19
20
21
22
23
24
25
|
//art/runtime/native/dalvik_system_DexFile.cc
// TODO(calin): clean up the unused parameters (here and in libcore).
static jobject DexFile_openDexFileNative(JNIEnv* env,
                                         jclass,
                                         jstring javaSourceName,
                                         jstring javaOutputName ATTRIBUTE_UNUSED,
                                         jint flags ATTRIBUTE_UNUSED,
                                         jobject class_loader,
                                         jobjectArray dex_elements) {
  ScopedUtfChars sourceName(env, javaSourceName);
  if (sourceName.c_str() == nullptr) {
    return nullptr;
  }

  std::vector<std::string> error_msgs;
  const OatFile* oat_file = nullptr;
  // 打开oat文件
  std::vector<std::unique_ptr<const DexFile>> dex_files =
      Runtime::Current()->GetOatFileManager().OpenDexFilesFromOat(sourceName.c_str(),
                                                                  class_loader,
                                                                  dex_elements,
                                                                  /*out*/ &oat_file,
                                                                  /*out*/ &error_msgs);
  return CreateCookieFromOatFileManagerResult(env, dex_files, oat_file, error_msgs);
}
|
OatFileManager::OpenDexFilesFromOat
以上代码大致流程如下(Android 8.0的流程和此处有部分区别,使用DexFile::Open加载dex文件):
- 通过oat_file_assistant()获取oat_file_assistant对象
- 通过oat_file_assistant.GetBestOatFile()获取oat文件
- 调用oat_file_assistant.LoadDexFiles()从oat文件中加载dex文件
- 如果从oat文件中加载dex文件失败,则调用ArtDexFileLoader::Open()加载dex文件
 1
 2
 3
 4
 5
 6
 7
 8
 9
10
11
12
13
14
15
16
17
18
19
20
21
22
23
24
25
26
27
28
29
30
31
32
33
34
35
36
37
38
39
40
41
42
43
44
45
46
47
48
49
50
51
52
53
54
55
56
57
58
59
60
61
62
63
64
65
66
67
68
69
70
71
72
73
74
75
76
77
78
79
80
81
82
83
84
85
86
87
88
89
90
91
92
93
94
95
96
97
98
|
//art/runtime/oat_file_manager.cc#447
std::vector<std::unique_ptr<const DexFile>> OatFileManager::OpenDexFilesFromOat(
    const char* dex_location,
    jobject class_loader,
    jobjectArray dex_elements,
    const OatFile** out_oat_file,
    std::vector<std::string>* error_msgs) {
	......
  // 1.获取OatFileAssistant
  OatFileAssistant oat_file_assistant(dex_location,
                                      kRuntimeISA,
                                      !runtime->IsAotCompiler(),
                                      only_use_system_oat_files_);

  // 2.通过oat_file_assistant.GetBestOatFile获取oat文件
  // Get the oat file on disk.
  std::unique_ptr<const OatFile> oat_file(oat_file_assistant.GetBestOatFile().release());
  VLOG(oat) << "OatFileAssistant(" << dex_location << ").GetBestOatFile()="
            << reinterpret_cast<uintptr_t>(oat_file.get())
            << " (executable=" << (oat_file != nullptr ? oat_file->IsExecutable() : false) << ")";

  const OatFile* source_oat_file = nullptr;
  CheckCollisionResult check_collision_result = CheckCollisionResult::kPerformedHasCollisions;
  std::string error_msg;
  if ((class_loader != nullptr || dex_elements != nullptr) && oat_file != nullptr) {
    check_collision_result = CheckCollision(oat_file.get(), context.get(), /*out*/ &error_msg);
    bool accept_oat_file = AcceptOatFile(check_collision_result);
      ......
      //冲突检测
  }

  std::vector<std::unique_ptr<const DexFile>> dex_files;

  // 从oat文件加载dex文件
  // Load the dex files from the oat file.
  if (source_oat_file != nullptr) {
    bool added_image_space = false;
    if (source_oat_file->IsExecutable()) {
        ......
        // oat镜像处理
    }
    if (!added_image_space) {
      DCHECK(dex_files.empty());
      // 3.调用LoadDexFiles从oat文件加载dex文件
      dex_files = oat_file_assistant.LoadDexFiles(*source_oat_file, dex_location);

      // Register for tracking.
      // 注册跟踪
      for (const auto& dex_file : dex_files) {
        dex::tracking::RegisterDexFile(dex_file.get());
      }
    }
    // 从oat加载dex文件失败
    if (dex_files.empty()) {
      error_msgs->push_back("Failed to open dex files from " + source_oat_file->GetLocation());
    } else {
      // Opened dex files from an oat file, madvise them to their loaded state.
       for (const std::unique_ptr<const DexFile>& dex_file : dex_files) {
         OatDexFile::MadviseDexFile(*dex_file, MadviseState::kMadviseStateAtLoad);
       }
    }
  }

  // Fall back to running out of the original dex file if we couldn't load any
  // dex_files from the oat file.
  if (dex_files.empty()) {
    if (oat_file_assistant.HasOriginalDexFiles()) {//判断是否存在原始dex文件
      if (Runtime::Current()->IsDexFileFallbackEnabled()) {//是否启用了dex文件的回退机制
        static constexpr bool kVerifyChecksum = true;
        const ArtDexFileLoader dex_file_loader;
        // 4.调用ArtDexFileLoader::Open打开dex文件
        if (!dex_file_loader.Open(dex_location,
                                  dex_location,
                                  Runtime::Current()->IsVerificationEnabled(),
                                  kVerifyChecksum,
                                  /*out*/ &error_msg,
                                  &dex_files)) {
          LOG(WARNING) << error_msg;
          error_msgs->push_back("Failed to open dex files from " + std::string(dex_location)
                                + " because: " + error_msg);
        }
      } else {
        error_msgs->push_back("Fallback mode disabled, skipping dex files.");
      }
    } else {
      error_msgs->push_back("No original dex files found for dex location "
          + std::string(dex_location));
    }
  }

  if (Runtime::Current()->GetJit() != nullptr) {
    ScopedObjectAccess soa(self);
    Runtime::Current()->GetJit()->RegisterDexFiles(
        dex_files, soa.Decode<mirror::ClassLoader>(class_loader));
  }

  return dex_files;
}
|
OatFileAssistant::GetBestOatFile
首先调用GetBestInfo()获取最佳的oat文件信息
然后调用ReleaseFileForUse()方法根据oat文件的状态释放文件以供使用(默认使用最新状态的oat文件)
 1
 2
 3
 4
 5
 6
 7
 8
 9
10
11
12
13
14
15
16
17
18
19
20
21
22
23
24
25
26
27
28
29
30
31
32
33
34
35
36
37
38
39
40
41
42
43
44
45
46
47
48
49
50
51
52
53
54
55
56
57
58
59
60
61
62
63
64
|
//art/runtime/oat_file_assistant.cc
std::unique_ptr<OatFile> OatFileAssistant::GetBestOatFile() {
  return GetBestInfo().ReleaseFileForUse();
}

OatFileAssistant::OatFileInfo& OatFileAssistant::GetBestInfo() {

  if (dex_parent_writable_ || UseFdToReadFiles()) {
    // 父目录可写,选择odex
    return odex_;
  }
  // 父目录不可写,说明是系统app,如果oat文件可用则选择oat文件
  if (oat_.IsUseable()) {
    return oat_;
  }

  // oat文件不可用,如果odex文件为最新则使用odex
  if (odex_.Status() == kOatUpToDate) {
    return odex_;
  }

  // oat文件不可用,odex部不为最新,若存在原始oat则使用
  if (HasOriginalDexFiles()) {
    return oat_;
  }

  // 最糟糕的情况,有什么选什么
  // We got into the worst situation here:
  // - the oat location is not usable
  // - the prebuild odex location is not up to date
  // - and we don't have the original dex file anymore (stripped).
  // Pick the odex if it exists, or the oat if not.
  return (odex_.Status() == kOatCannotOpen) ? oat_ : odex_;
}

std::unique_ptr<OatFile> OatFileAssistant::OatFileInfo::ReleaseFileForUse() {
  // 若oat文件为最新,则释放文件直接使用
  if (Status() == kOatUpToDate) {
    return ReleaseFile();
  }

  VLOG(oat) << "Oat File Assistant: No relocated oat file found,"
    << " attempting to fall back to interpreting oat file instead.";

  switch (Status()) {
    case kOatBootImageOutOfDate:
      // OutOfDate may be either a mismatched image, or a missing image.
      if (oat_file_assistant_->HasOriginalDexFiles()) {
        // If there are original dex files, it is better to use them (to avoid a potential
        // quickening mismatch because the boot image changed).
        break;
      }
      // If we do not accept the oat file, we may not have access to dex bytecode at all. Grudgingly
      // go forward.
      FALLTHROUGH_INTENDED;

    case kOatUpToDate:
    case kOatCannotOpen:
    case kOatDexOutOfDate:
      break;
  }

  return std::unique_ptr<OatFile>();
}
|
OatFileAssistant::OatFileInfo::Status方法如下
 1
 2
 3
 4
 5
 6
 7
 8
 9
10
11
12
13
14
15
16
17
18
19
20
21
22
23
24
25
26
27
28
29
30
31
32
33
34
35
36
37
38
39
40
41
42
43
44
45
46
47
48
49
50
51
52
53
54
55
56
|
OatFileAssistant::OatStatus OatFileAssistant::OatFileInfo::Status() {
  if (!status_attempted_) {
    status_attempted_ = true;
      //打开oat文件
    const OatFile* file = GetFile();
    if (file == nullptr) {
      // Check to see if there is a vdex file we can make use of.
      std::string error_msg;
      std::string vdex_filename = GetVdexFilename(filename_);
      std::unique_ptr<VdexFile> vdex;
      if (use_fd_) {
        if (vdex_fd_ >= 0) {
          struct stat s;
          int rc = TEMP_FAILURE_RETRY(fstat(vdex_fd_, &s));
          if (rc == -1) {
            error_msg = StringPrintf("Failed getting length of the vdex file %s.", strerror(errno));
          } else {
              //打开vdex文件
            vdex = VdexFile::Open(vdex_fd_,
                                  s.st_size,
                                  vdex_filename,
                                  /*writable=*/ false,
                                  /*low_4gb=*/ false,
                                  /*unquicken=*/ false,
                                  &error_msg);
          }
        }
      } else {
        vdex = VdexFile::Open(vdex_filename,
                              /*writable=*/ false,
                              /*low_4gb=*/ false,
                              /*unquicken=*/ false,
                              &error_msg);
      }
      if (vdex == nullptr) {
        status_ = kOatCannotOpen;
        VLOG(oat) << "unable to open vdex file " << vdex_filename << ": " << error_msg;
      } else {
        if (oat_file_assistant_->DexChecksumUpToDate(*vdex, &error_msg)) {
          // The vdex file does not contain enough information to determine
          // whether it is up to date with respect to the boot image, so we
          // assume it is out of date.
          VLOG(oat) << error_msg;
          status_ = kOatBootImageOutOfDate;
        } else {
          status_ = kOatDexOutOfDate;
        }
      }
    } else {
      status_ = oat_file_assistant_->GivenOatFileStatus(*file);
      VLOG(oat) << file->GetLocation() << " is " << status_
          << " with filter " << file->GetCompilerFilter();
    }
  }
  return status_;
}
|
OatFileAssistant::LoadDexFiles
- 通过OatFile::GetOatDexFile获取OatDexFile对象
- 通过OatDexFile::OpenDexFile打开dex文件并添加到DexFile数组中
- 遍历Oat文件,如果存在multidex则依次打开这些dex并添加到DexFile数组中
总而言之,该函数的作用是从Oat文件中打开dex文件并添加到DexFile数组
 1
 2
 3
 4
 5
 6
 7
 8
 9
10
11
12
13
14
15
16
17
18
19
20
21
22
23
24
25
26
27
28
29
30
31
32
33
34
35
36
37
38
39
40
41
42
43
44
45
46
47
48
49
50
51
52
53
54
55
56
|
//art/runtime/oat_file_assistant.cc
std::vector<std::unique_ptr<const DexFile>> OatFileAssistant::LoadDexFiles(
    const OatFile &oat_file, const char *dex_location) {
  std::vector<std::unique_ptr<const DexFile>> dex_files;
  // 调用3参数LoadDexFiles重载
  if (LoadDexFiles(oat_file, dex_location, &dex_files)) {
    return dex_files;
  } else {
    return std::vector<std::unique_ptr<const DexFile>>();
  }
}

bool OatFileAssistant::LoadDexFiles(
    const OatFile &oat_file,
    const std::string& dex_location,
    std::vector<std::unique_ptr<const DexFile>>* out_dex_files) {
  // Load the main dex file.
  std::string error_msg;
  //1.通过oat_file.GetOatDexFile获取OatDexFile对象
  const OatDexFile* oat_dex_file = oat_file.GetOatDexFile(
      dex_location.c_str(), nullptr, &error_msg);
  if (oat_dex_file == nullptr) {
    LOG(WARNING) << error_msg;
    return false;
  }

  //2.通过OatDexFile::OpenDexFile打开dex文件
  std::unique_ptr<const DexFile> dex_file = oat_dex_file->OpenDexFile(&error_msg);
  if (dex_file.get() == nullptr) {
    LOG(WARNING) << "Failed to open dex file from oat dex file: " << error_msg;
    return false;
  }
  //3.添加dex文件到dex_files数组中
  out_dex_files->push_back(std::move(dex_file));

  // Load the rest of the multidex entries
  //4.查看是否存在多个dex文件(multidex支持)
  for (size_t i = 1;; i++) {
    //从oat文件扫描并获取第i个dex文件
    std::string multidex_dex_location = DexFileLoader::GetMultiDexLocation(i, dex_location.c_str());
    oat_dex_file = oat_file.GetOatDexFile(multidex_dex_location.c_str(), nullptr);
    if (oat_dex_file == nullptr) {
      // There are no more multidex entries to load.
      break;
    }
	//打开第i个dex文件
    dex_file = oat_dex_file->OpenDexFile(&error_msg);
    if (dex_file.get() == nullptr) {
      LOG(WARNING) << "Failed to open dex file from oat dex file: " << error_msg;
      return false;
    }
    //添加dex文件到dex_files数组中
    out_dex_files->push_back(std::move(dex_file));
  }
  return true;
}
|
OatFile::GetOatDexFile
以dex_location作为key,在oat_dex_files_ map中查找oat_dex文件位置,经过校验后返回
 1
 2
 3
 4
 5
 6
 7
 8
 9
10
11
12
13
14
15
16
17
18
19
20
21
22
23
24
25
26
27
28
29
30
31
32
33
34
35
36
37
38
39
40
41
42
43
44
45
46
47
48
49
50
51
52
53
54
55
56
57
58
59
60
61
62
63
64
|
//art/runtime/oat_file.cc
const OatDexFile* OatFile::GetOatDexFile(const char* dex_location,
                                         const uint32_t* dex_location_checksum,
                                         std::string* error_msg) const {
  const OatDexFile* oat_dex_file = nullptr;
  std::string_view key(dex_location);
  // Try to find the key cheaply in the oat_dex_files_ map which holds dex locations
  // directly mentioned in the oat file and doesn't require locking.
  //通过key在oat_dex_files_ map中查找oat_dex文件的位置
  auto primary_it = oat_dex_files_.find(key);
  if (primary_it != oat_dex_files_.end()) {//dex文件不唯一
    oat_dex_file = primary_it->second;
    DCHECK(oat_dex_file != nullptr);
  } else {
    // This dex_location is not one of the dex locations directly mentioned in the
    // oat file. The correct lookup is via the canonical location but first see in
    // the secondary_oat_dex_files_ whether we've looked up this location before.
    MutexLock mu(Thread::Current(), secondary_lookup_lock_);
    auto secondary_lb = secondary_oat_dex_files_.lower_bound(key);
    if (secondary_lb != secondary_oat_dex_files_.end() && key == secondary_lb->first) {
      oat_dex_file = secondary_lb->second;  // May be null.
    } else {
      // We haven't seen this dex_location before, we must check the canonical location.
      std::string dex_canonical_location = DexFileLoader::GetDexCanonicalLocation(dex_location);
      if (dex_canonical_location != dex_location) {
        std::string_view canonical_key(dex_canonical_location);
        auto canonical_it = oat_dex_files_.find(canonical_key);
        if (canonical_it != oat_dex_files_.end()) {
          oat_dex_file = canonical_it->second;
        }  // else keep null.
      }  // else keep null.

      // Copy the key to the string_cache_ and store the result in secondary map.
      string_cache_.emplace_back(key.data(), key.length());
      std::string_view key_copy(string_cache_.back());
      secondary_oat_dex_files_.PutBefore(secondary_lb, key_copy, oat_dex_file);
    }
  }

  //获取oat_dex_file文件失败
  if (oat_dex_file == nullptr) {
    if (error_msg != nullptr) {
      std::string dex_canonical_location = DexFileLoader::GetDexCanonicalLocation(dex_location);
      *error_msg = "Failed to find OatDexFile for DexFile " + std::string(dex_location)
          + " (canonical path " + dex_canonical_location + ") in OatFile " + GetLocation();
    }
    return nullptr;
  }

  // 验证oat_dex_file文件的校验码
  if (dex_location_checksum != nullptr &&
      oat_dex_file->GetDexFileLocationChecksum() != *dex_location_checksum) {
    if (error_msg != nullptr) {
      std::string dex_canonical_location = DexFileLoader::GetDexCanonicalLocation(dex_location);
      std::string checksum = StringPrintf("0x%08x", oat_dex_file->GetDexFileLocationChecksum());
      std::string required_checksum = StringPrintf("0x%08x", *dex_location_checksum);
      *error_msg = "OatDexFile for DexFile " + std::string(dex_location)
          + " (canonical path " + dex_canonical_location + ") in OatFile " + GetLocation()
          + " has checksum " + checksum + " but " + required_checksum + " was required";
    }
    return nullptr;
  }
  return oat_dex_file;
}
|
OatDexFile::OpenDexFile
内部调用ArtDexFileLoader::Open
 1
 2
 3
 4
 5
 6
 7
 8
 9
10
11
12
13
14
15
|
//art/runtime/oat_file.cc
std::unique_ptr<const DexFile> OatDexFile::OpenDexFile(std::string* error_msg) const {
  ScopedTrace trace(__PRETTY_FUNCTION__);
  static constexpr bool kVerify = false;
  static constexpr bool kVerifyChecksum = false;
  const ArtDexFileLoader dex_file_loader;
  return dex_file_loader.Open(dex_file_pointer_,
                              FileSize(),
                              dex_file_location_,
                              dex_file_location_checksum_,
                              this,
                              kVerify,
                              kVerifyChecksum,
                              error_msg);
}
|
ArtDexFileLoader::Open
通过上述分析可以得知,在OatFileManager::OpenDexFilesFromOat中
OatFileAssistant::LoadDexFiles最终也调用ArtDexFileLoader::Open,参数个数有所区别
OatFileAssistant::LoadDexFiles内调用9参数的Open(比较奇怪,调用时只传递了8个参数,第9个container没传)
参数解释
- base: 指向dex文件的内存地址
- size: dex文件的大小
- location: dex文件的位置
- location_checksum: dex文件位置的校验和
- oat_dex_file: 指向OatDexFile对象的指针
- verify: 表示是否要对dex文件进行验证
- verify_checksum: 表示是否要验证dex文件的校验和
- error_msg: 指向错误信息字符串的指针
直接调用了ArtDexFileLoader::OpenCommon
 1
 2
 3
 4
 5
 6
 7
 8
 9
10
11
12
13
14
15
16
17
18
19
20
21
22
23
24
25
|
//art/libdexfile/dex/art_dex_file_loader.cc
std::unique_ptr<const DexFile> ArtDexFileLoader::Open(
    const uint8_t* base,
    size_t size,
    const std::string& location,
    uint32_t location_checksum,
    const OatDexFile* oat_dex_file,
    bool verify,
    bool verify_checksum,
    std::string* error_msg,
    std::unique_ptr<DexFileContainer> container) const {
  ScopedTrace trace(std::string("Open dex file from RAM ") + location);
  return OpenCommon(base,
                    size,
                    /*data_base=*/ nullptr,
                    /*data_size=*/ 0u,
                    location,
                    location_checksum,
                    oat_dex_file,
                    verify,
                    verify_checksum,
                    error_msg,
                    std::move(container),
                    /*verify_result=*/ nullptr);
}
|
OatFileManager::OpenDexFilesFromOat内部调用的6参数ArtDexFileLoader::Open,参数解释如下
- filename: dex文件名
- location: dex文件的位置
- verify_checksum: 表示是否要验证dex文件的校验和
- error_msg: 指向错误信息字符串的指针
- dex_files: 存储dex file的DexFile数组
内部调用了ArtDexFileLoader::OpenWithMagic,判断文件头,如果是zip则通过OpenZip打开,如果是dex则通过OpenFile打开
 1
 2
 3
 4
 5
 6
 7
 8
 9
10
11
12
13
14
15
16
17
18
19
20
21
22
23
24
25
26
27
28
29
30
31
32
33
34
35
36
37
38
39
40
41
42
43
44
45
46
47
48
49
50
|
//art/libdexfile/dex/art_dex_file_loader.cc
bool ArtDexFileLoader::Open(const char* filename,
                            const std::string& location,
                            bool verify,
                            bool verify_checksum,
                            std::string* error_msg,
                            std::vector<std::unique_ptr<const DexFile>>* dex_files) const {
  uint32_t magic;
  //打开文件并读取magic[8],OpenAndReadMagic可作为一个常用脱壳点,但此时dex还没加载到内存中
  File fd = OpenAndReadMagic(filename, &magic, error_msg);
  if (fd.Fd() == -1) {
    DCHECK(!error_msg->empty());
    return false;
  }
  return OpenWithMagic(
      magic, fd.Release(), location, verify, verify_checksum, error_msg, dex_files);
}

bool ArtDexFileLoader::OpenWithMagic(uint32_t magic,
                                     int fd,
                                     const std::string& location,
                                     bool verify,
                                     bool verify_checksum,
                                     std::string* error_msg,
                                     std::vector<std::unique_ptr<const DexFile>>* dex_files) const {
  ScopedTrace trace(std::string("Open dex file ") + std::string(location));
  DCHECK(dex_files != nullptr) << "DexFile::Open: out-param is nullptr";
  // 如果是zip文件头,通过OpenZip打开zip文件
  if (IsZipMagic(magic)) {
    return OpenZip(fd, location, verify, verify_checksum, error_msg, dex_files);
  }
  // 如果是dex文件头,通过ArtDexFileLoader::OpenFile打开并创建DexFile对象
  if (IsMagicValid(magic)) {
    std::unique_ptr<const DexFile> dex_file(OpenFile(fd,
                                                     location,
                                                     verify,
                                                     verify_checksum,
                                                     /* mmap_shared= */ false,
                                                     error_msg));
    if (dex_file.get() != nullptr) {
      //打开dex文件成功,添加到DexFile数组中
      dex_files->push_back(std::move(dex_file));
      return true;
    } else {
      return false;
    }
  }
  *error_msg = StringPrintf("Expected valid zip or dex file: '%s'", location.c_str());
  return false;
}
|
ArtDexFileLoader::OpenZip
内部调用OpenAllDexFilesFromZip
 1
 2
 3
 4
 5
 6
 7
 8
 9
10
11
12
13
14
15
16
|
bool ArtDexFileLoader::OpenZip(int fd,
                               const std::string& location,
                               bool verify,
                               bool verify_checksum,
                               std::string* error_msg,
                               std::vector<std::unique_ptr<const DexFile>>* dex_files) const {
  ScopedTrace trace("Dex file open Zip " + std::string(location));
  DCHECK(dex_files != nullptr) << "DexFile::OpenZip: out-param is nullptr";
  std::unique_ptr<ZipArchive> zip_archive(ZipArchive::OpenFromFd(fd, location.c_str(), error_msg));
  if (zip_archive.get() == nullptr) {
    DCHECK(!error_msg->empty());
    return false;
  }
  return OpenAllDexFilesFromZip(
      *zip_archive, location, verify, verify_checksum, error_msg, dex_files);
}
|
ArtDexFileLoader::OpenAllDexFilesFromZip
OpenAllDexFilesFromZip内部调用OpenOneDexFileFromZip打开dex文件
 1
 2
 3
 4
 5
 6
 7
 8
 9
10
11
12
13
14
15
16
17
18
19
20
21
22
23
24
25
26
27
28
29
30
31
32
33
34
35
36
37
38
39
40
41
42
43
44
45
46
47
48
49
50
51
52
53
54
55
56
57
58
59
60
61
62
|
bool ArtDexFileLoader::OpenAllDexFilesFromZip(
    const ZipArchive& zip_archive,
    const std::string& location,
    bool verify,
    bool verify_checksum,
    std::string* error_msg,
    std::vector<std::unique_ptr<const DexFile>>* dex_files) const {
  ScopedTrace trace("Dex file open from Zip " + std::string(location));
  DCHECK(dex_files != nullptr) << "DexFile::OpenFromZip: out-param is nullptr";
  DexFileLoaderErrorCode error_code;
  std::unique_ptr<const DexFile> dex_file(OpenOneDexFileFromZip(zip_archive,
                                                                kClassesDex,
                                                                location,
                                                                verify,
                                                                verify_checksum,
                                                                error_msg,
                                                                &error_code));
  if (dex_file.get() == nullptr) {
    return false;
  } else {
    // Had at least classes.dex.
    dex_files->push_back(std::move(dex_file));

    // Now try some more.

    // We could try to avoid std::string allocations by working on a char array directly. As we
    // do not expect a lot of iterations, this seems too involved and brittle.

    for (size_t i = 1; ; ++i) {
      std::string name = GetMultiDexClassesDexName(i);
      std::string fake_location = GetMultiDexLocation(i, location.c_str());
      std::unique_ptr<const DexFile> next_dex_file(OpenOneDexFileFromZip(zip_archive,
                                                                         name.c_str(),
                                                                         fake_location,
                                                                         verify,
                                                                         verify_checksum,
                                                                         error_msg,
                                                                         &error_code));
      if (next_dex_file.get() == nullptr) {
        if (error_code != DexFileLoaderErrorCode::kEntryNotFound) {
          LOG(WARNING) << "Zip open failed: " << *error_msg;
        }
        break;
      } else {
        dex_files->push_back(std::move(next_dex_file));
      }

      if (i == kWarnOnManyDexFilesThreshold) {
        LOG(WARNING) << location << " has in excess of " << kWarnOnManyDexFilesThreshold
                     << " dex files. Please consider coalescing and shrinking the number to "
                        " avoid runtime overhead.";
      }

      if (i == std::numeric_limits<size_t>::max()) {
        LOG(ERROR) << "Overflow in number of dex files!";
        break;
      }
    }

    return true;
  }
}
|
ArtDexFileLoader::OpenOneDexFileFromZip
OpenOneDexFileFromZip内部调用OpenCommon打开dex文件
 1
 2
 3
 4
 5
 6
 7
 8
 9
10
11
12
13
14
15
16
17
18
19
20
21
22
23
24
25
26
27
28
29
30
31
32
33
34
35
36
37
38
39
40
41
42
43
44
45
46
47
48
49
50
51
52
53
54
55
56
57
58
59
60
|
std::unique_ptr<const DexFile> ArtDexFileLoader::OpenOneDexFileFromZip(
    const ZipArchive& zip_archive,
    const char* entry_name,
    const std::string& location,
    bool verify,
    bool verify_checksum,
    std::string* error_msg,
    DexFileLoaderErrorCode* error_code) const {
  ScopedTrace trace("Dex file open from Zip Archive " + std::string(location));
  CHECK(!location.empty());
  //1.通过zip_archive.Find找到给定的dex文件
  std::unique_ptr<ZipEntry> zip_entry(zip_archive.Find(entry_name, error_msg));
  if (zip_entry == nullptr) {
    *error_code = DexFileLoaderErrorCode::kEntryNotFound;
    return nullptr;
  }
  if (zip_entry->GetUncompressedLength() == 0) {
    *error_msg = StringPrintf("Dex file '%s' has zero length", location.c_str());
    *error_code = DexFileLoaderErrorCode::kDexFileError;
    return nullptr;
  }

  MemMap map;
  if (zip_entry->IsUncompressed()) {
    //判断文件对齐
    if (!zip_entry->IsAlignedTo(alignof(DexFile::Header))) {
      // Do not mmap unaligned ZIP entries because
      // doing so would fail dex verification which requires 4 byte alignment.
      LOG(WARNING) << "Can't mmap dex file " << location << "!" << entry_name << " directly; "
                   << "please zipalign to " << alignof(DexFile::Header) << " bytes. "
                   << "Falling back to extracting file.";
    } else {
      //2.映射未压缩的文件,避免脏拷贝,例如lib库文件,arsc文件等
      // Map uncompressed files within zip as file-backed to avoid a dirty copy.
      map = zip_entry->MapDirectlyFromFile(location.c_str(), /*out*/error_msg);
      if (!map.IsValid()) {
        LOG(WARNING) << "Can't mmap dex file " << location << "!" << entry_name << " directly; "
                     << "is your ZIP file corrupted? Falling back to extraction.";
        // Try again with Extraction which still has a chance of recovery.
      }
    }
  }
  //...... MemMap检测
  //3.调用OpenCommon打开dex文件
  std::unique_ptr<DexFile> dex_file = OpenCommon(begin,
                                                 size,
                                                 /*data_base=*/ nullptr,
                                                 /*data_size=*/ 0u,
                                                 location,
                                                 zip_entry->GetCrc32(),
                                                 kNoOatDexFile,
                                                 verify,
                                                 verify_checksum,
                                                 error_msg,
                                                 std::make_unique<MemMapContainer>(std::move(map)),
                                                 &verify_result);
  // 合法性检测
  ......
  return dex_file;
}
|
ArtDexFileLoader::OpenFile
内部调用ArtDexFileLoader::OpenCommon打开dex文件
 1
 2
 3
 4
 5
 6
 7
 8
 9
10
11
12
13
14
15
16
17
18
19
20
21
22
23
24
25
26
27
28
29
30
31
32
33
34
35
36
37
38
39
40
41
42
43
44
45
46
47
48
49
50
51
52
53
54
55
56
57
58
59
60
61
62
63
64
65
66
67
68
69
70
71
|
std::unique_ptr<const DexFile> ArtDexFileLoader::OpenFile(int fd,
                                                          const std::string& location,
                                                          bool verify,
                                                          bool verify_checksum,
                                                          bool mmap_shared,
                                                          std::string* error_msg) const {
  ScopedTrace trace(std::string("Open dex file ") + std::string(location));
  CHECK(!location.empty());
  MemMap map;
  {
    File delayed_close(fd, /* check_usage= */ false);
    struct stat sbuf;
    memset(&sbuf, 0, sizeof(sbuf));
    if (fstat(fd, &sbuf) == -1) {
      *error_msg = StringPrintf("DexFile: fstat '%s' failed: %s", location.c_str(),
                                strerror(errno));
      return nullptr;
    }
    if (S_ISDIR(sbuf.st_mode)) {
      *error_msg = StringPrintf("Attempt to mmap directory '%s'", location.c_str());
      return nullptr;
    }
    size_t length = sbuf.st_size;
    //1.将dex文件映射到内存
    map = MemMap::MapFile(length,
                          PROT_READ,
                          mmap_shared ? MAP_SHARED : MAP_PRIVATE,
                          fd,
                          0,
                          /*low_4gb=*/false,
                          location.c_str(),
                          error_msg);
    if (!map.IsValid()) {
      DCHECK(!error_msg->empty());
      return nullptr;
    }
  }

  const uint8_t* begin = map.Begin();
  size_t size = map.Size();
  if (size < sizeof(DexFile::Header)) {
    *error_msg = StringPrintf(
        "DexFile: failed to open dex file '%s' that is too short to have a header",
        location.c_str());
    return nullptr;
  }

  const DexFile::Header* dex_header = reinterpret_cast<const DexFile::Header*>(begin);

  //2.调用OpenCommon打开dex文件
  std::unique_ptr<DexFile> dex_file = OpenCommon(begin,
                                                 size,
                                                 /*data_base=*/ nullptr,
                                                 /*data_size=*/ 0u,
                                                 location,
                                                 dex_header->checksum_,
                                                 kNoOatDexFile,
                                                 verify,
                                                 verify_checksum,
                                                 error_msg,
                                                 std::make_unique<MemMapContainer>(std::move(map)),
                                                 /*verify_result=*/ nullptr);

  // Opening CompactDex is only supported from vdex files.
  if (dex_file != nullptr && dex_file->IsCompactDexFile()) {
    *error_msg = StringPrintf("Opening CompactDex file '%s' is only supported from vdex files",
                              location.c_str());
    return nullptr;
  }
  return dex_file;
}
|
ArtDexFileLoader::OpenCommon
无论是ArtDexFileLoader::OpenZip还是ArtDexFileLoader::OpenFile,最终都调用OpenCommon打开dex文件(Android 7对应函数为OpenMemory)
内部调用了DexFileLoader::OpenCommon
 1
 2
 3
 4
 5
 6
 7
 8
 9
10
11
12
13
14
15
16
17
18
19
20
21
22
23
24
25
26
|
//art/libdexfile/dex/art_dex_file_loader.cc
std::unique_ptr<DexFile> ArtDexFileLoader::OpenCommon(const uint8_t* base,
                                                      size_t size,
                                                      const uint8_t* data_base,
                                                      size_t data_size,
                                                      const std::string& location,
                                                      uint32_t location_checksum,
                                                      const OatDexFile* oat_dex_file,
                                                      bool verify,
                                                      bool verify_checksum,
                                                      std::string* error_msg,
                                                      std::unique_ptr<DexFileContainer> container,
                                                      VerifyResult* verify_result) {
  return DexFileLoader::OpenCommon(base,
                                   size,
                                   data_base,
                                   data_size,
                                   location,
                                   location_checksum,
                                   oat_dex_file,
                                   verify,
                                   verify_checksum,
                                   error_msg,
                                   std::move(container),
                                   verify_result);
}
|
DexFileLoader::OpenCommon
- 根据不同情况,调用StandardDexFile或CompactDexFile的构造函数创建DexFile对象
- 如果magic == “dex\n”则证明dex文件是标准型的,调用new StandardDexFile()
- 如果magic == “cdex” 则证明dex文件是紧凑型的,调用new CompactDexFile()
- StandardDexFile与CompactDexFile都继承与DexFile,所以都会去调用DexFile::DexFile()构造函数
- 调用DexFile.Init方法进行初始化
- 调用DexFileVerifier::Verify对DexFile进行验证
- 返回DexFile
 1
 2
 3
 4
 5
 6
 7
 8
 9
10
11
12
13
14
15
16
17
18
19
20
21
22
23
24
25
26
27
28
29
30
31
32
33
34
35
36
37
38
39
40
41
42
43
44
45
46
47
48
49
50
51
52
53
54
55
56
57
58
59
60
61
62
63
64
65
66
67
68
69
70
71
72
73
74
75
76
77
78
79
|
//art/libdexfile/dex/dex_file_loader.cc
std::unique_ptr<DexFile> DexFileLoader::OpenCommon(const uint8_t* base,
                                                   size_t size,
                                                   const uint8_t* data_base,
                                                   size_t data_size,
                                                   const std::string& location,
                                                   uint32_t location_checksum,
                                                   const OatDexFile* oat_dex_file,
                                                   bool verify,
                                                   bool verify_checksum,
                                                   std::string* error_msg,
                                                   std::unique_ptr<DexFileContainer> container,
                                                   VerifyResult* verify_result) {
  if (verify_result != nullptr) {
    *verify_result = VerifyResult::kVerifyNotAttempted;
  }
  //1.创建DexFile对象
  std::unique_ptr<DexFile> dex_file;
  if (size >= sizeof(StandardDexFile::Header) && StandardDexFile::IsMagicValid(base)) {
    if (data_size != 0) {
      CHECK_EQ(base, data_base) << "Unsupported for standard dex";
    }
    //调用StandardDexFile构造函数进行创建,定义在art/libdexfile/dex/standard_dex_file.h,继承自DexFile
    dex_file.reset(new StandardDexFile(base,
                                       size,
                                       location,
                                       location_checksum,
                                       oat_dex_file,
                                       std::move(container)));
  } else if (size >= sizeof(CompactDexFile::Header) && CompactDexFile::IsMagicValid(base)) {
    if (data_base == nullptr) {
      // TODO: Is there a clean way to support both an explicit data section and reading the one
      // from the header.
      CHECK_EQ(data_size, 0u);
      const CompactDexFile::Header* const header = CompactDexFile::Header::At(base);
      data_base = base + header->data_off_;
      data_size = header->data_size_;
    }
    // 调用CompactDexFile构造函数进行创建,定义在art/libdexfile/dex/compact_dex_file.h,继承自DexFile
    dex_file.reset(new CompactDexFile(base,
                                      size,
                                      data_base,
                                      data_size,
                                      location,
                                      location_checksum,
                                      oat_dex_file,
                                      std::move(container)));
    // Disable verification for CompactDex input.
    verify = false;
  } else {
    *error_msg = "Invalid or truncated dex file";
  }
  if (dex_file == nullptr) {
    *error_msg = StringPrintf("Failed to open dex file '%s' from memory: %s", location.c_str(),
                              error_msg->c_str());
    return nullptr;
  }
  //2.init初始化dexfile
  if (!dex_file->Init(error_msg)) {
    dex_file.reset();
    return nullptr;
  }
  //3.对dexfile进行验证
  if (verify && !DexFileVerifier::Verify(dex_file.get(),
                                         dex_file->Begin(),
                                         dex_file->Size(),
                                         location.c_str(),
                                         verify_checksum,
                                         error_msg)) {
    if (verify_result != nullptr) {
      *verify_result = VerifyResult::kVerifyFailed;
    }
    return nullptr;
  }
  if (verify_result != nullptr) {
    *verify_result = VerifyResult::kVerifySucceeded;
  }
  return dex_file;
}
|
DexFile::Init
检查dex文件头和版本号
 1
 2
 3
 4
 5
 6
 7
 8
 9
10
11
12
13
14
15
16
17
18
19
20
21
22
23
24
25
26
27
28
29
30
|
//art/libdexfile/dex/dex_file.cc
bool DexFile::Init(std::string* error_msg) {
  if (!CheckMagicAndVersion(error_msg)) {
    return false;
  }
  return true;
}
bool DexFile::CheckMagicAndVersion(std::string* error_msg) const {
  if (!IsMagicValid()) {
    std::ostringstream oss;
    oss << "Unrecognized magic number in "  << GetLocation() << ":"
            << " " << header_->magic_[0]
            << " " << header_->magic_[1]
            << " " << header_->magic_[2]
            << " " << header_->magic_[3];
    *error_msg = oss.str();
    return false;
  }
  if (!IsVersionValid()) {
    std::ostringstream oss;
    oss << "Unrecognized version number in "  << GetLocation() << ":"
            << " " << header_->magic_[4]
            << " " << header_->magic_[5]
            << " " << header_->magic_[6]
            << " " << header_->magic_[7];
    *error_msg = oss.str();
    return false;
  }
  return true;
}
|
DexFileVerifier::Verify
检查dex文件头,maplist以及其他部分
 1
 2
 3
 4
 5
 6
 7
 8
 9
10
11
12
13
14
15
16
17
18
19
20
21
22
23
24
25
26
27
28
29
30
31
32
33
34
35
36
37
38
39
|
//art/libdexfile/dex/dex_file_verifier.cc
bool DexFileVerifier::Verify(const DexFile* dex_file,
                             const uint8_t* begin,
                             size_t size,
                             const char* location,
                             bool verify_checksum,
                             std::string* error_msg) {
  std::unique_ptr<DexFileVerifier> verifier(
      new DexFileVerifier(dex_file, begin, size, location, verify_checksum));
  if (!verifier->Verify()) {
    *error_msg = verifier->FailureReason();
    return false;
  }
  return true;
}

bool DexFileVerifier::Verify() {
  // Check the header.
  if (!CheckHeader()) {
    return false;
  }

  // Check the map section.
  if (!CheckMap()) {
    return false;
  }

  // Check structure within remaining sections.
  if (!CheckIntraSection()) {
    return false;
  }

  // Check references from one section to another.
  if (!CheckInterSection()) {
    return false;
  }

  return true;
}
|
DexFile::DexFile
StandardDexFile或CompactDexFile都继承自DexFile
构造函数DexFile():后的意思是赋值,将()中的变量依次赋值给()前的变量
该方法带有dex文件的base和size参数,所以可以作为一个脱壳点
内部调用了InitializeSectionsFromMapList
 1
 2
 3
 4
 5
 6
 7
 8
 9
10
11
12
13
14
15
16
17
18
19
20
21
22
23
24
25
26
27
28
29
30
31
32
33
34
35
36
37
38
39
40
41
|
//art/libdexfile/dex/dex_file.cc
DexFile::DexFile(const uint8_t* base,
                 size_t size,
                 const uint8_t* data_begin,
                 size_t data_size,
                 const std::string& location,
                 uint32_t location_checksum,
                 const OatDexFile* oat_dex_file,
                 std::unique_ptr<DexFileContainer> container,
                 bool is_compact_dex)
    : begin_(base),
      size_(size),
      data_begin_(data_begin),
      data_size_(data_size),
      location_(location),
      location_checksum_(location_checksum),
      header_(reinterpret_cast<const Header*>(base)),
      string_ids_(reinterpret_cast<const StringId*>(base + header_->string_ids_off_)),
      type_ids_(reinterpret_cast<const TypeId*>(base + header_->type_ids_off_)),
      field_ids_(reinterpret_cast<const FieldId*>(base + header_->field_ids_off_)),
      method_ids_(reinterpret_cast<const MethodId*>(base + header_->method_ids_off_)),
      proto_ids_(reinterpret_cast<const ProtoId*>(base + header_->proto_ids_off_)),
      class_defs_(reinterpret_cast<const ClassDef*>(base + header_->class_defs_off_)),
      method_handles_(nullptr),
      num_method_handles_(0),
      call_site_ids_(nullptr),
      num_call_site_ids_(0),
      hiddenapi_class_data_(nullptr),
      oat_dex_file_(oat_dex_file),
      container_(std::move(container)),
      is_compact_dex_(is_compact_dex),
      hiddenapi_domain_(hiddenapi::Domain::kApplication) {
  CHECK(begin_ != nullptr) << GetLocation();
  CHECK_GT(size_, 0U) << GetLocation();
  // Check base (=header) alignment.
  // Must be 4-byte aligned to avoid undefined behavior when accessing
  // any of the sections via a pointer.
  CHECK_ALIGNED(begin_, alignof(Header));

  InitializeSectionsFromMapList();
}
|
DexFile::InitializeSectionsFromMapList
通过dex文件中的map_list结构解析dex文件
 1
 2
 3
 4
 5
 6
 7
 8
 9
10
11
12
13
14
15
16
17
18
19
20
21
22
23
24
25
26
27
28
29
30
31
32
|
//art/libdexfile/dex/dex_file.cc
void DexFile::InitializeSectionsFromMapList() {
  const MapList* map_list = reinterpret_cast<const MapList*>(DataBegin() + header_->map_off_);
  if (header_->map_off_ == 0 || header_->map_off_ > DataSize()) {
    // Bad offset. The dex file verifier runs after this method and will reject the file.
    return;
  }
  const size_t count = map_list->size_;

  size_t map_limit = header_->map_off_ + count * sizeof(MapItem);
  if (header_->map_off_ >= map_limit || map_limit > DataSize()) {
    // Overflow or out out of bounds. The dex file verifier runs after
    // this method and will reject the file as it is malformed.
    return;
  }

  for (size_t i = 0; i < count; ++i) {
    const MapItem& map_item = map_list->list_[i];
    if (map_item.type_ == kDexTypeMethodHandleItem) {
      method_handles_ = reinterpret_cast<const MethodHandleItem*>(Begin() + map_item.offset_);
      num_method_handles_ = map_item.size_;
    } else if (map_item.type_ == kDexTypeCallSiteIdItem) {
      call_site_ids_ = reinterpret_cast<const CallSiteIdItem*>(Begin() + map_item.offset_);
      num_call_site_ids_ = map_item.size_;
    } else if (map_item.type_ == kDexTypeHiddenapiClassData) {
      hiddenapi_class_data_ = GetHiddenapiClassDataAtOffset(map_item.offset_);
    } else {
      // Pointers to other sections are not necessary to retain in the DexFile struct.
      // Other items have pointers directly into their data.
    }
  }
}
|
InMemoryDexClassLoader
以下代码分析基于Android 10.0_r47 https://cs.android.com/android/platform/superproject/+/android-10.0.0_r47
Android 8.0中新增了InMemoryDexClassLoader,包含以下2个重载
 1
 2
 3
 4
 5
 6
 7
 8
 9
10
11
12
13
14
15
16
17
|
//libcore/dalvik/src/main/java/dalvik/system/InMemoryDexClassLoader.java
public final class InMemoryDexClassLoader extends BaseDexClassLoader {

    public InMemoryDexClassLoader(ByteBuffer[] dexBuffers, ClassLoader parent) {
        super(dexBuffers, parent);//调用父类BaseDexClassLoader构造函数
    }

    public InMemoryDexClassLoader(ByteBuffer dexBuffer, ClassLoader parent) {
        this(new ByteBuffer[] { dexBuffer }, parent);//调用另一个重载
    }
}

//libcore/dalvik/src/main/java/dalvik/system/BaseDexClassLoader.java
public BaseDexClassLoader(ByteBuffer[] dexFiles, ClassLoader parent) {
    super(parent);
    this.pathList = new DexPathList(this, dexFiles);//通过DexPathList进行处理
}
|
但执行壳代码进行替换classloader时,容易出现找不到lib库的情况,可参考以下文章解决so找不到的问题:
https://blog.csdn.net/q610098308/article/details/105246355
http://www.yxhuang.com/2020/03/28/android-so-load/
Android 10.0中新增了一个重载,支持传递lib库路径
 1
 2
 3
 4
 5
 6
 7
 8
 9
10
11
12
13
14
15
16
|
//libcore/dalvik/src/main/java/dalvik/system/InMemoryDexClassLoader.java
public final class InMemoryDexClassLoader extends BaseDexClassLoader {
    public InMemoryDexClassLoader(@NonNull ByteBuffer @NonNull [] dexBuffers,
            @Nullable String librarySearchPath, @Nullable ClassLoader parent) {
        super(dexBuffers, librarySearchPath, parent);//调用父类BaseDexClassLoader构造函数
    }

    public InMemoryDexClassLoader(@NonNull ByteBuffer @NonNull [] dexBuffers,
            @Nullable ClassLoader parent) {
        this(dexBuffers, null, parent);//调用第1个重载
    }

    public InMemoryDexClassLoader(@NonNull ByteBuffer dexBuffer, @Nullable ClassLoader parent) {
        this(new ByteBuffer[] { dexBuffer }, parent);//调用第2个重载
    }
}
|
BaseDexClassLoader
InMemoryDexClassLoader继承自BaseDexClassLoader,对应方法在父类中实现,内部创建了DexPathList对象
1
2
3
4
5
6
7
|
//libcore/dalvik/src/main/java/dalvik/system/BaseDexClassLoader.java
	public BaseDexClassLoader(ByteBuffer[] dexFiles, String librarySearchPath, ClassLoader parent) {
        super(parent);
        this.sharedLibraryLoaders = null;
        this.pathList = new DexPathList(this, librarySearchPath);//创建对象并设置lib库目录
        this.pathList.initByteBufferDexPath(dexFiles);//根据字节流创建dex文件
    }
|
DexPathList::DexPathList
 1
 2
 3
 4
 5
 6
 7
 8
 9
10
11
12
13
14
15
|
//libcore/dalvik/src/main/java/dalvik/system/DexPathList.java
	public DexPathList(ClassLoader definingContext, String librarySearchPath) {
        if (definingContext == null) {
            throw new NullPointerException("definingContext == null");
        }

        this.definingContext = definingContext;
        //分割传入的lib库目录(支持通过一个String传递多个)
        this.nativeLibraryDirectories = splitPaths(librarySearchPath, false);
        //系统lib库目录
        this.systemNativeLibraryDirectories =
                splitPaths(System.getProperty("java.library.path"), true);
        //将所有lib库目录封装为NativeLibraryElement对象并添加到elements数组
        this.nativeLibraryPathElements = makePathElements(getAllNativeLibraryDirectories());
    }
|
getAllNativeLibraryDirectories代码如下,将传入的lib库和系统lib库目录添加到一起并返回
1
2
3
4
5
|
    private List<File> getAllNativeLibraryDirectories() {
        List<File> allNativeLibraryDirectories = new ArrayList<>(nativeLibraryDirectories);
        allNativeLibraryDirectories.addAll(systemNativeLibraryDirectories);
        return allNativeLibraryDirectories;
    }
|
DexPathList::makePathElements
 1
 2
 3
 4
 5
 6
 7
 8
 9
10
11
12
13
14
15
16
17
18
19
20
21
22
23
24
|
//libcore/dalvik/src/main/java/dalvik/system/DexPathList.java
	@UnsupportedAppUsage
    private static NativeLibraryElement[] makePathElements(List<File> files) {
        NativeLibraryElement[] elements = new NativeLibraryElement[files.size()];
        int elementsPos = 0;
        //遍历files,将存在的lib库封装为NativeLibraryElement对象,并添加到elements中
        for (File file : files) {
            String path = file.getPath();

            if (path.contains(zipSeparator)) {
                String split[] = path.split(zipSeparator, 2);
                File zip = new File(split[0]);
                String dir = split[1];
                elements[elementsPos++] = new NativeLibraryElement(zip, dir);
            } else if (file.isDirectory()) {
                // We support directories for looking up native libraries.
                elements[elementsPos++] = new NativeLibraryElement(file);
            }
        }
        if (elementsPos != elements.length) {
            elements = Arrays.copyOf(elements, elementsPos);
        }
        return elements;
    }
|
DexPathList::initByteBufferDexPath
调用DexFile创建了dex文件
 1
 2
 3
 4
 5
 6
 7
 8
 9
10
11
12
13
14
15
16
17
18
19
20
21
22
23
24
25
26
27
28
29
30
31
32
33
34
35
36
37
38
39
|
//libcore/dalvik/src/main/java/dalvik/system/DexPathList.java
	void initByteBufferDexPath(ByteBuffer[] dexFiles) {
		//......合法性检查

        final List<IOException> suppressedExceptions = new ArrayList<IOException>();

        try {
            Element[] null_elements = null;
            //1.创建dexfile
            DexFile dex = new DexFile(dexFiles, definingContext, null_elements);
            // Capture class loader context from *before* `dexElements` is set (see comment below).
            String classLoaderContext = dex.isBackedByOatFile()
                    ? null : DexFile.getClassLoaderContext(definingContext, null_elements);
            //2.创建dexElements
            dexElements = new Element[] { new Element(dex) };
            // Spawn background thread to verify all classes and cache verification results.
            // Must be called *after* `dexElements` has been initialized for ART to find
            // its classes (the field is hardcoded in ART and dex files iterated over in
            // the order of the array), but with class loader context from *before*
            // `dexElements` was set because that is what it will be compared against next
            // time the same bytecode is loaded.
            // We only spawn the background thread if the bytecode is not backed by an oat
            // file, i.e. this is the first time this bytecode is being loaded and/or
            // verification results have not been cached yet. Skip spawning the thread on
            // all subsequent loads of the same bytecode in the same class loader context.
            if (classLoaderContext != null) {
                dex.verifyInBackground(definingContext, classLoaderContext);
            }
        } catch (IOException suppressed) {
            System.logE("Unable to load dex files", suppressed);
            suppressedExceptions.add(suppressed);
            dexElements = new Element[0];
        }

        if (suppressedExceptions.size() > 0) {
            dexElementsSuppressedExceptions = suppressedExceptions.toArray(
                    new IOException[suppressedExceptions.size()]);
        }
    }
|
DexFile::DexFile
调用openInMemoryDexFiles
1
2
3
4
5
6
7
|
//libcore/dalvik/src/main/java/dalvik/system/DexFile.java
	DexFile(ByteBuffer[] bufs, ClassLoader loader, DexPathList.Element[] elements)
            throws IOException {
        mCookie = openInMemoryDexFiles(bufs, loader, elements);
        mInternalCookie = mCookie;
        mFileName = null;
    }
|
DexFile::openInMemoryDexFiles
调用openInMemoryDexFilesNative
 1
 2
 3
 4
 5
 6
 7
 8
 9
10
11
12
13
14
15
16
17
18
|
    private static Object openInMemoryDexFiles(ByteBuffer[] bufs, ClassLoader loader,
            DexPathList.Element[] elements) throws IOException {
        // Preprocess the ByteBuffers for openInMemoryDexFilesNative. We extract
        // the backing array (non-direct buffers only) and start/end positions
        // so that the native method does not have to call Java methods anymore.
        byte[][] arrays = new byte[bufs.length][];
        int[] starts = new int[bufs.length];
        int[] ends = new int[bufs.length];
        for (int i = 0; i < bufs.length; ++i) {
            arrays[i] = bufs[i].isDirect() ? null : bufs[i].array();
            starts[i] = bufs[i].position();
            ends[i] = bufs[i].limit();
        }
        return openInMemoryDexFilesNative(bufs, arrays, starts, ends, loader, elements);
    }

    private static native Object openInMemoryDexFilesNative(ByteBuffer[] bufs, byte[][] arrays,
            int[] starts, int[] ends, ClassLoader loader, DexPathList.Element[] elements);
|
DexFile_openInMemoryDexFilesNative
openInMemoryDexFilesNative对应实现方法为DexFile_openInMemoryDexFilesNative
 1
 2
 3
 4
 5
 6
 7
 8
 9
10
11
12
13
14
15
16
17
18
19
20
21
22
23
24
25
26
27
28
29
30
31
32
33
34
35
36
37
38
39
40
41
42
43
44
45
46
47
48
49
50
51
52
53
54
55
56
57
58
59
60
61
62
63
64
65
66
67
|
//art/runtime/native/dalvik_system_DexFile.cc
static jobject DexFile_openInMemoryDexFilesNative(JNIEnv* env,
                                                  jclass,
                                                  jobjectArray buffers,
                                                  jobjectArray arrays,
                                                  jintArray jstarts,
                                                  jintArray jends,
                                                  jobject class_loader,
                                                  jobjectArray dex_elements) {
  jsize buffers_length = env->GetArrayLength(buffers);
  CHECK_EQ(buffers_length, env->GetArrayLength(arrays));
  CHECK_EQ(buffers_length, env->GetArrayLength(jstarts));
  CHECK_EQ(buffers_length, env->GetArrayLength(jends));

  ScopedIntArrayAccessor starts(env, jstarts);
  ScopedIntArrayAccessor ends(env, jends);

  // Allocate memory for dex files and copy data from ByteBuffers.
  std::vector<MemMap> dex_mem_maps;
  dex_mem_maps.reserve(buffers_length);
  for (jsize i = 0; i < buffers_length; ++i) {
    jobject buffer = env->GetObjectArrayElement(buffers, i);
    jbyteArray array = reinterpret_cast<jbyteArray>(env->GetObjectArrayElement(arrays, i));
    jint start = starts.Get(i);
    jint end = ends.Get(i);

    //1.分配dex内存映射空间
    MemMap dex_data = AllocateDexMemoryMap(env, start, end);
    if (!dex_data.IsValid()) {
      DCHECK(Thread::Current()->IsExceptionPending());
      return nullptr;
    }

    if (array == nullptr) {
      // Direct ByteBuffer
      uint8_t* base_address = reinterpret_cast<uint8_t*>(env->GetDirectBufferAddress(buffer));
      if (base_address == nullptr) {
        ScopedObjectAccess soa(env);
        ThrowWrappedIOException("dexFileBuffer not direct");
        return nullptr;
      }
      size_t length = static_cast<size_t>(end - start);
      //2.复制dex文件到内存中
      memcpy(dex_data.Begin(), base_address + start, length);
    } else {
      // ByteBuffer backed by a byte array
      jbyte* destination = reinterpret_cast<jbyte*>(dex_data.Begin());
      env->GetByteArrayRegion(array, start, end - start, destination);
    }

    dex_mem_maps.push_back(std::move(dex_data));
  }

  // Hand MemMaps over to OatFileManager to open the dex files and potentially
  // create a backing OatFile instance from an anonymous vdex.
  std::vector<std::string> error_msgs;
  const OatFile* oat_file = nullptr;
  //通过OpenDexFilesFromOat打开oat文件获取dex文件
  std::vector<std::unique_ptr<const DexFile>> dex_files =
      Runtime::Current()->GetOatFileManager().OpenDexFilesFromOat(std::move(dex_mem_maps),
                                                                  class_loader,
                                                                  dex_elements,
                                                                  /*out*/ &oat_file,
                                                                  /*out*/ &error_msgs);
  //创建dex文件的cookie并返回
  return CreateCookieFromOatFileManagerResult(env, dex_files, oat_file, error_msgs);
}
|
OatFileManager::OpenDexFilesFromOat
该函数是一个不同的重载,内部调用了OpenDexFilesFromOat_Impl创建dexfile
 1
 2
 3
 4
 5
 6
 7
 8
 9
10
11
12
13
14
15
16
17
18
19
20
21
22
23
24
25
26
27
28
29
30
|
//art/runtime/oat_file_manager.cc
std::vector<std::unique_ptr<const DexFile>> OatFileManager::OpenDexFilesFromOat(
    std::vector<MemMap>&& dex_mem_maps,
    jobject class_loader,
    jobjectArray dex_elements,
    const OatFile** out_oat_file,
    std::vector<std::string>* error_msgs) {
  std::vector<std::unique_ptr<const DexFile>> dex_files = OpenDexFilesFromOat_Impl(
      std::move(dex_mem_maps),
      class_loader,
      dex_elements,
      out_oat_file,
      error_msgs);

  if (error_msgs->empty()) {
    // Remove write permission from DexFile pages. We do this at the end because
    // OatFile assigns OatDexFile pointer in the DexFile objects.
    for (std::unique_ptr<const DexFile>& dex_file : dex_files) {
      if (!dex_file->DisableWrite()) {
        error_msgs->push_back("Failed to make dex file " + dex_file->GetLocation() + " read-only");
      }
    }
  }

  if (!error_msgs->empty()) {
    return std::vector<std::unique_ptr<const DexFile>>();
  }

  return dex_files;
}
|
OatFileManager::OpenDexFilesFromOat_Impl
  1
  2
  3
  4
  5
  6
  7
  8
  9
 10
 11
 12
 13
 14
 15
 16
 17
 18
 19
 20
 21
 22
 23
 24
 25
 26
 27
 28
 29
 30
 31
 32
 33
 34
 35
 36
 37
 38
 39
 40
 41
 42
 43
 44
 45
 46
 47
 48
 49
 50
 51
 52
 53
 54
 55
 56
 57
 58
 59
 60
 61
 62
 63
 64
 65
 66
 67
 68
 69
 70
 71
 72
 73
 74
 75
 76
 77
 78
 79
 80
 81
 82
 83
 84
 85
 86
 87
 88
 89
 90
 91
 92
 93
 94
 95
 96
 97
 98
 99
100
101
102
|
std::vector<std::unique_ptr<const DexFile>> OatFileManager::OpenDexFilesFromOat_Impl(
    std::vector<MemMap>&& dex_mem_maps,
    jobject class_loader,
    jobjectArray dex_elements,
    const OatFile** out_oat_file,
    std::vector<std::string>* error_msgs) {
  ScopedTrace trace(__FUNCTION__);
  std::string error_msg;
  DCHECK(error_msgs != nullptr);

  // Extract dex file headers from `dex_mem_maps`.
  // 1.从dex内存映射中提取dex文件头
  const std::vector<const DexFile::Header*> dex_headers = GetDexFileHeaders(dex_mem_maps);

  // Determine dex/vdex locations and the combined location checksum.
  uint32_t location_checksum;
  std::string dex_location;
  std::string vdex_path;
  //检测是否存在vdex文件
  bool has_vdex = OatFileAssistant::AnonymousDexVdexLocation(dex_headers,
                                                             kRuntimeISA,
                                                             &location_checksum,
                                                             &dex_location,
                                                             &vdex_path);

  // Attempt to open an existing vdex and check dex file checksums match.
  std::unique_ptr<VdexFile> vdex_file = nullptr;
  if (has_vdex && OS::FileExists(vdex_path.c_str())) {
    //打开vdex文件
    vdex_file = VdexFile::Open(vdex_path,
                               /* writable= */ false,
                               /* low_4gb= */ false,
                               /* unquicken= */ false,
                               &error_msg);
    if (vdex_file == nullptr) {
      LOG(WARNING) << "Failed to open vdex " << vdex_path << ": " << error_msg;
    } else if (!vdex_file->MatchesDexFileChecksums(dex_headers)) {
      LOG(WARNING) << "Failed to open vdex " << vdex_path << ": dex file checksum mismatch";
      vdex_file.reset(nullptr);
    }
  }

  // Load dex files. Skip structural dex file verification if vdex was found
  // and dex checksums matched.
  //不存在vdex文件,并且dex的校验码符合
  std::vector<std::unique_ptr<const DexFile>> dex_files;
  for (size_t i = 0; i < dex_mem_maps.size(); ++i) {
    static constexpr bool kVerifyChecksum = true;
    const ArtDexFileLoader dex_file_loader;
    //通过ArtDexFileLoader.Open方法打开DexFile
    std::unique_ptr<const DexFile> dex_file(dex_file_loader.Open(
        DexFileLoader::GetMultiDexLocation(i, dex_location.c_str()),
        location_checksum,
        std::move(dex_mem_maps[i]),
        /* verify= */ (vdex_file == nullptr) && Runtime::Current()->IsVerificationEnabled(),
        kVerifyChecksum,
        &error_msg));
    if (dex_file != nullptr) {
      dex::tracking::RegisterDexFile(dex_file.get());  // Register for tracking.
      dex_files.push_back(std::move(dex_file));
    } else {
      error_msgs->push_back("Failed to open dex files from memory: " + error_msg);
    }
  }

  // Check if we should proceed to creating an OatFile instance backed by the vdex.
  // We need: (a) an existing vdex, (b) class loader (can be null if invoked via reflection),
  // and (c) no errors during dex file loading.
  if (vdex_file == nullptr || class_loader == nullptr || !error_msgs->empty()) {
    return dex_files;
  }

  // Attempt to create a class loader context, check OpenDexFiles succeeds (prerequisite
  // for using the context later).
  std::unique_ptr<ClassLoaderContext> context = ClassLoaderContext::CreateContextForClassLoader(
      class_loader,
      dex_elements);
  if (context == nullptr) {
    LOG(ERROR) << "Could not create class loader context for " << vdex_path;
    return dex_files;
  }
  DCHECK(context->OpenDexFiles(kRuntimeISA, ""))
      << "Context created from already opened dex files should not attempt to open again";

  // Check that we can use the vdex against this boot class path and in this class loader context.
  // Note 1: We do not need a class loader collision check because there is no compiled code.
  // Note 2: If these checks fail, we cannot fast-verify because the vdex does not contain
  //         full VerifierDeps.
  if (!vdex_file->MatchesBootClassPathChecksums() ||
      !vdex_file->MatchesClassLoaderContext(*context.get())) {
    return dex_files;
  }

  // Initialize an OatFile instance backed by the loaded vdex.
  std::unique_ptr<OatFile> oat_file(OatFile::OpenFromVdex(MakeNonOwningPointerVector(dex_files),
                                                          std::move(vdex_file),
                                                          dex_location));
  DCHECK(oat_file != nullptr);
  VLOG(class_linker) << "Registering " << oat_file->GetLocation();
  *out_oat_file = RegisterOatFile(std::move(oat_file));
  return dex_files;
}
|
ArtDexFileLoader::Open
虽然和之前类似,调用了ArtDexFileLoader::Open,但是参数略有不同
不过内部依然通过调用OpenCommon打开dex文件,之后的流程类似
 1
 2
 3
 4
 5
 6
 7
 8
 9
10
11
12
13
14
15
16
17
18
19
20
21
22
23
24
25
26
27
28
29
30
31
32
33
34
35
36
37
38
39
|
std::unique_ptr<const DexFile> ArtDexFileLoader::Open(const std::string& location,
                                                      uint32_t location_checksum,
                                                      MemMap&& map,
                                                      bool verify,
                                                      bool verify_checksum,
                                                      std::string* error_msg) const {
  ScopedTrace trace(std::string("Open dex file from mapped-memory ") + location);
  CHECK(map.IsValid());

  size_t size = map.Size();
  if (size < sizeof(DexFile::Header)) {
    *error_msg = StringPrintf(
        "DexFile: failed to open dex file '%s' that is too short to have a header",
        location.c_str());
    return nullptr;
  }

  uint8_t* begin = map.Begin();
  //调用OpenCommon打开dexfile
  std::unique_ptr<DexFile> dex_file = OpenCommon(begin,
                                                 size,
                                                 /*data_base=*/ nullptr,
                                                 /*data_size=*/ 0u,
                                                 location,
                                                 location_checksum,
                                                 kNoOatDexFile,
                                                 verify,
                                                 verify_checksum,
                                                 error_msg,
                                                 std::make_unique<MemMapContainer>(std::move(map)),
                                                 /*verify_result=*/ nullptr);
  // Opening CompactDex is only supported from vdex files.
  if (dex_file != nullptr && dex_file->IsCompactDexFile()) {
    *error_msg = StringPrintf("Opening CompactDex file '%s' is only supported from vdex files",
                              location.c_str());
    return nullptr;
  }
  return dex_file;
}
|
ArtDexFileLoader::OpenCommon
调用了DexFileLoader::OpenCommon,之后的流程同上
 1
 2
 3
 4
 5
 6
 7
 8
 9
10
11
12
13
14
15
16
17
18
19
20
21
22
23
24
25
|
std::unique_ptr<DexFile> ArtDexFileLoader::OpenCommon(const uint8_t* base,
                                                      size_t size,
                                                      const uint8_t* data_base,
                                                      size_t data_size,
                                                      const std::string& location,
                                                      uint32_t location_checksum,
                                                      const OatDexFile* oat_dex_file,
                                                      bool verify,
                                                      bool verify_checksum,
                                                      std::string* error_msg,
                                                      std::unique_ptr<DexFileContainer> container,
                                                      VerifyResult* verify_result) {
  return DexFileLoader::OpenCommon(base,
                                   size,
                                   data_base,
                                   data_size,
                                   location,
                                   location_checksum,
                                   oat_dex_file,
                                   verify,
                                   verify_checksum,
                                   error_msg,
                                   std::move(container),
                                   verify_result);
}
|
十二. ClassLoader加载Class流程详解
参考android类加载源码分析和Android类加载流程
在类被加载之前,其对应的dex文件已经在内存中

ClassLoader::LoadClass
ClassLoader类是所有类加载器的虚基类,在静态/动态加载一个类时会首先调用此虚基类的LoadClass函数,执行以下步骤
- 查找该类是否加载,已经加载则直接获取对应Class类对象
- 尝试调用父加载器loadClass进行加载
- 若该类未加载且父加载器未加载,则调用自身的findClass加载
 1
 2
 3
 4
 5
 6
 7
 8
 9
10
11
12
13
14
15
16
17
18
19
20
21
22
23
24
25
26
27
28
29
30
|
//libcore/ojluni/src/main/java/java/lang/ClassLoader.java
     protected Class<?> loadClass(String name, boolean resolve)
        throws ClassNotFoundException
    {
            // First, check if the class has already been loaded
            //1.查找此类是否已经加载
            Class<?> c = findLoadedClass(name);
            if (c == null) {
                try {
                    if (parent != null) {
                        //2.父加载器不为空,调用父加载器.loadClass加载此类
                        c = parent.loadClass(name, false);
                    } else {
                        //父加载器为空,说明此加载器为根加载器BootClassLoader,让根加载器去加载
                        c = findBootstrapClassOrNull(name);
                    }
                } catch (ClassNotFoundException e) {
                    // ClassNotFoundException thrown if class not found
                    // from the non-null parent class loader
                }

                if (c == null) {
                    // If still not found, then invoke findClass in order
                    // to find the class.
                    //3.如果父加载器都加载不了就让当前类加载器调用findclass去加载.
                    c = findClass(name);
                }
            }
            return c;
    }
|
BaseDexClassLoader::findClass
BaseDexClassLoader继承自ClassLoader虚类,Android常用的加载器基本都继承于BaseDexClassLoader类
所以会先调用BaseDexClassLoader.findClass方法,内部调用了DexPathList.findClass
 1
 2
 3
 4
 5
 6
 7
 8
 9
10
11
|
//libcore/dalvik/src/main/java/dalvik/system/BaseDexClassLoader.java
    protected Class<?> findClass(String name) throws ClassNotFoundException {
        ......
        // Check whether the class in question is present in the dexPath that
        // this classloader operates on.
        List<Throwable> suppressedExceptions = new ArrayList<Throwable>();
        Class c = pathList.findClass(name, suppressedExceptions);
        if (c != null) {
            return c;
        }
    }
|
DexPathList.findClass方法内部调用Element.findClass方法
 1
 2
 3
 4
 5
 6
 7
 8
 9
10
11
12
13
14
|
//libcore/dalvik/src/main/java/dalvik/system/DexPathList.java
    public Class<?> findClass(String name, List<Throwable> suppressed) {
        for (Element element : dexElements) {
            Class<?> clazz = element.findClass(name, definingContext, suppressed);
            if (clazz != null) {
                return clazz;
            }
        }

        if (dexElementsSuppressedExceptions != null) {
            suppressed.addAll(Arrays.asList(dexElementsSuppressedExceptions));
        }
        return null;
    }
|
Element.findClass方法调用DexFile.loadClassBinaryName
1
2
3
4
5
6
|
//libcore/dalvik/src/main/java/dalvik/system/DexPathList.java
    public Class<?> findClass(String name, ClassLoader definingContext,
                List<Throwable> suppressed) {
            return dexFile != null ? dexFile.loadClassBinaryName(name, definingContext, suppressed)
                    : null;
        }
|
defineClassNative (JNI)
Element.findClass方法内部调用loadClassBinaryName函数
loadClassBinaryName函数接着会调用defineClass->defineClassNative,该函数是一个native函数在art虚拟机中实现
 1
 2
 3
 4
 5
 6
 7
 8
 9
10
11
12
13
14
15
16
17
18
19
20
21
|
//libcore/dalvik/src/main/java/dalvik/system/DexFile.java
    public Class loadClassBinaryName(String name, ClassLoader loader, List<Throwable> suppressed) {
        return defineClass(name, loader, mCookie, this, suppressed);
    }

    private static Class defineClass(String name, ClassLoader loader, Object cookie,
                                     DexFile dexFile, List<Throwable> suppressed) {
        Class result = null;
        try {
            result = defineClassNative(name, loader, cookie, dexFile);
        } catch (NoClassDefFoundError e) {
            if (suppressed != null) {
                suppressed.add(e);
            }
        } catch (ClassNotFoundException e) {
            if (suppressed != null) {
                suppressed.add(e);
            }
        }
        return result;
    }
|
DexFile_defineClassNative
defineClassNative对应的art中的native函数为DexFile_defineClassNative,在art中进行类的字段,方法的加载
DexFile_defineClassNative的函数调用链如下
1
2
3
4
5
6
7
8
|
DexFile_defineClassNative()
 ├─ FindClassDef
 │  ClassLinker::DefineClass
 │  └─ ClassLinker::LoadClass
 │      └─ LoadField
 │         LoadMethod
 │         LinkCode
 └─ InsertDexFileInToClassLoader
|
- FindClassDef枚举此类加载器的所有dex文件,并在这些dex文件中寻找Class_def看是否等于当前加载类,如果找不到则返回失败
- ClassLinker::DefineClass加载对应类的字段和方法
- 将对应的DexFile添加到类加载器对应的ClassTable中
 1
 2
 3
 4
 5
 6
 7
 8
 9
10
11
12
13
14
15
16
17
18
19
20
21
22
23
24
25
26
27
28
29
30
31
32
33
34
35
36
37
38
39
40
41
|
//art/runtime/native/dalvik_system_DexFile.cc
static jclass DexFile_defineClassNative(JNIEnv* env,
                                        jclass,
                                        jstring javaName,
                                        jobject javaLoader,
                                        jobject cookie,
                                        jobject dexFile) {
  std::vector<const DexFile*> dex_files;
  const std::string descriptor(DotToDescriptor(class_name.c_str()));
  const size_t hash(ComputeModifiedUtf8Hash(descriptor.c_str()));
  //枚举此类加载器的所有dex文件
  for (auto& dex_file : dex_files) {
    //1.找到dex中的ClassDef
    const dex::ClassDef* dex_class_def =
        OatDexFile::FindClassDef(*dex_file, descriptor.c_str(), hash);
    if (dex_class_def != nullptr) {
      ScopedObjectAccess soa(env);
      ClassLinker* class_linker = Runtime::Current()->GetClassLinker();
      StackHandleScope<1> hs(soa.Self());
      Handle<mirror::ClassLoader> class_loader(
          hs.NewHandle(soa.Decode<mirror::ClassLoader>(javaLoader)));
      ObjPtr<mirror::DexCache> dex_cache =
          class_linker->RegisterDexFile(*dex_file, class_loader.Get());
      if (dex_cache == nullptr) {
        // OOME or InternalError (dexFile already registered with a different class loader).
        soa.Self()->AssertPendingException();
        return nullptr;
      }
      //2.完成目标类的加载
      ObjPtr<mirror::Class> result = class_linker->DefineClass(soa.Self(),
                                                               descriptor.c_str(),
                                                               hash,
                                                               class_loader,
                                                               *dex_file,
                                                               *dex_class_def);
      //3.将对应的DexFile添加到类加载器对应的ClassTable中
      // Add the used dex file. This only required for the DexFile.loadClass API since normal
      // class loaders already keep their dex files live.
      class_linker->InsertDexFileInToClassLoader(soa.Decode<mirror::Object>(dexFile),
                                                 class_loader.Get());
}
|
ClassLinker::DefineClass
DefineClass主要就是调用ClassLinker::LoadClass加载对应类的字段和方法
 1
 2
 3
 4
 5
 6
 7
 8
 9
10
11
12
13
14
|
//art/runtime/class_linker.cc
ObjPtr<mirror::Class> ClassLinker::DefineClass(Thread* self,
                                               const char* descriptor,
                                               size_t hash,
                                               Handle<mirror::ClassLoader> class_loader,
                                               const DexFile& dex_file,
                                               const dex::ClassDef& dex_class_def) {
  //从DexFile dex文件中(内存中的)加载所有的field和method
  // Load the fields and other things after we are inserted in the table. This is so that we don't
  // end up allocating unfree-able linear alloc resources and then lose the race condition. The
  // other reason is that the field roots are only visited from the class table. So we need to be
  // inserted before we allocate / fill in these fields.
  LoadClass(self, *new_dex_file, *new_class_def, klass);
}
|
ClassLinker::LoadClass
ClassLinker::LoadClass调用LoadField加载所有的字段,调用LoadMethod加载所有的方法.
 1
 2
 3
 4
 5
 6
 7
 8
 9
10
11
12
13
14
15
16
17
18
19
20
21
22
23
24
25
26
27
28
29
30
31
32
33
34
35
36
37
38
39
40
41
42
43
44
45
46
47
48
49
50
51
52
53
54
55
56
|
//art/runtime/class_linker.cc
void ClassLinker::LoadClass(Thread* self,
                            const DexFile& dex_file,
                            const dex::ClassDef& dex_class_def,
                            Handle<mirror::Class> klass) {

    uint16_t hotness_threshold = runtime->GetJITOptions()->GetWarmupThreshold();
    // Use the visitor since the ranged based loops are bit slower from seeking. Seeking to the
    // methods needs to decode all of the fields.
    accessor.VisitFieldsAndMethods([&](
        //加载所有的静态field
        const ClassAccessor::Field& field) REQUIRES_SHARED(Locks::mutator_lock_) {
          uint32_t field_idx = field.GetIndex();
          DCHECK_GE(field_idx, last_static_field_idx);  // Ordering enforced by DexFileVerifier.
          if (num_sfields == 0 || LIKELY(field_idx > last_static_field_idx)) {
            LoadField(field, klass, &sfields->At(num_sfields));
            ++num_sfields;
            last_static_field_idx = field_idx;
          }
        }, [&](const ClassAccessor::Field& field) REQUIRES_SHARED(Locks::mutator_lock_) {
          //加载所有的field
          uint32_t field_idx = field.GetIndex();
          DCHECK_GE(field_idx, last_instance_field_idx);  // Ordering enforced by DexFileVerifier.
          if (num_ifields == 0 || LIKELY(field_idx > last_instance_field_idx)) {
            LoadField(field, klass, &ifields->At(num_ifields));
            ++num_ifields;
            last_instance_field_idx = field_idx;
          }
        }, [&](const ClassAccessor::Method& method) REQUIRES_SHARED(Locks::mutator_lock_) {
          //加载所有的对象方法(direct method)
          ArtMethod* art_method = klass->GetDirectMethodUnchecked(class_def_method_index,
              image_pointer_size_);
          LoadMethod(dex_file, method, klass.Get(), art_method);
          LinkCode(this, art_method, oat_class_ptr, class_def_method_index);
          uint32_t it_method_index = method.GetIndex();
          if (last_dex_method_index == it_method_index) {
            // duplicate case
            art_method->SetMethodIndex(last_class_def_method_index);
          } else {
            art_method->SetMethodIndex(class_def_method_index);
            last_dex_method_index = it_method_index;
            last_class_def_method_index = class_def_method_index;
          }
          art_method->ResetCounter(hotness_threshold);
          ++class_def_method_index;
        }, [&](const ClassAccessor::Method& method) REQUIRES_SHARED(Locks::mutator_lock_) {
          //加载所有的抽象方法(virtual method)
          ArtMethod* art_method = klass->GetVirtualMethodUnchecked(
              class_def_method_index - accessor.NumDirectMethods(),
              image_pointer_size_);
          art_method->ResetCounter(hotness_threshold);
          LoadMethod(dex_file, method, klass.Get(), art_method);
          LinkCode(this, art_method, oat_class_ptr, class_def_method_index);
          ++class_def_method_index;
        });
}
|
十三. 创建应用程序进程详解
创建应用程序进程主要分为2部分:
- AMS向Zygote发送启动应用程序进程请求
- Zygote接收AMS请求并创建应用程序进程
AMS发送启动应用程序进程请求
时序图如下

假设此时启动应用程序所需的进程不存在,则AMS通过startProcessLocked方法向Zygote发送请求
startProcessLocked内部调用了Process.start启动进程,另外entryPoint是android.app.ActivityThread
-
注释1处 获取创建应用程序进程的用户ID
-
注释2处 对用户组ID (gids)进行创建和赋值
-
注释3处 如果entryPoint=null,则赋值为"android.app.ActivityThread" 即应用程序进程主线程的类名
-
注释4处 调用Process.start启动应用程序进程
传递了应用程序进程用户id,用户组gids,以及entryPoint
 1
 2
 3
 4
 5
 6
 7
 8
 9
10
11
12
13
14
15
16
17
18
19
20
21
22
23
24
25
26
27
28
29
30
31
32
33
34
35
36
37
38
39
40
41
42
43
44
45
46
47
48
49
50
51
52
53
54
55
56
57
58
59
60
61
62
63
|
//frameworks/base/services/core/java/com/android/server/am/ActivityManagerService.java
	private final void startProcessLocked(ProcessRecord app, String hostingType,
            String hostingNameStr, String abiOverride, String entryPoint, String[] entryPointArgs) {
		//...... check time
        try {
            try {
                final int userId = UserHandle.getUserId(app.uid);
                AppGlobals.getPackageManager().checkPackageStartable(app.info.packageName, userId);
            } catch (RemoteException e) {
                throw e.rethrowAsRuntimeException();
            }

            //1.获取要创建的应用程序进程的用户ID
            int uid = app.uid;
            int[] gids = null;
            int mountExternal = Zygote.MOUNT_EXTERNAL_NONE;
            if (!app.isolated) {
				//...... check
                /*
                 * Add shared application and profile GIDs so applications can share some
                 * resources like shared libraries and access user-wide resources
                 */
                //2.对gids进行创建和赋值
                if (ArrayUtils.isEmpty(permGids)) {
                    gids = new int[3];
                } else {
                    gids = new int[permGids.length + 3];
                    System.arraycopy(permGids, 0, gids, 3, permGids.length);
                }
                gids[0] = UserHandle.getSharedAppGid(UserHandle.getAppId(uid));
                gids[1] = UserHandle.getCacheAppGid(UserHandle.getAppId(uid));
                gids[2] = UserHandle.getUserGid(UserHandle.getUserId(uid));
            }
           	// check time and others .......

            // Start the process.  It will either succeed and return a result containing
            // the PID of the new process, or else throw a RuntimeException.
            //3.
            boolean isActivityProcess = (entryPoint == null);
            if (entryPoint == null) entryPoint = "android.app.ActivityThread";
            Trace.traceBegin(Trace.TRACE_TAG_ACTIVITY_MANAGER, "Start proc: " +
                    app.processName);
            checkTime(startTime, "startProcess: asking zygote to start proc");
            ProcessStartResult startResult;
            //判断是否为webview服务
            if (hostingType.equals("webview_service")) {
                //启动webview
                startResult = startWebView(entryPoint,
                        app.processName, uid, uid, gids, debugFlags, mountExternal,
                        app.info.targetSdkVersion, seInfo, requiredAbi, instructionSet,
                        app.info.dataDir, null, entryPointArgs);
            } else {
                //4.调用Process.start启动应用程序进程
                startResult = Process.start(entryPoint,
                        app.processName, uid, uid, gids, debugFlags, mountExternal,
                        app.info.targetSdkVersion, seInfo, requiredAbi, instructionSet,
                        app.info.dataDir, invokeWith, entryPointArgs);
            }
			//......
        } catch (RuntimeException e) {
			//......
        }
    }
|
Process.start内部调用了zygoteProcess.start
 1
 2
 3
 4
 5
 6
 7
 8
 9
10
11
12
13
14
15
16
|
//frameworks/base/core/java/android/os/Process.java
	public static final ProcessStartResult start(final String processClass,
                                  final String niceName,
                                  int uid, int gid, int[] gids,
                                  int debugFlags, int mountExternal,
                                  int targetSdkVersion,
                                  String seInfo,
                                  String abi,
                                  String instructionSet,
                                  String appDataDir,
                                  String invokeWith,
                                  String[] zygoteArgs) {
        return zygoteProcess.start(processClass, niceName, uid, gid, gids,
                    debugFlags, mountExternal, targetSdkVersion, seInfo,
                    abi, instructionSet, appDataDir, invokeWith, zygoteArgs);
    }
|
ZygoteProcess.start调用了startViaZygote
 1
 2
 3
 4
 5
 6
 7
 8
 9
10
11
12
13
14
15
16
17
18
19
20
21
22
23
|
//frameworks/base/core/java/android/os/ZygoteProcess.java
	public final Process.ProcessStartResult start(final String processClass,
                                                  final String niceName,
                                                  int uid, int gid, int[] gids,
                                                  int debugFlags, int mountExternal,
                                                  int targetSdkVersion,
                                                  String seInfo,
                                                  String abi,
                                                  String instructionSet,
                                                  String appDataDir,
                                                  String invokeWith,
                                                  String[] zygoteArgs) {
        try {
            return startViaZygote(processClass, niceName, uid, gid, gids,
                    debugFlags, mountExternal, targetSdkVersion, seInfo,
                    abi, instructionSet, appDataDir, invokeWith, zygoteArgs);
        } catch (ZygoteStartFailedEx ex) {
            Log.e(LOG_TAG,
                    "Starting VM process through Zygote failed");
            throw new RuntimeException(
                    "Starting VM process through Zygote failed", ex);
        }
    }
|
ZygoteProcess.startViaZygote保存应用进程的启动参数后,调用zygoteSendArgsAndGetResult
首先调用了openZygoteSocketIfNeeded
1
2
3
4
5
6
7
8
9
10
11
12
13
14
15
16
17
18
19
20
21
22
23
24
25
26
27
28
29
30
31
|
//frameworks/base/core/java/android/os/ZygoteProcess.java
private Process.ProcessStartResult startViaZygote(final String processClass,
final String niceName,
final int uid, final int gid,
final int[] gids,
int debugFlags, int mountExternal,
int targetSdkVersion,
String seInfo,
String abi,
String instructionSet,
String appDataDir,
String invokeWith,
String[] extraArgs)
throws ZygoteStartFailedEx {
//1.创建字符串列表,用于保存应用进程的启动参数
ArrayList<String> argsForZygote = new ArrayList<String>();
// --runtime-args, --setuid=, --setgid=,
// and --setgroups= must go first
argsForZygote.add("--runtime-args");
argsForZygote.add("--setuid=" + uid);
argsForZygote.add("--setgid=" + gid);
if ((debugFlags & Zygote.DEBUG_ENABLE_JNI_LOGGING) != 0) {
argsForZygote.add("--enable-jni-logging");
}
//......
synchronized(mLock) {
return zygoteSendArgsAndGetResult(openZygoteSocketIfNeeded(abi), argsForZygote);
}
}
|
ZygoteProcess.openZygoteSocketIfNeeded如下,主要是和Zygote进程通过Socket建立连接,并返回Zygote进程的状态
1
2
3
4
5
6
7
8
9
10
11
12
13
14
15
16
17
18
19
20
21
22
23
24
25
26
27
28
29
30
31
32
33
34
35
36
37
38
39
40
41
42
|
//frameworks/base/core/java/android/os/ZygoteProcess.java
/**
* Tries to open socket to Zygote process if not already open. If
* already open, does nothing. May block and retry. Requires that mLock be held.
*/
@GuardedBy("mLock")
private ZygoteState openZygoteSocketIfNeeded(String abi) throws ZygoteStartFailedEx {
//检查当前线程是否持有mLock锁,没有则抛出异常
Preconditions.checkState(Thread.holdsLock(mLock), "ZygoteProcess lock not held");
if (primaryZygoteState == null || primaryZygoteState.isClosed()) {
try {
//通过Socket与主Zygote进程建立连接
primaryZygoteState = ZygoteState.connect(mSocket);
} catch (IOException ioe) {
throw new ZygoteStartFailedEx("Error connecting to primary zygote", ioe);
}
}
//检查主Zygote进程和目标进程abi是否匹配,匹配则返回主Zygote进程状态
if (primaryZygoteState.matches(abi)) {
return primaryZygoteState;
}
// The primary zygote didn't match. Try the secondary.
// abi不匹配,尝试与辅Zygote进程建立连接
if (secondaryZygoteState == null || secondaryZygoteState.isClosed()) {
try {
//通过Socket与辅Zygote进程建立连接
secondaryZygoteState = ZygoteState.connect(mSecondarySocket);
} catch (IOException ioe) {
throw new ZygoteStartFailedEx("Error connecting to secondary zygote", ioe);
}
}
//返回辅zygote进程状态
if (secondaryZygoteState.matches(abi)) {
return secondaryZygoteState;
}
throw new ZygoteStartFailedEx("Unsupported zygote ABI: " + abi);
}
|
zygoteSendArgsAndGetResult代码如下
主要功能为将应用进程启动参数写入zygoteState(ZygoteProcess的静态内部类,用于表示与Zygote进程的通信状态)
然后与Zygote进程通信,等待发送新创建的进程pid和usingWrapper; 如果pid>=0则进程创建成功
1
2
3
4
5
6
7
8
9
10
11
12
13
14
15
16
17
18
19
20
21
22
23
24
25
26
27
28
29
30
31
32
33
34
35
36
37
38
39
40
41
42
43
44
45
46
47
48
49
50
51
52
53
54
55
56
57
58
59
60
61
|
//frameworks/base/core/java/android/os/ZygoteProcess.java
@GuardedBy("mLock")
private static Process.ProcessStartResult zygoteSendArgsAndGetResult(
ZygoteState zygoteState, ArrayList<String> args)
throws ZygoteStartFailedEx {
try {
// Throw early if any of the arguments are malformed. This means we can
// avoid writing a partial response to the zygote.
//1.检查args数组的参数
int sz = args.size();
for (int i = 0; i < sz; i++) {
if (args.get(i).indexOf('\n') >= 0) {
throw new ZygoteStartFailedEx("embedded newlines not allowed");
}
}
/**
* See com.android.internal.os.SystemZygoteInit.readArgumentList()
* Presently the wire format to the zygote process is:
* a) a count of arguments (argc, in essence)
* b) a number of newline-separated argument strings equal to count
*
* After the zygote process reads these it will write the pid of
* the child or -1 on failure, followed by boolean to
* indicate whether a wrapper process was used.
*/
//2.将参数写入ZygoteState中
final BufferedWriter writer = zygoteState.writer;
final DataInputStream inputStream = zygoteState.inputStream;
writer.write(Integer.toString(args.size()));
writer.newLine();
for (int i = 0; i < sz; i++) {
String arg = args.get(i);
writer.write(arg);
writer.newLine();
}
writer.flush();
// Should there be a timeout on this?
Process.ProcessStartResult result = new Process.ProcessStartResult();
// Always read the entire result from the input stream to avoid leaving
// bytes in the stream for future process starts to accidentally stumble
// upon.
//3.等待socket服务端(即Zygote) 返回新创建的进程pid,usingWrapper
result.pid = inputStream.readInt();
result.usingWrapper = inputStream.readBoolean();
if (result.pid < 0) {
throw new ZygoteStartFailedEx("fork() failed");
}
return result;
} catch (IOException ex) {
zygoteState.close();
throw new ZygoteStartFailedEx(ex);
}
}
|
Zygote接收请求并创建应用程序进程
时序图如下

socket连接成功并匹配abi后返回ZygoteState对象,之后zygoteSendArgsAndGetResult将应用进程启动参数写入ZygoteState
这样Zygote进程便可以接收创建新应用进程的请求,回到ZygoteInit.main方法中
Zygote创建Socket服务端后,会通过runSelectLoop方法等待AMS的请求来创建新的应用程序进程
1
2
3
4
5
6
7
8
9
10
11
12
13
14
15
16
17
18
19
20
21
22
23
24
25
26
27
28
29
30
31
32
33
34
35
36
37
38
39
40
41
42
|
public static void main(String argv[]) {
ZygoteServer zygoteServer = new ZygoteServer();
//......
try {
//......
//1.创建Server端的Socket,socketName="zygote"
zygoteServer.registerServerSocket(socketName);
// In some configurations, we avoid preloading resources and classes eagerly.
// In such cases, we will preload things prior to our first fork.
if (!enableLazyPreload) {
bootTimingsTraceLog.traceBegin("ZygotePreload");
EventLog.writeEvent(LOG_BOOT_PROGRESS_PRELOAD_START,
SystemClock.uptimeMillis());
//2.预加载类和资源
preload(bootTimingsTraceLog);
EventLog.writeEvent(LOG_BOOT_PROGRESS_PRELOAD_END,
SystemClock.uptimeMillis());
bootTimingsTraceLog.traceEnd(); // ZygotePreload
} else {
Zygote.resetNicePriority();
}
//......
//3.启动SystemServer进程
if (startSystemServer) {
startSystemServer(abiList, socketName, zygoteServer);
}
Log.i(TAG, "Accepting command socket connections");
//4.等待AMS请求
zygoteServer.runSelectLoop(abiList);
zygoteServer.closeServerSocket();
} catch (Zygote.MethodAndArgsCaller caller) {
caller.run();
} catch (Throwable ex) {
Log.e(TAG, "System zygote died with exception", ex);
zygoteServer.closeServerSocket();
throw ex;
}
}
|
runSelectLoop方法代码如下,通过注释2处的ZygoteConnection.runOnce处理请求数据
1
2
3
4
5
6
7
8
9
10
11
12
13
14
15
16
17
18
19
20
21
22
23
24
25
26
27
28
29
30
31
32
33
34
35
36
37
38
39
40
41
42
43
44
45
46
47
48
|
//frameworks/base/core/java/com/android/internal/os/ZygoteServer.java
void runSelectLoop(String abiList) throws Zygote.MethodAndArgsCaller {
//创建文件描述符数组和
ArrayList<FileDescriptor> fds = new ArrayList<FileDescriptor>();
//1.创建zygoteConnection对象数组
ArrayList<ZygoteConnection> peers = new ArrayList<ZygoteConnection>();
//mServerSocket是zygote进程的Socket,保存到fds[0]
fds.add(mServerSocket.getFileDescriptor());
peers.add(null);
while (true) {
//创建一个 StructPollfd 数组 pollFds,用于存储待轮询的文件描述符
StructPollfd[] pollFds = new StructPollfd[fds.size()];
for (int i = 0; i < pollFds.length; ++i) {
pollFds[i] = new StructPollfd();
pollFds[i].fd = fds.get(i);
pollFds[i].events = (short) POLLIN;
}
try {
//使用 Os.poll() 方法对文件描述符进行轮询,等待有数据可读的文件描述符.该方法会阻塞直到有事件发生
Os.poll(pollFds, -1);
} catch (ErrnoException ex) {
throw new RuntimeException("poll failed", ex);
}
//遍历 pollFds 数组,判断每个文件描述符是否有可读事件发生
for (int i = pollFds.length - 1; i >= 0; --i) {
if ((pollFds[i].revents & POLLIN) == 0) {
continue;
}
//如果文件描述符索引为 0,表示有新的连接请求到达
if (i == 0) {
//调用 acceptCommandPeer接受连接,并将新的连接对象添加到 peers 和对应的文件描述符添加到 fds
ZygoteConnection newPeer = acceptCommandPeer(abiList);
peers.add(newPeer);
fds.add(newPeer.getFileDesciptor());
} else {
//2.如果文件描述符索引不为 0,则表示已有连接的数据可读,调用对应连接对象的 runOnce方法
boolean done = peers.get(i).runOnce(this);
//处理完后移除该文件描述符和连接对象
if (done) {
peers.remove(i);
fds.remove(i);
}
}
}
}
}
|
runOnce代码如下
获取应用程序进程的启动参数和文件描述符后,对参数进行解析并调用Zygote.forkAndSpecialize创建应用程序进程
再通过pid判断代码在哪个进程,pid=0为子进程时,调用handleChildProc方法
1
2
3
4
5
6
7
8
9
10
11
12
13
14
15
16
17
18
19
20
21
22
23
24
25
26
27
28
29
30
31
32
33
34
35
36
37
38
39
40
41
42
43
44
45
46
47
48
49
50
51
52
53
54
55
56
57
58
59
60
61
|
//frameworks/base/core/java/com/android/internal/os/ZygoteConnection.java
boolean runOnce(ZygoteServer zygoteServer) throws Zygote.MethodAndArgsCaller {
String args[];
Arguments parsedArgs = null;
FileDescriptor[] descriptors;
try {
//1.获取应用进程启动参数和文件描述符
args = readArgumentList();
descriptors = mSocket.getAncillaryFileDescriptors();
} catch (IOException ex) {
Log.w(TAG, "IOException on command socket " + ex.getMessage());
closeSocket();
return true;
}
//......
try {
//2.将Binder客户端传递来的参数解析为Arguments对象格式
parsedArgs = new Arguments(args);
//...... 参数处理
//3.创建应用程序进程
pid = Zygote.forkAndSpecialize(parsedArgs.uid, parsedArgs.gid, parsedArgs.gids,
parsedArgs.debugFlags, rlimits, parsedArgs.mountExternal, parsedArgs.seInfo,
parsedArgs.niceName, fdsToClose, fdsToIgnore, parsedArgs.instructionSet,
parsedArgs.appDataDir);
} catch (ErrnoException ex) {
logAndPrintError(newStderr, "Exception creating pipe", ex);
} catch (IllegalArgumentException ex) {
logAndPrintError(newStderr, "Invalid zygote arguments", ex);
} catch (ZygoteSecurityException ex) {
logAndPrintError(newStderr,
"Zygote security policy prevents request: ", ex);
}
try {
if (pid == 0) {
//当前代码运行在子进程中
zygoteServer.closeServerSocket();
IoUtils.closeQuietly(serverPipeFd);
serverPipeFd = null;
//处理应用程序进程
handleChildProc(parsedArgs, descriptors, childPipeFd, newStderr);
// should never get here, the child is expected to either
// throw Zygote.MethodAndArgsCaller or exec().
return true;
} else {
//父进程中
// in parent...pid of < 0 means failure
IoUtils.closeQuietly(childPipeFd);
childPipeFd = null;
return handleParentProc(pid, descriptors, serverPipeFd, parsedArgs);
}
} finally {
IoUtils.closeQuietly(childPipeFd);
IoUtils.closeQuietly(serverPipeFd);
}
}
|
ZygoteConnection.handleChildProc代码如下
主要用于配置子进程的初始环境,包括关闭父进程(Zygote)的socket管道,重定向标准输入输出和错误输出,设置子进程名称等
之后调用ZygoteInit.zygoteInit方法初始化应用程序进程
1
2
3
4
5
6
7
8
9
10
11
12
13
14
15
16
17
18
19
20
21
22
23
24
25
26
27
28
29
30
31
32
33
34
35
36
37
38
39
40
41
42
43
44
45
46
|
//frameworks/base/core/java/com/android/internal/os/ZygoteConnection.java
private void handleChildProc(Arguments parsedArgs,
FileDescriptor[] descriptors, FileDescriptor pipeFd, PrintStream newStderr)
throws Zygote.MethodAndArgsCaller {
/**
* By the time we get here, the native code has closed the two actual Zygote
* socket connections, and substituted /dev/null in their place. The LocalSocket
* objects still need to be closed properly.
*/
//关闭从zygote进程来的Socket通信
closeSocket();
//重定向std_xxx到descriptors数组中对应的文件描述符,然后关闭descriptors数组中的文件描述符
if (descriptors != null) {
try {
Os.dup2(descriptors[0], STDIN_FILENO);
Os.dup2(descriptors[1], STDOUT_FILENO);
Os.dup2(descriptors[2], STDERR_FILENO);
for (FileDescriptor fd: descriptors) {
IoUtils.closeQuietly(fd);
}
newStderr = System.err;
} catch (ErrnoException ex) {
Log.e(TAG, "Error reopening stdio", ex);
}
}
//设置进程的命令行参数argv0为parsedArgs.niceName
if (parsedArgs.niceName != null) {
Process.setArgV0(parsedArgs.niceName);
}
//关闭Trace事件,表示不再跟踪当前的活动管理器事件
Trace.traceEnd(Trace.TRACE_TAG_ACTIVITY_MANAGER);
if (parsedArgs.invokeWith != null) {
WrapperInit.execApplication(parsedArgs.invokeWith,
parsedArgs.niceName, parsedArgs.targetSdkVersion,
VMRuntime.getCurrentInstructionSet(),
pipeFd, parsedArgs.remainingArgs);
} else {
//调用zygoteInit初始化进程,classloader设置为null
ZygoteInit.zygoteInit(parsedArgs.targetSdkVersion,
parsedArgs.remainingArgs, null /* classLoader */);
}
}
|
ZygoteInit.zygoteInit代码如下
1
2
3
4
5
6
7
8
9
10
11
12
13
14
15
16
17
|
//frameworks/base/core/java/com/android/internal/os/ZygoteInit.java
public static final void zygoteInit(int targetSdkVersion, String[] argv,
ClassLoader classLoader) throws Zygote.MethodAndArgsCaller {
if (RuntimeInit.DEBUG) {
Slog.d(RuntimeInit.TAG, "RuntimeInit: Starting application from zygote");
}
// 添加名为"ZygoteInit"的systrace tag以标识进程初始化流程
Trace.traceBegin(Trace.TRACE_TAG_ACTIVITY_MANAGER, "ZygoteInit");
RuntimeInit.redirectLogStreams();//重定向log输出
RuntimeInit.commonInit();//通用初始化
ZygoteInit.nativeZygoteInit();//nativeZygoteInit函数中JNI调用启动进程的binder线程池
RuntimeInit.applicationInit(targetSdkVersion, argv, classLoader);
}
private static final native void nativeZygoteInit();
|
RuntimeInit.applicationInit代码如下,内部调用invokeStaticMain方法
- args.startClass 前文的entryPoint,即"android.app.ActivityThread"
- args.startArgs 应用进程启动参数
- classLoader null
1
2
3
4
5
6
7
8
9
10
11
12
13
14
15
16
17
18
19
20
21
22
23
24
25
26
|
//frameworks/base/core/java/com/android/internal/os/RuntimeInit.java
protected static void applicationInit(int targetSdkVersion, String[] argv, ClassLoader classLoader)
throws Zygote.MethodAndArgsCaller {
//true代表应用程序退出时不调用AppRuntime.onExit,否则会在退出前调用
nativeSetExitWithoutCleanup(true);
//设置虚拟机的内存利用率参数值为0.75和SDK版本
VMRuntime.getRuntime().setTargetHeapUtilization(0.75f);
VMRuntime.getRuntime().setTargetSdkVersion(targetSdkVersion);
final Arguments args;
try {
args = new Arguments(argv);
} catch (IllegalArgumentException ex) {
Slog.e(TAG, ex.getMessage());
// let the process exit
return;
}
// The end of of the RuntimeInit event (see #zygoteInit).
Trace.traceEnd(Trace.TRACE_TAG_ACTIVITY_MANAGER);
// Remaining arguments are passed to the start class's static main
invokeStaticMain(args.startClass, args.startArgs, classLoader);
}
|
invokeStaticMain
1
2
3
4
5
6
7
8
9
10
11
12
13
14
15
16
17
18
19
20
21
22
23
24
25
26
27
28
29
30
31
32
33
34
35
|
//frameworks/base/core/java/com/android/internal/os/RuntimeInit.java
private static void invokeStaticMain(String className, String[] argv, ClassLoader classLoader)
throws Zygote.MethodAndArgsCaller {
Class<?> cl;
try {
//1.获取android.app.ActivityThread的类
cl = Class.forName(className, true, classLoader);
} catch (ClassNotFoundException ex) {
throw new RuntimeException(
"Missing class when invoking static main " + className,
ex);
}
Method m;
try {
//2.获取ActivityThread的main方法
m = cl.getMethod("main", new Class[] { String[].class });
} catch (NoSuchMethodException ex) {
throw new RuntimeException(
"Missing static main on " + className, ex);
} catch (SecurityException ex) {
throw new RuntimeException(
"Problem getting static main on " + className, ex);
}
int modifiers = m.getModifiers();
if (! (Modifier.isStatic(modifiers) && Modifier.isPublic(modifiers))) {
throw new RuntimeException(
"Main method is not public and static on " + className);
}
//3.通过抛出异常启动ActivityThread.main方法,同前文
throw new Zygote.MethodAndArgsCaller(m, argv);
}
|
回到ZygoteInit.main,此处捕获到Zygote.MethodAndArgsCaller异常后,调用caller.run方法
1
2
3
4
5
6
7
8
9
10
11
12
13
14
15
|
//frameworks/base/core/java/com/android/internal/os/ZygoteInit.java
public static void main(String argv[]) {
......
try {
......
zygoteServer.closeServerSocket();
} catch (Zygote.MethodAndArgsCaller caller) {
caller.run();
} catch (Throwable ex) {
Log.e(TAG, "System zygote died with exception", ex);
zygoteServer.closeServerSocket();
throw ex;
}
}
|
MethodAndArgsCaller是zygote的静态内部类
捕获到异常后通过反射获取方法,再通过invoke调用ActivityThread.main方法
1
2
3
4
5
6
7
8
9
10
11
12
13
14
15
16
17
18
19
20
21
22
23
24
25
26
27
28
29
30
31
|
//frameworks/base/core/java/com/android/internal/os/Zygote.java
public static class MethodAndArgsCaller extends Exception
implements Runnable {
/** method to call */
private final Method mMethod;
/** argument array */
private final String[] mArgs;
public MethodAndArgsCaller(Method method, String[] args) {
mMethod = method;
mArgs = args;
}
public void run() {
try {
//通过反射调用
mMethod.invoke(null, new Object[] { mArgs });
} catch (IllegalAccessException ex) {
throw new RuntimeException(ex);
} catch (InvocationTargetException ex) {
Throwable cause = ex.getCause();
if (cause instanceof RuntimeException) {
throw (RuntimeException) cause;
} else if (cause instanceof Error) {
throw (Error) cause;
}
throw new RuntimeException(ex);
}
}
}
|
至此为止,应用程序进程就成功创建,并运行了主线程的管理类ActivityThread
十四. 创建Application详解
参考Android中Application的创建流程
在学习Android进程启动时我们知道,AMS会向目标应用程序进程的ApplicationThread发起启动Activity的请求
之后ApplicationThread调用scheduleLaunchActivity方法向ActivityThread请求启动Activity
那么在此之前ApplicationThread对应的Application是何时被创建的呢?
实际上,Android系统中,系统进程和一般App进程的Application创建流程有所不同,我们主要关注一般的用户App进程
我们知道,应用程序进程创建后,通过Zygote.MethodAndArgsCaller回调ActivityThread.main方法
ActivityThread.main
1
2
3
4
5
6
7
8
9
10
11
12
13
14
15
16
17
18
19
20
21
22
23
24
25
26
27
28
29
30
31
32
33
34
35
36
37
38
39
40
41
42
43
44
45
46
47
48
49
|
//frameworks/base/core/java/android/app/ActivityThread.java
public static void main(String[] args) {
//开始跟踪,标记为"ActivityThreadMain"
Trace.traceBegin(Trace.TRACE_TAG_ACTIVITY_MANAGER, "ActivityThreadMain");
//启动采样分析器集成,用于性能分析
SamplingProfilerIntegration.start();
//关闭CloseGuard,默认情况下它是启用的,但在此处将其禁用.CloseGuard用于检测资源没有正确关闭的情况
CloseGuard.setEnabled(false);
//初始化当前用户的环境变量
Environment.initForCurrentUser();
//设置事件日志的报告器,用于在libcore中记录事件日志
EventLogger.setReporter(new EventLoggingReporter());
//寻找CA证书的存储位置并设置为默认的CA证书存储位置
final File configDir = Environment.getUserConfigDirectory(UserHandle.myUserId());
TrustedCertificateStore.setDefaultUserDirectory(configDir);
//设置当前进程的argv[0]值为"<pre-initialized>"
Process.setArgV0("<pre-initialized>");
//1.创建主线程的looper
Looper.prepareMainLooper();
//2.创建线程并将当前线程附加到ActivityThread,参数false表示不使用新线程
ActivityThread thread = new ActivityThread();
thread.attach(false);
//3.如果sMainThreadHandler为空,则将其设置为ActivityThread的Handler.
if (sMainThreadHandler == null) {
sMainThreadHandler = thread.getHandler();
}
//永假,可忽略
if (false) {
Looper.myLooper().setMessageLogging(new LogPrinter(Log.DEBUG, "ActivityThread"));
}
//结束跟踪
Trace.traceEnd(Trace.TRACE_TAG_ACTIVITY_MANAGER);
//4.开始主线程的消息循环
Looper.loop();
throw new RuntimeException("Main thread loop unexpectedly exited");
}
|
我们主要关注以下两行代码
创建ActivityThread线程并将当前线程附加到ActivityThread,参数false表示不使用新线程
1
2
|
ActivityThread thread = new ActivityThread();
thread.attach(false);
|
ActivityThread.attach
调用的ActivityThread.attach方法代码如下,内部调用了AMS的attachApplication
1
2
3
4
5
6
7
8
9
10
11
12
13
14
15
16
17
18
19
20
21
22
23
24
25
26
27
28
29
30
31
32
33
34
35
36
37
38
39
40
41
42
43
|
//frameworks/base/core/java/android/app/ActivityThread.java
private void attach(boolean system) {
sCurrentActivityThread = this;
mSystemThread = system;
//应用程序进程进入该分支
if (!system) {
ViewRootImpl.addFirstDrawHandler(new Runnable() {
@Override
public void run() {
ensureJitEnabled();
}
});
android.ddm.DdmHandleAppName.setAppName("<pre-initialized>",
UserHandle.myUserId());
//初始化RuntimeInit.mApplicationObject
RuntimeInit.setApplicationObject(mAppThread.asBinder());
final IActivityManager mgr = ActivityManager.getService();
try {
//通过AMS附加目标应用程序进程ApplicationThread
mgr.attachApplication(mAppThread);
} catch (RemoteException ex) {
throw ex.rethrowFromSystemServer();
}
// Watch for getting close to heap limit.
//......
} else {
// Don't set application object here -- if the system crashes,
// we can't display an alert, we just want to die die die.
android.ddm.DdmHandleAppName.setAppName("system_process",
UserHandle.myUserId());
try {
mInstrumentation = new Instrumentation();
ContextImpl context = ContextImpl.createAppContext(
this, getSystemContext().mPackageInfo);
mInitialApplication = context.mPackageInfo.makeApplication(true, null);
mInitialApplication.onCreate();
} catch (Exception e) {
throw new RuntimeException(
"Unable to instantiate Application():" + e.toString(), e);
}
}
//......
}
|
ActivityManagerService.attachApplication
attachApplication内部通过attachApplicationLocked为应用程序进程附加Application
1
2
3
4
5
6
7
8
9
10
11
|
//frameworks/base/services/core/java/com/android/server/am/ActivityManagerService.java
public final void attachApplication(IApplicationThread thread) {
synchronized (this) {
int callingPid = Binder.getCallingPid(); //获取调用者的pid
//临时清除调用者的身份信息,返回唯一标识符以便后续恢复调用者身份
final long origId = Binder.clearCallingIdentity();
//给调用进程附加Application
attachApplicationLocked(thread, callingPid);
//恢复之前清除的调用者身份
Binder.restoreCallingIdentity(origId);
}
|
ActivityManagerService.attachApplicationLocked
attachApplicationLocked内部主要调用IApplicationThread.bindApplication
1
2
3
4
5
6
7
8
9
10
11
12
13
14
15
16
17
18
19
20
21
22
23
24
25
26
27
28
29
30
31
32
33
34
35
36
|
//frameworks/base/services/core/java/com/android/server/am/ActivityManagerService.java
private final boolean attachApplicationLocked(IApplicationThread thread, int pid) {
ProcessRecord app;
long startTime = SystemClock.uptimeMillis();
if (pid != MY_PID && pid >= 0) {
synchronized (mPidsSelfLocked) {
app = mPidsSelfLocked.get(pid);//根据pid获取ProcessRecord应用程序进程描述类
}
}
...
try {
...
ApplicationInfo appInfo = app.instr != null ? app.instr.mTargetInfo : app.info;
...
if (app.instr != null) {
//
thread.bindApplication(processName, appInfo, providers,
app.instr.mClass,
profilerInfo, app.instr.mArguments,
app.instr.mWatcher,
app.instr.mUiAutomationConnection, testMode,
mBinderTransactionTrackingEnabled, enableTrackAllocation,
isRestrictedBackupMode || !normalMode, app.persistent,
new Configuration(getGlobalConfiguration()), app.compat,
getCommonServicesLocked(app.isolated),
mCoreSettingsObserver.getCoreSettingsLocked(),
buildSerial);
} else {
//调用thread.bindApplication不同参数的重载
...
}
...
}
...
}
|
IApplicationThread.bindApplication
bindApplication内部创建AppBindData实例并赋值,之后调用sendMessage将BIND_APPLICATION消息发送至应用程序消息队列
1
2
3
4
5
6
7
8
9
10
11
12
13
14
15
16
17
18
19
20
21
22
23
24
25
26
27
28
29
30
31
32
33
34
35
36
37
38
|
public final void bindApplication(String processName, ApplicationInfo appInfo,
List<ProviderInfo> providers, ComponentName instrumentationName,
ProfilerInfo profilerInfo, Bundle instrumentationArgs,
IInstrumentationWatcher instrumentationWatcher,
IUiAutomationConnection instrumentationUiConnection, int debugMode,
boolean enableBinderTracking, boolean trackAllocation,
boolean isRestrictedBackupMode, boolean persistent, Configuration config,
CompatibilityInfo compatInfo, Map services, Bundle coreSettings,
String buildSerial) {
if (services != null) {
// Setup the service cache in the ServiceManager
ServiceManager.initServiceCache(services);
}
setCoreSettings(coreSettings);
//创建AppBindData实例并赋值
AppBindData data = new AppBindData();
data.processName = processName;
data.appInfo = appInfo;
data.providers = providers;
data.instrumentationName = instrumentationName;
data.instrumentationArgs = instrumentationArgs;
data.instrumentationWatcher = instrumentationWatcher;
data.instrumentationUiAutomationConnection = instrumentationUiConnection;
data.debugMode = debugMode;
data.enableBinderTracking = enableBinderTracking;
data.trackAllocation = trackAllocation;
data.restrictedBackupMode = isRestrictedBackupMode;
data.persistent = persistent;
data.config = config;
data.compatInfo = compatInfo;
data.initProfilerInfo = profilerInfo;
data.buildSerial = buildSerial;
//调用sendMessage方法将BIND_APPLICATION消息添加至消息队列
sendMessage(H.BIND_APPLICATION, data);
}
|
ActivityThread.handleMessage
ActivityThread.main中通过Looper.loop启动了主线程消息循环,并通过handleMessage处理消息,内部调用handleBindApplication
1
2
3
4
5
6
7
8
9
10
11
12
|
//frameworks/base/core/java/android/app/ActivityThread.java
public void handleMessage(Message msg) {
switch (msg.what) {
...
case BIND_APPLICATION:
AppBindData data = (AppBindData)msg.obj; //转换消息传递来的参数为AppBindData类型
handleBindApplication(data); //
break;
...
}
...
}
|
ActivityThread.handleBindApplication
handleBindApplication代码如下,主要执行以下步骤
注释1处 获取LoadedApk对象,设置到AppBindData.info字段,用于创建appContext
注释2处 创建ContextImpl对象即appContext
注释3处 反射调用LoadedApk.makeApplication方法创建Application对象
注释4处 调用Application.onCreate方法
1
2
3
4
5
6
7
8
9
10
11
12
13
14
15
16
17
18
19
20
21
22
23
24
25
26
27
28
29
30
31
32
33
34
35
|
//frameworks/base/core/java/android/app/ActivityThread.java
private void handleBindApplication(AppBindData data) {
//......
mBoundApplication = data;
//......
//1.获取LoadedApk对象
data.info = getPackageInfoNoCheck(data.appInfo, data.compatInfo);
//......
//2.创建appContext
final ContextImpl appContext = ContextImpl.createAppContext(this, data.info);
//......
try {
//3.通过反射创建目标应用Application对象,此处data.info指LoadedApk
Application app = data.info.makeApplication(data.restrictedBackupMode, null);
mInitialApplication = app;
//......
try {
//调用空方法
mInstrumentation.onCreate(data.instrumentationArgs);
}
//......
try {
//4.调用Application.onCreate方法
mInstrumentation.callApplicationOnCreate(app);
}
//......
} finally {
StrictMode.setThreadPolicy(savedPolicy);
}
// Preload fonts resources
//...d...
}
|
依次查看涉及到的方法
ActivityThread.getPackageInfoNoCheck
getPackageInfoNoCheck 创建LoadedApk对象,并加入到mPackages中,之后为LoadedApk设置ApplicationInfo和ClassLoader
每个app会创建唯一的LoadedApk对象
1
2
3
4
5
6
7
8
9
10
11
12
13
14
15
16
17
18
19
20
21
22
23
24
25
26
27
28
29
30
31
32
33
34
35
36
37
38
39
40
41
42
43
44
45
46
47
48
49
50
51
|
//路径: /frameworks/base/core/java/android/app/ActivityThread.java
public final LoadedApk getPackageInfoNoCheck(ApplicationInfo ai, CompatibilityInfo compatInfo) {
return getPackageInfo(ai, compatInfo, null, false, true, false);
}
private LoadedApk getPackageInfo(ApplicationInfo aInfo, CompatibilityInfo compatInfo,
ClassLoader baseLoader, boolean securityViolation, boolean includeCode,
boolean registerPackage) {
final boolean differentUser = (UserHandle.myUserId() != UserHandle.getUserId(aInfo.uid));
synchronized (mResourcesManager) {
WeakReference<LoadedApk> ref;
// 根据不同的情况获取缓存的LoadedApk对象
if (differentUser) {
// Caching not supported across users
ref = null;
} else if (includeCode) {
ref = mPackages.get(aInfo.packageName);
} else {
ref = mResourcePackages.get(aInfo.packageName);
}
LoadedApk packageInfo = ref != null ? ref.get() : null;
if (packageInfo == null || (packageInfo.mResources != null
&& !packageInfo.mResources.getAssets().isUpToDate())) {
...
//创建LoadedApk对象
packageInfo = new LoadedApk(this, aInfo, compatInfo, baseLoader,
securityViolation, includeCode &&
(aInfo.flags&ApplicationInfo.FLAG_HAS_CODE) != 0, registerPackage);
if (mSystemThread && "android".equals(aInfo.packageName)) {
//设置ApplicationInfo和ClassLoader
packageInfo.installSystemApplicationInfo(aInfo,
getSystemContext().mPackageInfo.getClassLoader());
}
if (differentUser) {
// Caching not supported across users
} else if (includeCode) {
//更新mPackages,即将刚创建的packageInfo加入
mPackages.put(aInfo.packageName,
new WeakReference<LoadedApk>(packageInfo));
} else {
mResourcePackages.put(aInfo.packageName,
new WeakReference<LoadedApk>(packageInfo));
}
}
return packageInfo;
}
}
|
LoadedApk.installSystemApplicationInfo
1
2
3
4
5
6
|
//frameworks/base/core/java/android/app/LoadedApk.java
void installSystemApplicationInfo(ApplicationInfo info, ClassLoader classLoader) {
assert info.packageName.equals("android");
mApplicationInfo = info;
mClassLoader = classLoader;
}
|
ContextImpl.createAppContext
创建ContextImpl实例并为其设置资源
1
2
3
4
5
6
7
8
|
//frameworks/base/core/java/android/app/ContextImpl.java
static ContextImpl createAppContext(ActivityThread mainThread, LoadedApk packageInfo) {
if (packageInfo == null) throw new IllegalArgumentException("packageInfo");
//创建实例,传入当前应用程序的主线程管理类ActivityThread和应用程序包描述类LoadedApk
ContextImpl context = new ContextImpl(null, mainThread, packageInfo, null, null, null, 0, null);
context.setResources(packageInfo.getResources());//设置app资源
return context;
}
|
ContextImpl.ContextImpl
构造函数中执行以下操作,完成之后便成功创建了AppContext
1
2
3
4
5
6
7
8
9
10
11
12
13
14
15
16
17
18
19
20
21
22
23
24
25
26
27
28
29
30
31
32
33
34
35
36
37
38
39
40
41
42
43
44
45
|
//frameworks/base/core/java/android/app/ContextImpl.java
private ContextImpl(@Nullable ContextImpl container, @NonNull ActivityThread mainThread,
@NonNull LoadedApk packageInfo, @Nullable String splitName,
@Nullable IBinder activityToken, @Nullable UserHandle user, int flags,
@Nullable ClassLoader classLoader) {
mOuterContext = this;
if ((flags & (Context.CONTEXT_CREDENTIAL_PROTECTED_STORAGE
| Context.CONTEXT_DEVICE_PROTECTED_STORAGE)) == 0) {
final File dataDir = packageInfo.getDataDirFile();
if (Objects.equals(dataDir, packageInfo.getCredentialProtectedDataDirFile())) {
flags |= Context.CONTEXT_CREDENTIAL_PROTECTED_STORAGE;
} else if (Objects.equals(dataDir, packageInfo.getDeviceProtectedDataDirFile())) {
flags |= Context.CONTEXT_DEVICE_PROTECTED_STORAGE;
}
}
mMainThread = mainThread;
mActivityToken = activityToken;
mFlags = flags;
//1.设置当前进程的用户
if (user == null) {
user = Process.myUserHandle();
}
mUser = user;
//2.将LoadedApk实例赋给mPackageInfo
mPackageInfo = packageInfo;
mSplitName = splitName;
mClassLoader = classLoader;
mResourcesManager = ResourcesManager.getInstance();
//根据传入的上下文对象container是否为空来进行不同操作
if (container != null) {
mBasePackageName = container.mBasePackageName;
mOpPackageName = container.mOpPackageName;
setResources(container.mResources);
mDisplay = container.mDisplay;
} else {//将刚刚创建的LoadedApk实例的信息赋值某些字段
mBasePackageName = packageInfo.mPackageName;
ApplicationInfo ainfo = packageInfo.getApplicationInfo();//实际上是空的对象
if (ainfo.uid == Process.SYSTEM_UID && ainfo.uid != Process.myUid()) {
mOpPackageName = ActivityThread.currentPackageName();
} else {
mOpPackageName = mBasePackageName;
}
}
mContentResolver = new ApplicationContentResolver(this, mainThread, user);
}
|
LoadedApk.makeApplication
注释1处 判断是否创建过Application,保证一个LoadedApk对象只创建一个对应的Application对象
注释2处 获取类加载器
注释3处 创建Application对象,内部调用Application.attachBaseContext方法
注释4处 调用Application.onCreate
1
2
3
4
5
6
7
8
9
10
11
12
13
14
15
16
17
18
19
20
21
22
23
24
25
26
27
28
29
30
31
32
33
34
35
36
37
|
//
public Application makeApplication(boolean forceDefaultAppClass,
Instrumentation instrumentation) {
//1.判断是否已经创建Application
if (mApplication != null) {
return mApplication;
}
//......
Application app = null;
String appClass = mApplicationInfo.className;
if (forceDefaultAppClass || (appClass == null)) {//传入的参数为true,进入该分支
appClass = "android.app.Application";//system_server进程进入该分支
}
try {
//2.获取类加载器
java.lang.ClassLoader cl = getClassLoader();
if (!mPackageName.equals("android")) {//在之前流程可知默认android,显然不进入此分支
initializeJavaContextClassLoader();
}
ContextImpl appContext = ContextImpl.createAppContext(mActivityThread, this);
//3.通过类名创建Application对象,内部调用了Application.attachBaseContext
app = mActivityThread.mInstrumentation.newApplication(cl, appClass, appContext);
appContext.setOuterContext(app);
}
//......
mActivityThread.mAllApplications.add(app);//加入到Application列表中,一个进程可以有多个application
mApplication = app;//将刚刚创建的Application对象app赋值给mApplication
if (instrumentation != null) {//传入的instrumentation为null,不进入此分支
try {
//4.调用Application.onCreate
instrumentation.callApplicationOnCreate(app);
}
//.......
}
//......
return app;
}
|
Instrumentation.newApplication
使用指定的类加载器,通过类名创建Application实例,并调用Application.atach方法,内部调用attachBaseContext
这也是为什么壳程序要先替换ClassLoader再创建Application
因为创建Application实例依赖到指定的ClassLoader,如果没有通过ClassLoader获取到被保护程序的dex文件,则无法成功创建
1
2
3
4
5
6
7
8
9
10
|
//frameworks/base/core/java/android/app/Instrumentation.java
public Application newApplication(ClassLoader cl, String className, Context context) throws InstantiationException, IllegalAccessException, ClassNotFoundException {
return newApplication(cl.loadClass(className), context);
}
static public Application newApplication(Class<?> clazz, Context context) throws InstantiationException, IllegalAccessException, ClassNotFoundException {
Application app = (Application)clazz.newInstance();
app.attach(context);
return app;
}
|
Application.attach
调用父类的attachBaseContext并设置LoadedApk
1
2
3
4
5
|
//frameworks/base/core/java/android/app/Application.java
/* package */ final void attach(Context context) {
attachBaseContext(context);
mLoadedApk = ContextImpl.getImpl(context).mPackageInfo;
}
|
在壳Application的attachBaseContext中,替换ClassLoader
在壳Application的onCreate中,替换Application
因为在执行attachBaseContext时,已经创建好LoadedApk,ClassLoader,Application
其中LoadedApk用于描述apk文件本身,并不影响类的加载,类的加载主要通过ClassLoader进行
替换ClassLoader后,便可以正确加载源程序相关类,包括创建源程序的Application
在此之后,需要在Application.onCreate替换Application
因为LoadedApk.makeApplication中调用的是壳Application的实例方法,并且必定会执行onCreate
如果在attachBaseContext中替换了Application并执行可能会导致冲突: 壳Application.attachBaseContext创建并调用源Application相关方法后又调用壳Application.onCreate
Instrumentation.callApplicationOnCreate
调用Application.onCreate
1
2
3
4
5
6
7
|
//frameworks/base/core/java/android/app/Instrumentation.java
public void callApplicationOnCreate(Application app) {
app.onCreate();
}
public void onCreate(Bundle arguments) {
}
|
十五. 启动根Activity详解
当应用程序进程启动后就该启动应用程序了,即启动根Activity
Activity启动分为两种:
- 根Activity启动: 也称为APP冷启动,App还没有启动,一般从Launcher界面启动
- 普通Activity启动: APP已经启动,一般在APP内从一个Activity启动另一个Activity
两者主流程基本一致,区别在于根Activity启动流程还包含启动APP进程和实例化Application的流程
ActivityThread启动Activity的过程
经过以上流程之后,代码逻辑运行在应用程序进程中,ActivityThread启动Activity的时序图如下

ApplicationThread是ActivityThread的内部类,应用程序进程创建后会运行代表主线程的实例ActivityThread用于管理主线程
接着查看ApplicationThread.scheduleLaunchActivity方法:
- 使用updateProcessState更新进程状态
- 将要启动的Activity的参数封装成ActivityClientRecord
- 通过sendMessage向H类发送类型为LAUNCH_ACTIVITY的消息
1
2
3
4
5
6
7
8
9
10
11
12
13
14
15
16
17
18
19
20
21
22
23
24
25
26
27
28
29
30
31
32
33
34
35
36
37
38
39
40
|
//frameworks/base/core/java/android/app/ActivityThread.java
@Override
public final void scheduleLaunchActivity(Intent intent, IBinder token, int ident,
ActivityInfo info, Configuration curConfig, Configuration overrideConfig,
CompatibilityInfo compatInfo, String referrer, IVoiceInteractor voiceInteractor,
int procState, Bundle state, PersistableBundle persistentState,
List<ResultInfo> pendingResults, List<ReferrerIntent> pendingNewIntents,
boolean notResumed, boolean isForward, ProfilerInfo profilerInfo) {
//更新进程状态
updateProcessState(procState, false);
//将要启动的Activity的参数封装成ActivityClientRecord
ActivityClientRecord r = new ActivityClientRecord();
r.token = token;
r.ident = ident;
r.intent = intent;
r.referrer = referrer;
r.voiceInteractor = voiceInteractor;
r.activityInfo = info;
r.compatInfo = compatInfo;
r.state = state;
r.persistentState = persistentState;
r.pendingResults = pendingResults;
r.pendingIntents = pendingNewIntents;
r.startsNotResumed = notResumed;
r.isForward = isForward;
r.profilerInfo = profilerInfo;
r.overrideConfig = overrideConfig;
//更新要要启动Activity的配置
updatePendingConfiguration(curConfig);
//向H类发送类型为LAUNCH_ACTIVITY的消息
sendMessage(H.LAUNCH_ACTIVITY, r);
}
|
sendMessage有多个重载,调用到的如下所示
mH指的是H类,他是ActivityThread的内部类并继承自Handler,是应用程序进程中主线程的消息管理类
由于ApplicationThread是一个Binder,它的调用逻辑在Binder线程池中,此处需要使用H将代码逻辑切换回主线程
sendMessage方法将消息添加到消息队列中,消息处理程序会自动从消息队列取出消息并调用对应的handleMessage方法处理
1
2
3
4
5
6
7
8
9
10
11
12
13
14
15
16
17
18
19
20
21
|
//frameworks/base/core/java/android/app/ActivityThread.java
private void sendMessage(int what, Object obj) {
sendMessage(what, obj, 0, 0, false);
}
private void sendMessage(int what, Object obj, int arg1, int arg2, boolean async) {
if (DEBUG_MESSAGES) Slog.v(
TAG, "SCHEDULE " + what + " " + mH.codeToString(what)
+ ": " + arg1 + " / " + obj);
//获取消息实例
Message msg = Message.obtain();
msg.what = what;
msg.obj = obj;
msg.arg1 = arg1;
msg.arg2 = arg2;
//是否是异步消息
if (async) {
msg.setAsynchronous(true);
}
//调用消息处理程序 mH.sendMessage将消息发送出去
mH.sendMessage(msg);
}
|
handleMessage方定义在H类中,代码如下
-
注释1处 将msg的obj成员转换为ActivityClientRecord
-
注释2处 通过getPackageInfoNoCheck获取LoadedApk对象,并赋值给ActivityClientRecord.packageInfo
应用程序进程要启动Activity时,需要将该Activity所属的APK加载进进程
而LoadedApk就是用于描述已加载的APK文件的
-
注释3处 调用handleLaunchActivity启动Activity
1
2
3
4
5
6
7
8
9
10
11
12
13
14
15
16
17
18
19
20
21
22
23
24
25
26
27
28
29
30
31
|
//frameworks/base/core/java/android/app/ActivityThread.java
private class H extends Handler {
public static final int LAUNCH_ACTIVITY = 100;
public static final int PAUSE_ACTIVITY = 101;
//......
public void handleMessage(Message msg) {
if (DEBUG_MESSAGES) Slog.v(TAG, ">>> handling: " + codeToString(msg.what));
switch (msg.what) {
case LAUNCH_ACTIVITY: {
Trace.traceBegin(Trace.TRACE_TAG_ACTIVITY_MANAGER, "activityStart");
//1.将msg的obj成员转换为ActivityClientRecord
final ActivityClientRecord r = (ActivityClientRecord) msg.obj;
//2.通过getPackageInfoNoCheck获取LoadedApk类型的对象
//并赋值给ActivityClientRecord的成员packageInfo
r.packageInfo = getPackageInfoNoCheck(
r.activityInfo.applicationInfo, r.compatInfo);
//3.调用handleLaunchActivity启动Activity
handleLaunchActivity(r, null, "LAUNCH_ACTIVITY");
Trace.traceEnd(Trace.TRACE_TAG_ACTIVITY_MANAGER);
} break;
//......
}
Object obj = msg.obj;
if (obj instanceof SomeArgs) {
((SomeArgs) obj).recycle();
}
if (DEBUG_MESSAGES) Slog.v(TAG, "<<< done: " + codeToString(msg.what));
}
//......
}
|
handleLaunchActivity代码如下
执行完部分初始化操作后,在注释1处调用performLaunchActivity启动Activity
若得到的Activity!=null则设置为Resume状态,否则通知AMS停止启动Activity
1
2
3
4
5
6
7
8
9
10
11
12
13
14
15
16
17
18
19
20
21
22
23
24
25
26
27
28
29
30
31
32
33
34
35
36
37
38
39
40
41
42
43
44
45
46
47
48
49
50
51
52
53
54
55
56
57
58
59
60
61
62
63
64
65
66
67
|
//frameworks/base/core/java/android/app/ActivityThread.java
private void handleLaunchActivity(ActivityClientRecord r, Intent customIntent, String reason) {
// If we are getting ready to gc after going to the background, well
// we are back active so skip it.
//取消之前计划的GC(垃圾回收机制)操作,因为应用程序正在重新变为活动状态
unscheduleGcIdler();
mSomeActivitiesChanged = true;
//如果ActivityClientRecord对象中包含了profilerInfo(性能分析器相关信息),则将其设置到mProfiler中,并启动性能分析器
if (r.profilerInfo != null) {
mProfiler.setProfiler(r.profilerInfo);
mProfiler.startProfiling();//启动性能分析器
}
// Make sure we are running with the most recent config.
//处理配置变更,确保当前运行时使用的是最新的配置信息
handleConfigurationChanged(null, null);
if (localLOGV) Slog.v(
TAG, "Handling launch of " + r);
// Initialize before creating the activity
//初始化窗口管理器
WindowManagerGlobal.initialize();
//1.启动Activity
Activity a = performLaunchActivity(r, customIntent);
if (a != null) {
r.createdConfig = new Configuration(mConfiguration);
reportSizeConfigurations(r);
Bundle oldState = r.state;
//2.将Activity的状态设置为Resume
handleResumeActivity(r.token, false, r.isForward,
!r.activity.mFinished && !r.startsNotResumed, r.lastProcessedSeq, reason);
if (!r.activity.mFinished && r.startsNotResumed) {
// The activity manager actually wants this one to start out paused, because it
// needs to be visible but isn't in the foreground. We accomplish this by going
// through the normal startup (because activities expect to go through onResume()
// the first time they run, before their window is displayed), and then pausing it.
// However, in this case we do -not- need to do the full pause cycle (of freezing
// and such) because the activity manager assumes it can just retain the current
// state it has.
performPauseActivityIfNeeded(r, reason);
// We need to keep around the original state, in case we need to be created again.
// But we only do this for pre-Honeycomb apps, which always save their state when
// pausing, so we can not have them save their state when restarting from a paused
// state. For HC and later, we want to (and can) let the state be saved as the
// normal part of stopping the activity.
if (r.isPreHoneycomb()) {
r.state = oldState;
}
}
} else {
// If there was an error, for any reason, tell the activity manager to stop us.
try {
//3.如果a==null则通知AMS停止启动Activity
ActivityManager.getService()
.finishActivity(r.token, Activity.RESULT_CANCELED, null,
Activity.DONT_FINISH_TASK_WITH_ACTIVITY);
} catch (RemoteException ex) {
throw ex.rethrowFromSystemServer();
}
}
}
|
performLaunchActivity代码如下:
-
注释1处 获取ActivityInfo,用于存储代码以及AndroidManifest设置的Activity和Receiver结点信息,例如Activity的theme和launchMode
-
注释2处 获取APK文件的描述类LoadedApk
-
注释3处 获取要启动的Activity的ComponentName,该类保存该Activity的包名和类名
-
注释4处 为Activity创建上下文环境
-
注释5处 根据ComponentName存储的Activity类名,通过类加载器创建Activity的实例
-
注释6处 创建应用程序对象Application,makeApplication内部会调用Application.attachBaseContext和onCreate
注意: ActivityThread.main中会创建LoadedApk对象并调用makeApplication方法,创建主进程的application
此处调用主要是处理activity可能位于子进程,也需要application(一个进程对应一个application)
-
注释7处 调用Activity.attach方法初始化Activity,内部会创建Window对象PhoneWindow,并与Activity自身进行关联
-
注释8处 调用Instrumentation.callActivityOnCreate启动Activity
1
2
3
4
5
6
7
8
9
10
11
12
13
14
15
16
17
18
19
20
21
22
23
24
25
26
27
28
29
30
31
32
33
34
35
36
37
38
39
40
41
42
43
44
45
46
47
48
49
50
51
52
53
54
55
56
57
58
59
60
61
62
63
64
65
66
67
68
69
70
71
72
73
|
//frameworks/base/core/java/android/app/ActivityThread.java
private Activity performLaunchActivity(ActivityClientRecord r, Intent customIntent) {
// System.out.println("##### [" + System.currentTimeMillis() + "] ActivityThread.performLaunchActivity(" + r + ")");
//1.通过ActivityClientRecord获取ActivityInfo类
ActivityInfo aInfo = r.activityInfo;
if (r.packageInfo == null) {
//2.获取APK文件的描述类LoadedApk
r.packageInfo = getPackageInfo(aInfo.applicationInfo, r.compatInfo,
Context.CONTEXT_INCLUDE_CODE);
}
//3.获取componentName,即Activity的全限定类名(包名和类名)
ComponentName component = r.intent.getComponent();
//......
//4.创建要启动的Activity的上下文环境
ContextImpl appContext = createBaseContextForActivity(r);
Activity activity = null;
try {
//5.创建类加载器并通过类加载器创建Activity实例
java.lang.ClassLoader cl = appContext.getClassLoader();
activity = mInstrumentation.newActivity(
cl, component.getClassName(), r.intent);
//......
} catch (Exception e) {
//......
}
try {
//6.创建应用程序对象Application实例
Application app = r.packageInfo.makeApplication(false, mInstrumentation);
//......
if (activity != null) {
//7.初始化Activity
//......
//对 Activity 进行初始化和连接关键组件
activity.attach(appContext, this, getInstrumentation(), r.token,
r.ident, app, r.intent, r.activityInfo, title, r.parent,
r.embeddedID, r.lastNonConfigurationInstances, config,
r.referrer, r.voiceInteractor, window, r.configCallback);
//......
//8.启动Activity
if (r.isPersistable()) {
mInstrumentation.callActivityOnCreate(activity, r.state, r.persistentState);
} else {
mInstrumentation.callActivityOnCreate(activity, r.state);
}
//......
r.paused = true;
mActivities.put(r.token, r);
} catch (SuperNotCalledException e) {
throw e;
} catch (Exception e) {
if (!mInstrumentation.onException(activity, e)) {
throw new RuntimeException(
"Unable to start activity " + component
+ ": " + e.toString(), e);
}
}
return activity;
}
|
Instrumentation.callActivityOnCreate代码如下
1
2
3
4
5
6
7
8
9
|
//frameworks/base/core/java/android/app/Instrumentation.java
public void callActivityOnCreate(Activity activity, Bundle icicle,
//执行预处理操作,例如设定主题样式、初始化资源等
prePerformCreate(activity);
//执行Activity的创建操作
activity.performCreate(icicle, persistentState);
//执行后处理操作,例如注册广播接收器、初始化数据等
postPerformCreate(activity);
}
|
调用的Activity.performCreate代码如下,主要是调用了Activity.onCreate方法
1
2
3
4
5
6
7
8
9
10
11
|
//frameworks/base/core/java/android/app/Activity.java
final void performCreate(Bundle icicle, PersistableBundle persistentState) {
//在Android 6.0及以上版本中,应用需要动态请求某些权限,该方法用于恢复之前的权限请求状态
restoreHasCurrentPermissionRequest(icicle);
//调用Activity的实际的onCreate方法,执行开发者在Activity中重写的onCreate方法
onCreate(icicle, persistentState);
//读取Activity的转场状态,即过渡动画的状态.这个方法将之前保存的转场状态恢复到当前Activity中
mActivityTransitionState.readState(icicle);
//执行一些通用的初始化操作
performCreateCommon();
}
|
根Activity启动过程中涉及的进程
根Activity启动过程中涉及四个进程: Zygote进程, Launcher进程, AMS所在进程(SystemServer进程), 应用程序进程
如果是普通Activity启动,只涉及到AMS所在进程和应用程序进程
它们之间的关系如图所示, 启动根Activity的流程: Launcher->AMS->Zygote->AMS->Application->Activity

时序图如下

十六. References
主要参考资料如下,部分资料可能有所遗漏:
Android系统源码 aospxref.com和cs.android.com
Android进阶解密 刘望舒著
Android应用安全防护和逆向分析 姜维编著
Android第一代加固壳的原理及实现 —— 落地加载
Android第二代加固壳的原理及实现 —— 不落地加载
Android一代整体壳简易实现和踩坑记录
Android二代抽取壳简易实现和踩坑记录
App加壳和脱壳
[原创]dex壳简单分析与实现过程
Android-Activity启动过程
dpt-shell
dpt-shell抽取壳项目源码及其逆向分析
[原创]dpt-shell源码详细解析(v1.11.3)
[原创]Android加壳与脱壳(11)——不落地加载壳的对抗研究
脱壳工具:
BlackDex
frida-dexdump
FART
Youpk
https://nop.gs
Dex2C和Dex VMP相关项目:
dex2c
dcc
nmmp