第1章 启程
1.1 Andorid系统架构
Andorid大致可以分为四层架构: Linux内核层,系统运行库层,应用框架层和应用层
-
Linux内核层
Android系统是基于Linux内核开发的,这层为Android设备的各种硬件提供了底层的驱动,如显示驱动、音频驱动、照相机驱动、蓝牙驱动、WIFI驱动、电源驱动等。也就是通过底层代码去调用硬件设备。
-
系统运行库层
这一层主要是C/C++实现,为安卓系统提供一些特性支持。比如SQLite库提供了对数据库的支持,OpenGl|ES库提供了对3D绘图的支持等。另外这一层还有一个安卓运行时库,是对上层Java的支持,上层Java最终会调用到该层的C/C++实现函数,其实也就是同一个功能函数的更底层版本。
-
应用框架层
提供了构建程序时使用的各种Java层API
-
应用层
所有安装在手机上的应用程序都属于这一层,例如系统自带的联系人,短信等程序
1.2 Andorid应用开发特色
-
四大组件
Android系统的四大组件分别是:
-
活动(Activity):在应用中能看到的东西都是放在活动中。
-
服务(Service):无法看到,它会一直在后台运行,即使用户退出了应用,服务可以继续运行。
-
广播接收器(Broadcast Receiver):允许应用接受来自各处的广播信息,比如电话、短信等。
-
内容提供器(Content Provider):为应用程序之间共享数据提供了可能,比如读取系统电话簿中的联系人。
-
系统控件
Android系统为开发者提供了丰富的系统控件,使得我们可以很轻松的编写出漂亮界面.当然,不满足系统控件自带的效果也可以定制属于自己的控件
-
SQLite数据库
Android系统自带轻量级、运算速度快的嵌入式关系型数据库,支持标准的SQL语法,还可以通过封装好的API进行操作
-
多媒体
Android系统提供了丰富的多媒体服务,如音乐,视频,录音,拍照,闹铃等等
-
地理位置定位
现在的安卓手机都内置GPS支持定位
1.3 搭建开发环境
- JDK
- Android SDK
- Android Studio
1.4 分析安卓程序
1.4.1 Project结构
-
.gradle和.idea:这两个目录下放置的都是Android Studio自动生成的一些文件,我们无须关心,也不要去手动编辑。
-
app:项目中的代码、资源等内容几乎都是放置在这个目录下的,开发工作也基本都是在这个目录下进行的
-
build:这个目录你也不需要过多关心,它主要包含了一些在编译时自动生成的文件。
-
gradle:这个目录下包含了gradle wrapper的配置文件,使用gradle wrapper的方式不需要提前将gradle下载好,而是会自动根据本地的缓存情况决定是否需要联网下载gradle。Android Studio默认没有启用gradlewrapper的方式,如果需要打开,可以点击Android Studio导航栏→File→Settings→Build, Execution,Deployment→Gradle,进行配置更改。
-
.gitignore这个文件是用来将指定的目录或文件排除在版本控制之外的
-
build.gradle:这是项目全局的gradle构建脚本,通常这个文件中的内容是不需要修改的
-
gradle.properties:这个文件是全局的gradle配置文件,在这里配置的属性将会影响到项目中所有的gradle编译脚本
-
gradlew和gradlew.bat:这两个文件是用来在命令行界面中执行gradle命令的,其中gradlew是在Linux或Mac系统中使用的,gradlew.bat是在Windows系统中使用的
-
HelloWorld.iml:iml文件是所有IntelliJ IDEA项目都会自动生成的一个文件(Android Studio是基于IntelliJ IDEA开发的),用于标识这是一个IntelliJ IDEA项目,我们不需要修改这个文件中的任何内容
-
local.properties:这个文件用于指定本机中的Android SDK路径,通常内容都是自动生成的,我们并不需要修改。除非你本机中的Android SDK位置发生了变化,那么就将这个文件中的路径改成新的位置即可
-
.settings.gradle:这个文件用于指定项目中所有引入的模块。由于HelloWorld项目中就只有一个app模块,因此该文件中也就只引入了app这一个模块。通常情况下模块的引入都是自动完成的,需要我们手动去修改这个文件的场景可能比较少
1.4.2 app目录
-
build:这个目录和外层的build目录类似,主要也是包含了一些在编译时自动生成的文件,不过它里面的内容会更多更杂,我们不需要过多关心
-
如果你的项目中使用到了第三方jar包,就需要把这些jar包都放在libs目录下,放在这个目录下的jar包都会被自动添加到构建路径里去
-
androidTest:此处是用来编写Android Test测试用例的,可以对项目进行一些自动化测试
-
毫无疑问,java目录是放置我们所有Java代码的地方,展开该目录,你将看到我们刚才创建的the_first_demo文件就在里面
-
res:这个目录下的内容就有点多了。简单点说,就是你在项目中使用到的所有图片、布局、字符串等资源都要存放在这个目录下。当然这个目录下还有很多子目录,图片放在drawable目录下,布局放在layout目录下,字符串放在values目录下,所以你不用担心会把整个res目录弄得乱糟糟的
-
AndroidManifest.xml:这是你整个Android项目的配置文件,你在程序中定义的所有四大组件都需要在这个文件里注册,另外还可以在这个文件中给应用程序添加权限声明
-
test:此处是用来编写Unit Test测试用例的,是对项目进行自动化测试的另一种方式
-
gitignore:这个文件用于将app模块内的指定的目录或文件排除在版本控制之外,作用和外层的.gitignore文件类似
-
build.gradle:这是app模块的gradle构建脚本,这个文件中会指定很多项目构建相关的配置
-
proguard-rules.pro:这个文件用于指定项目代码的混淆规则,当代码开发完成后打成安装包文件,如果不希望代码被别人破解,通常会将代码进行混淆,从而让破解者难以阅读
1.5 Log Utils
Android中的日志工具类是Log(android.util.Log),可以方便我们打印一些信息进行调试。这个类一共提供了5个方法供我们打印日志:
-
Log.v()
用于打印那些最为琐碎的、意义最小的日志信息。对应级别verbose,是Android日志里面级别最低的一种
-
Log.d()
用于打印一些调试信息,这些信息对你调试程序和分析问题应该是有帮助的。对应级别debug,比verbose高一级
-
Log.i()
用于打印一些比较重要的数据,这些数据应该是你非常想看到的、可以帮你分析用户行为数据。对应级别info,比debug高一级
-
Log.w()
用于打印一些警告信息,提示程序在这个地方可能会有潜在的风险,最好去修复一下这些出现警告的地方。对应级别warn,比info高一级
-
Log.e()
用于打印程序中的错误信息,比如程序进入到了catch语句当中。当有错误信息打印出来的时候,一般都代表你的程序出现严重问题了,必须尽快修复。对应级别error,比warn高一级
第2章 探究活动
2.1手动创建主活动
创建项目时选择NoActivity即可创建空活动项目
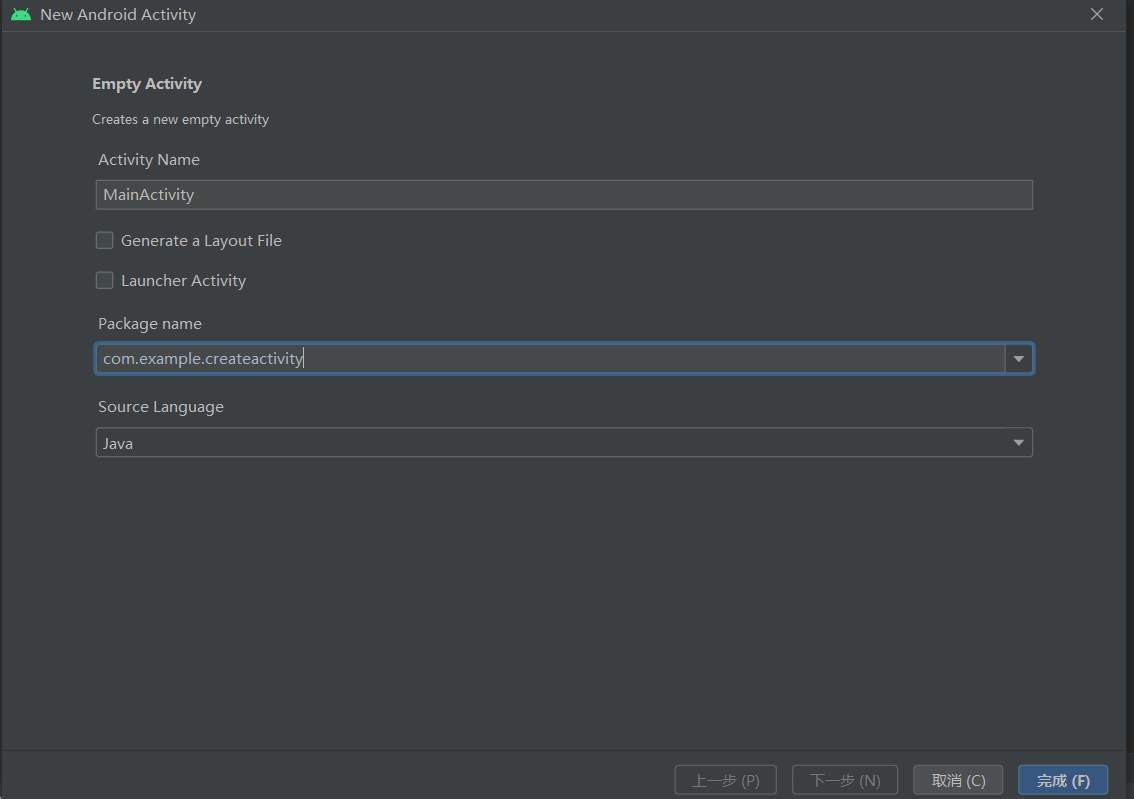
2.1.1 创建空白Activity
然后手动在app>src>main>java文件夹下新建一个空白Activity
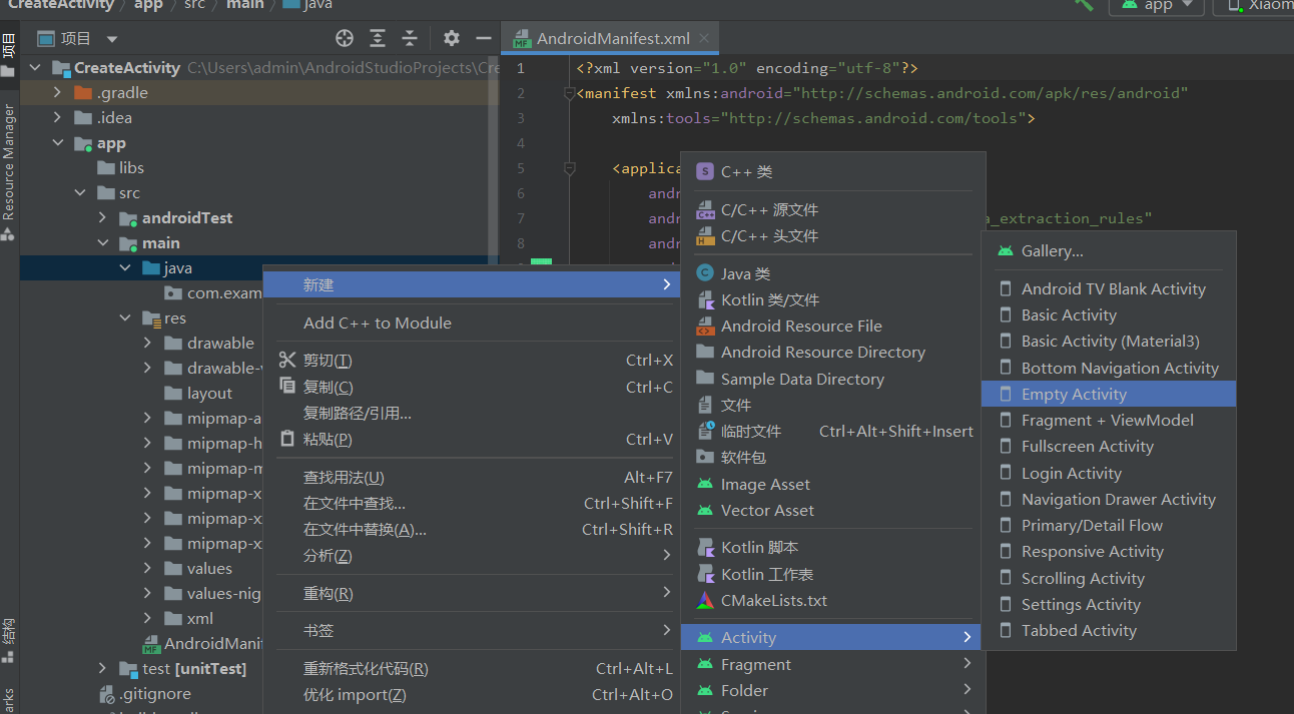
Generate a Layout File的作用是自动创建布局文件
Launcher Activity是将该Activity设置为主活动文件
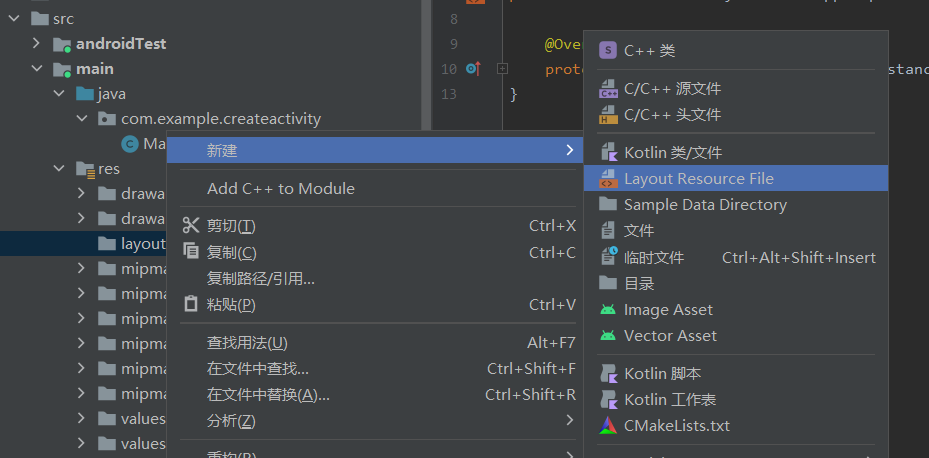
2.1.2 创建布局文件
创建活动对应的布局文件
默认布局为ConstraintLayout 感觉比较复杂可以手动更换为LinearLayout
注意添加andorid:orientation标签
 1
 2
 3
 4
 5
 6
 7
 8
 9
10
11
12
13
14
15
|
<?xml version="1.0" encoding="utf-8"?>
<LinearLayout xmlns:android="http://schemas.android.com/apk/res/android"
    android:layout_width="match_parent"
    android:layout_height="match_parent"
    android:orientation="vertical"
    >

    <TextView
        android:id="@+id/Hello"
        android:layout_width="match_parent"
        android:layout_height="wrap_content"
        android:text="HelloWorld"
        android:textAlignment="center" />

</LinearLayout>
|
2.1.3 注册主活动
再到AndroidManifest.xml文件中注册主活动
创建活动时会自动注册一些相关信息 添加下列两行代码注册为主活动
1
2
3
4
|
<intent-filter>
<action android:name="android.intent.action.MAIN"/>
<category android:name="android.intent.category.LAUNCHER"/>
</intent-filter>
|
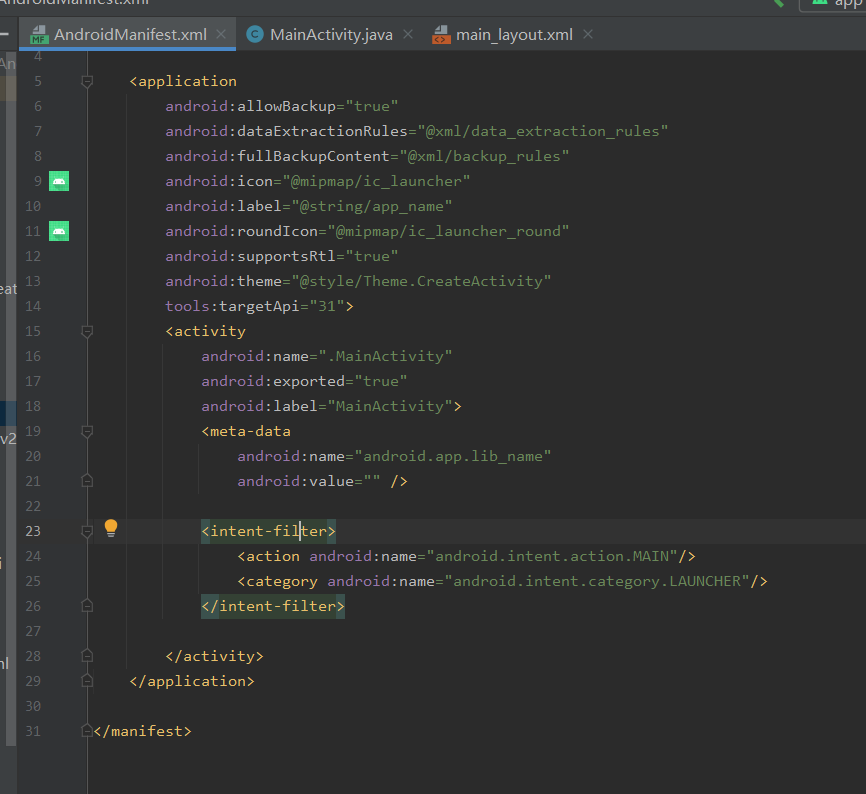
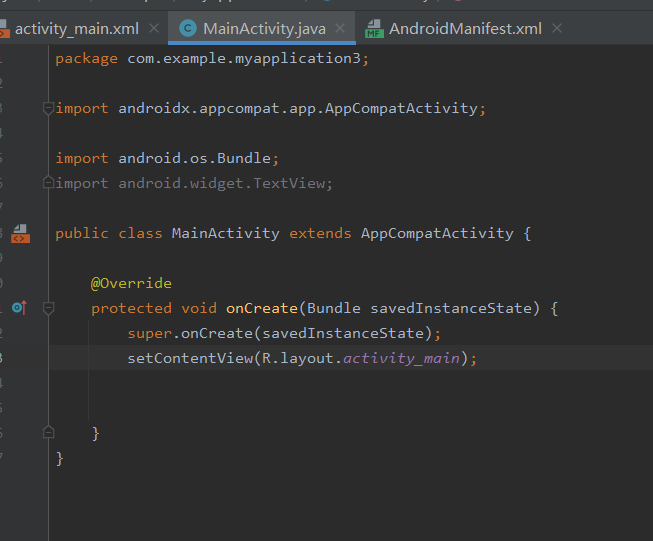
最后通过setContentView方法将布局和活动绑定
2.2 Intent跳转活动
2.2.1 显式跳转
使用Intent 类创建 第一个参数为当前活动this指针,第二个参数为跳转目标活动类
最后启动活动即可
 1
 2
 3
 4
 5
 6
 7
 8
 9
10
11
12
13
14
15
16
17
18
19
20
|
public class MainActivity extends AppCompatActivity {
    @Override
    protected void onCreate(Bundle savedInstanceState) {

        super.onCreate(savedInstanceState);
        setContentView(R.layout.main_layout);
        Context context=this;//环境 上下文
        Toast.makeText(this,"Hello",Toast.LENGTH_LONG).show();

        Button button1=(Button)findViewById(R.id.Button1);
        button1.setOnClickListener(new View.OnClickListener() {
            @Override
            public void onClick(View v) {//显式intent 很明显可以看到跳转逻辑
                Intent intent=new Intent(MainActivity.this,SecondActivity.class);
                startActivity(intent);
            }
        });

    }
}
|
布局
 1
 2
 3
 4
 5
 6
 7
 8
 9
10
11
12
13
14
|
<?xml version="1.0" encoding="utf-8"?>
<LinearLayout xmlns:android="h5
    android:layout_width="match_parent"
    android:layout_height="match_parent"
    android:orientation="vertical"
    android:gravity="center"
    >
    <Button
        android:id="@+id/Button1"
        android:layout_width="match_parent"
        android:layout_height="wrap_content"
        android:text="Jump to Second Activity"/>

</LinearLayout>
|
2.2.2 隐式跳转
隐式跳转首先要到AndoridManifest.xml文件中给活动设置intent-filter
添加action和category 这里都可以自定义
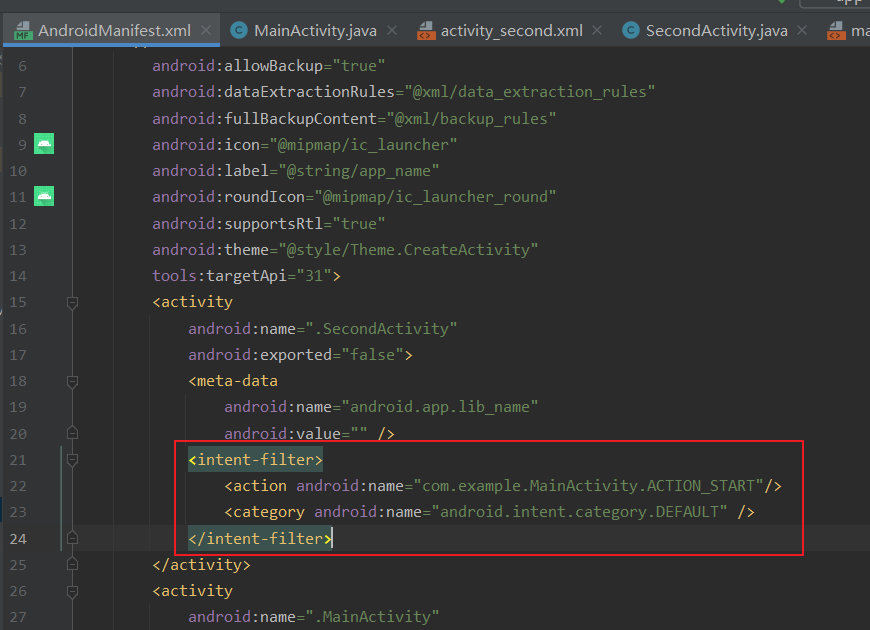
创建第二个活动,跳转到第一个活动中
每个intent只能指定一个action,可以指定多个category
必须当所有条件全部匹配时才能成功查找并跳转
 1
 2
 3
 4
 5
 6
 7
 8
 9
10
11
12
13
14
15
16
17
18
19
|
public class SecondActivity extends AppCompatActivity {

    @Override
    protected void onCreate(Bundle savedInstanceState) {
        super.onCreate(savedInstanceState);
        setContentView(R.layout.activity_second);
        Button button2=(Button)findViewById(R.id.Button2);
        button2.setOnClickListener(new View.OnClickListener() {
            @Override
            public void onClick(View v) {
                //每个intent只能指定一个action
                Intent intent=new Intent("com.example.MainActivity.ACTION_START");
                //可以指定多个category
                intent.addCategory("android.intent.category.DEFAULT");
                startActivity(intent);
            }
        });
    }
}
|
布局
 1
 2
 3
 4
 5
 6
 7
 8
 9
10
11
12
13
14
15
|
<?xml version="1.0" encoding="utf-8"?>
<LinearLayout xmlns:android="http://schemas.android.com/apk/res/android"
    xmlns:app="http://schemas.android.com/apk/res-auto"
    xmlns:tools="http://schemas.android.com/tools"
    android:layout_width="match_parent"
    android:layout_height="match_parent"
    android:gravity="center"
    tools:context=".SecondActivity">
    <Button
        android:id="@+id/Button2"
        android:layout_width="match_parent"
        android:layout_height="wrap_content"
        android:text="Jump to first activity"
        />
</LinearLayout>
|
2.2.3 更多隐式Intent的用法
跳转到网页
假设我们的应用程序需要展示一个网页,此时并不需要自己实现浏览器,只需要调用系统浏览器打开网页即可
1
2
3
4
5
|
public void onClick(View v) {//跳转到其他页面
                Intent intent=new Intent(Intent.ACTION_VIEW);
                intent.setData(Uri.parse("https://www.baidu.com"));
                startActivity(intent);
            }
|
Intent.ACTION_VIEW是一个安卓系统内置动作
Uri.parse()方法将网址字符串解析成一个Uri对象
setData方法接收Uri对象并指定intent正在操作的数据
我们也可以在intent-filter标签内设置data标签,用于指定当前活动能够响应什么数据
data中可以配置内容如下
1
2
3
4
5
|
android:scheme	//用于指定数据协议部分
android:host	//指定数据主机部分
android:port	//指定数据端口
android:path	//指定主机和端口后
android:mimeType	//指定可以处理的数据类型
|
只有data标签的内容和intent中携带的data完全一致时才可以响应,一般data中不会指定过多内容
跳转到程序
1
2
3
4
5
|
public void onClick(View v) {//跳转到其他页面
                Intent intent=new Intent(Intent.ACTION_VIEW);
                intent.setData(Uri.parse("tel:10086"));
                startActivity(intent);
            }
|
点击按钮后跳转到电话并且自动输入10086
2.2.4 向下一个活动传递数据
Intent启动活动时还可以传递数据
可以利用**intent.putExtra()**方法及其重载,将数据暂存在intent中,启动了另一个活动后只需要从intent中取出数据即可
参数以键值对形式传递
主活动,使用putExtra方法传递参数
1
2
3
4
5
6
7
8
9
|
button.setOnClickListener(new View.OnClickListener() {
            @Override
            public void onClick(View v) {
                String data="HelloActivity2!";
                Intent intent=new Intent(MainActivity.this,SecondActivity.class);
                intent.putExtra("data",data);
                startActivity(intent);
            }
        });
|
目标活动
首先要getIntent获取intent,再通过键名获取值
1
2
3
4
5
6
7
8
9
|
protected void onCreate(Bundle savedInstanceState) {
        super.onCreate(savedInstanceState);
        setContentView(R.layout.activity_second);
        TextView text=(TextView) findViewById(R.id.text);
        Intent intent=getIntent();//获取intent
        String data=intent.getStringExtra("data");
        text.setText(data);
        Log.d("MainActivityData=",data);
    }
|
2.2.5 返回数据给上一个活动
startActivityForResult()方法启动活动时,会期待目标活动返回一个值回来,参数为intent和请求码,请求码必须是唯一值
1
2
3
4
5
6
7
8
|
button.setOnClickListener(new View.OnClickListener() {
            @Override
            public void onClick(View v) {
                String data="HelloActivity2!";
                Intent intent=new Intent(MainActivity.this,SecondActivity.class);
                startActivityForResult(intent,1);
            }
        });
|
目标活动中创建intent用putExtra添加返回数据,再通过setResult()设置
这个intent并没有任何跳转的意图,只是用于数据传递而已
1
2
3
4
5
6
7
8
9
|
button2.setOnClickListener(new View.OnClickListener() {
            @Override
            public void onClick(View v) {
                Intent intent=new Intent();
                intent.putExtra("returnData","This is return data");
                setResult(RESULT_OK,intent);
                finish();
            }
        });
|
由于使用startActivityForResult启动目标活动,当目标活动被销毁时,会回调上一个活动的onActivityResult()方法
所以需要在主活动中重写该方法以得到返回数据
 1
 2
 3
 4
 5
 6
 7
 8
 9
10
11
12
|
protected void onActicityResult(int requestCode,int resultCode,Intent data){
        switch (requestCode){
            case 1:
                if(resultCode==RESULT_OK){
                    String returnData=data.getStringExtra("returnData");
                    Log.d("SecondActivityRetData=",returnData);

                }
                break;
            default:
        }
    }
|
2.3 活动的生命周期
2.3.1 返回栈
Android使用Task管理活动,一个Task就是一组放在返回栈(Back Stack)里的活动集合.
默认情况下,我们启动一个新活动则该活动入栈,并处于栈顶.当按下back键或者调用finish()销毁活动时活动出栈.系统总是将栈顶活动显示给用户
2.3.2 活动状态
每个活动在生命周期可能有四种状态
| 状态 |
位置 |
是否可见 |
系统回收 |
备注 |
| 运行状态 |
栈顶 |
可见 |
一般不回收 |
|
| 暂停状态 |
栈中 |
可见 |
一般不回收 |
活动仍然存活可见 |
| 停止状态 |
栈中 |
不可见 |
可能回收 |
保留状态和成员变量 |
| 销毁状态 |
移出栈 |
不可见 |
倾向回收 |
|
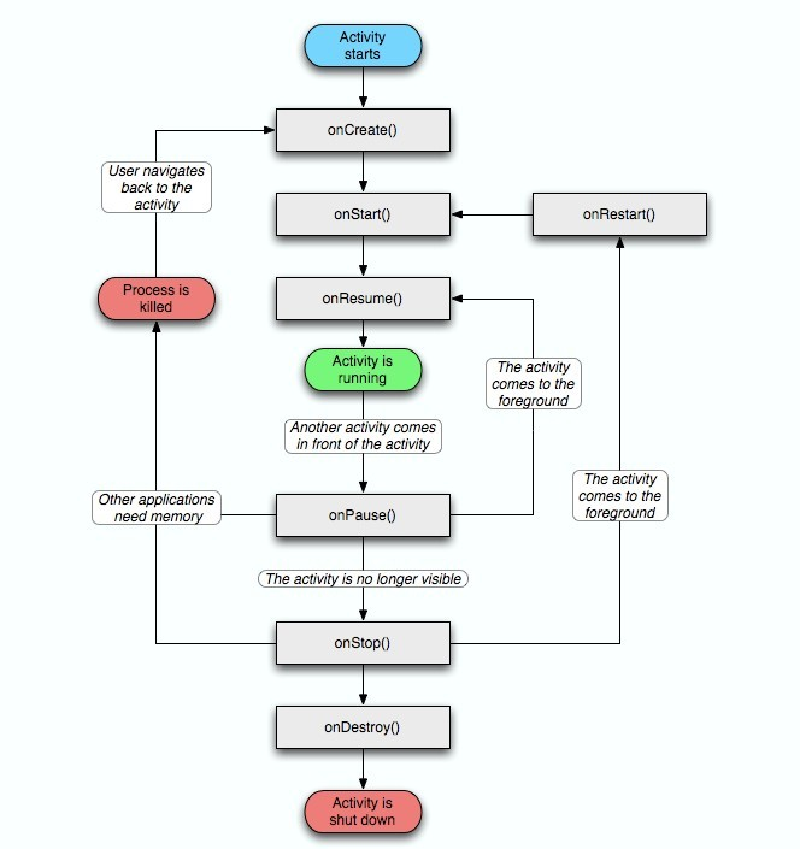
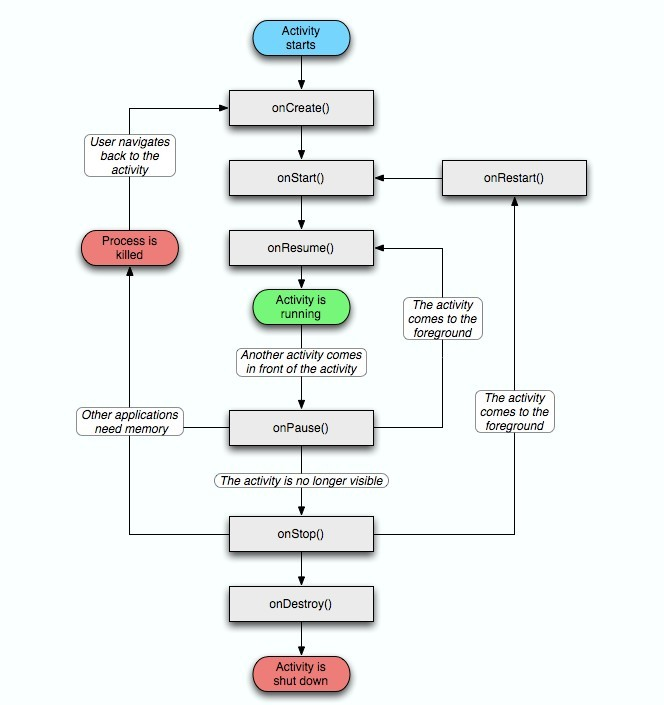
2.3.3 活动生存期
Activity类定义了7个回调方法,覆盖活动生命周期各个环节
| 方法 |
调用时机 |
备注 |
| onCreate() |
活动第一次创建时 |
完成初始化,加载布局,绑定事件等 |
| onStart() |
活动由不可见变为可见时 |
|
| onResume() |
活动准备好和用户进行交互时 |
此时活动必定位于栈顶且处于运行状态 |
| onPause() |
系统准备启动或恢复另一个活动时 |
在该方法中释放消耗CPU的资源,保存关键数据,防止影响新活动 |
| onStop() |
活动完全不可见时 |
如果新活动是对话框式,那么onPause()会执行而onStop不会执行 |
| onRestart() |
活动由停止变为运行前 |
活动重新启动时 |
| onDestory() |
活动被销毁前 |
之后活动变为销毁状态 |
活动可以分为3种生存期
-
完整生存期
活动在onCreate()和onDestroy()之间经历的,一般在onCreate()完成初始化,onDestroy释放内存
-
可见生存期
onStart()~onStop(),在此期间活动对于用户总是可见的,可能无法和用户交互,但可以管理对用户可见的资源.例如在onStart()加载资源,在onStop()释放资源,保证停止状态的活动不会占用过多内存
-
前台生存期
onResume()~onPause(),此期间活动总处于运行状态,并且可以和用户交互,这是平时看到和接触最多的活动状态
示意图
2.3.4 体验活动的生命周期
在MainActivity设置2个button,分别跳转到NormalActivity和DialogActivity,用于观察活动的生命周期
AndroidManifest.xml 给DialogActivity添加属性指示该活动主题为Dialog类型android:theme="@style/Theme.AppCompat.Dialog"
 1
 2
 3
 4
 5
 6
 7
 8
 9
10
11
12
13
14
15
16
17
18
19
20
21
22
23
24
25
26
27
28
29
30
31
32
33
34
35
36
|
<?xml version="1.0" encoding="utf-8"?>
<manifest xmlns:android="http://schemas.android.com/apk/res/android"
    xmlns:tools="http://schemas.android.com/tools">

    <application
        android:allowBackup="true"
        android:dataExtractionRules="@xml/data_extraction_rules"
        android:fullBackupContent="@xml/backup_rules"
        android:icon="@mipmap/ic_launcher"
        android:label="@string/app_name"
        android:roundIcon="@mipmap/ic_launcher_round"
        android:supportsRtl="true"
        android:theme="@style/Theme.CreateActivity"
        tools:targetApi="31">
        <activity
            android:name=".DialogActivity"
            android:theme="@style/Theme.AppCompat.Dialog" />
<!-- android:theme="@android:style/Theme.Dialog" 该标签兼容性有问题-->

        <activity
            android:name=".NormalActivity"
            android:label="@string/title_activity_normal"
            android:theme="@style/Theme.CreateActivity" />
        <activity
            android:name=".MainActivity"
            android:exported="true">
<!--            exported属性标识活动是否可被外部访问,默认true,入口活动必须设置为true-->
            <intent-filter>
                <action android:name="android.intent.action.MAIN"/>
                <category android:name="android.intent.category.LAUNCHER"/>
            </intent-filter>

        </activity>
    </application>

</manifest>
|
layout_main.xml 设置2个button用于跳转
 1
 2
 3
 4
 5
 6
 7
 8
 9
10
11
12
13
14
15
16
17
18
19
20
|
<?xml version="1.0" encoding="utf-8"?>
<LinearLayout xmlns:android="http://schemas.android.com/apk/res/android"
    android:orientation="vertical"
    android:layout_width="match_parent"
    android:layout_height="match_parent"
    >
    <Button
        android:id="@+id/start_normal_activity"
        android:layout_width="match_parent"
        android:layout_height="wrap_content"
        android:text="Start NormalActivity"
        />
    <Button
        android:id="@+id/start_dialog_activity"
        android:layout_width="match_parent"
        android:layout_height="wrap_content"
        android:text="Start DialogActivity"
        />

</LinearLayout>
|
layout_normal.xml (layout_dialog基本一致,text改动区分即可)
 1
 2
 3
 4
 5
 6
 7
 8
 9
10
|
<?xml version="1.0" encoding="utf-8"?>
<LinearLayout xmlns:android="http://schemas.android.com/apk/res/android"
    android:orientation="vertical"
    android:layout_width="match_parent"
    android:layout_height="match_parent">
    <TextView
        android:layout_width="match_parent"
        android:layout_height="wrap_content"
        android:text="This is a normal activity"/>
</LinearLayout>
|
MainActivity
 1
 2
 3
 4
 5
 6
 7
 8
 9
10
11
12
13
14
15
16
17
18
19
20
21
22
23
24
25
26
27
28
29
30
31
32
33
34
35
36
37
38
39
40
41
42
43
44
45
46
47
48
49
50
51
52
53
54
55
56
57
58
59
60
61
62
63
64
65
66
67
68
69
70
71
72
73
74
75
76
77
78
79
80
81
82
83
84
|
package com.example.createactivity;
import android.content.Intent;
import android.os.Bundle;
import android.util.Log;
import android.view.View;
import android.widget.Button;

import androidx.annotation.NonNull;
import androidx.appcompat.app.AppCompatActivity;


public class MainActivity extends AppCompatActivity {

    public static String tag="MainActivity";

//    @Override
//    protected void onSaveInstanceState(@NonNull Bundle outState) {
//        super.onSaveInstanceState(outState);
//        String tmpData="This is tmp data";
//        outState.putString("data_key",tmpData);
//    }

    @Override
    protected void onCreate(Bundle savedInstanceState) {
        super.onCreate(savedInstanceState);
        Log.d(tag,"onCerate");
        setContentView(R.layout.activity_main);
//        if(savedInstanceState!=null){
//            String tmpData=savedInstanceState.getString("data_key");
//            Log.d(tag, "tmpdata: "+tmpData);
//        }
        Button startNormalActivity=findViewById(R.id.start_normal_activity);
        Button startDialogActivity=findViewById(R.id.start_dialog_activity);
        startNormalActivity.setOnClickListener(new View.OnClickListener() {
            @Override
            public void onClick(View view) {
                Intent intent=new Intent(MainActivity.this, NormalActivity.class);
                startActivity(intent);
            }
        });
        startDialogActivity.setOnClickListener(new View.OnClickListener() {
            @Override
            public void onClick(View view) {
                Intent intent=new Intent(MainActivity.this,DialogActivity.class);
                startActivity(intent);
            }
        });
    }
    @Override
    protected void onStart(){
        super.onStart();
        Log.d(tag,"onStart");
    }

    @Override
    protected void onResume() {
        super.onResume();
        Log.d(tag,"onResume");
    }

    @Override
    protected void onPause() {
        super.onPause();
        Log.d(tag, "onPause");
    }

    @Override
    protected void onStop() {
        super.onStop();
        Log.d(tag, "onStop");
    }

    @Override
    protected void onDestroy() {
        super.onDestroy();
        Log.d(tag, "onDestroy");
    }

    @Override
    protected void onRestart() {
        super.onRestart();
        Log.d(tag, "onRestart");
    }
}
|
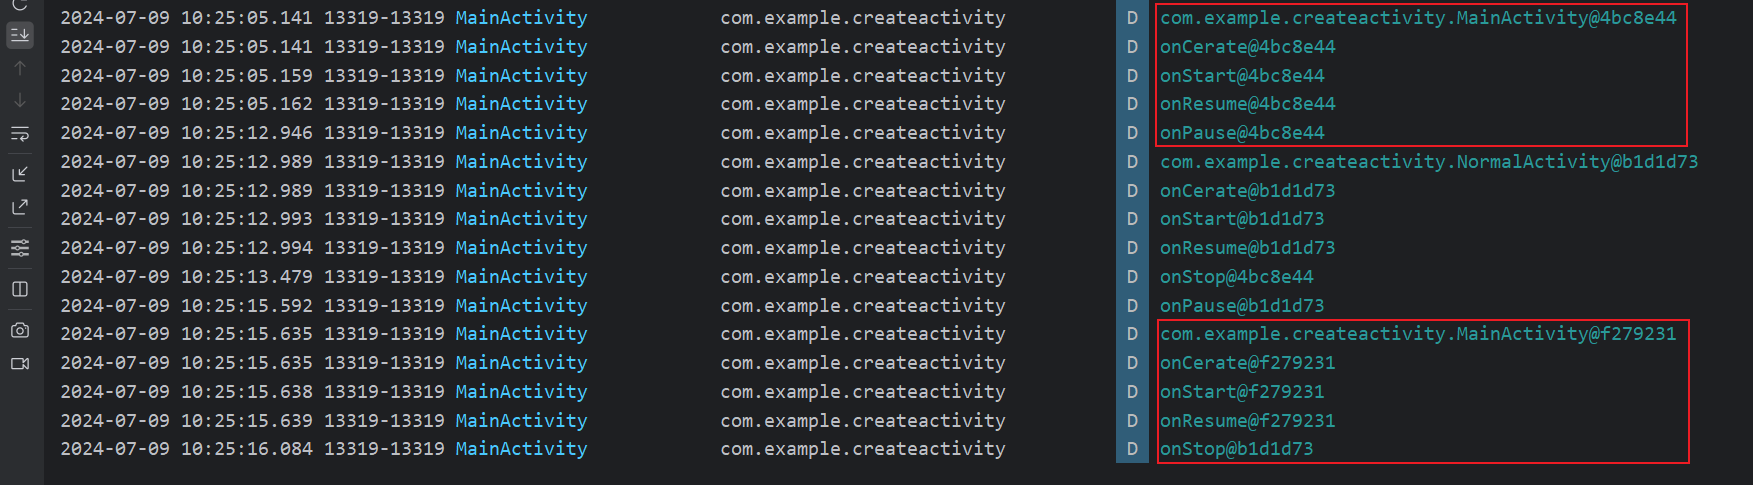
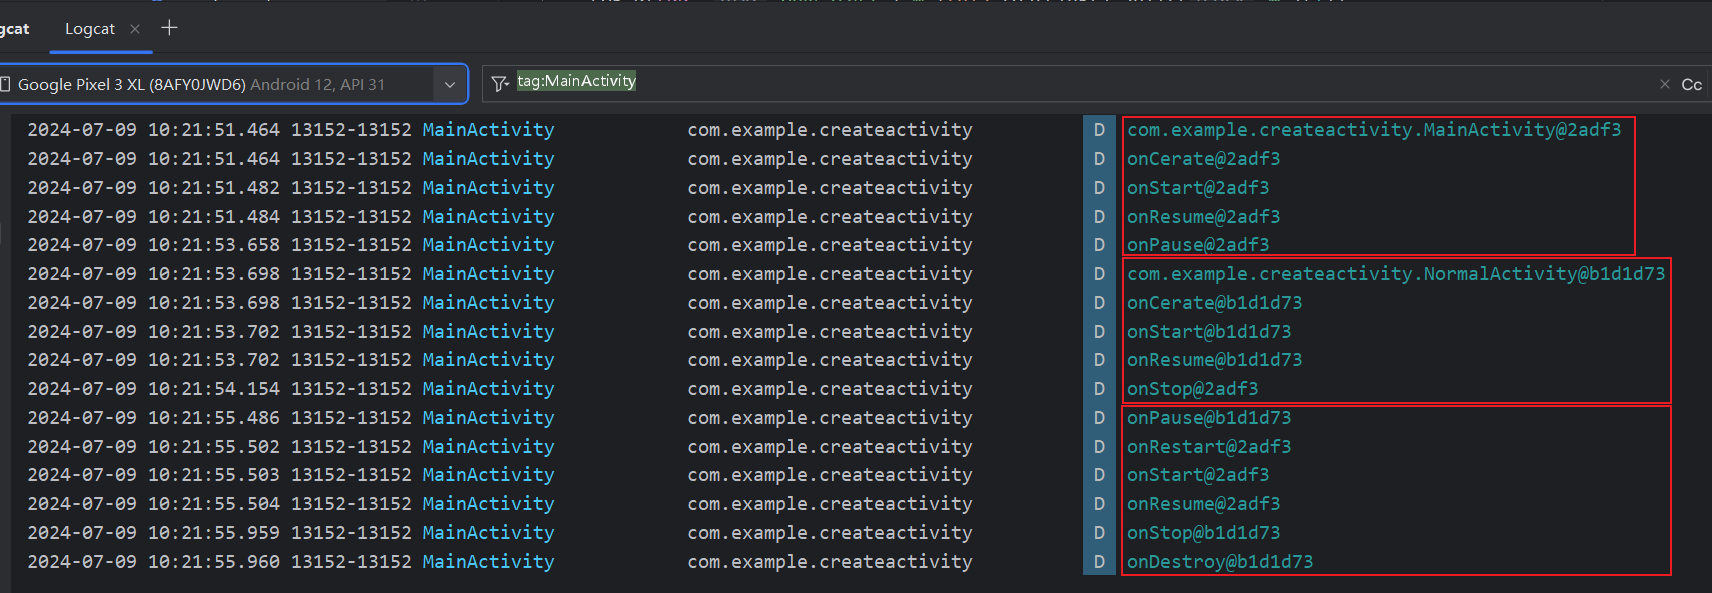
效果如下:
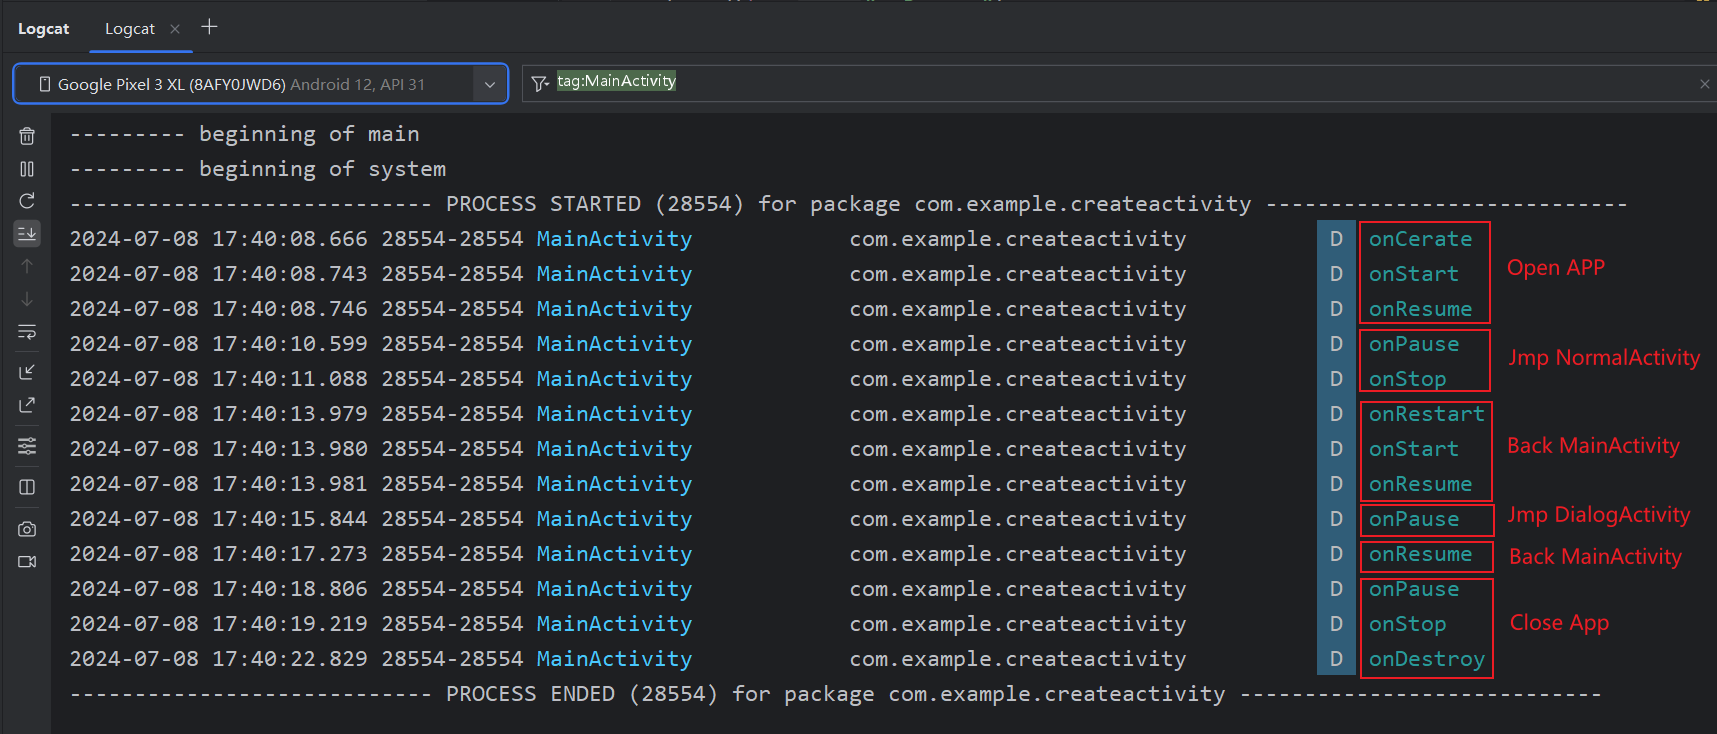
- 启动APP时,依次执行onCreate,onStart,onResume方法
- 跳转到NormalActivity时,执行onPause和onStop方法
- 返回MainActivity时,执行onRestart,onStart,onResume
- 跳转到DialogActivity时,执行onPause
- 返回MainActivity时,执行onResume
- 关闭APP时,执行onPause,onStop,onDestroy
2.3.5 活动被回收了怎么办
上文说过,当活动进入Stop状态时,可能会被系统回收,假设如下场景:
有两个活动A,B,在活动A的基础上启动活动B,此时内存不足回收活动A,当用户返回A时会如何?活动A会正常显示,但此时不执行onRestart(),而是执行onCreate(),即此时重新创建活动A.但此时有一个重要问题: 活动A中的临时数据和状态因回收会全部丢失.
例如在A的文本框中输入了一段文字,但A被回收后文字会消失,需要重新输入.这种情况严重影响用户体验,那么如何解决?可以使用onSaveInstanceState()回调方法,该方法参数为Bundle,在活动被回收前必定调用
在MainActivity添加该函数,利用Bundle传递数据,类似Intent,需要键值对
1
2
3
4
5
6
|
    @Override
    protected void onSaveInstanceState(@NonNull Bundle outState) {
        super.onSaveInstanceState(outState);//保存实例状态
        String tmpData="This is tmp data";
        outState.putString("data_key",tmpData);
    }
|
添加代码判断是否存在数据待获取
 1
 2
 3
 4
 5
 6
 7
 8
 9
10
|
    protected void onCreate(Bundle savedInstanceState) {
        super.onCreate(savedInstanceState);
        Log.d(tag,"onCerate");
        setContentView(R.layout.activity_main);
        if(savedInstanceState!=null){//已保存实例状态不为空,有数据待获取
            String tmpData=savedInstanceState.getString("data_key");
            Log.d(tag, "tmpdata: "+tmpData);
        }
        ......
    }
|
2.4 活动的启动模式
Android的活动启动模式有四种,可在AndroidManifest.xml中通过给<activity>标签指定android:launchMode进行选择
| Model |
作用 |
备注 |
| standard |
启动活动时每次都创建新的活动实例放到栈顶 |
活动默认的启动模式 |
| signleTop |
检测栈顶是否存在该活动,存在直接使用,不存在则创建活动实例 |
检测栈顶,若活动在栈顶之外也会创建新实例 |
| singleTask |
检测栈中是否存在活动实例,若存在则使用,否则创建新实例 |
若该活动存在实例,则其之上的所有活动全部出栈 |
| singleInstance |
启用单独的返回栈管理该活动 |
用于多程序共享该活动时,共用同一返回栈 |
简单体验一下四种启动模式的效果:
-
standard
添加log打印活动实例,修改MainActivity的按钮监听函数,使其跳转到MainActivity
1
2
3
4
5
6
7
8
|
Log.d(tag, this.toString());
startNormalActivity.setOnClickListener(new View.OnClickListener() {
    @Override
	public void onClick(View view) {
		Intent intent=new Intent(MainActivity.this, MainActivity.class);
		startActivity(intent);
	}
});
|
点击2次按钮,可以发现启动了2个新实例,需要3次back才能关闭app
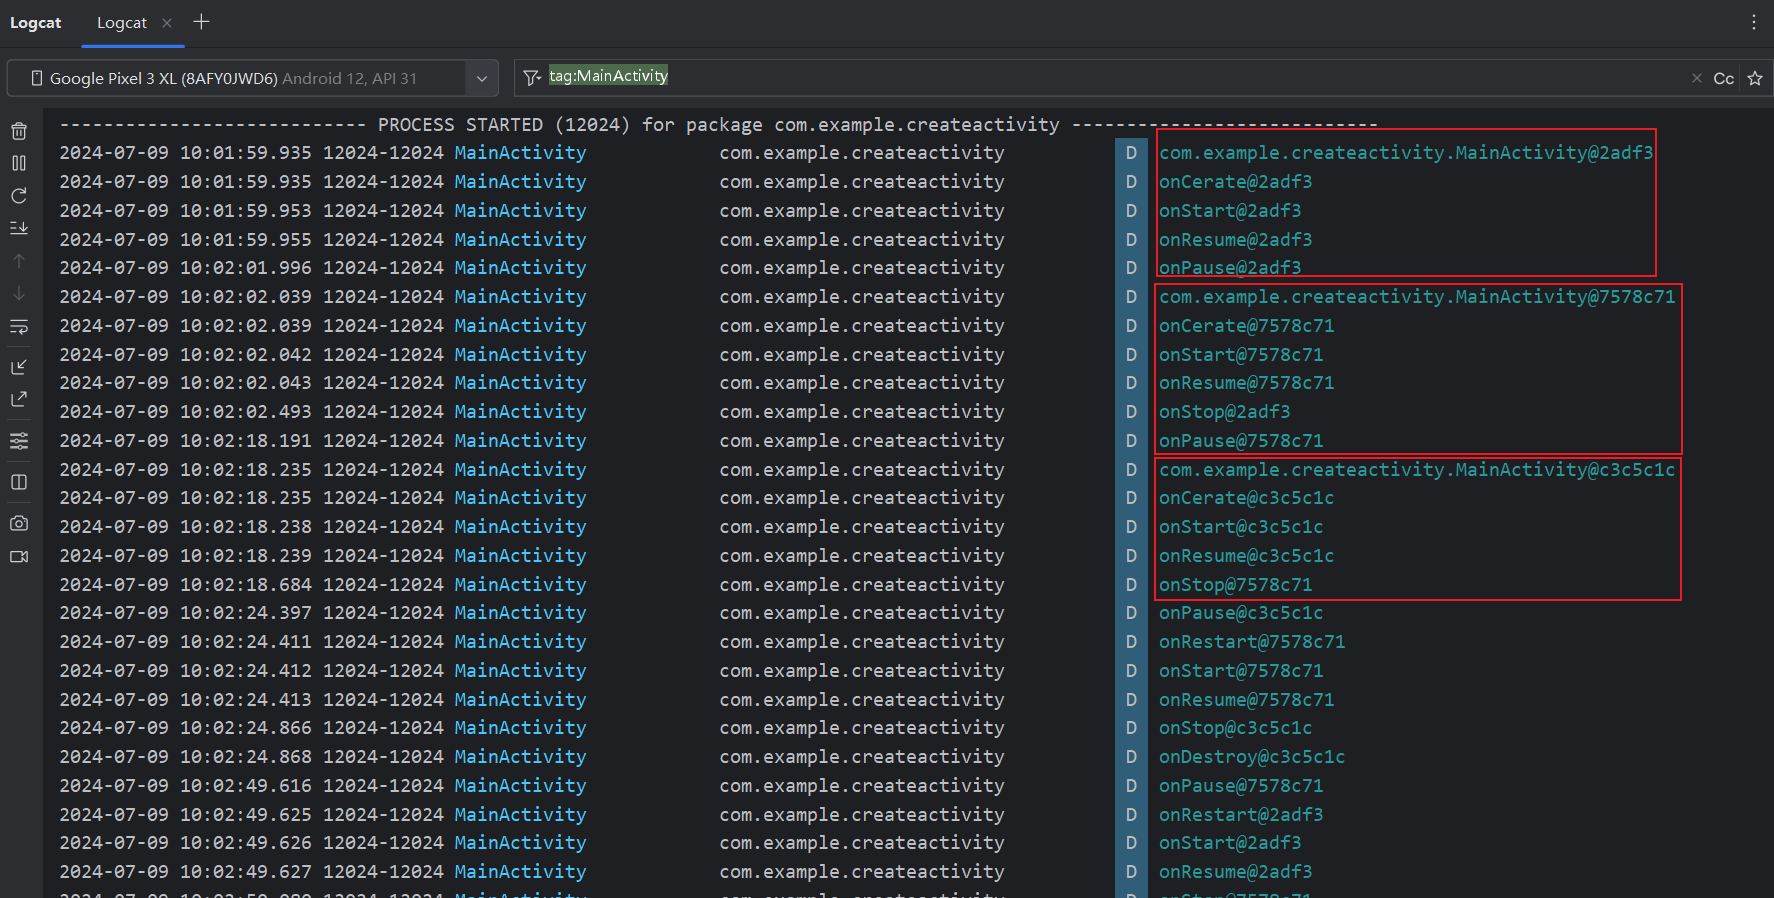
返回栈的情况如下,创建实例入栈,返回时销毁实例
-
singleTop
在AndroidManifest.xml中为MainActivity添加属性android:launchMode=“singleTop”
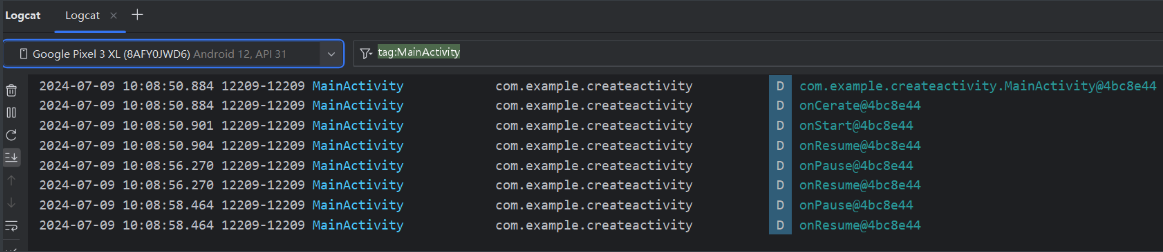
点击按钮返回MainActivity时:点击2次,点击时触发onPause,检测栈顶存在活动实例所以调用onResume继续运行
1次back即可关闭app
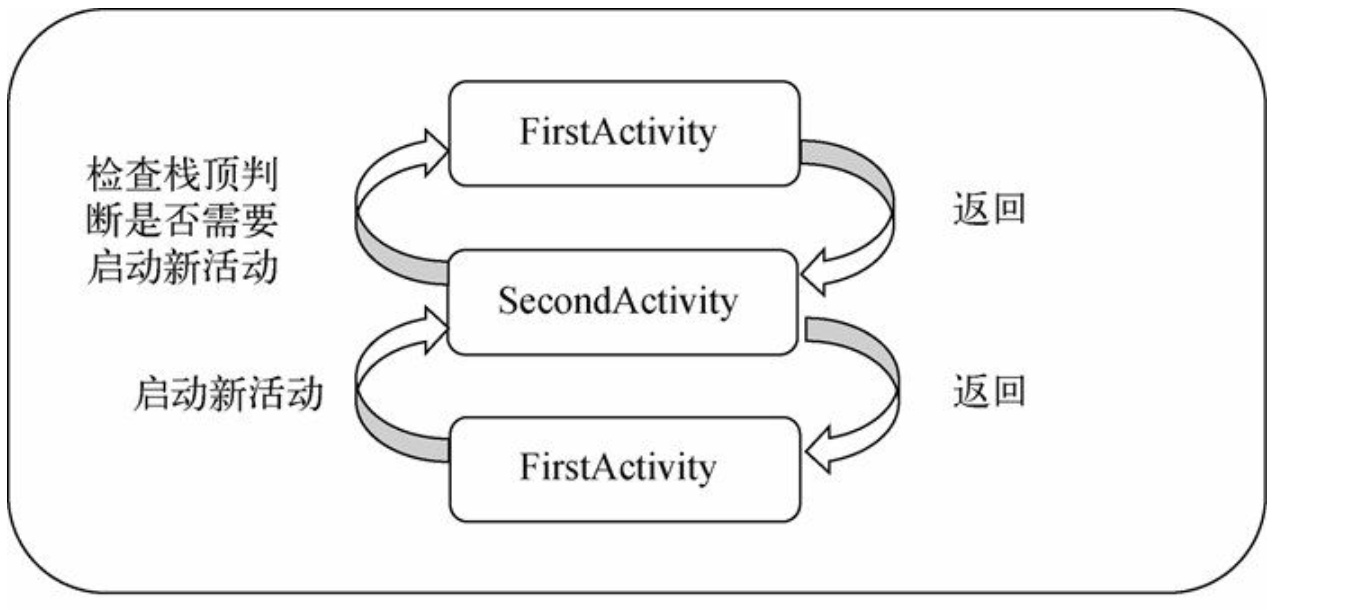
点击按钮返回NormalActivity,NormalActivity添加按钮点击返回MainActivity时:
各点击1次,发现从NormalActivity返回MainActivity时,由于栈顶不存在实例,所以创建新实例,但没有销毁NormalActivity
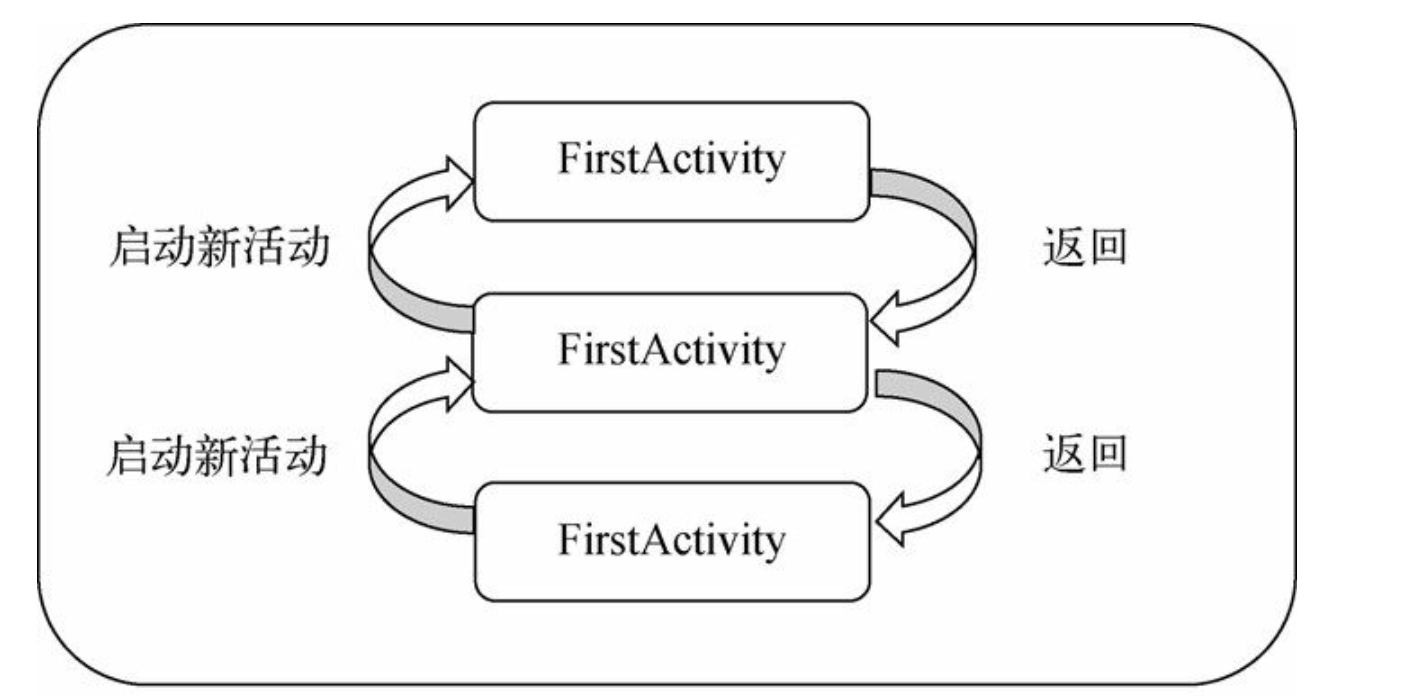
栈示意图
-
singleTask
MainActivity跳转到NormalActivity再跳转回去
当返回MainActivity时,由于栈中存在实例,所以直接运行实例,同时位于其上方的NormalActivity出栈销毁
栈示意图

-
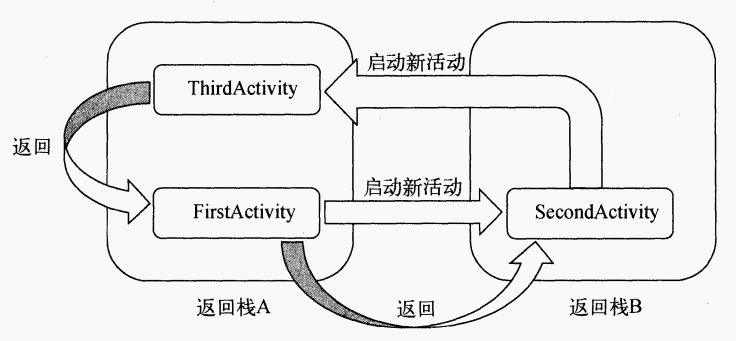
singleInstance
该种情况下,创建单独的返回栈,无论是哪个应用程序访问该活动都是同一个栈
假设在FirstActivity中启动SecondActivity,在SecondActivity中启动ThirdActivity
由于只有SecondActivity是singleInstance模式,所以ThirdActivity和FirstActivity在同一栈中,并位于其上方
back时,3返回到1再返回到2最后关闭app
2.5 活动的最佳实践
2.5.1 了解当前界面对应活动
创建BaseActivity基类,添加log打印活动名,让其他类继承该基类
 1
 2
 3
 4
 5
 6
 7
 8
 9
10
11
12
13
|
package com.example.createactivity;
import android.os.Bundle;
import android.util.Log;

import androidx.annotation.Nullable;
import androidx.appcompat.app.AppCompatActivity;
public class BaseActivity extends AppCompatActivity {
    @Override
    protected void onCreate(@Nullable Bundle savedInstanceState) {
        super.onCreate(savedInstanceState);
        Log.d("BaseActivity",getClass().getName());
    }
}
|

2.5.2 随时随地退出程序
2.5.3 启动活动的最佳写法
通过添加actionStart方法,提供接口调用
1
2
3
4
5
6
|
public static void actionStart(Context context, String data1, String data2) {
	Intent intent = new Intent(context, NormalActivity.class);
	intent.putExtra("param1", data1);
	intent.putExtra("param2", data2);
	context.startActivity(intent);
}
|
这样其他活动希望启动该活动时,只需要直接调用即可
1
2
3
4
5
6
|
        button.setOnClickListener(new View.OnClickListener() {
            @Override
            public void onClick(View view) {
                NormalActivity.actionStart(MainActivity.this,"data1","data2");
            }
        });
|
第3章 UI开发
3.1 常用控件的使用
3.2.0 Toast
简单的小型消息框,会在屏幕底部弹出
1
|
Toast.makeText(this,"Hello",Toast.LENGTH_LONG).show();
|
3.2.1 TextView
示例代码
 1
 2
 3
 4
 5
 6
 7
 8
 9
10
11
12
13
14
15
16
17
|
<?xml version="1.0" encoding="utf-8"?>
<LinearLayout xmlns:android="http://schemas.android.com/apk/res/android"
    android:orientation="vertical"
    android:layout_width="match_parent"
    android:layout_height="match_parent">

    <TextView
        android:id="@+id/text_view"
        android:layout_width="match_parent"
        android:layout_height="wrap_content"
        android:text="This is a TestView!"
        android:gravity="center"
        android:textSize="24sp"
        android:textColor="#00ff00"
        />

</LinearLayout>
|
文本框,用于显示文本内容
| 属性 |
作用 |
样例 |
| android:text |
设置文本内容 |
android:text=“Hello,World!” |
| android:textSize |
设置文本大小 |
android:textSize=“18sp” |
| android:textColor |
设置文本颜色 |
android:textColor="#FF0000" |
| android:gravity |
设置文本对齐方式 |
android:gravity=“center” |
| 方法 |
|
|
| setText(String text) |
设置文本内容 |
textView.setText(“Hello, World!”); |
| getText() |
获取文本内容 |
String text = textView.getText().toString(); |
| setTextSize(float size) |
设置文字大小 |
textView.setTextSize(18); |
| setTextColor(int color) |
设置文字颜色 |
textView.setTextColor(Color.RED); |
Button是安卓开发中常用的控件之一,用于触发点击事件
| 属性 |
作用 |
样例 |
| android:text |
设置Button上显示的文本内容 |
android:text=“Click Me” |
| android:onClick |
设置点击事件的处理方法,通过指定方法名来响应按钮点击事件。 |
android:onClick=“onClickButton” |
| android:enabled |
设置按钮是否可用 |
android:enabled=“true” |
| 方法 |
|
|
| setOnClickListener(View.OnClickListener listener) |
设置点击事件的监听器,用于在按钮被点击时执行相应的逻辑。 |
button.setOnClickListener(new View.OnClickListener() {
@Override
public void onClick(View v) {
// 按钮被点击时的处理逻辑
}
}); |
| setText(String text) |
设置按钮上显示的文本内容。 |
button.setText(“Click Me”); |
| setEnabled(boolean enabled) |
设置按钮是否可用 |
button.setEnabled(true); |
3.2.3 EditText
EditText用于接收用户输入的文本
| 属性 |
作用 |
样例 |
| android:hint |
设置提示文本 |
android:hint=“请输入用户名” |
| android:inputType |
设置期望的输入类型,如文本、数字、日期 |
android:inputType=“text” |
| android:maxLines |
设置最大行数 |
android:maxLines=“3” |
| android:maxLength |
设置最大字符数 |
android:maxLength=“10” |
| 方法 |
|
|
| getText() |
获取文本内容 |
String text = editText.getText().toString(); |
| setText(String text) |
设置文本内容 |
editText.setText(“Hello, World!”); |
| setSelection(int index) |
设置文本的选中范围 |
editText.setSelection(2, 5); // 选中第2到第5个字符 |
| addTextChangedListener(TextWatcher watcher) |
添加文本变化监听器,监听EditText中文本的变化 |
editText.addTextChangedListener(new TextWatcher() {
@Override
public void beforeTextChanged(CharSequence s, int start, int count, int after) {
// 文本变化前的处理逻辑
}
@Override
public void onTextChanged(CharSequence s, int start, int before, int count) {
// 文本变化时的处理逻辑
}
@Override
public void afterTextChanged(Editable s) {
// 文本变化后的处理逻辑
}
}); |
3.2.4 ImageView
ImageView用于显示图像
注:
- 图像一般放在res/drawable/下,引用图片只需文件名,不用后缀,注意图片不要中文
- adjustViewBounds设置为true后ImageView大小即为图像大小,否则仍然会填充父布局
| 属性 |
作用 |
样例 |
| android:src |
设置显示的图像 |
android:src="@drawable/image" |
| android:scaleType |
设置图像缩放类型 |
android:scaleType=“centerCrop” |
| android:adjustViewBounds |
设置是否根据图像的宽高比调整边界 |
android:adjustViewBounds=“true” |
| 方法 |
|
|
| setImageResource(int resId) |
设置显示的图像 |
imageView.setImageResource(R.drawable.image); |
| setScaleType(ImageView.ScaleType scaleType) |
设置图像缩放类型 |
imageView.setScaleType(ImageView.ScaleType.CENTER_CROP); |
| setAdjustViewBounds(boolean adjust) |
设置是否根据图像的宽高比调整边界 |
imageView.setAdjustViewBounds(true); |
3.2.5 ProgressBar
常用属性:
android:layout_width:设置组件的宽度。android:layout_height:设置组件的高度。android:id:为组件分配一个唯一的ID。android:indeterminate:指定进度条是否为不确定模式。android:max:设置进度条的最大值。android:progress:设置进度条的当前进度值。android:progressDrawable:设置进度条的自定义背景和进度绘制。
常用方法:
setMax(int max):设置进度条的最大值。setProgress(int progress):设置进度条的当前进度值。getProgress():获取进度条的当前进度值。setIndeterminate(boolean indeterminate):设置进度条是否为不确定模式。isIndeterminate():检查进度条是否为不确定模式。setVisibility(int visibility):设置进度条的可见性。setProgressDrawable(Drawable d):设置进度条的自定义背景和进度绘制。
3.2.6 AlterDialog
AlertDialog是一个常用的对话框类,用于显示一个警告或提示对话框,并与用户进行交互
创建alertDialog:
1
2
3
|
AlertDialog.Builder builder = new AlertDialog.Builder(context);//创建AlterDialog Builder用于设置
AlertDialog alertDialog = builder.create();//创建alertDialog实例
alertDialog.show();//显示
|
| 方法 |
作用 |
样例 |
| setTitle(CharSequence title) |
设置对话框的标题 |
builder.setTitle(“AlertDialog Title”); |
| setMessage(CharSequence message) |
设置对话框的消息内容 |
builder.setMessage(“AlertDialog Message”); |
| setPositiveButton(CharSequence text, DialogInterface.OnClickListener listener) |
设置对话框的积极按钮(通常表示确定或确认) |
builder.setPositiveButton(“OK”, new DialogInterface.OnClickListener() {
@Override
public void onClick(DialogInterface dialog, int which) {
// 点击积极按钮时的处理逻辑
}
}); |
| setNegativeButton(CharSequence text, DialogInterface.OnClickListener listener) |
设置对话框的消极按钮(通常表示取消或拒绝) |
builder.setNegativeButton(“Cancel”, new DialogInterface.OnClickListener() {
@Override
public void onClick(DialogInterface dialog, int which) {
// 点击消极按钮时的处理逻辑
}
}); |
| setNeutralButton(CharSequence text, DialogInterface.OnClickListener listener) |
设置对话框的中立按钮(通常表示中间选项) |
builder.setNeutralButton(“Skip”, new DialogInterface.OnClickListener() {
@Override
public void onClick(DialogInterface dialog, int which) {
// 点击中立按钮时的处理逻辑
}
}); |
| setCancelable(boolean cancelable) |
设置对话框是否可以被取消 |
builder.setCancelable(true); // 对话框可以被取消
如果为true 那么点击dialog框外或者点击物理返回键都会取消对话框如果为false
那么必须点击对话框的按钮才能关闭对话框,点击框外或者点击返回键都无法取消 |
| create() |
创建AlertDialog对象 |
AlertDialog alertDialog = builder.create(); |
| show() |
显示对话框 |
AlertDialog alertDialog = builder.create();
alertDialog.show(); |
示例代码
 1
 2
 3
 4
 5
 6
 7
 8
 9
10
11
12
13
14
15
16
17
18
19
20
21
22
23
24
25
26
27
28
29
30
31
32
33
34
35
36
37
38
39
40
41
42
43
|
package com.example.createactivity;

import androidx.appcompat.app.AlertDialog;
import androidx.appcompat.app.AppCompatActivity;

import android.app.Dialog;
import android.content.Context;
import android.content.DialogInterface;
import android.os.Bundle;

public class MainActivity extends AppCompatActivity {

    @Override
    protected void onCreate(Bundle savedInstanceState) {

        super.onCreate(savedInstanceState);
        setContentView(R.layout.main_layout);
        Context context=this;//环境 上下文
        AlertDialog.Builder dialog=new AlertDialog.Builder(context);
        dialog.setPositiveButton("OK", new DialogInterface.OnClickListener() {
            @Override
            public void onClick(DialogInterface dialog, int which) {
                //
            }
        });
        dialog.setNegativeButton("Cancel", new DialogInterface.OnClickListener() {
            @Override
            public void onClick(DialogInterface dialog, int which) {
                //
            }
        });
        dialog.setNeutralButton("middle", new DialogInterface.OnClickListener() {
            @Override
            public void onClick(DialogInterface dialog, int which) {
                //
            }
        });
        dialog.setCancelable(false);//必须点击警告框按钮进行处理
        dialog.setTitle("Alert");
        dialog.setMessage("This is a Test");
        dialog.show();
    }
}
|
运行结果
按钮没有设运行为,点击任意按钮即可关闭

封装: 可以封装一个MessageBox方法,每次使用时给定参数直接调用即可
 1
 2
 3
 4
 5
 6
 7
 8
 9
10
11
12
13
14
15
16
17
18
19
20
21
22
23
24
25
26
|
public void MessageBox(String title,String message){
        AlertDialog.Builder dialog=new AlertDialog.Builder(this);
        dialog.setTitle(title);
        dialog.setMessage(message);

        dialog.setPositiveButton("OK", new DialogInterface.OnClickListener() {
            @Override
            public void onClick(DialogInterface dialog, int which) {
                //
            }
        });
        dialog.setNegativeButton("Cancel", new DialogInterface.OnClickListener() {
            @Override
            public void onClick(DialogInterface dialog, int which) {
                //
            }
        });
        dialog.setNeutralButton("middle", new DialogInterface.OnClickListener() {
            @Override
            public void onClick(DialogInterface dialog, int which) {
                //
            }
        });
        dialog.setCancelable(false);//必须点击警告框按钮进行处理
        dialog.show();
    }
|
3.2.7 ProgressDialog
常用属性:
setMessage(CharSequence message):设置对话框中显示的消息文本。setProgressStyle(int style):设置进度条的样式,如水平进度条或圆形进度条。setCancelable(boolean cancelable):设置对话框是否可以被取消。setMax(int max):设置进度条的最大值。setProgress(int progress):设置进度条的当前进度值。
常用方法:
show():显示ProgressDialog对话框。dismiss():关闭ProgressDialog对话框。setIndeterminate(boolean indeterminate):设置进度条是否为不确定模式。isIndeterminate():检查进度条是否为不确定模式。setCanceledOnTouchOutside(boolean cancel):设置在点击对话框外部时是否取消对话框。setOnCancelListener(DialogInterface.OnCancelListener listener):设置对话框取消事件的监听器。
3.3 4种基本布局
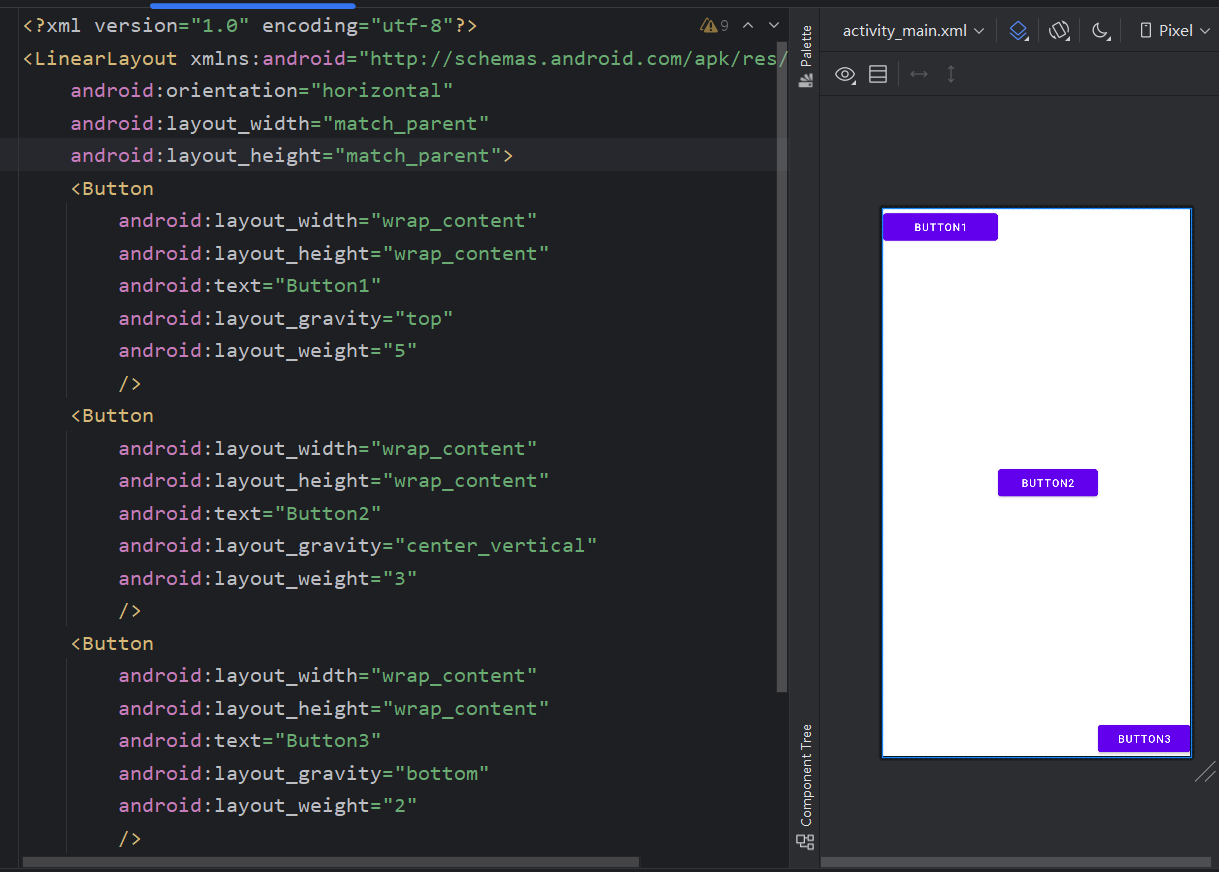
3.3.1 LinearLayout
| 属性 |
作用 |
示例 |
备注 |
| android:orientation |
指定布局排列方向 |
android:orientation=“horizontal” (vertical) |
|
| android:layout_gravity |
指定控件对齐方式 |
android:layout_gravity=“top” (center_vertical bottom) |
layout_gravity有效方向和orientation垂直,该属性作用于控件 |
| android:layout_weight |
按比例指定控件大小 |
android:layout_weight=“1” |
该属性作用于控件 |
注意:
- 如果orientation=horizontal, 内部控件不能将宽度设为match_parent,否则单个控件会占满整个水平方向,vertical同理不能指定高度为match_parent
- layout_weight可用于按比例分配控件大小,系统将所有指定该属性控件的值求和,每个控件属性值/总和即为比例
示例
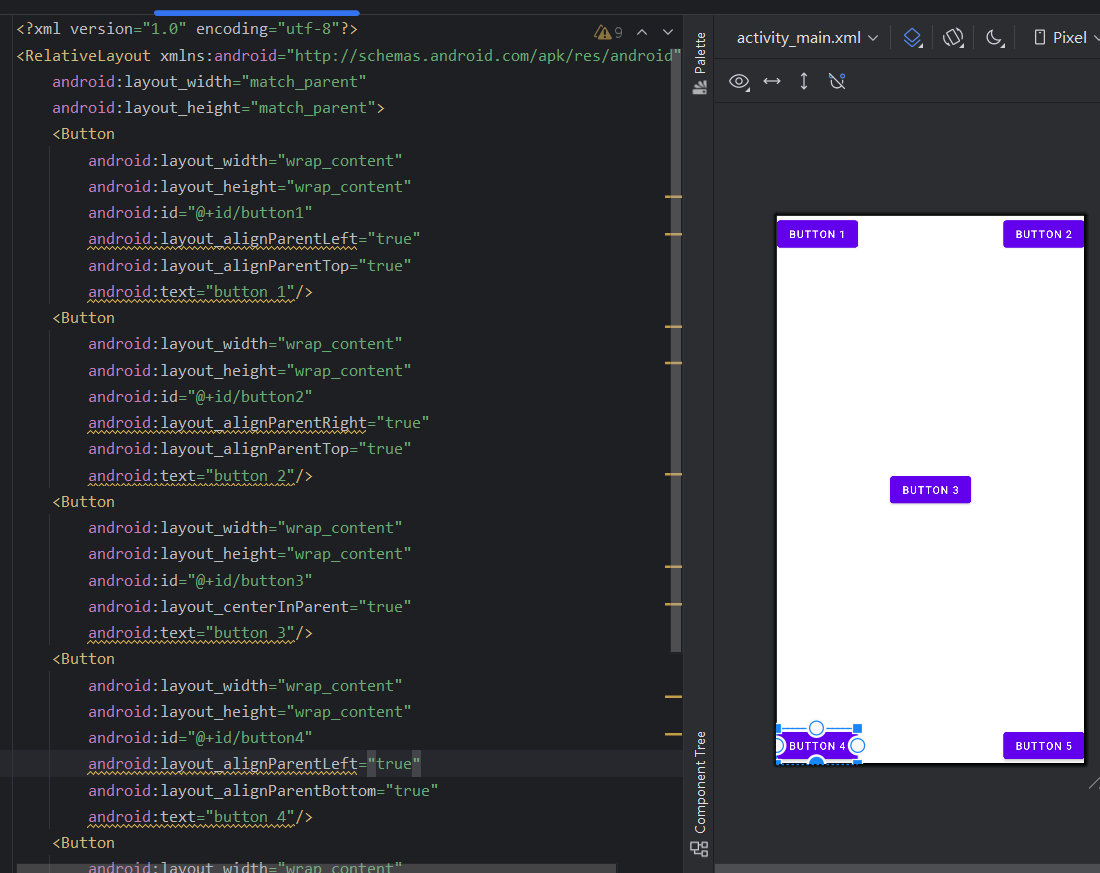
3.3.2 RelativeLayout
| 属性 |
作用 |
示例 |
| android:layout_alignParentTop |
相对父布局定位 |
android:layout_alignParentTop=“true” |
| android:layout_alignParentBottom |
|
|
| android:layout_alignParentLeft |
|
|
| android:layout_alignParentRight |
|
|
| android:layout_centerInParent |
|
|
|
|
|
| android:layout_above |
相对其他组件定位 |
|
| android:layout_below |
|
|
| android:layout_toLeftOf |
|
|
| android:layout_toRightOf |
|
|
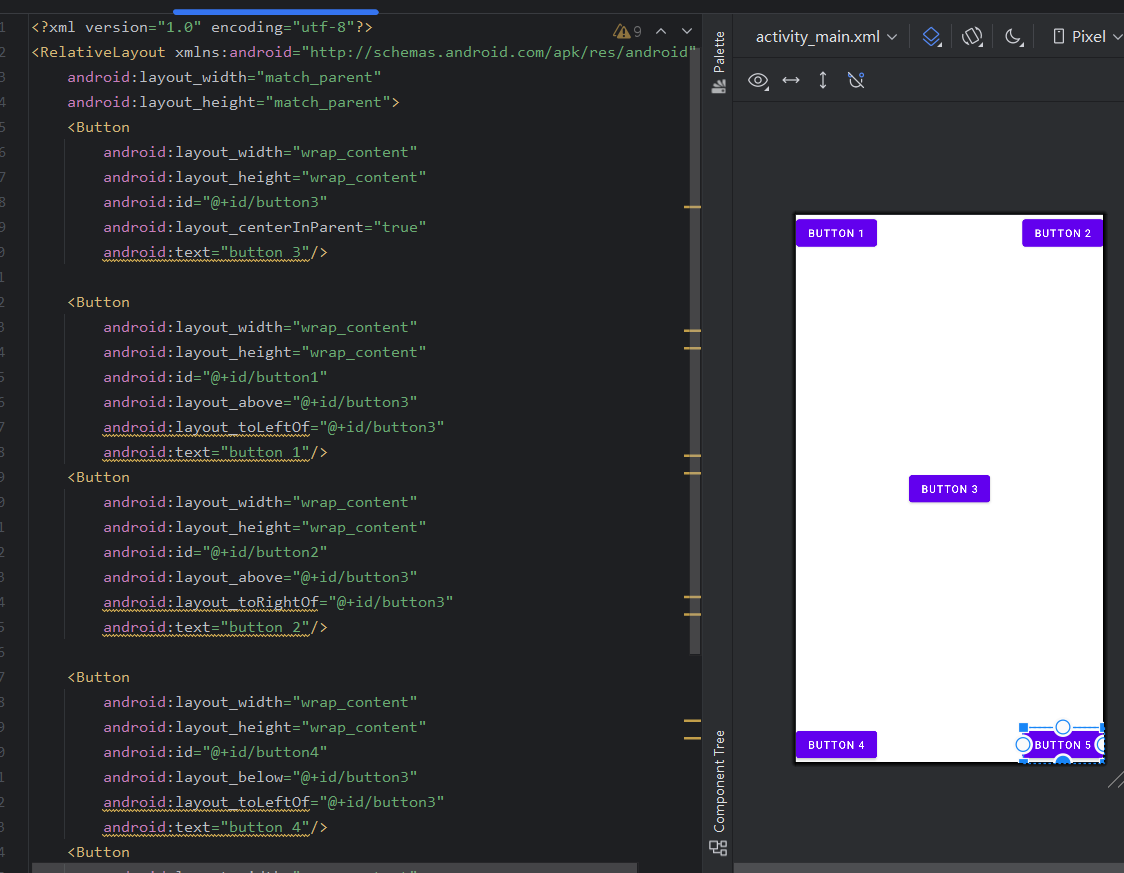
示例
相对父布局定位
相对其他组件定位
此处以Button3为基准控件,其他控件相对该控件定位
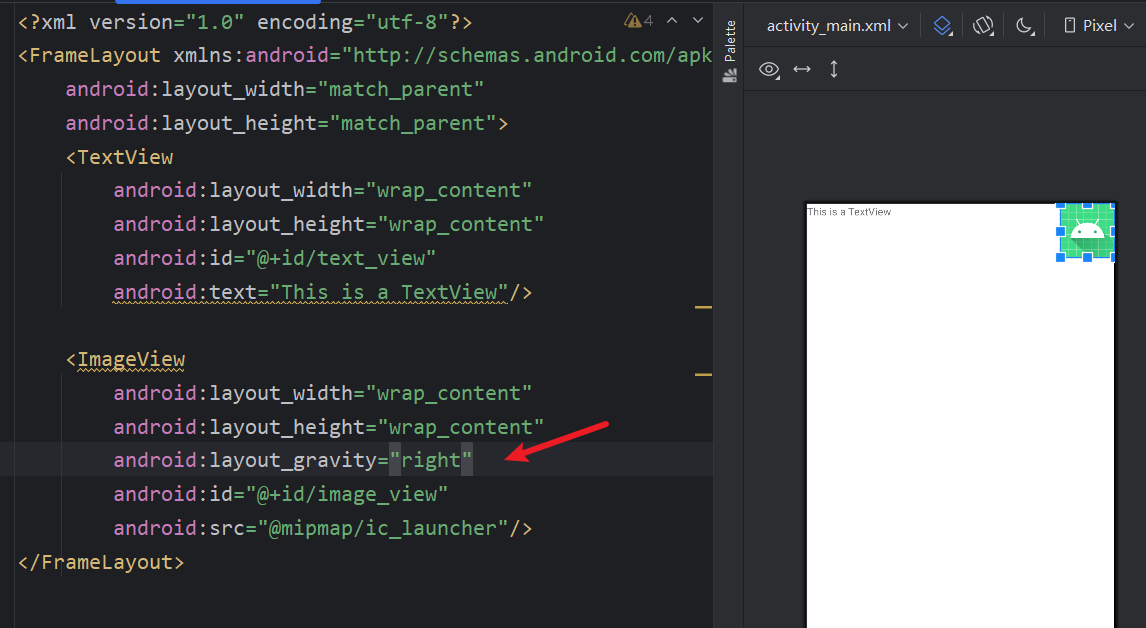
3.3.3 FrameLayout
帧布局,所有控件默认放在布局左上角,应用场景较少
图片盖住文字是由于图片组件后添加
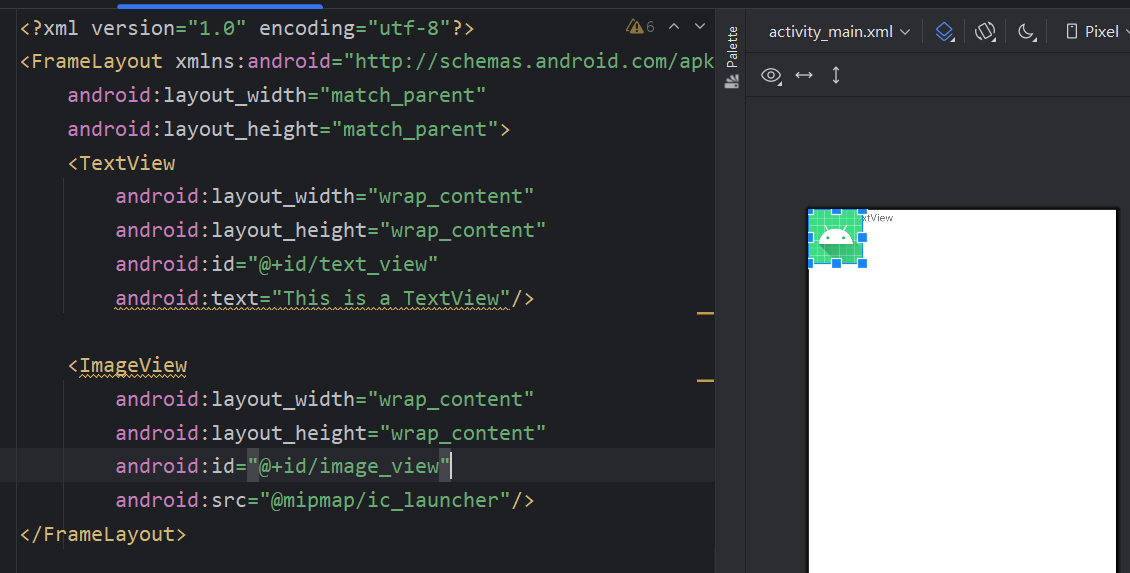
可通过给组件指定对齐方式修改位置
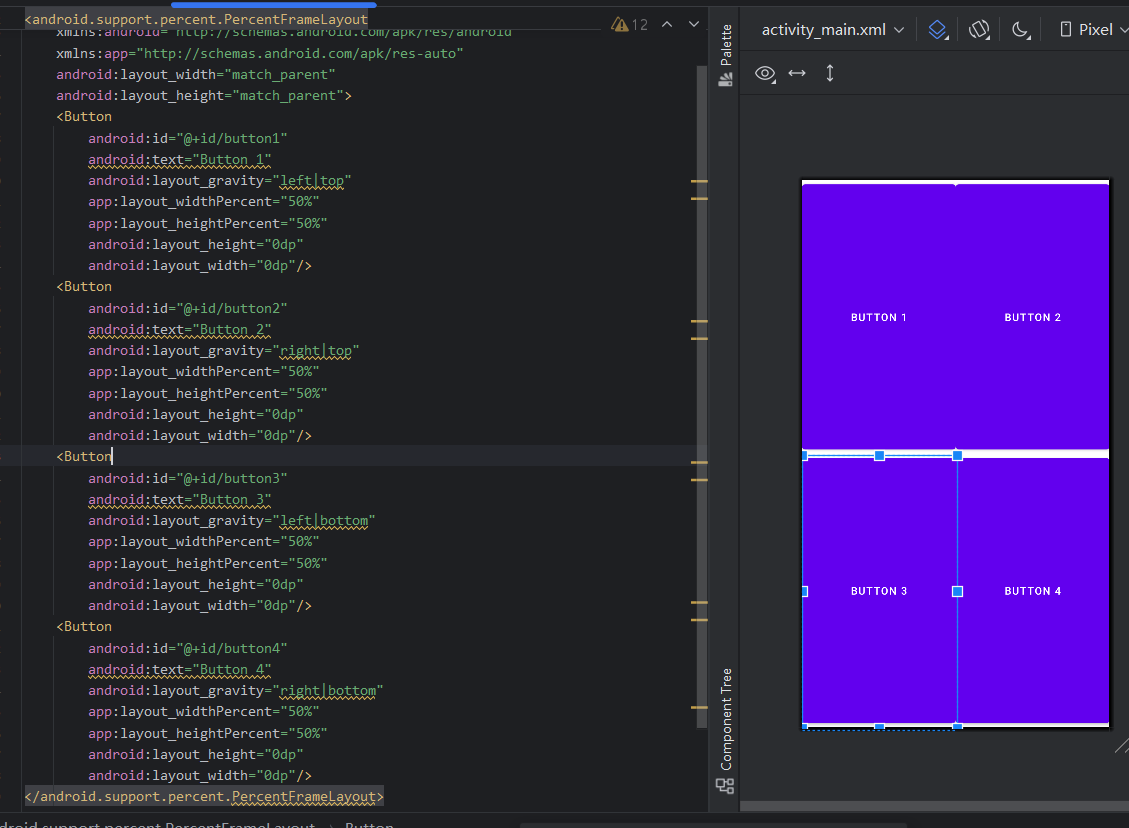
3.3.4 百分比布局
以上三种布局从Android1.0开始沿用至今,其中只有LinearLayout支持按比例指定控件大小,为此Android引入了百分比布局,扩展相对布局和帧布局的功能,可以直接通过百分比指定控件大小
分别是PercentFrameLayout和PercentRelativeLayout
| 属性 |
作用 |
示例 |
| app:layout_widthPercent |
指定相对于父布局的百分比宽度 |
|
| app:layout_heightPercent |
制定高度 |
|
使用百分比布局需要打开app.build.gradle,在dependencies添加如下内容
1
2
3
4
5
6
|
dependencies {
	...
    implementation libs.support.percent //新版gradle写法
    //compile 'com.android.support:percent:28.0.0' //老版本写法
    ...
}
|
代码
 1
 2
 3
 4
 5
 6
 7
 8
 9
10
11
12
13
14
15
16
17
18
19
20
21
22
23
24
25
26
27
28
29
30
31
32
33
34
35
36
37
38
39
|
<?xml version="1.0" encoding="utf-8"?>
<android.support.percent.PercentFrameLayout
    xmlns:android="http://schemas.android.com/apk/res/android"
    xmlns:app="http://schemas.android.com/apk/res-auto"
    android:layout_width="match_parent"
    android:layout_height="match_parent">
    <Button
        android:id="@+id/button1"
        android:text="Button 1"
        android:layout_gravity="left|top"
        app:layout_widthPercent="50%"
        app:layout_heightPercent="50%"
        android:layout_height="0dp"
        android:layout_width="0dp"/>
    <Button
        android:id="@+id/button2"
        android:text="Button 2"
        android:layout_gravity="right|top"
        app:layout_widthPercent="50%"
        app:layout_heightPercent="50%"
        android:layout_height="0dp"
        android:layout_width="0dp"/>
    <Button
        android:id="@+id/button3"
        android:text="Button 3"
        android:layout_gravity="left|bottom"
        app:layout_widthPercent="50%"
        app:layout_heightPercent="50%"
        android:layout_height="0dp"
        android:layout_width="0dp"/>
    <Button
        android:id="@+id/button4"
        android:text="Button 4"
        android:layout_gravity="right|bottom"
        app:layout_widthPercent="50%"
        app:layout_heightPercent="50%"
        android:layout_height="0dp"
        android:layout_width="0dp"/>
</android.support.percent.PercentFrameLayout>
|
效果
3.4 创建自定义控件
控件和容器均继承自View,我们可以利用继承自定义控件

3.4.1 引入布局
某些布局可能需要在多个活动中使用,这时如果每个活动都编写一次布局会造成大量的代码重复,引入布局可以做到一个布局供多个活动使用
首先编写title布局
 1
 2
 3
 4
 5
 6
 7
 8
 9
10
11
12
13
14
15
16
17
18
19
20
21
22
23
24
25
26
27
28
29
30
31
32
33
34
|
<?xml version="1.0" encoding="utf-8"?>
<LinearLayout xmlns:android="http://schemas.android.com/apk/res/android"
android:layout_width="match_parent"
android:layout_height="wrap_content">

<Button
android:id="@+id/title_back"
android:layout_width="wrap_content"
android:layout_height="wrap_content"
android:layout_gravity="center"
android:layout_margin="5dp"
android:text="Back"
android:textColor="#fff"/>

<TextView
android:layout_width="0dp"
android:layout_height="wrap_content"
android:id="@+id/title_text"
android:layout_gravity="center"
android:layout_weight="1"
android:gravity="center"
android:text="Title Text"
android:textColor="#f16"
android:textSize="24sp"/>
<Button
android:layout_width="wrap_content"
android:layout_height="wrap_content"
android:id="@+id/title_edit"
android:layout_gravity="center"
android:layout_margin="5dp"
android:text="Edit"
android:textColor="#fff"/>

</LinearLayout>
|
使用include标签引入布局即可

3.4.2 自定义控件
引入布局可以解决重复编写布局代码的问题,但布局中如果有部分控件需要响应事件,例如标题栏的返回按钮,不管在哪个活动中该按钮的功能都是销毁当前活动,此时使用自定义控件可以省去重复代码的编写
首先创建TitleLayout类继承LinearLayout类,动态加载title布局并给按钮添加事件
 1
 2
 3
 4
 5
 6
 7
 8
 9
10
11
12
13
14
15
16
17
18
19
20
21
22
23
24
25
26
27
28
29
30
31
32
|
package com.example.chapter3_uiwidgettest;

import android.app.Activity;
import android.util.AttributeSet;
import android.view.LayoutInflater;
import android.view.View;
import android.widget.Button;
import android.widget.LinearLayout;
import android.content.Context;
import android.widget.Toast;

public class TitleLayout extends LinearLayout {
    public TitleLayout(Context context, AttributeSet attrs){
        super(context,attrs);//LinearLayout构造函数
        LayoutInflater.from(context).inflate(R.layout.title,this);//动态加载title布局
        //给按钮添加事件
        Button titleBack=(Button)findViewById(R.id.title_back);
        Button titleEdit=(Button)findViewById(R.id.title_edit);
        titleBack.setOnClickListener(new OnClickListener() {
            @Override
            public void onClick(View view) {
                ((Activity)getContext()).finish();//销毁活动
            }
        });
        titleEdit.setOnClickListener(new OnClickListener() {
            @Override
            public void onClick(View view) {
                Toast.makeText(getContext(),"You clicked Edit Button!",Toast.LENGTH_SHORT).show();
            }
        });
    }
}
|
activity_main.xml
使用完整包名.类名标签引入自定义控件
 1
 2
 3
 4
 5
 6
 7
 8
 9
10
|
<?xml version="1.0" encoding="utf-8"?>
<LinearLayout xmlns:android="http://schemas.android.com/apk/res/android"
    android:layout_width="match_parent"
    android:layout_height="match_parent"
    >
    <com.example.chapter3_uiwidgettest.TitleLayout
        android:layout_width="match_parent"
        android:layout_height="wrap_content"
        />
</LinearLayout>
|
效果如下,和include类似

3.5 ListView
3.5.1 ListView的简单用法
首先在布局中添加ListView组件
 1
 2
 3
 4
 5
 6
 7
 8
 9
10
|
<?xml version="1.0" encoding="utf-8"?>
<LinearLayout xmlns:android="http://schemas.android.com/apk/res/android"
    android:layout_width="match_parent"
    android:layout_height="match_parent">

    <ListView
        android:id="@+id/list_view"
        android:layout_width="match_parent"
        android:layout_height="match_parent"/>
</LinearLayout>
|
再修改MainActivity
数组的数据无法直接传递给ListView,必须通过适配器完成,ArrayAdapter可通过泛型适配多种数据类型
另外这里使用了android.R.layout.simple_list_item_1,这是安卓内置的布局文件,里面只有一个TextView,可简单显示一段文本
 1
 2
 3
 4
 5
 6
 7
 8
 9
10
11
12
13
14
15
16
17
18
|
public class MainActivity extends AppCompatActivity {
    private ActivityMainBinding mainBinding;
    private String[] data={"Apple","Banana","Orange","Watermelon","Pear","Grape","Pineapple",
            "Strawberry","Cherry","Mango","Apple","Banana","Orange","Watermelon","Pear","Grape","Pineapple",
            "Strawberry","Cherry","Mango"
    };
    @Override
    protected void onCreate(Bundle savedInstanceState) {
        super.onCreate(savedInstanceState);
        mainBinding=ActivityMainBinding.inflate(getLayoutInflater());
        setContentView(mainBinding.getRoot());

        ArrayAdapter<String> adapter=new ArrayAdapter<String>(MainActivity.this,android.R.layout.simple_list_item_1,data);
        ListView listView=mainBinding.listView;
        listView.setAdapter(adapter);

    }
}
|
效果如下,运行后可以上下翻页

3.5.2 定制ListView的界面
上述ListView比较单调,我们可以对其界面进行定制
首先创建Fruit类
 1
 2
 3
 4
 5
 6
 7
 8
 9
10
11
12
13
14
|
public class Fruit{
    private String name;
    private int imageId;
    public Fruit(String name,int id){
        this.name=name;
        this.imageId=id;
    }
    public String getName(){
        return name;
    }
    public int getImageId(){
        return imageId;
    }
}
|
再为ListView子项指定布局,新建fruit_item.xml
 1
 2
 3
 4
 5
 6
 7
 8
 9
10
11
12
13
14
15
|
<?xml version="1.0" encoding="utf-8"?>
<LinearLayout xmlns:android="http://schemas.android.com/apk/res/android"
    android:layout_width="match_parent"
    android:layout_height="wrap_content">
    <ImageView
        android:layout_width="wrap_content"
        android:layout_height="wrap_content"
        android:id ="@+id/fruit_image"/>
    <TextView
        android:layout_width="wrap_content"
        android:layout_height="wrap_content"
        android:layout_gravity="center_vertical"
        android:id="@+id/fruit_name"
        android:layout_marginLeft="10dp"/>
</LinearLayout>
|
创建并重写适配器FruitAdapter
 1
 2
 3
 4
 5
 6
 7
 8
 9
10
11
12
13
14
15
16
17
18
19
20
21
22
23
24
25
26
27
28
29
30
31
|
import android.content.Context;
import android.view.LayoutInflater;
import android.view.View;
import android.view.ViewGroup;
import android.widget.ArrayAdapter;
import android.widget.ImageView;
import android.widget.TextView;

import org.w3c.dom.Text;

import java.util.List;

public class FruitAdapter extends ArrayAdapter<Fruit> {
    private int resourceId;//保存传入的子项布局id,用于后续动态加载

    public FruitAdapter(Context context, int textviewResourceId, List<Fruit> objects) {
        super(context, textviewResourceId, objects);
        resourceId = textviewResourceId;
    }
    //重写父类ArrayAdapter的getView
    public View getView(int position, View converView, ViewGroup parent) {
        //每个子项被滚动到屏幕内会被调用
        Fruit fruit = getItem(position);//获取当前项的Fruit实例
        View view= LayoutInflater.from(getContext()).inflate(resourceId,parent,false);// 为子项加载我们传入的布局
        ImageView fruitImage=(ImageView) view.findViewById(R.id.fruit_image);//获取实例
        TextView fruitname=(TextView) view.findViewById(R.id.fruit_name);
        fruitImage.setImageResource(fruit.getImageId());//为实例设置参数
        fruitname.setText(fruit.getName());
        return view;
    }
}
|
MainActivity
 1
 2
 3
 4
 5
 6
 7
 8
 9
10
11
12
13
14
15
16
17
18
19
20
21
22
23
24
25
26
27
28
29
30
31
32
33
34
35
36
37
38
39
40
41
42
43
44
45
46
47
48
49
|
package com.example.chapter3_uiwidgettest;

import androidx.appcompat.app.AppCompatActivity;

import android.os.Bundle;
import android.widget.ArrayAdapter;
import android.widget.ListView;

import java.util.ArrayList;
import java.util.List;


public class MainActivity extends AppCompatActivity {
    private List<Fruit> fruitList =new ArrayList<>();
    private void initFruits(){
        for (int i=0;i<2;i++){
            Fruit apple =new Fruit("Apple",R.drawable.apple_pic);
            fruitList.add(apple);
            Fruit banana = new Fruit("Banana",R.drawable.banana_pic);
            fruitList.add(banana);
            Fruit orange = new Fruit("Orange",R.drawable.orange_pic);
            fruitList.add(orange);
            Fruit watermelon = new Fruit("Watermelon",R.drawable.watermelon_pic);
            fruitList.add(watermelon);
            Fruit pear = new Fruit("Pear",R.drawable.pear_pic);
            fruitList.add(pear);
            Fruit grape = new Fruit("Grape",R.drawable.grape_pic);
            fruitList.add(grape);
            Fruit pineapple = new Fruit("Pineapple",R.drawable.pineapple_pic);
            fruitList.add(pineapple);
            Fruit strawberry = new Fruit("Strawberry",R.drawable.strawberry_pic);
            fruitList.add(strawberry);
            Fruit cherry = new Fruit("Cherry",R.drawable.cherry_pic);
            fruitList.add(cherry);
            Fruit mango = new Fruit("Mango",R.drawable.mango_pic);
            fruitList.add(mango);
        }
    }
    @Override
    protected void onCreate(Bundle savedInstanceState) {
        super.onCreate(savedInstanceState);
        setContentView(R.layout.activity_main);
        initFruits();
        FruitAdapter adapter=new FruitAdapter(MainActivity.this,R.layout.fruit_item,fruitList);
        ListView listView =(ListView) findViewById(R.id.list_view);
        listView.setAdapter(adapter);
    }

}
|
效果如下

3.5.3 提升ListView运行效率
…
3.5.4 ListView的点击事件
…
3.6 RecyclerView
RecyclerView是增强版的ListView,可以实现横向滚动
3.6.1 RecyclerView基本用法
该控件属于新增控件,为保持兼容性需要在gradle.build的dependencies中添加依赖
1
|
implementation 'androidx.recyclerview:recyclerview:1.2.1'
|
activity_main 由于该控件不是系统内置sdk控件,所以要写完整包名
1
2
3
4
5
6
7
8
9
|
<?xml version="1.0" encoding="utf-8"?>
<LinearLayout xmlns:android="http://schemas.android.com/apk/res/android"
    android:layout_width="match_parent"
    android:layout_height="match_parent">
    <androidx.recyclerview.widget.RecyclerView
        android:id="@+id/recycler_view"
        android:layout_width="match_parent"
        android:layout_height="match_parent"/>
</LinearLayout>
|
重写FruitAdapter 继承RecyclerView.Adapter,指定泛型类型为FruitAdapter.ViewHolder自定义类
 1
 2
 3
 4
 5
 6
 7
 8
 9
10
11
12
13
14
15
16
17
18
19
20
21
22
23
24
25
26
27
28
29
30
31
32
33
34
35
36
37
38
39
40
41
42
43
44
45
|
package com.example.chapter3_uiwidgettest;

import android.view.LayoutInflater;
import android.view.View;
import android.view.ViewGroup;
import android.widget.ImageView;
import android.widget.TextView;

import androidx.recyclerview.widget.RecyclerView;

import java.util.List;

public class FruitAdapter extends RecyclerView.Adapter<FruitAdapter.ViewHolder>{
    private List<Fruit> mFruitList;
    //继承并自定义类
    static class ViewHolder extends RecyclerView.ViewHolder{
        ImageView fruitImage;
        TextView fruitName;
        public ViewHolder(View view){
            super(view);
            fruitImage =(ImageView) view.findViewById(R.id.fruit_image);//加载图片文字实例
            fruitName =(TextView) view.findViewById(R.id.fruit_name);
        }
    }

    public FruitAdapter(List<Fruit> fruitList){
        mFruitList=fruitList;
    }
    @Override
    public ViewHolder onCreateViewHolder(ViewGroup parent, int viewType){
        View view = LayoutInflater.from(parent.getContext()).inflate(R.layout.fruit_item,parent,false);
        ViewHolder holder=new ViewHolder(view);
        return holder;
    }
    @Override
    public void onBindViewHolder(ViewHolder holder,int position){
        Fruit fruit=mFruitList.get(position);
        holder.fruitImage.setImageResource(fruit.getImageId());
        holder.fruitName.setText(fruit.getName());
    }
    @Override
    public int getItemCount(){
        return mFruitList.size();
    }
}
|
MainActivity
 1
 2
 3
 4
 5
 6
 7
 8
 9
10
11
12
13
14
15
16
17
18
19
20
21
22
23
24
25
26
27
28
29
30
31
32
33
34
35
36
37
38
39
40
41
42
43
44
45
46
47
48
49
50
51
52
53
54
55
56
57
58
59
60
61
62
63
|
package com.example.chapter3_uiwidgettest;

import androidx.annotation.NonNull;
import androidx.appcompat.app.AppCompatActivity;
import androidx.recyclerview.widget.LinearLayoutManager;
import androidx.recyclerview.widget.RecyclerView;

import android.os.Bundle;
import android.view.LayoutInflater;
import android.view.View;
import android.view.ViewGroup;
import android.widget.ImageView;
import android.widget.TextView;

import java.util.ArrayList;
import java.util.List;

public class MainActivity extends AppCompatActivity {
    private List<Fruit> fruitList=new ArrayList<>();

    private void initFruits(){
        for (int i=0;i<2;i++){
            Fruit apple =new Fruit("Apple",R.drawable.apple_pic);
            fruitList.add(apple);
            Fruit banana = new Fruit("Banana",R.drawable.banana_pic);
            fruitList.add(banana);
            Fruit orange = new Fruit("Orange",R.drawable.orange_pic);
            fruitList.add(orange);
            Fruit watermelon = new Fruit("Watermelon",R.drawable.watermelon_pic);
            fruitList.add(watermelon);
            Fruit pear = new Fruit("Pear",R.drawable.pear_pic);
            fruitList.add(pear);
            Fruit grape = new Fruit("Grape",R.drawable.grape_pic);
            fruitList.add(grape);
            Fruit pineapple = new Fruit("Pineapple",R.drawable.pineapple_pic);
            fruitList.add(pineapple);
            Fruit strawberry = new Fruit("Strawberry",R.drawable.strawberry_pic);
            fruitList.add(strawberry);
            Fruit cherry = new Fruit("Cherry",R.drawable.cherry_pic);
            fruitList.add(cherry);
            Fruit mango = new Fruit("Mango",R.drawable.mango_pic);
            fruitList.add(mango);
        }
    }
    @Override
    protected void onCreate(Bundle savedInstanceState) {
        super.onCreate(savedInstanceState);
        setContentView(R.layout.activity_main);
//初始化所有的水果数据
        initFruits();
//获取recycler_view实例
        RecyclerView recyclerView=(RecyclerView) findViewById(R.id.recycler_view);
//创建一个LinearLayoutManager 对象
        LinearLayoutManager layoutManager=new LinearLayoutManager(this);
//LayoutManager用于指定RecyclerView的布局方式 LinearLayoutManager是线性布局
        recyclerView.setLayoutManager(layoutManager);
//创建FruitAdapter的实例,传入水果数据
        FruitAdapter adapter=new FruitAdapter(fruitList);
//适配器设置
        recyclerView.setAdapter(adapter);

    }
}
|
效果同上
3.6.2 实现横向滚动和瀑布流布局
3.6.3 RecyclerView的点击事件
3.7 编写界面的最佳实践
3.7.1 制作Nine-Patch图片
3.7.2 编写聊天界面
第4章 探究碎片
Android3.0引入了碎片(Fragment),可以使界面在平板上更好的显示
4.1 碎片是什么
碎片(Fragment)是一种可以嵌入在活动中的UI片段,可以让程序更合理更充分的利用大屏幕空间,常在平板使用
和活动非常相似,可以包含布局,拥有生命周期,可以理解为迷你型活动
4.2 碎片的使用方式
首先创建一个平板模拟器
4.2.1 碎片的简单用法
创建left_fragment.xml
 1
 2
 3
 4
 5
 6
 7
 8
 9
10
11
12
13
|
<?xml version="1.0" encoding="utf-8"?>
<LinearLayout xmlns:android="http://schemas.android.com/apk/res/android"
    android:layout_width="match_parent"
    android:layout_height="match_parent"
    android:orientation="vertical">
    <Button
        android:layout_width="wrap_content"
        android:layout_height="wrap_content"
        android:id="@+id/button"
        android:layout_gravity="center_horizontal"
        android:text="Button"
        />
</LinearLayout>
|
创建right_fragment.xml
 1
 2
 3
 4
 5
 6
 7
 8
 9
10
11
12
13
14
15
|
<?xml version="1.0" encoding="utf-8"?>
<LinearLayout xmlns:android="http://schemas.android.com/apk/res/android"
    android:layout_width="match_parent"
    android:layout_height="match_parent"
    android:background="#00ff00"
    android:orientation="vertical"
    >
    <TextView
        android:layout_width="wrap_content"
        android:layout_height="wrap_content"
        android:layout_gravity="center_horizontal"
        android:textSize="20sp"
        android:text="This is right fragment"/>

</LinearLayout>
|
编写LeftFragment类,继承Fragment类,重写onCreateView方法加载布局
 1
 2
 3
 4
 5
 6
 7
 8
 9
10
11
12
13
14
15
16
|
package com.example.chapter4_fragment;

import android.os.Bundle;
import android.view.LayoutInflater;
import android.view.View;
import android.view.ViewGroup;

import androidx.fragment.app.Fragment;

public class LeftFragment extends Fragment {
    @Override
    public View onCreateView(LayoutInflater inflater, ViewGroup container, Bundle saveInstanceState){
        View view =inflater.inflate(R.layout.left_fragment,container,false);//加载布局
        return view;
    }
}
|
编写RightFragment类
 1
 2
 3
 4
 5
 6
 7
 8
 9
10
11
12
13
14
15
16
|
package com.example.chapter4_fragment;

import android.os.Bundle;
import android.view.LayoutInflater;
import android.view.View;
import android.view.ViewGroup;

import androidx.fragment.app.Fragment;

public class RightFragment extends Fragment {
    @Override
    public View onCreateView(LayoutInflater inflater, ViewGroup container, Bundle saveInstanceState){
        View view =inflater.inflate(R.layout.right_fragment,container,false);//加载布局
        return view;
    }
}
|
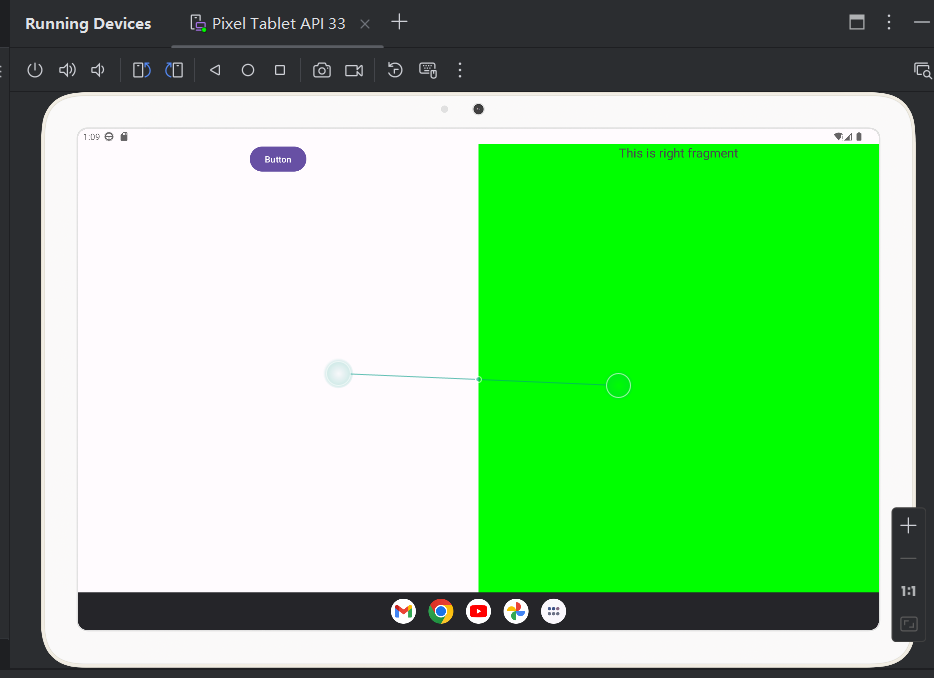
修改activity_main.xml
添加两个fragment,并通过layout_weight设置为均分
 1
 2
 3
 4
 5
 6
 7
 8
 9
10
11
12
13
14
15
16
17
|
<LinearLayout xmlns:android="http://schemas.android.com/apk/res/android"
    android:layout_width="match_parent"
    android:layout_height="match_parent"
    android:orientation="horizontal">
    <fragment
        android:layout_width="0dp"
        android:layout_height="match_parent"
        android:name="com.example.chapter4_fragment.LeftFragment"
        android:id ="@+id/left_fragment"
        android:layout_weight="1"/>
    <fragment
        android:layout_width="0dp"
        android:layout_height="match_parent"
        android:id="@+id/right_fragment"
        android:name="com.example.chapter4_fragment.RightFragment"
        android:layout_weight="1"/>
</LinearLayout>
|
效果如下,两个碎片平分了整个活动布局
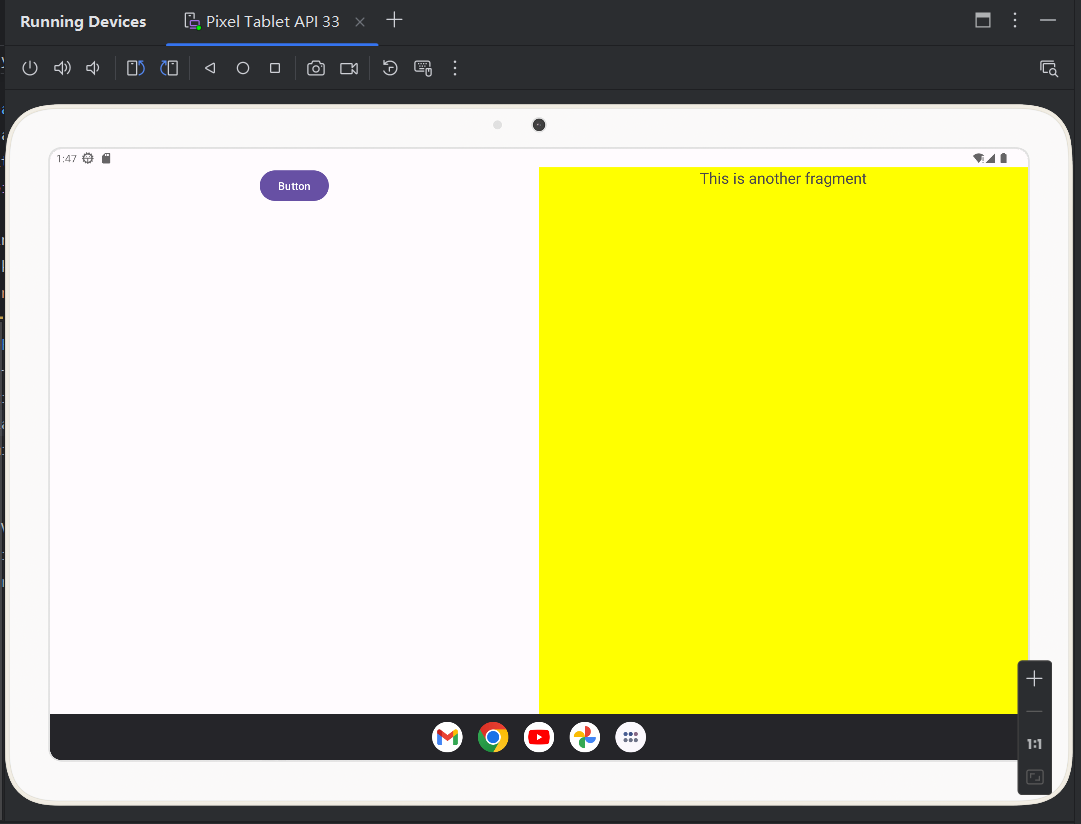
4.2.2 动态加载碎片
编写another_right_fragment.xml
 1
 2
 3
 4
 5
 6
 7
 8
 9
10
11
12
13
14
15
|
<?xml version="1.0" encoding="utf-8"?>
<LinearLayout xmlns:android="http://schemas.android.com/apk/res/android"
    android:layout_width="match_parent"
    android:layout_height="match_parent"
    android:background="#ffff00"
    android:orientation="vertical"
    >
    <TextView
        android:layout_width="wrap_content"
        android:layout_height="wrap_content"
        android:layout_gravity="center_horizontal"
        android:textSize="20sp"
        android:text="This is another fragment"/>

</LinearLayout>
|
编写AnotherRigtFragment类
 1
 2
 3
 4
 5
 6
 7
 8
 9
10
11
12
13
14
15
16
|
package com.example.chapter4_fragment;

import android.os.Bundle;
import android.view.LayoutInflater;
import android.view.View;
import android.view.ViewGroup;

import androidx.fragment.app.Fragment;

public class AnotherRightFragment extends Fragment {
    @Override
    public View onCreateView(LayoutInflater inflater, ViewGroup container, Bundle savedInstanceState) {
        View view=inflater.inflate(R.layout.another_right_fragment,container,false);//参数3用于设置父布局
        return view;
    }
}
|
修改activit_main.xml 将右侧碎片替换为FrameLayout
FrameLayout所有控件默认摆放在左上角,此处只需要在布局放一个碎片不需要定位所以适合用该布局
 1
 2
 3
 4
 5
 6
 7
 8
 9
10
11
12
13
14
15
16
17
18
|
<LinearLayout xmlns:android="http://schemas.android.com/apk/res/android"
    android:layout_width="match_parent"
    android:layout_height="match_parent"
    android:orientation="horizontal">
    <fragment
        android:layout_width="0dp"
        android:layout_height="match_parent"
        android:name="com.example.chapter4_fragment.LeftFragment"
        android:id ="@+id/left_fragment"
        android:layout_weight="1"/>
    <FrameLayout
        android:id="@+id/right_layout"
        android:layout_width="0dp"
        android:layout_height="match_parent"
        android:layout_weight="1"
        >
    </FrameLayout>
</LinearLayout>
|
修改MainActivity,向FrameLayout添加碎片
 1
 2
 3
 4
 5
 6
 7
 8
 9
10
11
12
13
14
15
16
17
18
19
20
21
22
23
24
25
26
27
28
29
30
31
32
33
34
35
36
37
38
39
40
41
42
43
44
|
package com.example.chapter4_fragment;

import android.os.Bundle;
import android.view.View;
import android.widget.Button;

import androidx.appcompat.app.AppCompatActivity;
import androidx.fragment.app.Fragment;
import androidx.fragment.app.FragmentManager;
import androidx.fragment.app.FragmentTransaction;

import com.example.chapter4_fragment.databinding.ActivityMainBinding;

public class MainActivity extends AppCompatActivity implements View.OnClickListener {
    private ActivityMainBinding binding;
    @Override
    protected void onCreate(Bundle savedInstanceState) {
        super.onCreate(savedInstanceState);
        binding = ActivityMainBinding.inflate(getLayoutInflater());
        setContentView(binding.getRoot());

        Button button=findViewById(R.id.button);
        button.setOnClickListener(this);
        replaceFragment(new RightFragment());
    }
    private void replaceFragment(Fragment fragment){

        //1.获取FragmentManager
        FragmentManager fragmentManager=getSupportFragmentManager();
        //2.通过beginTransaction()开启事物
        FragmentTransaction transaction=fragmentManager.beginTransaction();
        //3.向容器添加或替换碎片,一般用replace(),需传入容器id和待添加的碎片实例
        transaction.replace(R.id.right_layout,fragment);
        //4.通过commit()提交事物
        transaction.commit();
    }
    @Override
    public void onClick(View v){
        //给左侧碎片按钮添加点击事件,创建新的碎片实例替换右侧碎片
        if(v.getId()==R.id.button)
                replaceFragment(new AnotherRightFragment());//0.创建碎片实例
    }

}
|
效果如下,启动时和上次示例相同,点击按钮后右侧碎片被替换
4.3 碎片的生命周期
4.4 动态加载布局的技巧
4.5 碎片的最佳实践
第5章 广播机制
5.1 广播机制简介
Android程序可以对自己感兴趣的广播进行注册,这样只会接收到关心的广播内容,这些广播可以是来自于系统的,也可以是其他应用程序的
发送广播的方式可以借助Intent,接收广播则需要广播接收器(Broadcast Receiver)
Android的广播分为两种类型:
-
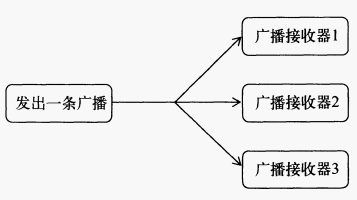
标准广播(Normal broadcasts)
异步执行,所有广播接收器几乎同时接收该广播,没有先后顺序
效率高.但无法截断,工作示意图如下
-
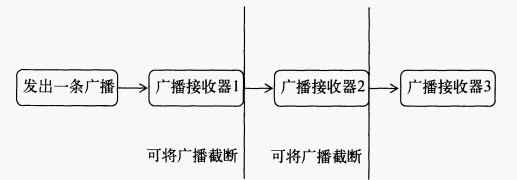
有序广播(Ordered broadcasts)
同步执行,同一时刻只有一个广播接收器接收到该广播
有先后顺序,优先级高的接收器先收到广播,并且可以截断
5.2 接收系统广播
Android内置了很多系统级广播,可通过监听这些广播得到各种系统状态信息
例如: 手机开机完成,电池电量变化,时间/时区发生改变等
5.2.1 动态注册监听网络变化
广播接收器有两种注册方法:
- 动态注册: 在代码中注册
- 静态注册: 在AndroidManifest.xml注册
创建广播接收器只需要新建一个类继承BroadcastReceiver,并重写onReceive()方法即可
另外还需要创建IntentFilter并指定广播类型,之后注册广播接收器即可
 1
 2
 3
 4
 5
 6
 7
 8
 9
10
11
12
13
14
15
16
17
18
19
20
21
22
23
24
25
26
27
28
29
30
31
32
33
34
35
36
37
38
39
40
41
42
43
44
45
46
47
|
package com.example.chapter5_broadcast;

import android.content.Context;
import android.content.Intent;
import android.content.IntentFilter;
import android.net.ConnectivityManager;
import android.net.NetworkInfo;
import android.os.Bundle;
import android.content.BroadcastReceiver;
import android.widget.Toast;

import androidx.appcompat.app.AppCompatActivity;


public class MainActivity extends AppCompatActivity {
    private IntentFilter intentFilter;
    private NetworkChangeReceiver networkChangeReceiver;
    class NetworkChangeReceiver extends BroadcastReceiver{
        //每当网络变化时都会接收广播并执行该方法
        @Override
        public void onReceive(Context context, Intent intent) {
            ConnectivityManager connectivityManager=(ConnectivityManager) getSystemService(Context.CONNECTIVITY_SERVICE);//获取系统服务实例,该类用于管理网络连接
            NetworkInfo networkInfo=connectivityManager.getActiveNetworkInfo();//获取网络信息实例
            if(networkInfo!=null&&networkInfo.isAvailable())//判断是否有网络
            {
                Toast.makeText(context,"network is available",Toast.LENGTH_LONG).show();
            }else {
                Toast.makeText(context,"network is unavailable",Toast.LENGTH_LONG).show();
            }
        }
    }
    @Override
    protected void onCreate(Bundle savedInstanceState) {
        super.onCreate(savedInstanceState);
        setContentView(R.layout.activity_main);
        intentFilter=new IntentFilter();
        intentFilter.addAction("android.net.conn.CONNECTIVITY_CHANGE");//网络变化时系统发出该种广播
        networkChangeReceiver=new NetworkChangeReceiver();
        registerReceiver(networkChangeReceiver,intentFilter);//注册接收器 传入网络接收器实例和过滤器
    }

    @Override
    protected void onDestroy() {
        super.onDestroy();
        unregisterReceiver(networkChangeReceiver);//动态注册的必须要卸载
    }
}
|
需要在AndroidManifest.xml中添加权限声明
1
2
3
4
5
6
|
<manifest xmlns:android="http://schemas.android.com/apk/res/android"
    xmlns:tools="http://schemas.android.com/tools">
    ...
    <uses-permission android:name="android.permission.ACCESS_NETWORK_STATE" />
	...
</manifest>
|
运行效果如下,每次网络变化时都会弹出提醒

5.2.2 静态注册实现开机启动
动态注册的广播接收器很灵活,可以自由控制注册与注销,但是必须在程序启动后才能接收广播
如果希望程序在未启动的情况下接收广播则需要静态注册,例如接收开机广播实现开机启动
创建活动时选择New->Other->Broadcast Receiver即可创建接收器,修改代码如下
 1
 2
 3
 4
 5
 6
 7
 8
 9
10
11
12
13
|
package com.example.chapter5_broadcast;

import android.content.BroadcastReceiver;
import android.content.Context;
import android.content.Intent;
import android.widget.Toast;

public class BootedReceiver extends BroadcastReceiver {
    @Override
    public void onReceive(Context context, Intent intent) {
        Toast.makeText(context,"Boot Complete!",Toast.LENGTH_LONG).show();
    }
}
|
打开AndroidManifest.xml,由于是快捷创建,所以会自动注册Receiver
添加接收开机信息的权限声明,再添加intent-filter指定action
 1
 2
 3
 4
 5
 6
 7
 8
 9
10
11
12
13
14
15
16
17
18
19
20
21
|
<?xml version="1.0" encoding="utf-8"?>
<manifest xmlns:android="http://schemas.android.com/apk/res/android"
    xmlns:tools="http://schemas.android.com/tools">

    <uses-permission android:name="android.permission.ACCESS_NETWORK_STATE" />
    <uses-permission android:name="android.permission.RECEIVE_BOOT_COMPLETED"/>

    <application
        ...
        <receiver
            android:name=".BootedReceiver"
            android:enabled="true"
            android:exported="true">
            <intent-filter>
                <action android:name="android.intent.action.BOOT_COMPLETED"/>
            </intent-filter>
        </receiver>
        ...
    </application>

</manifest>
|
书上操作安装并重启手机即可看到通知,经过测试无法看到
可能有以下原因:
- Android8.0对静态注册的隐式广播限制
- 权限问题,没有授权
- 系统启动后广播服务还在缓慢启动,故没有捕捉到特定接收的时机
注意: 当onReceive()方法运行较长时间没有结束时程序会报错
不要在中添加过多逻辑或耗时操作,广播接收器中不允许开启线程
更多的是用于打开程序其他组件,例如创建一个状态栏通知,启动一个服务等
5.3 发送自定义广播
上面学习了如何通过广播接收器接收系统广播,现在学习如何在程序中发送自定义广播并体会两种广播的区别
5.3.1 发送标准广播
新建一个广播接收器
 1
 2
 3
 4
 5
 6
 7
 8
 9
10
11
12
13
14
|
package com.example.chapter5_broadcast;

import android.content.BroadcastReceiver;
import android.content.Context;
import android.content.Intent;
import android.widget.Toast;

public class MyReceiver extends BroadcastReceiver {

    @Override
    public void onReceive(Context context, Intent intent) {
        Toast.makeText(context,"Receiver my broadcast!",Toast.LENGTH_LONG).show();
    }
}
|
修改Manifest,添加标签用于接收广播
1
2
3
4
5
6
7
8
9
|
        <receiver
            android:name=".MyReceiver"
            android:enabled="true"
            android:exported="true">
            <intent-filter>
                <action android:name="com.example.chapter5_broadcast.MY_BROADCAST"/>
            </intent-filter>

        </receiver>
|
创建按钮用于发送广播
1
2
3
4
5
6
|
    <Button
        android:layout_width="wrap_content"
        android:layout_height="wrap_content"
        android:id="@+id/SendBroadcast"
        android:text="Send Broadcast"
        />
|
MainActivity添加监听器
 1
 2
 3
 4
 5
 6
 7
 8
 9
10
11
|
        Button button=findViewById(R.id.SendBroadcast);
        button.setOnClickListener(new View.OnClickListener() {
            @Override
            public void onClick(View view) {
                Intent intent=new Intent("com.example.chapter5_broadcast.MY_BROADCAST");
                //Android8.0后静态注册的接收器无法隐式接收广播
                //必须显式指定接收广播的组件
                intent.setComponent(new ComponentName("com.example.chapter5_broadcast","com.example.chapter5_broadcast.MyReceiver"));
                sendBroadcast(intent);
            }
        });
|
效果如下,点击后接收到广播

广播可以跨进程通信,所以在应用程序内发送的广播其他程序也可以接收
由于Android8.0后静态注册Receiver不支持隐式广播,书上实验不予实现(修改为动态注册Receiver则可以接收隐式广播)
注意:
参考【Android Broadcast】BroadcastReceiver
android 8.0及以上版本对静态注册广播严格限制
Android8.0以后,静态注册的Receiver无法隐式接收自定义广播,必须显示指定,官方说明:
https://developer.android.google.cn/about/versions/oreo/background
静态注册的只可以接收部分豁免的系统广播,名单如下:
https://developer.android.google.cn/develop/background-work/background-tasks/broadcasts/broadcast-exceptions
5.3.2 发送有序广播
书上使用的是静态注册的隐式广播,由于Android8.0的限制无法复现,于是修改为动态注册的隐式广播
创建第二个项目BroadcastTest用于接收广播,动态注册Receiver
 1
 2
 3
 4
 5
 6
 7
 8
 9
10
11
12
13
14
15
16
17
18
19
20
21
22
23
24
25
26
27
28
29
30
31
32
33
34
35
36
|
package com.example.broadcasttest;

import android.content.BroadcastReceiver;
import android.content.Context;
import android.content.Intent;
import android.content.IntentFilter;
import android.os.Bundle;
import android.widget.Toast;

import androidx.appcompat.app.AppCompatActivity;


public class MainActivity extends AppCompatActivity {
    private AnotherBroadcastReceiver anotherBroadcastReceiver;
    @Override
    protected void onCreate(Bundle savedInstanceState) {
        super.onCreate(savedInstanceState);
        setContentView(R.layout.activity_main);
        IntentFilter intentFilter=new IntentFilter();
        intentFilter.addAction("com.example.chapter5_broadcast.MY_BROADCAST");
        anotherBroadcastReceiver=new AnotherBroadcastReceiver();
        registerReceiver(anotherBroadcastReceiver,intentFilter);
    }
    class AnotherBroadcastReceiver extends BroadcastReceiver{
        @Override
        public void onReceive(Context context, Intent intent) {
            Toast.makeText(context,"Another Receiver Received!",Toast.LENGTH_LONG).show();
        }
    }

    @Override
    protected void onDestroy() {
        super.onDestroy();
        unregisterReceiver(anotherBroadcastReceiver);
    }
}
|
在Chapter5_Broadcast项目中,添加按钮用于创建Receiver(另一个用于发送)
 1
 2
 3
 4
 5
 6
 7
 8
 9
10
11
12
|
    <Button
        android:layout_width="wrap_content"
        android:layout_height="wrap_content"
        android:id="@+id/CreateReceiver"
        android:text="Create Receiver"
        />
    <Button
        android:layout_width="wrap_content"
        android:layout_height="wrap_content"
        android:id="@+id/SendBroadcast"
        android:text="Send Broadcast"
        />
|
MainActivity如下
由于无法使用静态注册,所以通过intentFilter.setPriority()设置优先级,没有设置优先级时顺序不固定
设置后固定本项目先收到广播,如果在onReceive()添加abortBroadcast()则可以截断广播,Test项目无法接收
 1
 2
 3
 4
 5
 6
 7
 8
 9
10
11
12
13
14
15
16
17
18
19
20
21
22
23
24
25
26
27
28
29
30
31
32
33
34
35
36
37
38
39
40
41
42
43
44
45
46
47
48
49
50
51
52
53
54
55
56
|
package com.example.chapter5_broadcast;

import android.content.BroadcastReceiver;
import android.content.ComponentName;
import android.content.Context;
import android.content.Intent;
import android.content.IntentFilter;
import android.os.Bundle;
import android.view.View;
import android.widget.Button;
import android.widget.Toast;

import androidx.appcompat.app.AppCompatActivity;

public class MainActivity extends AppCompatActivity {
    private MyReceiver myReceiver;
    @Override
    protected void onCreate(Bundle savedInstanceState) {
        super.onCreate(savedInstanceState);
        setContentView(R.layout.activity_main);
        Button createReceiver=findViewById(R.id.CreateReceiver);
        createReceiver.setOnClickListener(new View.OnClickListener(){
            @Override
            public void onClick(View view) {
                myReceiver=new MyReceiver();
                IntentFilter intentFilter=new IntentFilter();
                intentFilter.addAction("com.example.chapter5_broadcast.MY_BROADCAST");
                intentFilter.setPriority(100);//设置优先级
                registerReceiver(myReceiver,intentFilter);
                Toast.makeText(MainActivity.this,"Create Receiver Successed!",Toast.LENGTH_SHORT).show();
            }
        });
        Button button=findViewById(R.id.SendBroadcast);
        button.setOnClickListener(new View.OnClickListener() {
            @Override
            public void onClick(View view) {
                Intent intent=new Intent("com.example.chapter5_broadcast.MY_BROADCAST");
                sendOrderedBroadcast(intent,null);
            }
        });
    }

    @Override
    protected void onDestroy() {
        super.onDestroy();
        unregisterReceiver(myReceiver);
    }

    public class MyReceiver extends BroadcastReceiver {
        @Override
        public void onReceive(Context context, Intent intent) {
            Toast.makeText(context,"Receiver my broadcast!",Toast.LENGTH_LONG).show();
            //abortBroadcast(); //截断广播
        }
    }
}
|
综上,有序广播的功能得以证明
5.4 使用本地广播
上述广播都属于全局广播,这样容易引起安全性问题,例如我们发送的带关键性数据的广播可能被其他程序截获;或者其他程序不断向我们的接收器发送垃圾广播等
Android引入了一套本地广播机制解决这些问题,通过LocalBroadcastManager对广播进行管理
修改MainActivity如下,和使用隐式广播类似无需指定目标(只在内部广播),主要通过LocalBroadcastManager进行管理
 1
 2
 3
 4
 5
 6
 7
 8
 9
10
11
12
13
14
15
16
17
18
19
20
21
22
23
24
25
26
27
28
29
30
31
32
33
34
35
36
37
38
39
40
41
42
43
44
45
46
47
48
49
50
51
52
53
54
|
package com.example.chapter5_broadcast;

import android.content.BroadcastReceiver;
import android.content.ComponentName;
import android.content.Context;
import android.content.Intent;
import android.content.IntentFilter;
import android.os.Bundle;
import android.view.View;
import android.widget.Button;
import android.widget.Toast;

import androidx.appcompat.app.AppCompatActivity;
import androidx.localbroadcastmanager.content.LocalBroadcastManager;

public class MainActivity extends AppCompatActivity {
    private LocalReceiver localReciver;
    private LocalBroadcastManager localBroadcastManager;
    @Override
    protected void onCreate(Bundle savedInstanceState) {
        super.onCreate(savedInstanceState);
        setContentView(R.layout.activity_main);
        localBroadcastManager=LocalBroadcastManager.getInstance(this);//获取本地广播管理器实例

        //注册本地广播监听器
        IntentFilter intentFilter=new IntentFilter();
        intentFilter.addAction("com.example.chapter5_broadcast.LOCAL_BROADCAST");
        localReciver=new LocalReceiver();
        localBroadcastManager.registerReceiver(localReciver,intentFilter);

        //发送广播
        Button button=findViewById(R.id.SendBroadcast);
        button.setOnClickListener(new View.OnClickListener() {
            @Override
            public void onClick(View view) {
                Intent intent=new Intent("com.example.chapter5_broadcast.LOCAL_BROADCAST");
                localBroadcastManager.sendBroadcast(intent);
            }
        });
    }

    public class LocalReceiver extends BroadcastReceiver {
        @Override
        public void onReceive(Context context, Intent intent) {
            Toast.makeText(context,"Receive local broadcast!",Toast.LENGTH_LONG).show();
        }
    }

    @Override
    protected void onDestroy() {
        super.onDestroy();
        localBroadcastManager.unregisterReceiver(localReciver);
    }
}
|
值得注意的是本地广播无法通过静态注册接收器接收,必须动态注册,因为发送本地广播时app已经启动
本地广播的优势:
- 广播不会离开本程序,不用担心机密数据泄露
- 本地广播比全局广播高效
- 其他程序无法广播到本程序,无须担心安全漏洞
5.5 广播实现强制下线功能
以qq登录为例,强制下线思路: 弹出对话框,让用户无法进行任何操作,必须点击确定并返回登录界面.需要关闭所有活动再返回登录页面
先创建一个ActivityCollector管理所有活动,实现一键强制下线所有活动的函数
 1
 2
 3
 4
 5
 6
 7
 8
 9
10
11
12
13
14
15
16
17
18
19
20
21
22
|
import android.app.Activity;

import java.util.ArrayList;
import java.util.List;

public class ActivityCollector {
    public static List<Activity> activities =new ArrayList<>();
    public static void addActivity(Activity activity){
        activities.add(activity);
    }
    public static void removeActivity(Activity activity){
        activities.remove(activity);
    }
    //结束所有活动
    public static void finishAll(){
        for (Activity activity:activities) {
            if (!activity.isFinishing()){
                activity.finish();
            }
        }
    }
}
|
再创建BaseActivity作为所有活动的父类
 1
 2
 3
 4
 5
 6
 7
 8
 9
10
11
12
13
14
15
16
17
18
19
|
import android.os.Bundle;
import android.os.PersistableBundle;

import androidx.annotation.Nullable;
import androidx.appcompat.app.AppCompatActivity;

public class BaseActivity extends AppCompatActivity {
    @Override
    public void onCreate(@Nullable Bundle savedInstanceState, @Nullable PersistableBundle persistentState) {
        super.onCreate(savedInstanceState, persistentState);
        ActivityCollector.addActivity(this);
    }

    @Override
    protected void onDestroy() {
        super.onDestroy();
        ActivityCollector.removeActivity(this);
    }
}
|
创建LoginActivity
布局如下,构建账号密码输入框和点击按钮
 1
 2
 3
 4
 5
 6
 7
 8
 9
10
11
12
13
14
15
16
17
18
19
20
21
22
23
24
25
26
27
28
29
30
31
32
33
34
35
36
37
38
39
40
41
42
43
44
45
46
|
<?xml version="1.0" encoding="utf-8"?>
<LinearLayout xmlns:android="http://schemas.android.com/apk/res/android"
    android:orientation="vertical"
    android:layout_width="match_parent"
    android:layout_height="match_parent">
    <LinearLayout
        android:orientation="horizontal"
        android:layout_width="match_parent"
        android:layout_height="60dp">
        <TextView
            android:layout_width="90dp"
            android:layout_height="wrap_content"
            android:layout_gravity="center_vertical"
            android:textSize="18sp"
            android:text="Account:"/>
        <EditText
            android:id="@+id/account"
            android:layout_width="0dp"
            android:layout_height="wrap_content"
            android:layout_weight="1"
            android:layout_gravity="center_vertical"/>
    </LinearLayout>
    <LinearLayout
        android:orientation="horizontal"
        android:layout_width="match_parent"
        android:layout_height="60dp">
        <TextView
            android:layout_width="90dp"
            android:layout_height="wrap_content"
            android:layout_gravity="center_vertical"
            android:textSize="18sp"
            android:text="Password"/>
        <EditText
            android:id="@+id/password"
            android:layout_width="0dp"
            android:layout_height="wrap_content"
            android:layout_weight="1"
            android:layout_gravity="center_vertical"
            android:inputType="textPassword"/>
    </LinearLayout>
    <Button
        android:id="@+id/login"
        android:layout_width="match_parent"
        android:layout_height="60dp"
        android:text="Login"/>
</LinearLayout>
|
代码如下,账号=admin,密码=123456时跳转至MainActivity并销毁本活动,否则提示错误
 1
 2
 3
 4
 5
 6
 7
 8
 9
10
11
12
13
14
15
16
17
18
19
20
21
22
23
24
25
26
27
28
29
30
31
32
33
34
35
36
37
38
39
40
|
package com.example.chapter5_broadcast;

import android.content.Intent;
import android.os.Bundle;
import android.view.View;
import android.widget.Button;
import android.widget.EditText;
import android.widget.TextView;
import android.widget.Toast;

import androidx.annotation.Nullable;

public class LoginActivity extends BaseActivity{
    private EditText accountEdit;
    private EditText passwordEdit;
    private Button login;

    @Override
    protected void onCreate(@Nullable Bundle savedInstanceState) {
        super.onCreate(savedInstanceState);
        setContentView(R.layout.activity_login);
        accountEdit=(EditText)findViewById(R.id.account);
        passwordEdit=(EditText)findViewById(R.id.password);
        login =(Button) findViewById(R.id.login);
        login.setOnClickListener(new View.OnClickListener() {
            @Override
            public void onClick(View view) {
                String account=accountEdit.getText().toString();
                String password=passwordEdit.getText().toString();
                if (account.equals("admin")&&password.equals("123456")){
                    Intent intent=new Intent(LoginActivity.this,MainActivity.class);
                    startActivity(intent);
                    finish();
                }else {
                    Toast.makeText(LoginActivity.this, "account or password is error!", Toast.LENGTH_SHORT).show();
                }
            }
        });
    }
}
|
修改activity_main,添加按钮用于强制下线
 1
 2
 3
 4
 5
 6
 7
 8
 9
10
11
|
<?xml version="1.0" encoding="utf-8"?>
<LinearLayout xmlns:android="http://schemas.android.com/apk/res/android"
    android:orientation="vertical"
    android:layout_width="match_parent"
    android:layout_height="match_parent">
    <Button
        android:id="@+id/force_offline"
        android:layout_width="match_parent"
        android:layout_height="wrap_content"
        android:text="Send force offline broadcast"/>
</LinearLayout>
|
修改MainActivity,发送下线广播用于下线所有活动
 1
 2
 3
 4
 5
 6
 7
 8
 9
10
11
12
13
14
15
16
17
18
19
20
21
22
23
24
|
package com.example.chapter5_broadcast;

import androidx.appcompat.app.AppCompatActivity;

import android.content.Intent;
import android.os.Bundle;
import android.view.View;
import android.widget.Button;

public class MainActivity extends BaseActivity {
    @Override
    protected void onCreate(Bundle savedInstanceState) {
        super.onCreate(savedInstanceState);
        setContentView(R.layout.activity_main);
        Button offline =(Button) findViewById(R.id.force_offline);
        offline.setOnClickListener(new View.OnClickListener() {
            @Override
            public void onClick(View view) {
                Intent intent=new Intent("com.example.chapter5_broadcast.FORCE_OFFLINE");
                sendBroadcast(intent);
            }
        });
    }
}
|
那么如何接收下线广播呢?显然每个活动都添加接收器太过麻烦
直接在BaseActivity添加下线广播接收器即可
 1
 2
 3
 4
 5
 6
 7
 8
 9
10
11
12
13
14
15
16
17
18
19
20
21
22
23
24
25
26
27
28
29
30
31
32
33
34
35
36
37
38
39
40
41
42
43
44
45
46
47
48
49
50
51
52
53
54
55
56
57
58
59
60
61
62
63
64
|
package com.example.chapter5_broadcast;

import android.content.BroadcastReceiver;
import android.content.Context;
import android.content.DialogInterface;
import android.content.Intent;
import android.content.IntentFilter;
import android.os.Bundle;

import androidx.annotation.Nullable;
import androidx.appcompat.app.AlertDialog;
import androidx.appcompat.app.AppCompatActivity;

public class BaseActivity extends AppCompatActivity {
    private ForeceOfflineReceiver receiver;
    @Override
    protected void onCreate(@Nullable Bundle savedInstanceState) {
        super.onCreate(savedInstanceState);
        ActivityCollector.addActivity(this);//添加本活动进活动管理器列表
    }

    @Override
    protected void onResume() {
        super.onResume();
        IntentFilter intentFilter=new IntentFilter();//每当面向用户运行时创建下线广播接收器
        intentFilter.addAction("com.example.chapter5_broadcast.FORCE_OFFLINE");
        receiver=new ForeceOfflineReceiver();
        registerReceiver(receiver,intentFilter);
    }

    @Override
    protected void onPause() {
        super.onPause();
        if (receiver!=null){
            unregisterReceiver(receiver);//暂停时停止接收广播
            receiver=null;
        }
    }

    @Override
    protected void onDestroy() {
        super.onDestroy();
        ActivityCollector.removeActivity(this);
    }
    //弹窗只允许点击ok并下线所有活动返回登录页
    class ForceOfflineReceiver extends BroadcastReceiver{
        @Override
        public void onReceive(Context context, Intent intent) {
            AlertDialog.Builder builder =new AlertDialog.Builder(context);
            builder.setTitle("Warning");
            builder.setMessage("You are forced to be offline ,Pleasr try to login again");
            builder.setCancelable(false);//不可取消,防止back
            builder.setPositiveButton("OK", new DialogInterface.OnClickListener() {
                @Override
                public void onClick(DialogInterface dialogInterface, int i) {
                    ActivityCollector.finishAll();//下线所有活动
                    Intent intent=new Intent(context,LoginActivity.class);
                    context.startActivity(intent);//返回登录页面
                }
            });
            builder.show();
        }
    }
}
|
为什么要在onResume()和onPause()进行注册和卸载ForceOfflineReceiver呢?之前都是在onCreate()和onDestroy()进行
这是因为我们需要保证始终只有处于栈顶的活动能接受到强制下线广播,非栈顶活动不应该也没必要接收该广播
只需要栈顶活动能弹出强制下线弹窗即可,如果其他活动也弹窗效果会很不好,这样写可以保证活动不在栈顶时自动关闭广播接收器
修改Manifest,设置登录活动为app入口
 1
 2
 3
 4
 5
 6
 7
 8
 9
10
11
12
13
14
15
16
17
18
19
20
21
22
23
24
25
26
27
28
|
<?xml version="1.0" encoding="utf-8"?>
<manifest xmlns:android="http://schemas.android.com/apk/res/android"
    xmlns:tools="http://schemas.android.com/tools">

    <application
        android:allowBackup="true"
        android:dataExtractionRules="@xml/data_extraction_rules"
        android:fullBackupContent="@xml/backup_rules"
        android:icon="@mipmap/ic_launcher"
        android:label="@string/app_name"
        android:roundIcon="@mipmap/ic_launcher_round"
        android:supportsRtl="true"
        android:theme="@style/Theme.Chapter5_Broadcast"
        tools:targetApi="31">
        <activity
            android:name=".LoginActivity"
            android:exported="true">
            <intent-filter>
                <action android:name="android.intent.action.MAIN" />
                <category android:name="android.intent.category.LAUNCHER" />
            </intent-filter>
        </activity>
        <activity
            android:name=".MainActivity">
        </activity>
    </application>

</manifest>
|
效果如下,点击ok后返回登录页

登录页,输错账号密码会提示,输对跳转到MainActivity

第6章 持久化技术
6.1 持久化技术简介
数据持久化是指将内存中的瞬时数据保存到存储设备中,Android提供了3种简单的方式实现: 文件存储,SharedPreference存储,数据库存储
除此之外也可以保存在SD卡中,但这种方式不太安全
6.2 文件存储
文件存储是Android中最基本的数据存储方式,不对存储内容进行任何格式化处理,数据原封不动保存到文件中,比较适合存储简单的数据
6.2.1 将数据存储到文件中
Context类提供了一个**openFileOutput()**方法用于存储数据到指定文件中,参数1是文件名,参数2是操作模式
文件操作模式原来还有两种,MODE_WORLD_READABLE和MODE_WORLD_WRITEABLE,表示允许其他程序对本程序的文件进行读写,但这两种模式过于危险于Android4.2被废弃
编写代码测试
创建项目,修改layout,添加button用于确认保存
 1
 2
 3
 4
 5
 6
 7
 8
 9
10
11
12
13
14
15
16
17
18
19
|
<?xml version="1.0" encoding="utf-8"?>
<LinearLayout xmlns:android="http://schemas.android.com/apk/res/android"
    android:layout_width="match_parent"
    android:layout_height="match_parent"
    android:orientation="vertical">

    <EditText
        android:id="@+id/input"
        android:layout_width="match_parent"
        android:layout_height="wrap_content"
        android:hint="Please input data:" />

    <Button
        android:id="@+id/button"
        android:layout_width="wrap_content"
        android:layout_height="wrap_content"
        android:text="Store data"/>

</LinearLayout>
|
MainActivity,使用点击按钮保存数据,不使用书上back销毁活动保存(没复现出来)
 1
 2
 3
 4
 5
 6
 7
 8
 9
10
11
12
13
14
15
16
17
18
19
20
21
22
23
24
25
26
27
28
29
30
31
32
33
34
35
36
37
38
39
40
41
42
43
44
45
46
47
48
49
50
51
52
|
package com.example.chapter6_storage;

import android.content.Context;
import android.os.Bundle;
import android.view.View;
import android.widget.Button;
import android.widget.EditText;

import androidx.appcompat.app.AppCompatActivity;

import java.io.BufferedWriter;
import java.io.FileOutputStream;
import java.io.IOException;
import java.io.OutputStreamWriter;

public class MainActivity extends AppCompatActivity {
    @Override
    protected void onCreate(Bundle savedInstanceState) {
        super.onCreate(savedInstanceState);
        setContentView(R.layout.activity_main);
        EditText input=findViewById(R.id.input);
        Button button=findViewById(R.id.button);
        button.setOnClickListener(new View.OnClickListener() {
            @Override
            public void onClick(View view) {
                String data=input.getText().toString();
                saveData(data);
            }
        });
    }
    //使用java文件流读写
    public void saveData(String data){
        FileOutputStream out=null;
        BufferedWriter writer=null;
        try{
            out=openFileOutput("data", Context.MODE_PRIVATE);
            writer=new BufferedWriter(new OutputStreamWriter(out));
            writer.write(data);
        }
        catch (IOException e){
            e.printStackTrace();
        }finally {
            try{
                if(writer!=null){
                    writer.close();
                }
            }catch (IOException e){
                e.printStackTrace();
            }
        }
    }
}
|
通过设备管理器查找文件双击即可(按ctrl+f可快捷搜索)
效果如下,保存数据成功
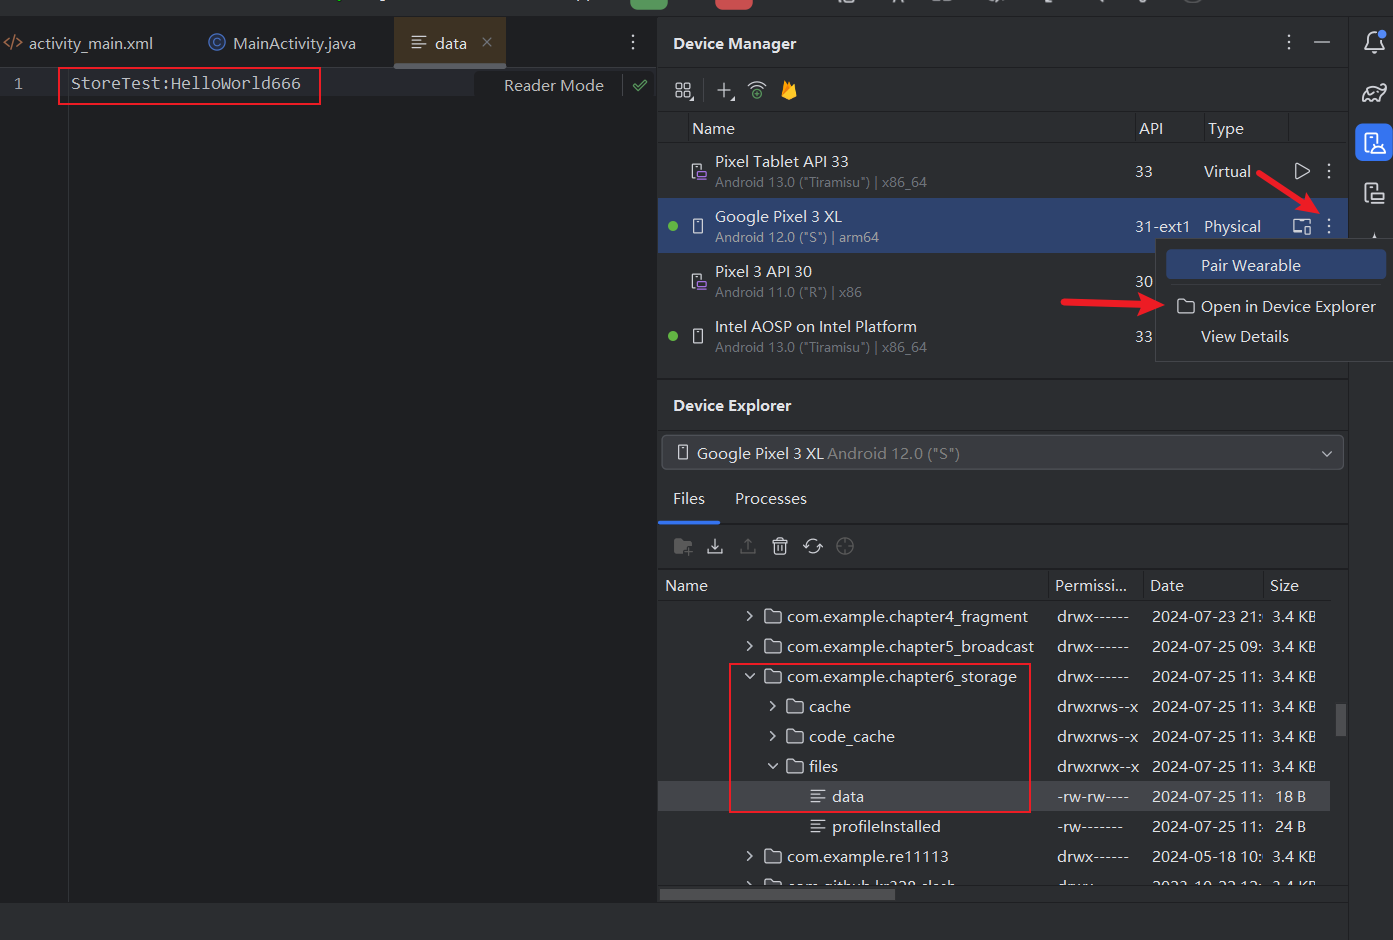
6.2.2 从文件中读取数据
Context类提供了**openFileInput()**方法用于从文件读取数据,该方法仅接收一个参数–要读取的文件名
自动到/data/data/<package_name>/files/下加载文件并返回FileInputStream类,之后通过java的io流读取即可
修改MainActivity
 1
 2
 3
 4
 5
 6
 7
 8
 9
10
11
12
13
14
15
16
17
18
19
20
21
22
23
24
25
26
27
28
29
30
31
32
33
34
35
36
37
38
39
40
41
42
43
44
45
46
47
48
49
50
51
52
53
54
|
package com.example.chapter6_storage;

import android.os.Bundle;
import android.view.View;
import android.widget.Button;
import android.widget.EditText;

import androidx.appcompat.app.AppCompatActivity;

import java.io.BufferedReader;
import java.io.FileInputStream;
import java.io.IOException;
import java.io.InputStreamReader;

public class MainActivity extends AppCompatActivity {
    @Override
    protected void onCreate(Bundle savedInstanceState) {
        super.onCreate(savedInstanceState);
        setContentView(R.layout.activity_main);
        EditText input=findViewById(R.id.input);
        Button button=findViewById(R.id.button);
        button.setOnClickListener(new View.OnClickListener() {
            @Override
            public void onClick(View view) {
                String data=readData("data");//读取文件并设置input文本内容
                input.setText(data);
            }
        });
    }
    public String readData(String name){
        FileInputStream fileInputStream=null;
        BufferedReader reader = null;
        StringBuilder content=new StringBuilder();
        try {
            fileInputStream=openFileInput(name);
            reader = new BufferedReader(new InputStreamReader(fileInputStream));
            String line="";
            while ((line=reader.readLine())!=null){
                content.append(line);
            }
        }catch (IOException e){
            e.printStackTrace();
        }finally {
            if (reader!=null){
                try {
                    reader.close();
                }catch (IOException e){
                    e.printStackTrace();
                }
            }
        }
        return content.toString();
    }
}
|
文件存储的核心是使用Context类提供的openFileInput和openFileOutput方法,再利用Java的IO流进行读写操作
只适用于保存简单数据,不适用于复杂数据
6.3 SharedPreferences存储
SharedPreferences使用键值对方式存储数据,支持多种不同数据类型存储,比文件存储更加简单易用
6.3.1 将数据存储到SharedPreferences
使用SharedPreferences存储数据首先需要获取SharedPreferences对象,Android提供了3种方法获取
-
Context类的getSharedPreferences()方法
接收2个参数,参数1指定SharedPreferences文件名称,若不存在则创建,该文件存放在/data/data/<package_name>/shared_prefs/下
参数2指定操作模式,目前只有MODE_PRIVATE可选(默认模式,和传0效果相同),表示只有当前程序可对该文件读写,其他模式均被废弃
-
Activity类的getPreferences()方法
和上一个方法类似,不过只接收一个操作模式参数,该方法自动将当前活动类名作为文件名
-
PreferenceManager类的getDefaultSharedPreferences()方法
静态方法,接收一个Context参数,并自动使用当前程序包名作为前缀命名文件
得到SharedPreferences对象后即可存储数据,分3步实现:
- 调用SharedPreferences.edit()获取SharedPreferences.Editor对象
- 向SharedPreferences.Editor添加数据,使用putDataType()添加,例如String用putString(),布尔用putBoolean()
- 调用apply()方法提交添加的数据完成存储
修改activity_main
 1
 2
 3
 4
 5
 6
 7
 8
 9
10
11
|
<?xml version="1.0" encoding="utf-8"?>
<LinearLayout xmlns:android="http://schemas.android.com/apk/res/android"
    android:orientation="vertical"
    android:layout_width="match_parent"
    android:layout_height="match_parent">
    <Button
        android:layout_width="match_parent"
        android:layout_height="wrap_content"
        android:id="@+id/save_data"
        android:text="Save data"/>
</LinearLayout>
|
修改MainActivity
 1
 2
 3
 4
 5
 6
 7
 8
 9
10
11
12
13
14
15
16
17
18
19
20
21
22
23
24
25
26
27
28
|
package com.example.chapter6_storage;
import androidx.appcompat.app.AppCompatActivity;
import android.content.SharedPreferences;
import android.os.Bundle;
import android.preference.PreferenceManager;
import android.view.View;
import android.widget.Button;

public class MainActivity extends AppCompatActivity {
    @Override
    protected void onCreate(Bundle savedInstanceState) {
        super.onCreate(savedInstanceState);
        setContentView(R.layout.activity_main);
        Button button=findViewById(R.id.save_data);
        //this.getPreferences(MODE_PRIVATE); //Activity的方法
        //PreferenceManager.getDefaultSharedPreferencesName(this); //PreferenceManager的方法
        button.setOnClickListener(new View.OnClickListener() {
            @Override
            public void onClick(View view) {
                SharedPreferences.Editor editor =getSharedPreferences("data",MODE_PRIVATE).edit();//获取editor对象
                editor.putString("name","Tom");//写入数据
                editor.putBoolean("married",false);
                editor.putInt("age",28);
                editor.apply();//提交数据
            }
        });
    }
}
|
运行效果,文件使用xml形式,以键值对方式存储,其中string类型直接存储,其他类型使用value存储
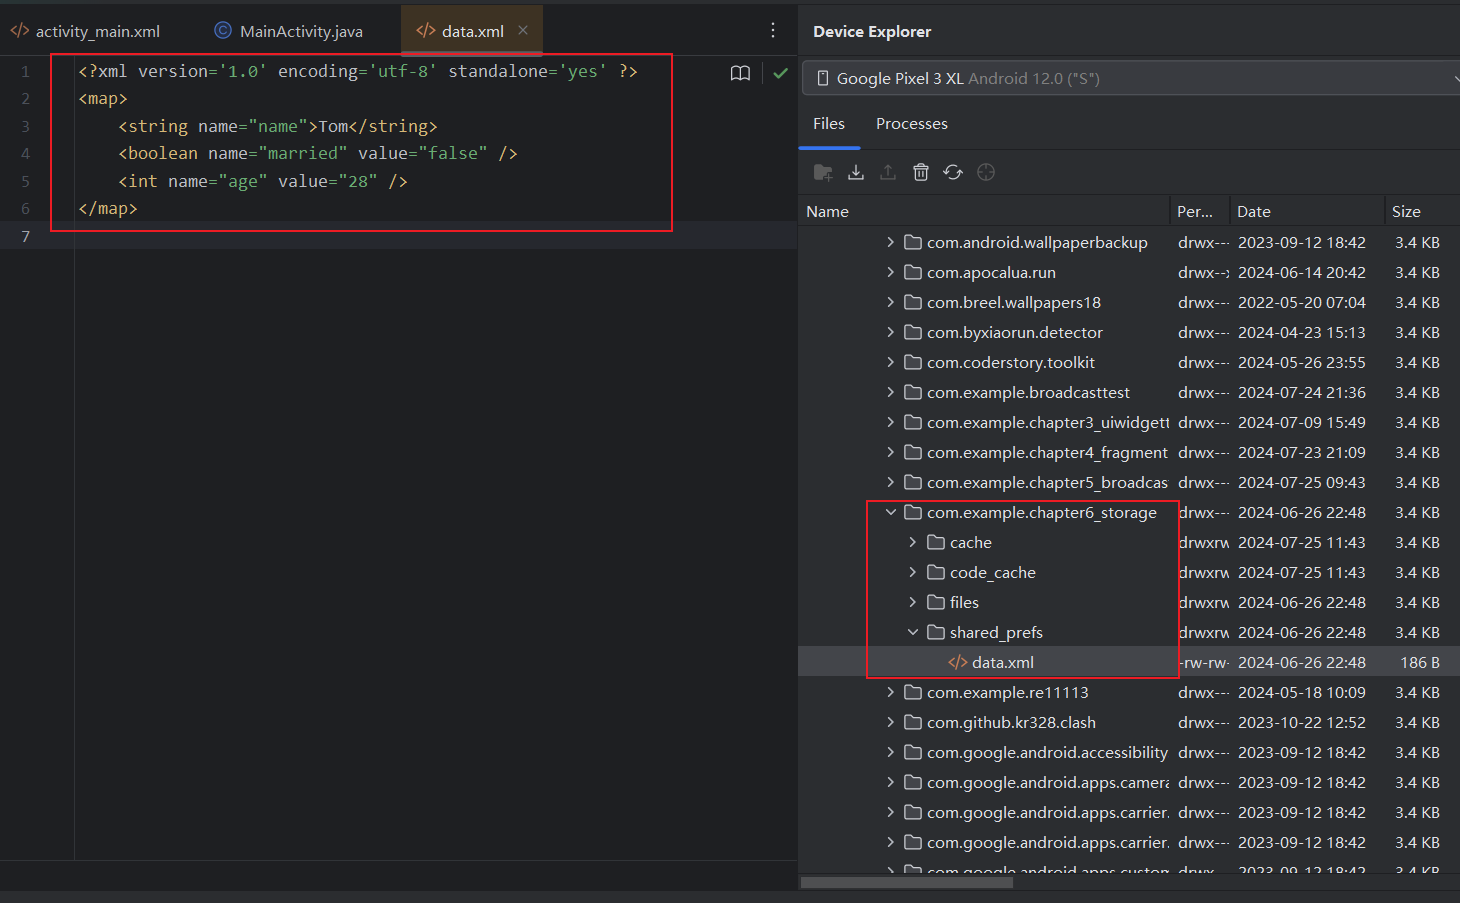
6.3.2 从SharedPreferences读取数据
SharedPreferences对象提供了一系列的getDataType()方法读取数据,每个get方法和前文的put方法一一对应
每个get方法都接收两个参数: 参数1是键,传入存储时使用的键即可得到对应值; 参数2是默认值,表示找不到对应值时返回什么默认值
修改布局文件
 1
 2
 3
 4
 5
 6
 7
 8
 9
10
11
12
13
14
15
16
|
<?xml version="1.0" encoding="utf-8"?>
<LinearLayout xmlns:android="http://schemas.android.com/apk/res/android"
    android:orientation="vertical"
    android:layout_width="match_parent"
    android:layout_height="match_parent">
    <Button
        android:layout_width="match_parent"
        android:layout_height="wrap_content"
        android:id="@+id/save_data"
        android:text="Save data"/>
    <Button
        android:layout_width="match_parent"
        android:layout_height="wrap_content"
        android:id="@+id/restore_data"
        android:text="Restore data"/>
</LinearLayout>
|
修改MainActivity
 1
 2
 3
 4
 5
 6
 7
 8
 9
10
11
12
13
14
15
16
17
18
19
20
21
22
23
24
25
26
27
28
29
30
31
32
33
34
35
36
37
38
39
40
41
|
package com.example.chapter6_storage;
import androidx.appcompat.app.AppCompatActivity;

import android.content.SharedPreferences;
import android.os.Bundle;
import android.util.Log;
import android.view.View;
import android.widget.Button;

public class MainActivity extends AppCompatActivity {

    @Override
    protected void onCreate(Bundle savedInstanceState) {
        super.onCreate(savedInstanceState);
        setContentView(R.layout.activity_main);
        Button button=findViewById(R.id.save_data);
        Button reStoreData=findViewById(R.id.restore_data);
        button.setOnClickListener(new View.OnClickListener() {
            @Override
            public void onClick(View view) {
                SharedPreferences.Editor editor =getSharedPreferences("data",MODE_PRIVATE).edit();
                editor.putString("name","Tom");
                editor.putBoolean("married",false);
                editor.putInt("age",28);
                editor.apply();
            }
        });
        reStoreData.setOnClickListener(new View.OnClickListener() {
            @Override
            public void onClick(View view) {
                SharedPreferences pref=getSharedPreferences("data",MODE_PRIVATE);//直接获取对象读取数据
                String name=pref.getString("name","");
                int age=pref.getInt("age",0);
                boolean married=pref.getBoolean("married",false);
                Log.d("MainActivity","name is "+name);
                Log.d("MainActivity","age is "+age);
                Log.d("Mainactivity","married is "+married);
            }
        });
    }
}
|
运行效果
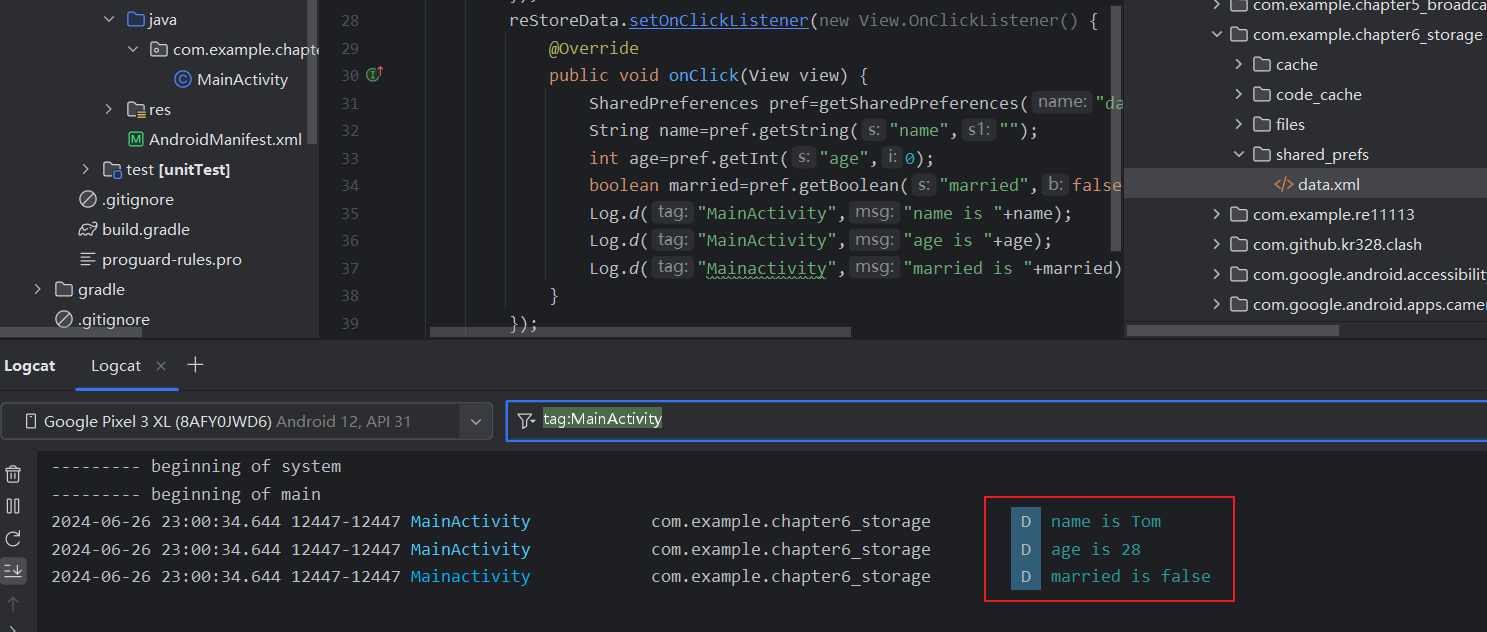
相比之下SharedPreferences存储确实比文本存储简单方便,应用场景也多了不少,例如很多程序的应用偏好设置就利用到了该技术
6.3.3 实现记住密码功能
使用上一章广播强制下线的登录界面,略作修改
checkbox是复选框控件,可通过点击进行选中和取消,使用该控件确认是否需要记住密码
activity_login.xml
 1
 2
 3
 4
 5
 6
 7
 8
 9
10
11
12
13
14
15
16
17
18
19
20
21
22
23
24
25
26
27
28
29
30
31
32
33
34
35
36
37
38
39
40
41
42
43
44
45
46
47
48
49
50
51
52
53
54
55
56
57
58
59
60
|
<?xml version="1.0" encoding="utf-8"?>
<LinearLayout xmlns:android="http://schemas.android.com/apk/res/android"
    android:orientation="vertical"
    android:layout_width="match_parent"
    android:layout_height="match_parent">
    <LinearLayout
        android:orientation="horizontal"
        android:layout_width="match_parent"
        android:layout_height="60dp">
        <TextView
            android:layout_width="90dp"
            android:layout_height="wrap_content"
            android:layout_gravity="center_vertical"
            android:textSize="18sp"
            android:text="Account:"/>
        <EditText
            android:id="@+id/account"
            android:layout_width="0dp"
            android:layout_height="wrap_content"
            android:layout_weight="1"
            android:layout_gravity="center_vertical"/>
    </LinearLayout>
    <LinearLayout
        android:orientation="horizontal"
        android:layout_width="match_parent"
        android:layout_height="60dp">
        <TextView
            android:layout_width="90dp"
            android:layout_height="wrap_content"
            android:layout_gravity="center_vertical"
            android:textSize="18sp"
            android:text="Password"/>
        <EditText
            android:id="@+id/password"
            android:layout_width="0dp"
            android:layout_height="wrap_content"
            android:layout_weight="1"
            android:layout_gravity="center_vertical"
            android:inputType="textPassword"/>
    </LinearLayout>
    <LinearLayout
        android:layout_width="match_parent"
        android:layout_height="wrap_content"
        android:orientation="horizontal">
        <CheckBox
            android:layout_width="wrap_content"
            android:layout_height="wrap_content"
            android:id="@+id/checkbox"/>
        <TextView
            android:layout_width="wrap_content"
            android:layout_height="wrap_content"
            android:textSize="18sp"
            android:text="Remember password"/>
    </LinearLayout>
    <Button
        android:id="@+id/login"
        android:layout_width="match_parent"
        android:layout_height="60dp"
        android:text="Login"/>
</LinearLayout>
|
LoginActivity
 1
 2
 3
 4
 5
 6
 7
 8
 9
10
11
12
13
14
15
16
17
18
19
20
21
22
23
24
25
26
27
28
29
30
31
32
33
34
35
36
37
38
39
40
41
42
43
44
45
46
47
48
49
50
51
52
53
54
55
56
57
58
59
60
61
62
63
64
65
66
67
68
69
70
|
package com.example.chapter6_storage;

import android.app.Activity;
import android.content.Intent;
import android.content.SharedPreferences;
import android.os.Bundle;
import android.preference.PreferenceManager;
import android.view.View;
import android.widget.Button;
import android.widget.CheckBox;
import android.widget.EditText;
import android.widget.Toast;

import androidx.annotation.Nullable;

public class LoginActivity extends Activity {
    private EditText accountEdit;
    private EditText passwordEdit;
    private Button login;
    private SharedPreferences pref;
    private SharedPreferences.Editor editor;
    private CheckBox checkBox;


    @Override
    protected void onCreate(@Nullable Bundle savedInstanceState) {
        super.onCreate(savedInstanceState);
        setContentView(R.layout.activity_login);
        pref= PreferenceManager.getDefaultSharedPreferences(this);
        accountEdit=(EditText)findViewById(R.id.account);
        passwordEdit=(EditText)findViewById(R.id.password);
        checkBox=(CheckBox)findViewById(R.id.remember_password);
        login =(Button) findViewById(R.id.login);
        boolean isRemember=pref.getBoolean("remember_password",false);//最初没有存储数据,所以默认应该是false
        if (isRemember){
            //如果选择了记住密码则自动填写账号密码并勾选checkbox
            String account =pref.getString("account","");
            String password =pref.getString("password","");
            accountEdit.setText(account);
            passwordEdit.setText(password);
            checkBox.setChecked(true);//这一步是为了显示并保证继续勾选记住密码,防止下次失效
        }
        login.setOnClickListener(new View.OnClickListener() {
            @Override
            public void onClick(View view) {
                //获取账密登录
                String account=accountEdit.getText().toString();
                String password=passwordEdit.getText().toString();
                if (account.equals("admin")&&password.equals("123456")){
                    editor=pref.edit();
                    if (checkBox.isChecked()){  //检验复选框是否被选中,若选中则存储账密和记住密码选项
                        editor.putBoolean("remember_pass",true);
                        editor.putString("account",account);
                        editor.putString("password",password);
                    }else {
                        editor.clear(); //取消勾选则清除存储数据
                    }
                    editor.apply();

                    //跳转MainActivity
                    Intent intent=new Intent(LoginActivity.this,MainActivity.class);
                    startActivity(intent);
                    finish();
                }else {
                    Toast.makeText(LoginActivity.this, "account or password is error!", Toast.LENGTH_SHORT).show();
                }
            }
        });
    }
}
|
运行效果,包名_preferences存储文件
勾选后第二次打开自动填充账密
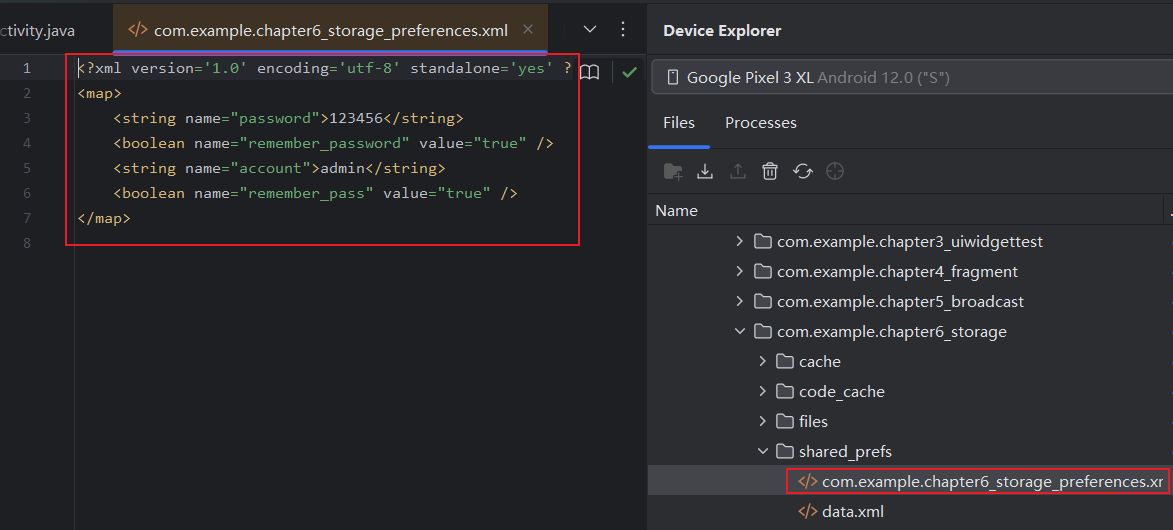
6.4 SQLite数据库存储
Android系统内置了SQLite数据库,它是一款轻量级的关系型数据库,运算速度快,占用资源少,不仅支持标准SQL语法,还遵循数据库的ACID事物.
6.4.1 创建数据库
Android提供了一个SQLiteOpenHelper帮助类,借助该类可以简单的对数据库进行创建和升级
-
SQLiteOpenHelper是一个抽象类,使用它需要创建自己的帮助类并继承它
SQLiteOpenHelper有两个抽象方法,分别是onCreate()和onUpgrade(),必须在自己的帮助类里面重写这两个方法,然后分别在这两个方法中去实现创建、升级数据库的逻辑。
-
SQLiteOpenHelper中还有两个非常重要的实例方法: getReadableDatabase()和getWritableDatabase()
-
这两个方法都可以创建或打开一个现有的数据库(如果数据库已存在则直接打开,否则创建一个新的数据库), 并返回一个可对数据库进行读写操作的对象
-
当数据库不可写入的时候(如磁盘空间已满), getReadableDatabase()方法返回的对象将以只读的方式去打开数据库,而getWritableDatabase()方法则将出现异常
-
SQLiteOpenHelper中有两个构造方法可供重写,一般使用参数少的构造方法即可,该构造方法接收4个参数
-
第1个参数是Context,必须要有它才能对数据库进行操作。
-
第2个参数是数据库名,创建数据库时使用的就是这里指定的名称。
-
第3个参数允许我们在查询数据的时候返回一个自定义的Cursor,一般都是传入null。
-
第4个参数表示当前数据库的版本号,可用于对数据库进行升级操作。
-
构建出SQLiteOpenHelper的实例后, 再调用getReadableDatabase()或getWritableDatabase()方法够创建数据库
数据库文件存放在/data/data/<package_name>/databases/目录下。
此时重写的onCreate()方法也会得到执行,所以通常会在这里去处理一些创建表的逻辑。
下面用例子来体会SQLiteOpenHelper的用法,新建DataBaseTest项目
创建一个名为BookStore.db的数据库,然后在数据库中新建一张Book表,表中有id(主键)、作者、价格、页数和书名等列
SQLite的数据类型比较简单,integer整型,real浮点型,text文本型,blob二进制型
1
2
3
4
5
6
7
|
create table Book (
    //autoincrement表示id列自增长
id integer primary key autoincrement,
author text,
price real,
pages integer,
name text)
|
新建MyDatabaseHelper类继承SQLiteOpenHelper
 1
 2
 3
 4
 5
 6
 7
 8
 9
10
11
12
13
14
15
16
17
18
19
20
21
22
23
24
25
26
27
28
29
30
31
32
33
34
|
package com.example.chapter6_storage;

import android.content.Context;
import android.database.sqlite.SQLiteDatabase;
import android.database.sqlite.SQLiteOpenHelper;
import android.widget.Toast;

public class MyDatabaseHelper extends SQLiteOpenHelper {
    public static final String CREATE_BOOK =
            "create table Book (" +
            " id integer primary key autoincrement," +
            " author text," +
            " price real," +
            " pages integer," +
            " name text)";
    private Context mContext;

    //context,数据库名,cursor,数据库版本
    public MyDatabaseHelper(Context context, String name, SQLiteDatabase.CursorFactory factory,int version){
        super(context,name,factory,version);
        mContext=context;
    }

    @Override
    public void onCreate(SQLiteDatabase sqLiteDatabase) {
        sqLiteDatabase.execSQL(CREATE_BOOK);//创建时执行sql语句
        Toast.makeText(mContext, "Create DataBase Succeeded!", Toast.LENGTH_SHORT).show();
    }

    @Override
    public void onUpgrade(SQLiteDatabase sqLiteDatabase, int i, int i1) {

    }
}
|
修改activity_main
 1
 2
 3
 4
 5
 6
 7
 8
 9
10
11
|
<?xml version="1.0" encoding="utf-8"?>
<LinearLayout xmlns:android="http://schemas.android.com/apk/res/android"
    android:orientation="vertical"
    android:layout_width="match_parent"
    android:layout_height="match_parent">
    <Button
        android:layout_width="match_parent"
        android:layout_height="wrap_content"
        android:id="@+id/create_database"
        android:text="Create database"/>
</LinearLayout>
|
修改MainActivity
 1
 2
 3
 4
 5
 6
 7
 8
 9
10
11
12
13
14
15
16
17
18
19
20
21
22
23
|
package com.example.chapter6_storage;
import androidx.appcompat.app.AppCompatActivity;

import android.os.Bundle;
import android.view.View;
import android.widget.Button;

public class MainActivity extends AppCompatActivity {
    private MyDatabaseHelper myDatabaseHelper;
    @Override
    protected void onCreate(Bundle savedInstanceState) {
        super.onCreate(savedInstanceState);
        setContentView(R.layout.activity_main);
        Button button=(Button) findViewById(R.id.create_database);
        myDatabaseHelper=new MyDatabaseHelper(this,"BookStore.db",null,1);
        button.setOnClickListener(new View.OnClickListener() {
            @Override
            public void onClick(View view) {
                myDatabaseHelper.getWritableDatabase();
            }
        });
    }
}
|
点击按钮时调用getWriteableDatabase()获取可读写的SQLiteDatabase对象
第一次点击Create database按钮时,检测到当前程序中没有BookStore.db数据库,于是创建该数据库调用MyDatabaseHelper的onCreate()方法,并创建Book表
再次点击Create database按钮时,此时已经存在BookStore.db数据库,不会再次创建
效果如下: 成功创建数据库,其中.db-journal是用于支持事物而产生的临时日志文件,通常大小为0
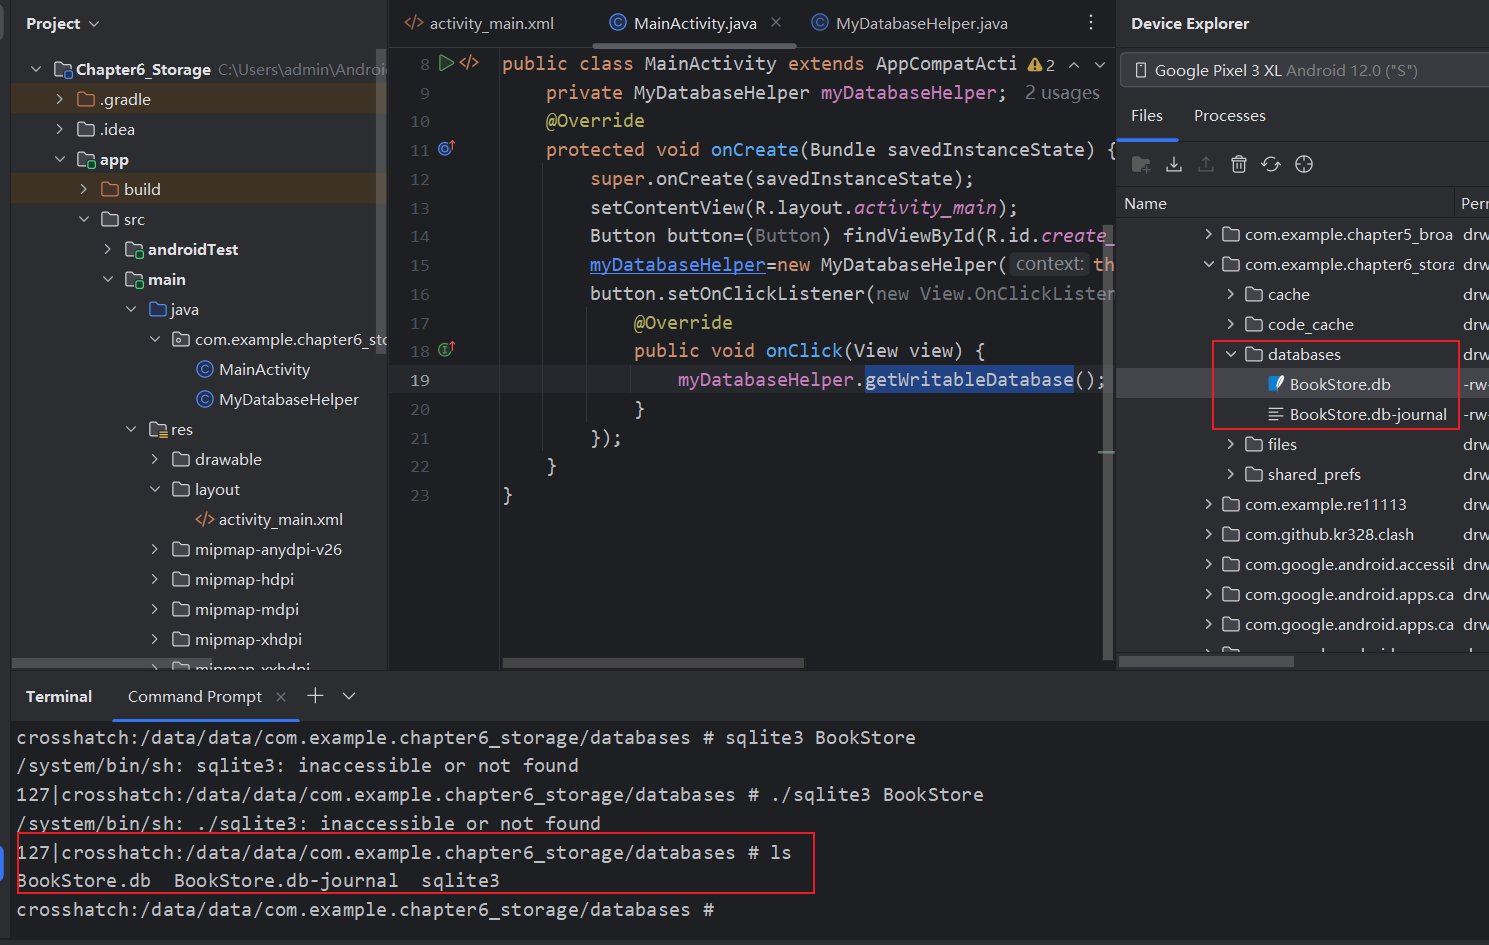
我们如何知道创建了的数据库的内容呢?通过adb工具+sqlite工具查看
adb用于提取文件到主机方便分析,sqlite工具可在https://www.sqlite.org/download.html下载
sqlite3+数据库文件名即可加载数据库
.table可查看已创建的表,其中android_metadata表每个数据库都自动生成
.schema可查看建表语句
.exit或.quit退出编辑

6.4.2 升级数据库
SQLiteOpenHelper还有一个onUpgrade()方法用于对数据库升级
现在数据有Book表存放书籍详细信息,如果在想添加一张Category表记录图书分类怎么做?
假设建表语句如下
1
2
3
4
|
create table Category (
id integer primary key autoincrement,
category_name text,
category_code integer)
|
添加到MyDatabaseHelper中
 1
 2
 3
 4
 5
 6
 7
 8
 9
10
11
12
13
14
15
16
17
18
19
20
21
22
23
24
25
26
27
28
29
30
31
32
33
34
35
36
|
package com.example.chapter6_storage;

import android.content.Context;
import android.database.sqlite.SQLiteDatabase;
import android.database.sqlite.SQLiteOpenHelper;
import android.widget.Toast;

public class MyDatabaseHelper extends SQLiteOpenHelper {
    public static final String CREATE_BOOK ="create table Book (" +
            " id integer primary key autoincrement," +
            " author text," +
            " price real," +
            " pages integer," +
            " name text)";
    public static final String CREATE_CATEGORY ="create table Category (" +
            " id integer primary key autoincrement," +
            " category_name text," +
            " category_code integer)";
    private Context mContext;
    public MyDatabaseHelper(Context context, String name, SQLiteDatabase.CursorFactory factory,int version){
        super(context,name,factory,version);
        mContext=context;
    }

    @Override
    public void onCreate(SQLiteDatabase sqLiteDatabase) {
        sqLiteDatabase.execSQL(CREATE_BOOK);
        sqLiteDatabase.execSQL(CREATE_CATEGORY);
        Toast.makeText(mContext, "Create Succeeded!", Toast.LENGTH_SHORT).show();
    }

    @Override
    public void onUpgrade(SQLiteDatabase sqLiteDatabase, int i, int i1) {

    }
}
|
此时运行程序并点击按钮会发现创建Category表失败,因为已经存在了BookStore数据库,再次点击按钮也不会执行MyDatabaseHelper的onCreate()方法
解决这个问题可以卸载程序并重新运行,这样会删除原数据库,但这么做未免太极端,只需要使用onUpgrade()方法即可
此处我们添加drop语句,当存在原表时则删除,之后调用onCreate重新创建即可
1
2
3
4
5
6
|
	@Override
	public void onUpgrade(SQLiteDatabase sqLiteDatabase, int oldVersion, int newVersion) {
        sqLiteDatabase.execSQL("drop table if exists Book");
        sqLiteDatabase.execSQL("drop table if exists Category");
        onCreate(sqLiteDatabase);
    }
|
那么如何让onUpgrade()方法执行呢?
只需要修改SQLiteOpenHelper构造方法的第4个参数,保证版本号更新即可(之前传入的是1)
修改MainActivity
 1
 2
 3
 4
 5
 6
 7
 8
 9
10
11
12
13
14
15
16
17
18
19
20
21
22
23
|
package com.example.chapter6_storage;
import androidx.appcompat.app.AppCompatActivity;

import android.os.Bundle;
import android.view.View;
import android.widget.Button;

public class MainActivity extends AppCompatActivity {
    private MyDatabaseHelper myDatabaseHelper;
    @Override
    protected void onCreate(Bundle savedInstanceState) {
        super.onCreate(savedInstanceState);
        setContentView(R.layout.activity_main);
        Button button=(Button) findViewById(R.id.create_database);
        myDatabaseHelper=new MyDatabaseHelper(this,"BookStore.db",null,2);
        button.setOnClickListener(new View.OnClickListener() {
            @Override
            public void onClick(View view) {
                myDatabaseHelper.getWritableDatabase();
            }
        });
    }
}
|
MainActivity创建MyDatabaseHelper实例时,由于版本号更新自动调用onUpgrade方法删除已有表
之后点击创建按钮时调用getWriteableDatabase方法,自动调用onCreate方法创建表
成功创建Category表

6.4.3 添加数据
上面掌握了创建和升级数据库的方法,接下来学习对表中数据操作的方法
对数据无非4种操作CRUD, C(create),R(retrieve),U(updata),d(delete), 每种操作又各自对应一条SQL命令, 例如insert,select,update,delete, 而Android提供了一系列的辅助方法,使得无需编写SQL语句即可完成CRUD的各种操作
SQLiteOpenHelper的getReadableDatabase()和getWriteableDatabase()会返回SQLiteDatabase对象,通过该对象即可操作数据
SQLiteDatabase.insert()方法用于添加数据
参数1是表名
参数2是用于在未指定添加数据的情况下,给某些可为空的列自动赋null,一般用不到,传null即可
参数3是ContentValues对象,提供了一系列put方法重载用于添加数据,只需将列名及相应数据传入即可
修改activity_main,新增添加数据按钮
 1
 2
 3
 4
 5
 6
 7
 8
 9
10
11
12
13
14
15
16
|
<?xml version="1.0" encoding="utf-8"?>
<LinearLayout xmlns:android="http://schemas.android.com/apk/res/android"
    android:orientation="vertical"
    android:layout_width="match_parent"
    android:layout_height="match_parent">
    <Button
        android:layout_width="match_parent"
        android:layout_height="wrap_content"
        android:id="@+id/create_database"
        android:text="Create database"/>
    <Button
        android:layout_width="match_parent"
        android:layout_height="wrap_content"
        android:id="@+id/add_data"
        android:text="Add data"/>
</LinearLayout>
|
修改MainActivity
 1
 2
 3
 4
 5
 6
 7
 8
 9
10
11
12
13
14
15
16
17
18
19
20
21
22
23
24
25
26
27
28
29
30
31
32
33
34
35
36
37
38
39
40
41
42
43
44
45
46
47
48
|
package com.example.chapter6_storage;

import androidx.appcompat.app.AppCompatActivity;

import android.content.ContentValues;
import android.database.sqlite.SQLiteDatabase;
import android.os.Bundle;
import android.view.View;
import android.widget.Button;
import android.widget.Toast;

public class MainActivity extends AppCompatActivity {
    private MyDatabaseHelper myDatabaseHelper;
    @Override
    protected void onCreate(Bundle savedInstanceState) {
        super.onCreate(savedInstanceState);
        setContentView(R.layout.activity_main);
        Button button=(Button) findViewById(R.id.create_database);
        Button addButton =(Button)findViewById(R.id.add_data);
        addButton.setOnClickListener(new View.OnClickListener() {
            @Override
            public void onClick(View view) {
                SQLiteDatabase db=myDatabaseHelper.getWritableDatabase();//获取数据库对象
                ContentValues contentValues=new ContentValues();//创建实例用于增加数据
                contentValues.put("name","Tom's Life");//列名+数据
                contentValues.put("author","Jack");
                contentValues.put("pages",454);
                contentValues.put("price",16.96);
                db.insert("Book",null,contentValues);//插入第一条数据
                contentValues.clear();//清空记录

                contentValues.put("name","Nioooe's Life");
                contentValues.put("author","Brown");
                contentValues.put("pages",332);
                contentValues.put("price",20.66);
                db.insert("Book",null,contentValues);//插入第二条数据
                Toast.makeText(MainActivity.this,"Add data succeed!",Toast.LENGTH_SHORT).show();
            }
        });
        myDatabaseHelper=new MyDatabaseHelper(this,"BookStore.db",null,2);
        button.setOnClickListener(new View.OnClickListener() {
            @Override
            public void onClick(View view) {
                myDatabaseHelper.getWritableDatabase();
            }
        });
    }
}
|
添加数据成功,其中id列自动增长
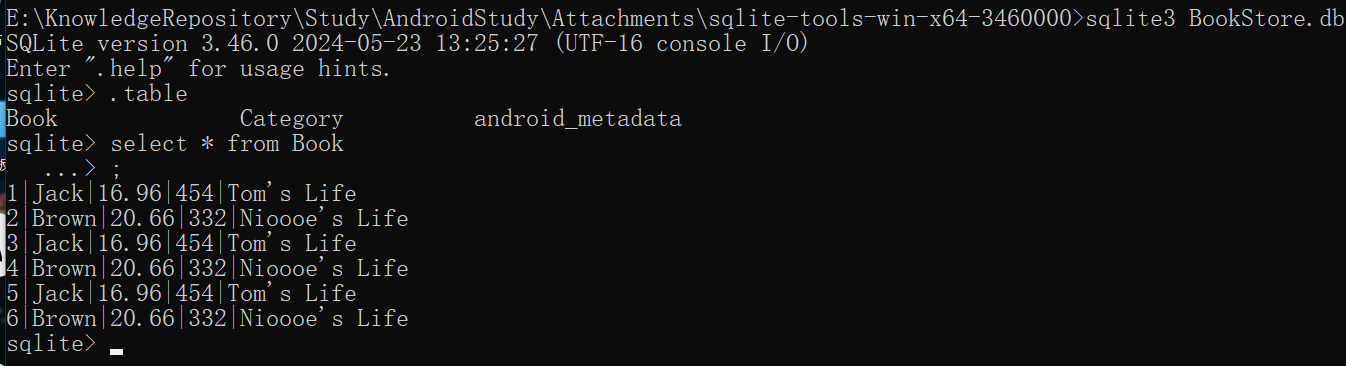
6.4.4 更新数据
SQLiteDatabase中也提供了一个非常好用的update()方法,用于对数据进行更新,这个方法接收4个参数:
-
第1个参数表名, 指定更新哪张表的数据。
-
第2个参数是ContentValues对象, 组装更新数据。
-
第3,4个参数用于约束更新某一行或某几行中的数据,不指定则默认更新所有行。
修改布局,新增更新按钮
 1
 2
 3
 4
 5
 6
 7
 8
 9
10
11
12
13
14
15
16
17
18
19
20
21
|
<?xml version="1.0" encoding="utf-8"?>
<LinearLayout xmlns:android="http://schemas.android.com/apk/res/android"
    android:orientation="vertical"
    android:layout_width="match_parent"
    android:layout_height="match_parent">
    <Button
        android:layout_width="match_parent"
        android:layout_height="wrap_content"
        android:id="@+id/create_database"
        android:text="Create database"/>
    <Button
        android:layout_width="match_parent"
        android:layout_height="wrap_content"
        android:id="@+id/add_data"
        android:text="Add data"/>
    <Button
        android:layout_width="match_parent"
        android:layout_height="wrap_content"
        android:id="@+id/update_data"
        android:text="Update data"/>
</LinearLayout>
|
修改MainActivity,新增updateData
 1
 2
 3
 4
 5
 6
 7
 8
 9
10
11
12
13
14
15
16
17
18
19
20
21
22
23
24
25
26
27
28
29
30
31
32
33
34
35
36
37
38
39
40
41
42
43
44
45
46
47
48
49
50
51
52
53
54
55
56
57
58
59
60
61
62
|
package com.example.chapter6_storage;

import androidx.appcompat.app.AppCompatActivity;

import android.content.ContentValues;
import android.database.sqlite.SQLiteDatabase;
import android.os.Bundle;
import android.view.View;
import android.widget.Button;
import android.widget.Toast;

public class MainActivity extends AppCompatActivity {
    private MyDatabaseHelper myDatabaseHelper;
    @Override
    protected void onCreate(Bundle savedInstanceState) {
        super.onCreate(savedInstanceState);
        setContentView(R.layout.activity_main);
        Button button=(Button) findViewById(R.id.create_database);
        Button addButton =(Button)findViewById(R.id.add_data);
        addButton.setOnClickListener(new View.OnClickListener() {
            @Override
            public void onClick(View view) {
                SQLiteDatabase db=myDatabaseHelper.getWritableDatabase();//获取数据库对象
                ContentValues contentValues=new ContentValues();//创建实例用于增加数据
                contentValues.put("name","Tom's Life");//列名+数据
                contentValues.put("author","Jack");
                contentValues.put("pages",454);
                contentValues.put("price",16.96);
                db.insert("Book",null,contentValues);//插入第一条数据
                contentValues.clear();//清空记录

                contentValues.put("name","Nioooe's Life");
                contentValues.put("author","Brown");
                contentValues.put("pages",332);
                contentValues.put("price",20.66);
                db.insert("Book",null,contentValues);//插入第二条数据
                Toast.makeText(MainActivity.this,"Add data succeed!",Toast.LENGTH_SHORT).show();
            }
        });

        Button updateData=(Button)findViewById(R.id.update_data);
        updateData.setOnClickListener(new View.OnClickListener() {
            @Override
            public void onClick(View view) {
                SQLiteDatabase db =myDatabaseHelper.getWritableDatabase();
                ContentValues contentValues=new ContentValues();
                contentValues.put("price",9.99);
                db.update("Book",contentValues,"name = ?",new String[]{"Tom's Life"});//修改Tom's Lite这本书的价格
                //参数3对应SQL语句的where表示更新所有name=?的行 ? 是占位符
                //参数4提供的字符串数组会替换参数3的每个对应占位符
            }
        });

        myDatabaseHelper=new MyDatabaseHelper(this,"BookStore.db",null,2);
        button.setOnClickListener(new View.OnClickListener() {
            @Override
            public void onClick(View view) {
                myDatabaseHelper.getWritableDatabase();
            }
        });
    }
}
|
效果如下,成功更新
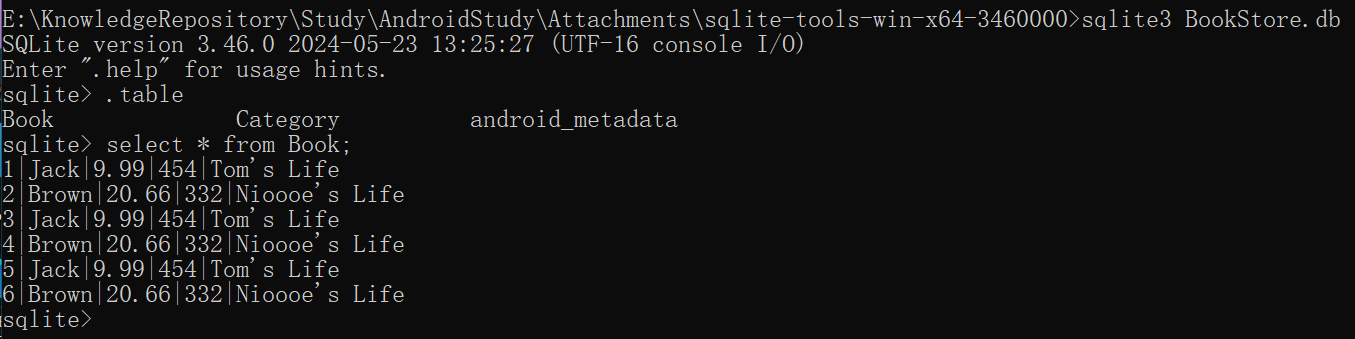
6.4.5 删除数据
SQLiteDatabase.delete()用于删除数据,接收3个参数
参数1 表名
参数2,3 约束某行或某几行数据,不指定则默认删除所有行
修改布局,添加删除按钮
1
2
3
4
5
|
    <Button
        android:layout_width="match_parent"
        android:layout_height="wrap_content"
        android:id="@+id/delete_data"
        android:text="Delete data"/>
|
修改MainActivity,限制条件和update类似
 1
 2
 3
 4
 5
 6
 7
 8
 9
10
|
        ...
		Button deleteData=(Button)findViewById(R.id.delete_data);
        deleteData.setOnClickListener(new View.OnClickListener() {
            @Override
            public void onClick(View view) {
                SQLiteDatabase db=myDatabaseHelper.getWritableDatabase();
                db.delete("Book","pages > ?",new String[]{"400"});
            }
        });
		...
|
成功删除pages>400的书

6.4.6 查询数据
SQLiteDatabase.query()方法用于查询,该方法非常负责,最短的重载也需要7个参数
调用该方法后返回Cursor对象,通过该对象取出查询数据

添加query按钮
1
2
3
4
5
|
    <Button
        android:layout_width="match_parent"
        android:layout_height="wrap_content"
        android:id="@+id/query_data"
        android:text="Query data"/>
|
修改MainActivity
 1
 2
 3
 4
 5
 6
 7
 8
 9
10
11
12
13
14
15
16
17
18
19
20
21
22
23
24
25
26
27
28
29
|
        ......
        Button queryData=(Button)findViewById(R.id.query_data);
        queryData.setOnClickListener(new View.OnClickListener() {
            @Override
            public void onClick(View view) {
                SQLiteDatabase db =myDatabaseHelper.getWritableDatabase();
                //查询book所有数据
                Cursor cursor=db.query("Book",null,null,null,null,null,null);
                //moveToFirst移动数据指针到第一行
                if (cursor.moveToFirst()){
                    //遍历cursor,逐条打印数据
                    do {
                        //cursor.getColumnIndex()获取某列在表中的索引 如第1列,第3列等
                        //再通过cursor.getDataType()方法重载获取具体数据
                        //@SuppressLint("Range")用于忽略数据范围 getColumnIndex可能返回-1
                        @SuppressLint("Range") String name=cursor.getString(cursor.getColumnIndex("name"));
                        @SuppressLint("Range") String author =cursor.getString(cursor.getColumnIndex("author"));
                        @SuppressLint("Range")  int pages=cursor.getInt(cursor.getColumnIndex("pages"));
                        @SuppressLint("Range")  double price=cursor.getDouble(cursor.getColumnIndex("price"));
                        Log.d("MainActivity","book name is "+name);
                        Log.d("MainActivity","author name is "+author);
                        Log.d("MainActivity","book pages is " +pages);
                        Log.d("MainActivity","book price is "+price);
                    }while (cursor.moveToNext());
                }
                cursor.close();//关闭cursor对象
            }
        });
		......
|
查询结果如下,成功打印信息

6.4.7 使用SQL操作数据库
Android提供了很多API操作数据库,也提供了一系列的方法支持通过SQL操作数据库
除查询数据调用SQLiteDatabase.rawQuery()方法外, 其他操作调用execSQL()方法, 通过?占位符+字符串数组替换参数
-
添加数据
1
|
db.execSQL("insert into Book(name,author,pages,price)values(?,?,?,?)",new String[]{"Mike'Life","Tom","333","17.99"});
|
-
更新数据
1
|
db.execSQL("update Book set price = ? where name = ? ",new String[]{"10.99","The Da Vinci Code" });
|
-
删除数据
1
|
db.execSQL("delete from Book where pages > ? ",new String[] { "400" });
|
-
查询数据
1
2
|
db.rawQuery("select * from Book",null);
db.rawQuery("select ?,?,? from book",new String[]{"author","name","price"});
|
6.5 使用SQLite框架操作数据库
书中的LitePal已停止维护,框架的使用大同小异,学习了SQLite原生操作和数据库基础足以应付一般场景
等有需求再学习使用其他框架,如Room、Realm、GreenDAO、ObjectBox和SQLDelight等
第7章 内容提供器
在上一章我们学习了Android数据持久化技术,包括文件存储、SharedPreferences存储以及数据库存储, 这些技术保存的数据都只能在当前应用程序中访问。文件和SharedPreferences存储曾提供MODE_WORLD_READABLE和MODE_WORLD_WRITEABLE 操作模式,用于其他应用程序访问当前应用的数据,但这两种模式在Android 4.2后被废弃,Android官方推荐使用更加安全可靠的内容提供器(ContentProvider)
为什么要将我们程序中的数据共享给其他程序?当然,这个要视情况而定,例如账号和密码之类的隐私数据显然不能共享给其他程序,而某些可供其他程序进行二次开发的基础性数据,可以选择将其共享。
例如系统的电话簿程序,它的数据库中保存了很多的联系人信息,如果这些数据都不允许第三方的程序访问,很多应用的功能都要大打折扣。除电话簿外,还有短信、媒体库等程序都实现了跨程序数据共享的功能,使用的技术就是内容提供器,下面我们就来对这一技术进行深入的探讨
7.1 ContentProvider简介
内容提供器(Content Provider)主要用于在不同的应用程序之间实现数据共享的功能,它提供了一套完整的机制,允许一个程序访问另一个程序中的数据,同时还能保证被访数据的安全性。目前,使用内容提供器是Android实现跨程序共享数据的标准方式。
不同于文件存储和SharedPreferences存储中的两种全局可读写操作模式,内容提供器可以选择只对哪一部分数据进行共享,从而保证我们程序中的隐私数据不会有泄漏的风险。
在正式开始学习内容提供器之前,需要先掌握另外一个非常重要的知识——Android运行时权限, 不光是内容提供器, 以后我们的开发过程中也会经常使用到运行时权限, 所以先要了解下Android运行时权限。
7.2 运行时权限
Android的权限机制,从系统的第一个版本开始就已经存在。但旧的Android的权限机制在保护用户安全和隐私等方面起到的作用比较有限,尤其是一些大家都离不开的常用软件,非常容易“店大欺客”。
为此,Android开发团队在Android 6.0中引用了运行时权限功能,从而更好地保护用户的安全和隐私,那么本节我们就来详细学习一下这个6.0系统中引入的新特性。
7.2.1 Android权限机制
回顾一下过去Android的权限机制是什么样的, 在第5章写BroadcastTest项目时第一次接触了Android权限相关的内容,当时为了访问系统的网络状态以及监听开机广播,在AndroidManifest.xml文件中添加了两句权限声明:
1
2
3
4
5
6
7
8
|
<?xml version="1.0" encoding="utf-8"?>
<manifest xmlns:android="http://schemas.android.com/apk/res/android"
    package="com.example.broadcasttest">
    ...
    <uses-permission android:name="android.permission.ACCESS_NETWORK_STATE" />
    <uses-permission android:name="android.permission.RECEIVE_BOOT_COMPLETED" />
    ...
</manifest>
|
因为访问系统的网络状态以及监听开机广播涉及了用户设备的安全性,所以必须在AndroidManifest.xml中加入权限声明,否则我们的程序就会崩溃。加入了权限声明后,对于用户来说到底有什么影响呢?为什么这样就可以保护用户设备的安全性了呢?其实用户主要在以下两个方面得到了保护:
一方面,如果用户在低于6.0系统的设备上安装该程序,会在安装界面给出下图所示的提醒。这样用户就可以清楚地知晓该程序一共申请了哪些权限,从而决定是否要安装这个程序

另一方面,用户可以随时在应用程序管理界面查看任意一个程序的权限申请情况,以此保证应用程序不会出现各种滥用权限的情况。

这种权限机制的设计思路非常简单,用户如果认可你所申请的权限,那么就会安装你的程序,如果不认可你所申请的权限,那么拒绝安装就可以。但理想很美好,现实很残酷,因为我们很多常用软件普遍存在着滥用权限的情况,不管到底用不用得到,反正先把权限申请了再说。比如说微信所申请的权限列表如图所示

这只是微信所申请的一半左右的权限,因为权限太多一屏截不下来。其中有一些权限, 例如微信为什么要读取手机的短信和彩信?但是我们不认可又能怎样,难道拒绝安装微信?
Android团队意识到了这个问题,于是在6.0中加入了运行时权限功能。用户不需要在安装软件的时候一次性授权所有申请的权限,而是可以在软件的使用过程中再对某一项权限申请进行授权。比如一款相机应用在运行时申请了地理位置定位权限,就算拒绝了这个权限,但是仍然可以使用其他功能,而不是像之前那样直接无法安装。
Android将所有权限分为两类(第三类特殊权限使用情况很少不予讨论):
- **普通权限:**不会直接威胁到用户的安全和隐私的权限,对于这部分权限申请,系统会自动帮我们进行授权,不需要用户手动操作,比如在BroadcastTest项目中申请的两个权限就是普通权限。
- **危险权限:**可能会触及用户隐私或者对设备安全性造成影响的权限,如获取设备联系人信息、定位设备的地理位置等,对于这部分权限申请,必须要由用户手动点击授权才可以,否则程序就无法使用相应的功能。
除危险权限外, 其余为普通权限, 下表列出了Android所有的危险权限, 共是9组24个权限:
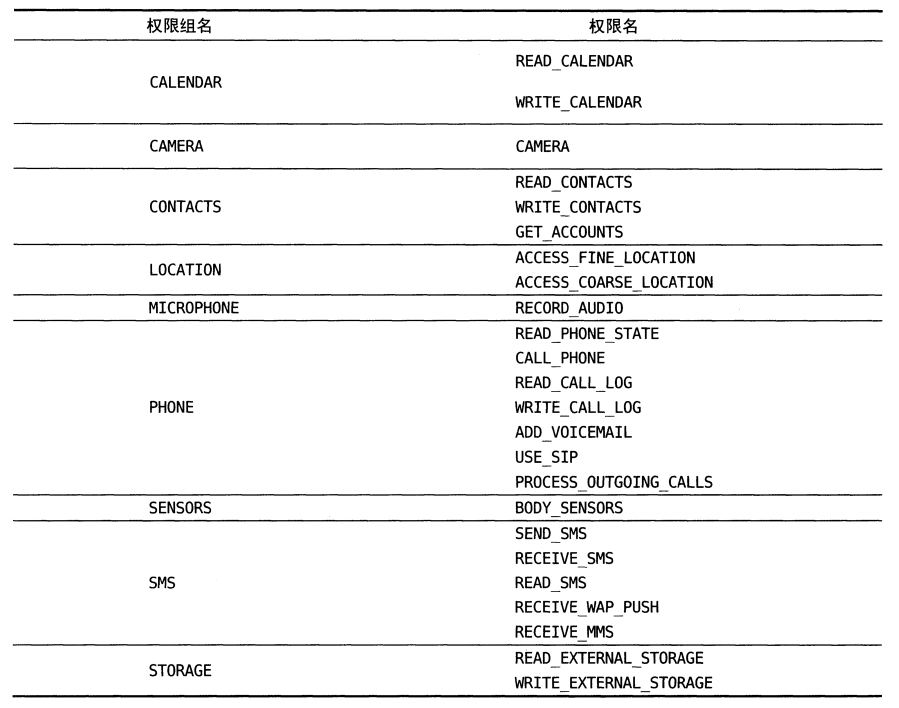
当使用某个权限时可以查看是否属于该表权限,如果是则进行运行时权限处理,不是则只需在Manifest.xml添加权限声明
注意: 表中每个危险权限都属于一个权限组,进行运行时权限处理使用的是权限名,用户一旦同意授权那么该权限组中所有其他权限也会被授权
Android完整权限列表: https://developer.android.com/reference/android/Manifest.permission
7.2.2 程序运行时申请权限
新建项目学习运行时权限使用方法,上表中所有权限都可以申请,简单起见使用CALL_PHONE示例
该权限在编写拨打电话功能时需要声明,由于拨打电话涉及用户手机资费问题,所以被设置为危险权限,在Android6.0前,拨打电话功能实现非常简单
布局文件如下,提供call按钮
 1
 2
 3
 4
 5
 6
 7
 8
 9
10
11
|
<?xml version="1.0" encoding="utf-8"?>
<LinearLayout xmlns:android="http://schemas.android.com/apk/res/android"
    android:layout_width="match_parent"
    android:layout_height="match_parent">

    <Button
        android:id="@+id/make_call"
        android:layout_width="match_parent"
        android:layout_height="wrap_content"
        android:text="Make Call"/>
</LinearLayout>
|
MainActivity如下,点击按钮触发拨打电话逻辑
 1
 2
 3
 4
 5
 6
 7
 8
 9
10
11
12
13
14
15
16
17
18
19
20
21
22
23
24
25
26
27
28
29
30
|
package com.example.chapter7_contentprovider;
import androidx.appcompat.app.AppCompatActivity;

import android.content.Intent;
import android.net.Uri;
import android.os.Bundle;
import android.view.View;
import android.widget.Button;

public class MainActivity extends AppCompatActivity {

    @Override
    protected void onCreate(Bundle savedInstanceState) {
        super.onCreate(savedInstanceState);
        setContentView(R.layout.activity_main);
        Button make_call=(Button) findViewById(R.id.make_call);
        make_call.setOnClickListener(new View.OnClickListener() {
            @Override
            public void onClick(View view) {
                try {
                    Intent intent=new Intent(Intent.ACTION_CALL);//内置电话动作
                    intent.setData(Uri.parse("tel:10086"));//指定协议tel和电话号码
                    startActivity(intent);
                }catch (SecurityException e){
                    e.printStackTrace();
                }
            }
        });
    }
}
|
Intent.ACTION_CALL是系统内置的一个打电话动作,data部分指定协议为tel,号码为10086
之前使用过Intent.ACTION_DIAL表示打开拨号界面,该功能则无需声明权限
修改AndroidManifest.xml,添加权限声明如下:
1
2
3
4
5
6
7
8
9
10
11
|
<?xml version="1.0" encoding="utf-8"?>
<manifest xmlns:android="http://schemas.android.com/apk/res/android"
xmlns:tools="http://schemas.android.com/tools">
<uses-feature
android:name="android.hardware.telephony"
android:required="false" />
<uses-permission android:name="android.permission.CALL_PHONE"/>
<application>
...
</application>
</manifest>
|
其中uses-permission标签用于声明需要的权限,uses-feature标签用于声明应用使用的一项硬件或软件功能
required=false表示无需该权限程序可以运行,设置为true表示必须拥有该权限才能运行
如果不添加该标签编译也可以通过,但会报错
1
|
Permission exists without corresponding hardware `<uses-feature android:name="android.hardware.telephony" required="false">` tag
|
参考隐含功能要求的权限和<uses-feature>
Android5.1可以正常运行并触发CALL_PHONE

Android6.0以上无法正常运行,会遇到报错
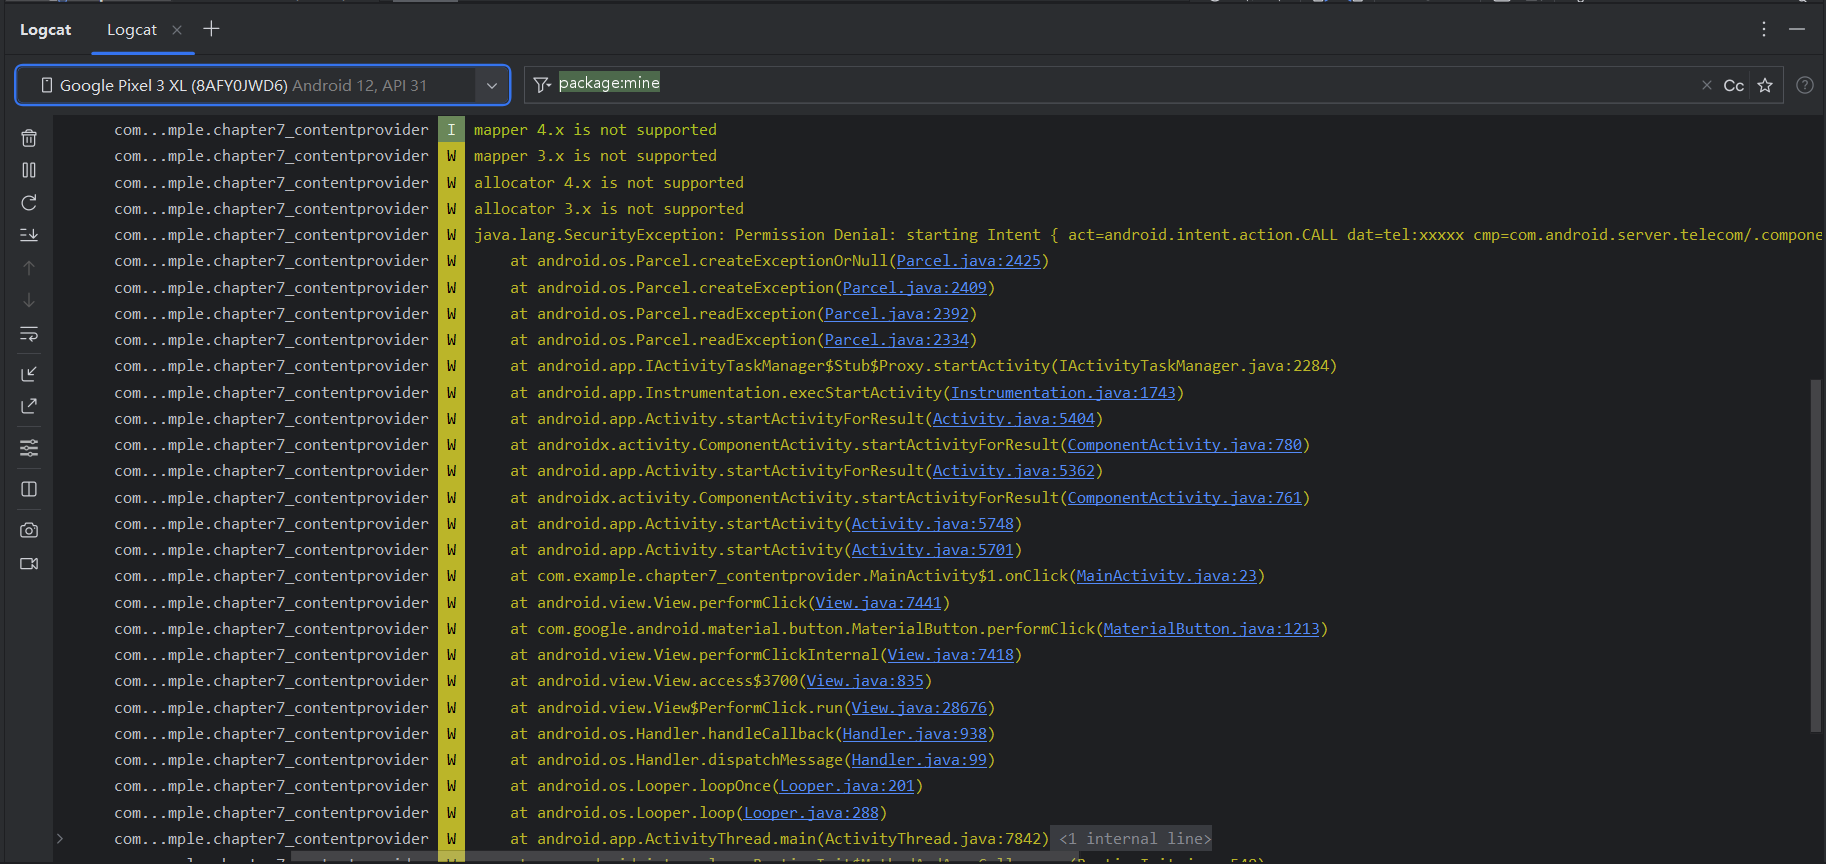
修改MainActivity如下
1
2
3
4
5
6
7
8
9
10
11
12
13
14
15
16
17
18
19
20
21
22
23
24
25
26
27
28
29
30
31
32
33
34
35
36
37
38
39
40
41
42
43
44
45
46
47
48
49
50
51
52
53
54
55
56
57
58
59
60
61
|
package com.example.chapter7_contentprovider;
import androidx.annotation.NonNull;
import androidx.appcompat.app.AppCompatActivity;
import androidx.core.app.ActivityCompat;
import androidx.core.content.ContextCompat;
import android.content.Intent;
import android.content.pm.PackageManager;
import android.net.Uri;
import android.os.Bundle;
import android.view.View;
import android.widget.Button;
import android.widget.Toast;
public class MainActivity extends AppCompatActivity {
@Override
protected void onCreate(Bundle savedInstanceState) {
super.onCreate(savedInstanceState);
setContentView(R.layout.activity_main);
Button make_call=(Button) findViewById(R.id.make_call);
make_call.setOnClickListener(new View.OnClickListener() {
@Override
public void onClick(View view) {
//检测是否具有权限,没有则申请
if (ContextCompat.checkSelfPermission(MainActivity.this,android.Manifest.permission.CALL_PHONE) != PackageManager.PERMISSION_GRANTED){
ActivityCompat.requestPermissions(MainActivity.this,new String[]{android.Manifest.permission.CALL_PHONE},1);
}else {
call();
}
}
});
}
//调用requestPermissions()方法后必定运行onRequestPermissionsResult回调函数
@Override
public void onRequestPermissionsResult(int requestCode, @NonNull String[] permissions, @NonNull int[] grantResults) {
super.onRequestPermissionsResult(requestCode, permissions, grantResults);
//此处requestCode和ActivityCompat.requestPermissions()的参数3对应
switch (requestCode){
case 1:
//判断是否成功获取权限
if (grantResults.length>0 &&grantResults[0]==PackageManager.PERMISSION_GRANTED){
call();
}else {
Toast.makeText(this, "You denied the permission", Toast.LENGTH_SHORT).show();
}
break;
default:
}
}
private void call(){
try {
Intent intent=new Intent(Intent.ACTION_CALL);
intent.setData(Uri.parse("tel:10086"));
startActivity(intent);
}catch (SecurityException e){
e.printStackTrace();
}
}
}
|
**运行时权限的核心是在程序运行过程中由用户授权去执行某些危险操作,程序不可以擅自执行危险操作。**因此,第一步要判断是否已经获取用户授权, 借助ContextCompat.checkSelfPermission()方法判断
该方法接收两个参数,参数1是Context,参数2是具体权限名, 比如打电话的权限名是android.Manifest.permission.CALL_PHONE,然后将方法的返回值和PackageManager. PERMISSION_GRANTED比较,相等则说明用户已授权, 不等表示没有授权。
-
如果已经授权则比较简单,直接执行拨打电话的call()方法即可
-
如果没有授权,则需要调用**ActivityCompat. requestPermissions()**方法向用户申请授权
该方法接收3个参数, 参数1要求是Activity的实例,参数2是一个String数组,我们把要申请的权限名放在数组中即可,参数3是请求码,只要是唯一值就即可,这里传入1。
调用完requestPermissions()方法后,系统弹出一个权限申请的对话框,然后用户可以选择同意或拒绝我们的权限申请,不论是哪种结果,最终都会回调到**onRequestPermissionsResult()**方法中
授权的结果则会封装在grantResults参数当中。我们只需要判断最后的授权结果,如果用户同意的话就调用call()方法来拨打电话,如果用户拒绝的话我们只能放弃操作,并且弹出一条失败提示。
请求权限

授权后成功拨打电话

7.3 访问其他程序中的数据
内容提供器的用法一般有两种:
- 使用现有内容提供器来访问对应程序的数据
- 创建自己的内容提供器给我们程序的数据提供外部访问接口
如果一个应用程序通过内容提供器对其数据提供了外部访问接口,那么任何其他的应用程序就都可以对这部分数据进行访问。
Android系统中自带的电话簿、短信、媒体库等程序都提供了类似的访问接口,这就使得第三方应用程序可以充分地利用这部分数据来实现更好的功能。下面我们就来看一看,内容提供器到底是如何使用的。
7.3.1 ContentProvider基本用法
想要访问内容提供器中共享的数据,必须借助ContentResolver类,可通过Context的getContentResolver()方法获取到该类的实例。ContentResolver中提供了一系列的方法用于对数据进行CRUD操作: insert()方,update(),delete(),query()。不同于SQLiteDatabase, ContentResolver的增删改查方法不接收表名参数,而是使用一个Uri参数代替,这个参数被称为内容URI。
内容URI给内容提供器中的数据建立了唯一标识符,它主要由两部分组成:authority和path。
-
authority是用于对不同的应用程序做区分的,为了避免冲突,一般采用程序包名命名
比如某个程序的包名是com.example.app,那么该程序对应的authority就可以命名为com.example.app.provider。
-
path则是用于对同一应用程序中不同的表做区分的,通常都会添加到authority的后面
比如某个程序的数据库里存在两张表:table1和table2,这时就可以将path分别命名为/table1和/table2,然后把authority和path进行组合,内容URI就变成了com.example.app.provider/table1和com.example.app.provider/table2
**内容URI可以非常清楚地表达出我们想要访问哪个程序中哪张表里的数据。**因此,ContentResolver中的增删改查方法才都接收Uri对象作为参数,如果使用表名,系统将无法得知我们期望访问的是哪个应用程序里的表。在得到了内容URI字符串之后,我们还需要将它解析成Uri对象才可以作为参数传入。解析的方法也相当简单,只需要调用Uri.parse()方法,就可以将内容URI字符串解析成Uri对象:
1
|
Uri uri = Uri.parse("content://com.example.app.provider/table1")
|
现在我们可以使用该Uri对象查询table1表中的数据:
1
2
3
4
5
6
|
Cursor cursor = getContentResolver().query(
uri,
projection,
selection,
selectionArgs,
sortOrder);
|
这些参数和SQLiteDatabase中query()方法里的参数很像,但总体来说要简单一些,毕竟这是在访问其他程序中的数据,没必要构建过于复杂的查询语句。下表对使用到的这部分参数进行了详细的解释。
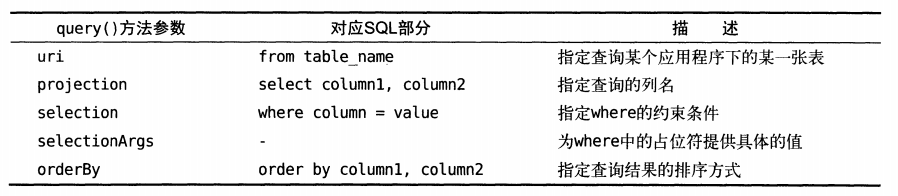
查询完成后返回一个Cursor对象,可从Cursor对象中逐个读取数据, 读取思路仍是通过移动游标的位置遍历Cursor的所有行,然后再取出每一行中相应列的数据,代码如下所示:
1
2
3
4
5
6
7
|
if (cursor != null) {
while (cursor.moveToNext()) {
String column1 = cursor.getString(cursor.getColumnIndex("column1"));
int column2 = cursor.getInt(cursor.getColumnIndex("column2"));
}
cursor.close();
}
|
添加数据
1
2
3
4
|
ContentValues values = new ContentValues();
values.put("column1","text");
values.put("column2",1);
getContentResolver().insert(uri,values);
|
更新数据
1
2
3
|
ContentValues values = new ContentValues();
values.put("column1","");
getContentResolver().update(uri,values,"column1 = ? and column2 = ? ",new String[] {"text","1"});
|
删除数据
1
2
|
getContentResolver().delete(uri,"column2 = ? ",new String[] {"1"});
language-java复制代码
|
到此为止,我们就把ContentResolver中的增删改查方法全部学完了。接下来,利用目前所学实现读取系统电话簿中的联系人信息。
7.3.2 获取系统联系人
首先在测试机的通讯录创建联系人用于后续测试
修改布局,添加ListView
1
2
3
4
5
6
7
8
9
10
11
|
<?xml version="1.0" encoding="utf-8"?>
<LinearLayout xmlns:android="http://schemas.android.com/apk/res/android"
android:orientation="vertical"
android:layout_width="match_parent"
android:layout_height="match_parent">
<ListView
android:id="@+id/contacts_view"
android:layout_width="match_parent"
android:layout_height="match_parent"/>
</LinearLayout>
|
修改MainActivity,基本逻辑如下:
-
首先获取ListView控件的实例,并设置适配器,然后调用运行时权限处理逻辑,因为READ_CONTACTS权限是属于危险权限,这里在用户授权后调用readContacts()读取系统联系人信息
-
readContacts()方法使用了ContentResolver.query()方法查询系统的联系人数据
传入的Uri参数没有调用Uri.parse()方法解析一个内容URI字符串?因为ContactsContract.CommonDataKinds.Phone类已经封装了一个CONTENT_URI常量,该常量就是Uri.parse()方法解析出的结果
-
遍历Cursor对象,将联系人姓名和手机号这些数据逐个取出
姓名列对应的常量是ContactsContract.CommonDataKinds. Phone.DISPLAY_NAME
手机号列对应的常量是ContactsContract.CommonData-Kinds.Phone.NUMBER
两个数据都取出之后,将它们进行拼接,并且在中间加上换行符,然后将拼接后的数据添加到ListView的数据源里,并通知刷新一下ListView。最后千万不要忘记将Cursor对象关闭掉。
1
2
3
4
5
6
7
8
9
10
11
12
13
14
15
16
17
18
19
20
21
22
23
24
25
26
27
28
29
30
31
32
33
34
35
36
37
38
39
40
41
42
43
44
45
46
47
48
49
50
51
52
53
54
55
56
57
58
59
60
61
62
63
64
65
66
67
68
69
70
71
72
73
74
75
76
77
78
79
|
package com.example.chapter7_contentprovider;
import androidx.annotation.NonNull;
import androidx.appcompat.app.AppCompatActivity;
import androidx.core.app.ActivityCompat;
import androidx.core.content.ContextCompat;
import androidx.core.content.PackageManagerCompat;
import android.annotation.SuppressLint;
import android.content.pm.PackageManager;
import android.database.Cursor;
import android.os.Bundle;
import android.provider.ContactsContract;
import android.widget.ArrayAdapter;
import android.widget.ListView;
import android.widget.Toast;
import java.util.ArrayList;
import java.util.List;
public class MainActivity extends AppCompatActivity {
ArrayAdapter<String> adapter;
List<String> contactList=new ArrayList<>();
@Override
protected void onCreate(Bundle savedInstanceState) {
super.onCreate(savedInstanceState);
setContentView(R.layout.activity_main);
ListView contactView=(ListView) findViewById(R.id.contacts_view);
adapter=new ArrayAdapter<String>(this, android.R.layout.simple_list_item_1,contactList);
contactView.setAdapter(adapter);//初始化ListView的adapter
//检查/申请权限
if (ContextCompat.checkSelfPermission(this,android.Manifest.permission.READ_CONTACTS)!= PackageManager.PERMISSION_GRANTED){
ActivityCompat.requestPermissions(this,new String[]{android.Manifest.permission.READ_CONTACTS},1);
}else {
readContacts();//如果有权限则直接读取联系人
}
}
private void readContacts(){
Cursor cursor = null;
try {
//查询联系人数据
//ContactsContract.CommonDataKinds.Phone.CONTENT_URI是封装好的uri类,已经是Uri.parse()解析的结果
cursor=getContentResolver().query(ContactsContract.CommonDataKinds.Phone.CONTENT_URI,null,null,null,null);
if (cursor!=null){
while (cursor.moveToNext()){
//获取联系人姓名 对应ContactsContract.CommonDataKinds.Phone.DISPLAY_NAME
@SuppressLint("Range") String displayname=cursor.getString(cursor.getColumnIndex(ContactsContract.CommonDataKinds.Phone.DISPLAY_NAME));
//获取联系人手机号 对应ContactsContract.CommonDataKinds.Phone.NUMBER
@SuppressLint("Range") String number=cursor.getString(cursor.getColumnIndex(ContactsContract.CommonDataKinds.Phone.NUMBER));
contactList.add(displayname+"\n"+number);//添加数据
}
adapter.notifyDataSetChanged();//通知ListView更新UI数据
}
}catch (Exception e){
e.printStackTrace();
}finally {
if (cursor!=null){
cursor.close();
}
}
}
@Override
public void onRequestPermissionsResult(int requestCode, @NonNull String[] permissions, @NonNull int[] grantResults) {
super.onRequestPermissionsResult(requestCode, permissions, grantResults);
//执行requestPermissions后如果授权则读取联系人,否则弹提示
switch (requestCode) {
case 1:
if (grantResults.length > 0 && grantResults[0] == PackageManager.PERMISSION_GRANTED) {
readContacts();
} else {
Toast.makeText(this,"You denied the permission",Toast.LENGTH_SHORT).show();
}
break;
default:
}
}
}
|
最后在Manifest添加权限声明
1
2
3
4
5
6
7
8
|
<?xml version="1.0" encoding="utf-8"?>
<manifest xmlns:android="http://schemas.android.com/apk/res/android"
xmlns:tools="http://schemas.android.com/tools">
<uses-permission android:name="android.permission.READ_CONTACTS"/>
<application>
...
</application>
</manifest>
|
运行效果如下
首先请求授权

授权后输出联系人信息
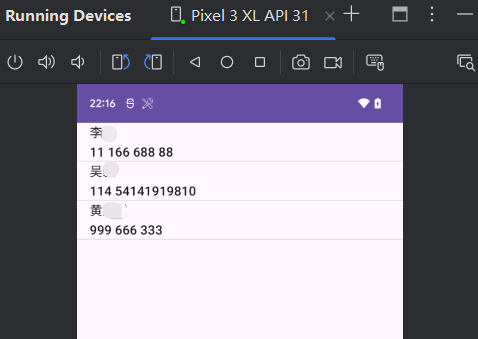
7.4 创建自定义ContentProvider
上一节当中的思路较为简单,只需要获取到目标应用程序的内容URI,再借助ContentResolver进行CRUD操作即可。那些提供外部访问接口的应用程序是如何实现这种功能的呢?它们又是怎样保证数据的安全性,隐私数据不会泄漏出去?下面进行学习
7.4.1 创建ContentProvider的步骤
如果想要实现跨程序共享数据的功能,官方推荐的方式是使用内容提供器,可通过新建一个类并继承ContentProvider的方式来创建一个自己的内容提供器。ContentProvider类中有6个抽象方法,我们在使用子类继承它的时候,需要将这6个方法全部重写。
| 方法 |
作用 |
备注 |
| onCreate() |
初始化内容提供器时调用, 通常在这里完成对数据库的创建和升级等操作 |
返回true表示内容提供器初始化成功,返回false则表示失败 |
| query() |
从内容提供器中查询数据,查询的结果存放在Cursor对象中返回 |
uri确定查询哪张表,projection确定查询哪些列,selection和selectionArgs用于约束查询哪些行,sortOrder用于对结果排序 |
| insert() |
向内容提供器中添加一条数据,返回一个用于表示这条新记录的URI |
使用uri参数确定要添加到的表,待添加的数据保存在values参数中 |
| update() |
更新内容提供器中已有的数据,返回受影响的行数 |
使用uri参数来确定更新哪一张表中的数据,新数据保存在values参数中,selection和selectionArgs参数用于约束更新哪些行 |
| delete() |
从内容提供器中删除数据,返回被删除的行数 |
使用uri参数来确定删除哪一张表中的数据,selection和selectionArgs参数用于约束删除哪些行 |
| getType() |
根据传入的内容URI来返回相应的MIME类型 |
|
可以看到,几乎每一个方法都会带有Uri这个参数,这个参数也正是调用ContentResolver的增删改查方法时传递过来的。我们需要对传入的Uri参数进行解析,从中分析出调用方期望访问的表和数据。标准的内容URI写法如下:
1
|
content://com.example.app.provider/table
|
表示调用方期望访问的是com.example.app应用的table表中的数据。除此之外,我们还可以在这个内容URI的后面加上一个id:
1
|
content://com.example.app.provider/table/1
|
内容URI的格式主要就只有以上两种:
-
以路径结尾就表示期望访问该表中所有的数据 (app.provider路径+具体表名)
-
以id结尾就表示期望访问该表中拥有相应id的数据 (app.provider路径+具体表名/id)
-
可以使用通配符分别匹配这两种格式的内容URI:
接着,再借助UriMatcher这个类就可以实现匹配内容URI的功能。UriMatcher中提供了一个addURI()方法,这个方法接收3个参数,分别把authority、path和某个自定义代码传入
当调用UriMatcher.match()方法时,传入一个Uri对象,返回某个能够匹配这个Uri对象所对应的自定义代码(上面addURI绑定的),利用该代码,可以判断出调用方期望访问的是哪张表中的数据
1
2
3
4
5
6
7
8
9
10
11
12
13
14
15
16
17
18
19
20
21
22
23
24
25
26
27
28
29
30
31
32
33
34
35
36
37
38
39
40
41
42
43
44
45
46
47
48
49
50
51
52
53
54
55
56
57
58
59
60
61
62
63
64
65
66
67
68
69
70
71
72
73
74
75
|
package com.example.chapter7_contentprovider;
import android.content.ContentProvider;
import android.content.ContentValues;
import android.content.UriMatcher;
import android.database.Cursor;
import android.net.Uri;
import androidx.annotation.NonNull;
import androidx.annotation.Nullable;
public class MyProvider extends ContentProvider {
public static final int TABLE1_DIR = 0;//枚举常量code用于确定需要匹配哪张表
public static final int TABLE1_ITEM = 1;
public static final int TABLE2_DIR = 2;
public static final int TABLE2_ITEM = 3;
private static UriMatcher uriMatcher;
static {
uriMatcher = new UriMatcher(UriMatcher.NO_MATCH);
//provider+表格内容与枚举常量code绑定
uriMatcher.addURI("com.example.app.provider", "table1", TABLE1_DIR);
uriMatcher.addURI("com.example.app.provider", "table1/#", TABLE1_ITEM);
uriMatcher.addURI("com.example.app.provider", "table2", TABLE2_DIR);
uriMatcher.addURI("com.example.app.provider", "table2/#", TABLE2_ITEM);
}
@Override
public boolean onCreate() {
return false;
}
@Nullable
@Override
public Cursor query(@NonNull Uri uri, @Nullable String[] strings, @Nullable String s, @Nullable String[] strings1, @Nullable String s1) {
//判断uri匹配,返回对应枚举常量code,根据不同code执行不同逻辑
switch (uriMatcher.match(uri)) {
case TABLE1_DIR:
//查询table1表中的所有数据
break;
case TABLE1_ITEM:
//查询table1表中的单条数据
break;
case TABLE2_DIR:
//查询table2表中的所有数据
break;
case TABLE2_ITEM:
//查询table2表中的单条数据
break;
}
return null;
}
@Nullable
@Override
public String getType(@NonNull Uri uri) {
return "";
}
@Nullable
@Override
public Uri insert(@NonNull Uri uri, @Nullable ContentValues contentValues) {
return null;
}
@Override
public int delete(@NonNull Uri uri, @Nullable String s, @Nullable String[] strings) {
return 0;
}
@Override
public int update(@NonNull Uri uri, @Nullable ContentValues contentValues, @Nullable String s, @Nullable String[] strings) {
return 0;
}
}
|
可以看到,MyProvider中新增了4个整型常量:
- TABLE1_DIR表示访问table1表中的所有数据
- TABLE1_ITEM表示访问table1表中的单条数据
- TABLE2_DIR表示访问table2表中的所有数据
- TABLE2_ITEM表示访问table2表中的单条数据
接着在静态代码块里我们创建了UriMatcher的实例,并调用addURI()方法,将期望匹配的内容URI格式传递进去,注意这里传入的路径参数是可以使用通配符的。然后,当query()方法被调用的时候,就会通过UriMatcher的match()方法对传入的Uri对象进行匹配,如果发现UriMatcher中某个内容URI格式成功匹配了该Uri对象,则会返回相应的自定义代码,然后我们就可以判断出调用方期望访问的到底是什么数据了。
上述代码以query()方法为例,insert()、update()、delete()这几个方法的实现是类似的,它们都会携带Uri这个参数,然后同样利用UriMatcher.match()方法判断出调用方期望访问的是哪张表,再对该表中的数据进行相应的操作即可。
对于getType()方法,它是所有的内容提供器都必须提供的一个方法,用于获取Uri对象所对应的MIME类型。
一个内容URI所对应的MIME类型字符串由3部分组成,格式规定如下:
-
以vnd.开头
-
如果内容URI以路径结尾,则后接android.cursor.dir/,如果内容URI以id结尾,则后接android.cursor.item/
-
最后接上vnd.<authority>.<path>
所以,对于content://com.example.app.provider/table这个内容URI,它所对应的MIME类型就可以写成:
1
|
vnd.android.cursor.dir/vnd.com.example.app.provider.table
|
对于content://com.example.app.provider/table/1这个内容URI,它所对应的MIME类型就可以写成:
1
|
vnd.android.cursor.item/vnd.com.example.app.provider.table
|
继续完善MyProvider中的内容,实现getType()方法中的逻辑,代码如下
1
2
3
4
5
6
7
8
9
10
11
12
13
14
15
16
17
18
19
20
|
......
@Nullable
@Override
public String getType(@NonNull Uri uri) {
//根据uri不同匹配结果返回不同mime类型
switch (uriMatcher.match(uri)){
case TABLE1_DIR:
return "vnd.android.cursor.dir/vnd.com.example.app.provider.table1";
case TABLE1_ITEM:
return "vnd.android.cursor.item/vnd.com.example.app.provider.table1";
case TABLE2_DIR:
return "vnd.android.cursor.dir/vnd.com.example.app.provider.table2";
case TABLE2_ITEM:
return "vnd.android.cursor.item/vnd.com.example.app.provider.table2";
default:
break;
}
return null;
}
......
|
到此为止,一个完整的内容提供器就创建完成了,现在任何一个应用程序都可以使用ContentResolver来访问我们程序中的数据。那么,如何才能保证隐私数据不会泄漏出去呢?
内容提供器的良好机制使得这个问题在不知不觉中已经被解决了。因为所有的CRUD操作都一定要匹配到相应的内容URI格式才能进行,而我们不可能向UriMatcher中添加隐私数据的URI,所以这部分数据根本无法被外部程序访问到,安全问题也就不存在了。
总结创建步骤如下:
- 编写MyContentProvider继承自ContentProvider
- 确定常量代码和提供的URI绑定
- 实现ContentProvider的6个抽象方法
- 针对getType()单独处理,返回对应MIME类型格式
7.4.2 实现跨程序数据共享
实战一下,真正体验一回跨程序数据共享的功能。为简单起见,继续第6章的数据库项目开发,通过内容提供器为其加入外部访问接口.首先将MyDatabaseHelper使用Toast弹出创建数据库成功的提示去除,因为跨程序访问时不能直接使用Toast(与Context有关)
右键com.example.chapter6_storage>new>other>Content Provider创建
exported表示是否允许外部程序访问内容提供器
enabled表示是否启用内容提供器
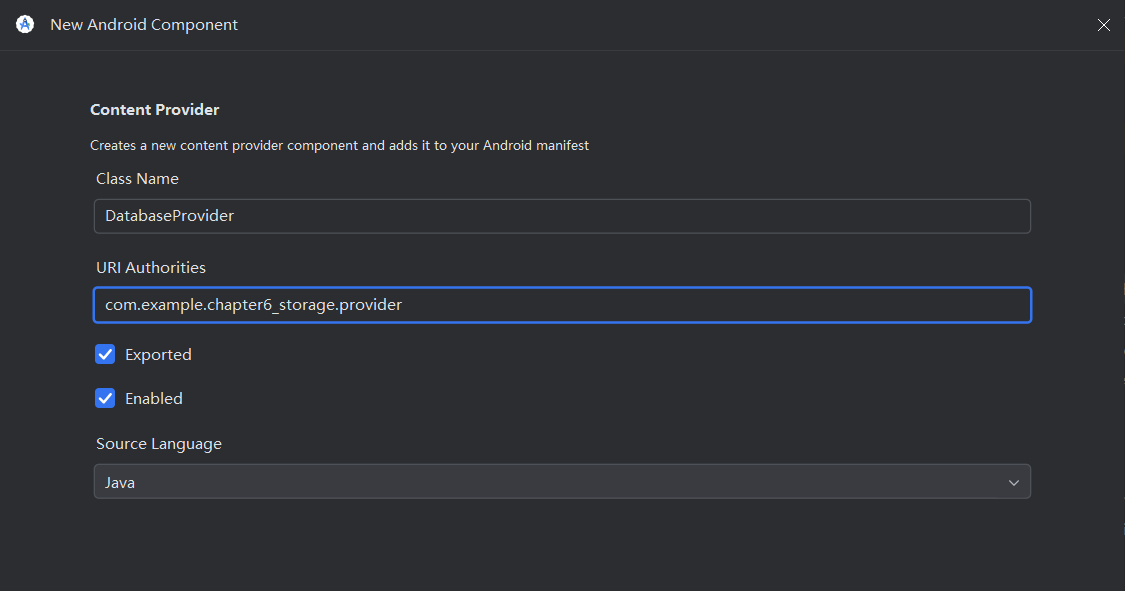
修改代码如下
1
2
3
4
5
6
7
8
9
10
11
12
13
14
15
16
17
18
19
20
21
22
23
24
25
26
27
28
29
30
31
32
33
34
35
36
37
38
39
40
41
42
43
44
45
46
47
48
49
50
51
52
53
54
55
56
57
58
59
60
61
62
63
64
65
66
67
68
69
70
71
72
73
74
75
76
77
78
79
80
81
82
83
84
85
86
87
88
89
90
91
92
93
94
95
96
97
98
99
100
101
102
103
104
105
106
107
108
109
110
111
112
113
114
115
116
117
118
119
120
121
122
123
124
125
126
127
128
129
130
131
132
133
134
135
136
137
138
139
140
141
142
143
144
145
146
147
148
149
150
151
152
|
package com.example.chapter6_storage;
import android.content.ContentProvider;
import android.content.ContentValues;
import android.content.UriMatcher;
import android.database.Cursor;
import android.database.sqlite.SQLiteDatabase;
import android.net.Uri;
public class DatabaseProvider extends ContentProvider {
public static final int BOOK_DIR = 0;//Book表所有数据
public static final int BOOK_ITEM = 1;//Book表单条数据
public static final int CATEGORY_DIR = 2;//Category表所有数据
public static final int CATEGORY_ITEM = 3;//Category表单条数据
public static final String AUTHORITY = "com.example.chapter6_storage.provider";//本提供器的Authority
private static UriMatcher uriMatcher;
private MyDatabaseHelper dbHelper;
static {
//初始化UriMacher,绑定URI和常量代码
uriMatcher = new UriMatcher(UriMatcher.NO_MATCH);
uriMatcher.addURI(AUTHORITY,"book",BOOK_DIR);
uriMatcher.addURI(AUTHORITY,"book/#",BOOK_ITEM);
uriMatcher.addURI(AUTHORITY,"category",CATEGORY_DIR);
uriMatcher.addURI(AUTHORITY,"category/#",CATEGORY_ITEM);
}
public DatabaseProvider() {
}
@Override
public boolean onCreate() {
//创建DataHelper实例,返回true表示创建成功,此时数据库完成创建/升级
dbHelper=new MyDatabaseHelper(getContext(),"BookStore.db",null,2);
return true;
}
@Override
public Cursor query(Uri uri, String[] projection, String selection, String[] selectionArgs, String sortOrder) {
SQLiteDatabase db=dbHelper.getReadableDatabase();//获取数据库实例
Cursor cursor=null;
//根据匹配情况进行对应查询,结果存到cursor返回
switch (uriMatcher.match(uri)){
case BOOK_DIR:
cursor =db.query("Book",projection,selection,selectionArgs,null,null,sortOrder);
break;
case CATEGORY_DIR:
cursor = db.query("Category",projection,selection,selectionArgs,null,null,sortOrder);
break;
case BOOK_ITEM:
//uri.getPathSegments()方法将URI权限后的部分以/分割 故0号位置为path(表名) 1号位置为id
String bookId = uri.getPathSegments().get(1);//获取id用于约束
cursor = db.query("Book",projection,"id = ?",new String[]{ bookId },null,null,sortOrder);
break;
case CATEGORY_ITEM:
String categoryId = uri.getPathSegments().get(1);
cursor = db.query("Category",projection,"id = ?",new String[]{ categoryId },null,null,sortOrder);
break;
default:
break;
}
return cursor;
}
@Override
public Uri insert(Uri uri, ContentValues values) {
SQLiteDatabase db = dbHelper.getWritableDatabase();
Uri uriReturn = null;
switch (uriMatcher.match(uri)) {
case BOOK_DIR:
case CATEGORY_DIR:
case BOOK_ITEM:
long newBookId = db.insert("Book",null,values);
//解析Content URI为Uri对象
uriReturn = Uri.parse("content://" + AUTHORITY + "/book/" + newBookId);
break;
case CATEGORY_ITEM:
long newCategoryId = db.insert("Category",null,values);
uriReturn = Uri.parse("content://" + AUTHORITY + "/category/" + newCategoryId);
break;
default:
break;
}
return uriReturn;//insert方法要求返回能表示这条新增数据的URI
}
@Override
public int update(Uri uri, ContentValues values, String selection, String[] selectionArgs) {
SQLiteDatabase db = dbHelper.getWritableDatabase();
int updateRows = 0;//返回被更新的行数
switch (uriMatcher.match(uri)) {
case BOOK_DIR:
//更新所有约束行
updateRows = db.update("Book",values,selection,selectionArgs);
break;
case BOOK_ITEM:
//更新指定id行
String bookId = uri.getPathSegments().get(1);
updateRows = db.update("Book",values,"id = ?",new String[] { bookId });
break;
case CATEGORY_DIR:
updateRows = db.update("Category",values,selection,selectionArgs);
break;
case CATEGORY_ITEM:
String categoryId = uri.getPathSegments().get(1);
updateRows = db.update("Category",values,"id = ?",new String[] { categoryId });
break;
default:
break;
}
return updateRows;
}
@Override
public int delete(Uri uri, String selection, String[] selectionArgs) {
SQLiteDatabase db=dbHelper.getWritableDatabase();
int deleteRows=0;//返回被删除的行数
switch (uriMatcher.match(uri)){
case BOOK_DIR:
//删除所有约束行
deleteRows=db.delete("book",selection,selectionArgs);
break;
case BOOK_ITEM:
//删除指定id行
String bookid=uri.getPathSegments().get(1);
deleteRows=db.delete("book","id = ?",new String[]{bookid});
case CATEGORY_DIR:
deleteRows=db.delete("Category",selection,selectionArgs);
break;
case CATEGORY_ITEM:
String categoryid=uri.getPathSegments().get(1);
deleteRows=db.delete("Category","id = ?",new String[]{categoryid});
break;
}
return deleteRows;
}
@Override
public String getType(Uri uri) {
switch (uriMatcher.match(uri)) {
case BOOK_DIR:
return "vnd.android.cursor.dir/vnd.com.example.chapter6_storage.provider.book";
case BOOK_ITEM:
return "vnd.android.cursor.item/vnd.com.example.chapter6_storage.provider.book";
case CATEGORY_DIR:
return "vnd.android.cursor.dir/vnd.com.example.chapter6_storage.provider.category";
case CATEGORY_ITEM:
return "vnd.android.cursor.item/vnd.com.example.chapter6_storage.provider.category";
}
return null;
}
}
|
首先在开始同样是定义了4个常量,分别用于表示访问Book表中的所有数据、访问Book表中的单条数据、访问Category表中的所有数据和访问Category表中的单条数据。然后,在静态代码块里对UriMatcher进行初始化,将添加期望匹配的几种URI格式并绑定常量代码
解析下实现的各个方法:
-
onCreate()
创建MyDatabaseHelper实例,返回true表示内容提供器初始化成功,此时数据库已经完成创建或升级。
-
query()
先获取SQLiteDatabase实例,然后根据传入的Uri参数判断出用户想要访问哪张表,再调用SQLiteDatabase.query()进行查询,并将结果存储到Cursor对象返回
注意: 访问单条数据的时候有一个细节,这里调用了Uri对象的**getPathSegments()**方法,它会将内容URI权限之后的部分以“/”符号进行分割,并把分割后的结果放入到一个字符串列表中.该列表第0个位置存放的是路径,第1个位置存放的是id。得到了id后,再通过selection和selectionArgs参数进行约束,就实现了查询单条数据的功能
-
insert()
先获取到了SQLiteDatabase的实例,然后根据传入的Uri参数判断出用户想要往哪张表里添加数据,再调用SQLiteDatabase的insert()方法进行添加
注意: insert()方法,要求返回一个能够表示这条新增数据的URI,所以我们还需要调用Uri.parse()方法来将一个内容URI解析成Uri对象,当然这个内容URI是以新增数据的id结尾的
-
update()
先获取SQLiteDatabase实例,根据传入的Uri参数判断出用户想要更新哪张表里的数据,再调用SQLiteDatabase的update()方法进行更新,返回受影响的行数
-
delete()
先获取SQLiteDatabase实例,根据传入的Uri参数判断出用户想要删除哪张表里的数据,再调用SQLiteDatabase的delete()方法进行删除就好了,返回被删除的行数
-
getType()
按照上一节中介绍的格式规则编写即可
另外需要在AndroidManifest注册Provider,使用Android快捷新建会自动注册
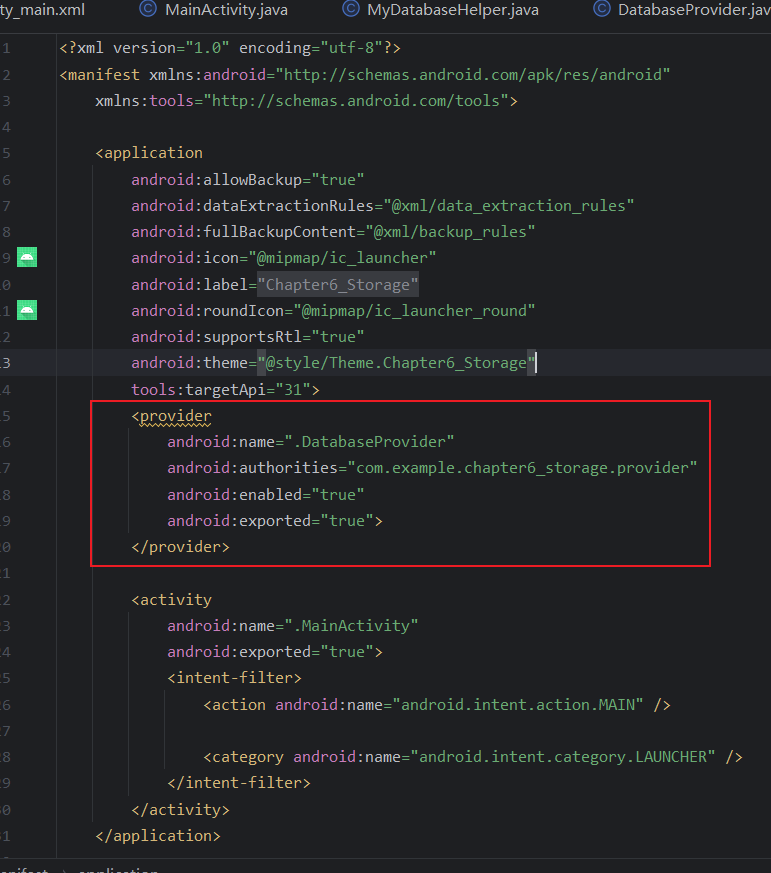
注意安装该程序前先删除原程序,防止上一章的遗留数据干扰,安装后创建数据库并添加数据
之后修改Chapter7_ContentProvider,实现访问DatabaseProvider数据的功能
布局如下,增删改查4个按钮
1
2
3
4
5
6
7
8
9
10
11
12
13
14
15
16
17
18
19
20
21
22
23
24
25
26
27
28
29
30
|
<?xml version="1.0" encoding="utf-8"?>
<LinearLayout xmlns:android="http://schemas.android.com/apk/res/android"
android:orientation="vertical"
android:layout_width="match_parent"
android:layout_height="match_parent">
<Button
android:layout_width="match_parent"
android:layout_height="wrap_content"
android:id="@+id/add_data"
android:text="Add To Book"/>
<Button
android:layout_width="match_parent"
android:layout_height="wrap_content"
android:id="@+id/query_data"
android:text="Query From Book"/>
<Button
android:layout_width="match_parent"
android:layout_height="wrap_content"
android:id="@+id/update_data"
android:text="Update Book"/>
<Button
android:layout_width="match_parent"
android:layout_height="wrap_content"
android:id="@+id/delete_data"
android:text="Delete From Book"/>
</LinearLayout>
|
修改MainActivity,分别在4个按钮的点击事件中处理增删改查逻辑
1
2
3
4
5
6
7
8
9
10
11
12
13
14
15
16
17
18
19
20
21
22
23
24
25
26
27
28
29
30
31
32
33
34
35
36
37
38
39
40
41
42
43
44
45
46
47
48
49
50
51
52
53
54
55
56
57
58
59
60
61
62
63
64
65
66
67
68
69
70
71
72
73
74
75
76
77
|
package com.example.chapter7_contentprovider;
import androidx.appcompat.app.AppCompatActivity;
import android.annotation.SuppressLint;
import android.content.ContentValues;
import android.database.Cursor;
import android.net.Uri;
import android.os.Bundle;
import android.util.Log;
import android.view.View;
import android.widget.Button;
public class MainActivity extends AppCompatActivity {
private String newId;
@Override
protected void onCreate(Bundle savedInstanceState) {
super.onCreate(savedInstanceState);
setContentView(R.layout.activity_main);
Button adddata=(Button) findViewById(R.id.add_data);
adddata.setOnClickListener(new View.OnClickListener() {
@Override
public void onClick(View view) {
Uri uri= Uri.parse("content://com.example.databasetest.provider/book");
ContentValues contentValues=new ContentValues();
contentValues.put("name","A king");
contentValues.put("author","Tom");
contentValues.put("price",22.85);
contentValues.put("pages",1040);
Uri newUri=getContentResolver().insert(uri,contentValues);
newId=newUri.getPathSegments().get(1);
}
});
Button queryData=(Button) findViewById(R.id.query_data);
queryData.setOnClickListener(new View.OnClickListener() {
@Override
public void onClick(View view) {
Uri uri=Uri.parse("content://com.example.databasetest.provider/book");
Cursor cursor=getContentResolver().query(uri,null,null,null,null);
if (cursor!=null){
while (cursor.moveToNext()){
@SuppressLint("Range") String name=cursor.getString(cursor.getColumnIndex("name"));
@SuppressLint("Range") String author=cursor.getString(cursor.getColumnIndex("author"));
@SuppressLint("Range") int pages=cursor.getInt(cursor.getColumnIndex("pages"));
@SuppressLint("Range") double price =cursor.getDouble(cursor.getColumnIndex("price"));
Log.d("MainActivity","book name is "+name);
Log.d("MainActivity","book author is "+author);
Log.d("MainActivity","book pages is "+pages);
Log.d("MainActivity","book price is "+price);
}
cursor.close();
}
}
});
Button updateData=(Button) findViewById(R.id.update_data);
updateData.setOnClickListener(new View.OnClickListener() {
@Override
public void onClick(View view) {
Uri uri=Uri.parse("content://com.example.databasetest.provider/book/"+newId);
ContentValues contentValues=new ContentValues();
contentValues.put("name","Two kings");
contentValues.put("price",9.99);
contentValues.put("pages",666);
getContentResolver().update(uri,contentValues,null,null);
}
});
Button deleteData=(Button) findViewById(R.id.delete_data);
deleteData.setOnClickListener(new View.OnClickListener() {
@Override
public void onClick(View view) {
Uri uri=Uri.parse("content://com.example.databasetest.provider/book/"+newId);
getContentResolver().delete(uri,null,null);
}
});
}
}
|
代码解析:
-
添加数据
首先调用Uri.parse()将一个内容URI解析成Uri对象,然后把要添加的数据都存放到ContentValues对象中,接着调用ContentResolver的insert()方法执行添加操作就可以了。注意insert()方法会返回一个Uri对象,这个对象中包含了新增数据的id,我们通过getPathSegments()方法将这个id取出,稍后会用到它。
-
查询数据
同样是调用了Uri.parse()方法将一个内容URI解析成Uri对象,然后调用ContentResolver的query()方法去查询数据,查询的结果当然还是存放在Cursor对象中的。之后对Cursor进行遍历,从中取出查询结果,并一一打印出来。
-
更新数据
也是先将内容URI解析成Uri对象,然后把想要更新的数据存放到ContentValues对象中,再调用ContentResolver的update()方法执行更新操作就可以了。注意这里我们为了不想让Book表中的其他行受到影响,在调用Uri.parse()方法时,给内容URI的尾部增加了一个id,而这个id正是添加数据时所返回的。这就表示我们只希望更新刚刚添加的那条数据,Book表中的其他行都不会受影响。
-
删除数据
也是使用同样的方法解析了一个以id结尾的内容URI,然后调用ContentResolver的delete()方法执行删除操作就可以了。由于我们在内容URI里指定了一个id,因此只会删掉拥有相应id的那行数据,Book表中的其他数据都不会受影响。
最后,在Android11以后由于权限策略,访问其他应用的content provider需要添加声明
修改Manifest如下
1
2
3
4
5
6
7
8
9
10
11
|
<?xml version="1.0" encoding="utf-8"?>
<manifest xmlns:android="http://schemas.android.com/apk/res/android"
xmlns:tools="http://schemas.android.com/tools">
<queries>
<provider android:authorities="com.example.chapter6_storage.provider"/>
</queries>
<!--需要声明访问的provider-->
<application
......
</application>
</manifest>
|
可以看到成功调用各类接口
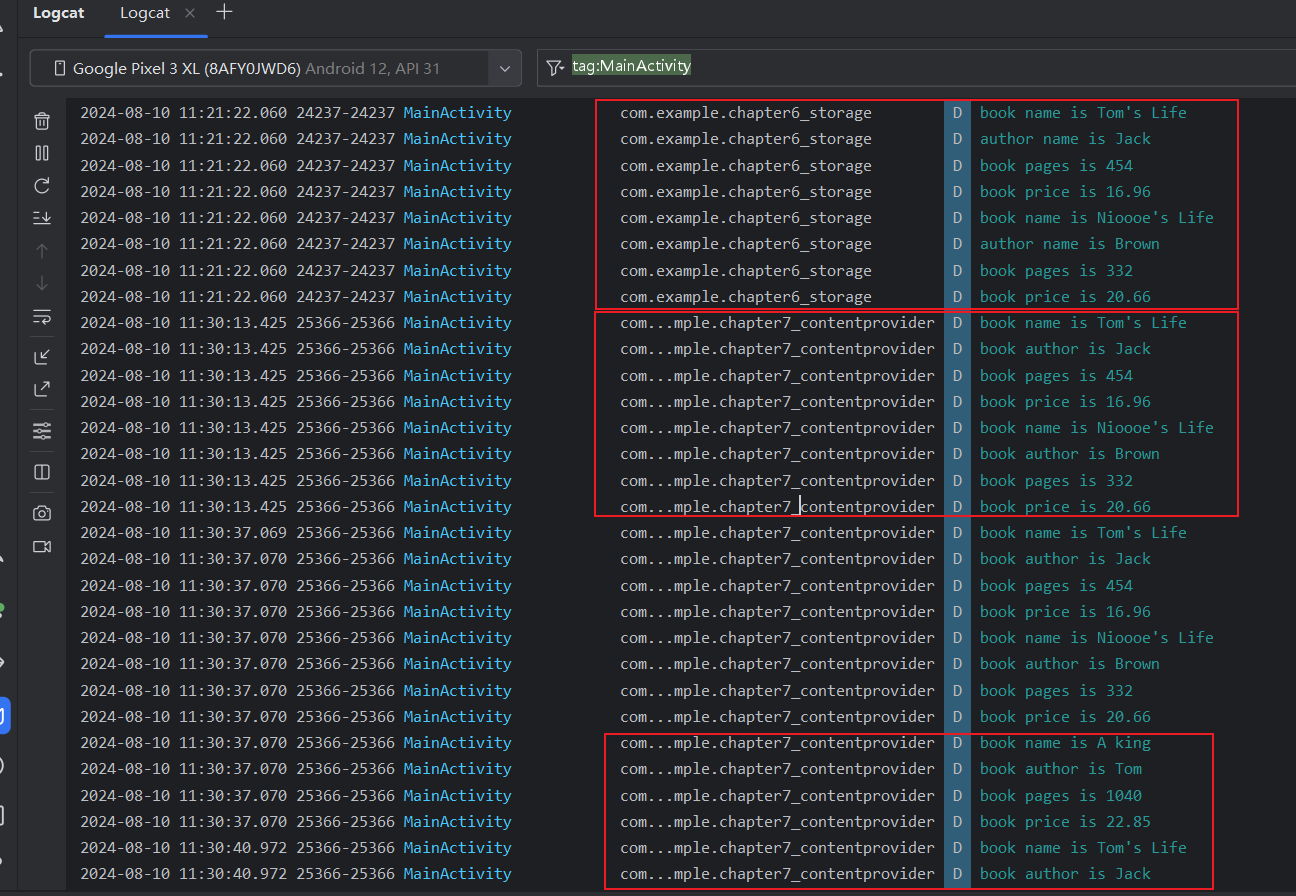
第8章 运用手机多媒体
8.1 使用通知
通知(Notification)是Android系统中比较有特色的一个功能,当某个应用程序希望向用户发出一些提示信息,而该应用程序又不在前台运行时,就可以借助通知来实现。
发出一条通知后,手机最上方的状态栏中会显示一个通知的图标,下拉状态栏后可以看到通知的详细内容。
8.1.1 通知的基本用法
通知的用法较为灵活,既可以在活动里创建,也可以在广播接收器里创建,还可以在下一章中即将学习的在服务里创建。相比于广播接收器和服务,在活动里创建通知的场景还是比较少的,因为一般当程序进入到后台的时候我们才需要使用通知。
无论是在哪里创建通知,整体的步骤都是相同的,首先需要一个NotificationManager来对通知进行管理,可以调用Context的getSystemService()方法获取到。
getSystemService()方法接收一个字符串参数用于确定获取系统的哪个服务,这里我们传入Context.NOTIFICATION_SERVICE即可。因此,获取NotificationManager的实例就可以写成:
1
|
NotificationManager manager = (NotificationManager)getSystemService(Context.NOTIFICATION_SERVICE);
|
接下来,需要使用一个Builder构造器来创建Notification对象,但问题在于,几乎Android系统的每一个版本都会对通知这部分功能进行或多或少的修改,API不稳定性问题在通知上面突显得尤其严重。那么该如何解决这个问题呢?
其实解决方案我们之前已经见过好几回了,就是使用support库中提供的兼容API。support-v4库中提供了一个NotificationCompat类,使用这个类的构造器来创建Notification对象,就可以保证我们的程序在所有Android系统版本上都能正常工作了,代码如下所示:
1
|
Notification notification = new NotificationCompat.Builder(context).build();
|
注: 该方法自Android8.0后被废弃,推荐使用新方法(添加了channelId参数)
1
|
NotificationCompat.Builder(Context context, String channelId)
|
创建具体的通知
1
2
3
4
5
6
7
8
9
10
11
12
13
14
15
16
17
18
19
20
21
22
23
24
25
26
27
|
package com.example.chapter8_media;
import android.app.Notification;
import android.app.NotificationManager;
import android.content.Context;
import android.graphics.BitmapFactory;
import android.os.Bundle;
import androidx.appcompat.app.AppCompatActivity;
import androidx.core.app.NotificationCompat;
public class MainActivity extends AppCompatActivity {
@Override
protected void onCreate(Bundle savedInstanceState) {
super.onCreate(savedInstanceState);
setContentView(R.layout.activity_main);
NotificationManager manager = (NotificationManager)getSystemService(Context.NOTIFICATION_SERVICE);
Notification notification = new NotificationCompat.Builder(MainActivity.this,"default")
.setContentTitle("This is content title") //指定通知的标题
.setContentText("This is content text") //指定通知的正文内容
.setWhen(System.currentTimeMillis()) //指定通知被创建的时间,以毫秒为单位,当下拉系统状态栏时,这里指定的时间会显示在相应的通知上
.setSmallIcon(R.mipmap.ic_launcher) //设置通知的小图标
.setLargeIcon(BitmapFactory.decodeResource(getResources(), R.mipmap.ic_launcher_round)).build();//设置通知的大图标,当下拉系统状态栏时,可以看到设置的大图标
}
}
|
方法解释
-
setContentTitle()
指定通知的标题内容,下拉系统状态栏就可以看到这部分内容
-
setContentText()
指定通知的正文内容,同样下拉系统状态栏就可以看到这部分内容
-
setWhen()
指定通知被创建的时间,以毫秒为单位,当下拉系统状态栏时,这里指定的时间会显示在相应的通知上
-
setSmallIcon()
设置通知的小图标,注意只能使用纯alpha图层的图片进行设置,小图标会显示在系统状态栏上。
-
setLargeIcon()
设置通知的大图标,当下拉系统状态栏时,就可以看到设置的大图标
创建完毕Notification对象后调用NotificationManager.notify()方法即可显示通知,id参数需要保证每个通知的id都不同
1
|
public void notify(int id, Notification notification)
|
修改布局,添加发送通知按钮
1
2
3
4
5
6
7
8
9
10
11
|
<?xml version="1.0" encoding="utf-8"?>
<LinearLayout xmlns:android="http://schemas.android.com/apk/res/android"
android:orientation="vertical"
android:layout_width="match_parent"
android:layout_height="match_parent">
<Button
android:layout_width="wrap_content"
android:layout_height="wrap_content"
android:id="@+id/send_notice"
android:text="Send notice"/>
</LinearLayout>
|
修改MainActivity
1
2
3
4
5
6
7
8
9
10
11
12
13
14
15
16
17
18
19
20
21
22
23
24
25
26
27
28
29
30
31
32
33
34
35
36
37
38
39
40
41
42
43
44
45
|
package com.example.chapter8_media;
import androidx.appcompat.app.AppCompatActivity;
import androidx.core.app.NotificationCompat;
import android.app.Notification;
import android.app.NotificationChannel;
import android.app.NotificationManager;
import android.graphics.BitmapFactory;
import android.os.Build;
import android.os.Bundle;
import android.view.View;
import android.widget.Button;
public class MainActivity extends AppCompatActivity {
@Override
protected void onCreate(Bundle savedInstanceState) {
super.onCreate(savedInstanceState);
setContentView(R.layout.activity_main);
Button sendNotice=(Button)findViewById(R.id.send_notice);
sendNotice.setOnClickListener(new View.OnClickListener() {
@Override
public void onClick(View view) {
//Android 8.0+需要开启channel
NotificationManager manager=(NotificationManager) getSystemService(NOTIFICATION_SERVICE);
if (Build.VERSION.SDK_INT >= Build.VERSION_CODES.O) {
String channelId = "default"; //通道名称
String channelName = "默认通知";
manager.createNotificationChannel(new NotificationChannel(channelId, channelName, NotificationManager.IMPORTANCE_HIGH));
}
//创建通知
Notification notification = new NotificationCompat.Builder(MainActivity.this,"default")
.setContentTitle("My notification")
.setContentText("Hello World!")
.setWhen(System.currentTimeMillis())
.setSmallIcon(R.mipmap.ic_launcher)
.setLargeIcon(BitmapFactory.decodeResource(getResources(),
R.mipmap.ic_launcher_round)).build();
//通知
manager.notify(1,notification);
}
});
}
}
|
Android8.0以后需要开启channel才能使用通知,参考NotificationCompat.Builder()过时,失效
Android13以后需要添加通知权限声明,参考https://developer.android.com/develop/ui/views/notifications/build-notification?hl=zh-cn
1
|
<uses-permission android:name="android.permission.POST_NOTIFICATIONS" />
|
运行后效果如下,成功弹出通知

但下拉系统状态栏并点击这条通知时,没有任何效果。要想实现通知的点击效果,还需要在代码中进行相应的设置,这就涉及了一个新的概念:PendingIntent。
PendingIntent从名字上看起来就和Intent有些类似,它们之间也确实存在着不少共同点。比如它们都可以去指明某一个“意图”,都可以用于启动活动、启动服务以及发送广播等。不同的是,Intent更加倾向于去立即执行某个动作,而PendingIntent更加倾向于在某个合适的时机去执行某个动作。所以,也可以把PendingIntent简单地理解为延迟执行的Intent。
PendingIntent的用法同样很简单,它主要提供了几个静态方法用于获取PendingIntent的实例,可以根据需求来选择是使用getActivity()方法、getBroadcast()方法,还是getService()方法。这几个方法所接收的参数都是相同的:
- 第一个参数依旧是Context,不用多做解释。
- 第二个参数一般用不到,通常都是传入0即可。
- 第三个参数是一个Intent对象,我们可以通过这个对象构建出PendingIntent的“意图”。
- 第四个参数用于确定PendingIntent的行为,默认推荐PendingIntent.FLAG_IMMUTABLE(不能传0)
对PendingIntent有了一定的了解后,我们再回过头来看一下NotificationCompat.Builder。这个构造器还可以再连缀一个**setContentIntent()**方法,接收的参数正是一个PendingIntent对象。因此,这里就可以通过PendingIntent构建出一个延迟执行的“意图”,当用户点击这条通知时就会执行相应的逻辑。
在我们来优化一下项目,给刚才的通知加上点击功能,让用户点击它的时候可以启动另一个活动。首先需要准备好另一个活动,右键包→New→Activity→Empty Activity,新建NotificationActivity,布局起名为notification_layout
1
2
3
4
5
6
7
8
9
10
11
|
<?xml version="1.0" encoding="utf-8"?>
<RelativeLayout xmlns:android="http://schemas.android.com/apk/res/android"
android:layout_width="match_parent"
android:layout_height="match_parent">
<TextView
android:layout_width="wrap_content"
android:layout_height="wrap_content"
android:layout_centerInParent="true"
android:textSize="24sp"
android:text="This is notification layout"/>
</RelativeLayout>
|
修改MainActivity,点击通知跳转到NotificationActivity
1
2
3
4
5
6
7
8
9
10
11
12
13
14
15
16
17
18
19
20
21
22
23
24
25
26
27
28
29
30
31
32
33
34
35
36
37
38
39
40
41
42
43
44
45
46
47
48
|
package com.example.chapter8_media;
import androidx.appcompat.app.AppCompatActivity;
import androidx.core.app.NotificationCompat;
import android.app.Notification;
import android.app.NotificationChannel;
import android.app.NotificationManager;
import android.app.PendingIntent;
import android.content.Intent;
import android.graphics.BitmapFactory;
import android.os.Build;
import android.os.Bundle;
import android.view.View;
import android.widget.Button;
public class MainActivity extends AppCompatActivity {
@Override
protected void onCreate(Bundle savedInstanceState) {
super.onCreate(savedInstanceState);
setContentView(R.layout.activity_main);
Button sendNotice=(Button)findViewById(R.id.send_notice);
sendNotice.setOnClickListener(new View.OnClickListener() {
@Override
public void onClick(View view) {
Intent intent =new Intent(MainActivity.this,NotificationActivity.class);
PendingIntent pendingIntent=PendingIntent.getActivity(MainActivity.this,0,intent, PendingIntent.FLAG_IMMUTABLE);
NotificationManager manager=(NotificationManager) getSystemService(NOTIFICATION_SERVICE);
if (Build.VERSION.SDK_INT >= Build.VERSION_CODES.O) {
String channelId = "default";
String channelName = "默认通知";
manager.createNotificationChannel(new NotificationChannel(channelId, channelName, NotificationManager.IMPORTANCE_HIGH));
}
Notification notification = new NotificationCompat.Builder(MainActivity.this,"default")
.setContentTitle("My notification")
.setContentText("Hello World!")
.setWhen(System.currentTimeMillis())
.setSmallIcon(R.mipmap.ic_launcher)
.setLargeIcon(BitmapFactory.decodeResource(getResources(), R.mipmap.ic_launcher))
.setContentIntent(pendingIntent).build();//添加pendingIntent
manager.notify(1,notification);
}
});
}
}
|

然而,点击之后系统状态上的通知图标还没有消失。如果我们没有在代码中对该通知进行取消,它就会一直显示在系统的状态栏上。解决的方法有两种,一种是在NotificationCompat.Builder中再连缀一个setAutoCancel()方法,一种是显式地调用NotificationManager的cancel()方法将它取消
第一种,创建通知时使用.setAutoCancel()传入true即可(比较方便)
1
2
3
|
Notification notification = new NotificationCompat.Builder(MainActivity.this,"default")
.setAutoCancel(true)
.build();
|
第二种,给NoticificationActivity添加代码,使用NotificationManager.cancel()
注意传入的id要和调用manager.notify()通知时的id一致
1
2
3
4
5
6
7
8
9
10
11
12
13
14
15
16
|
package com.example.chapter8_media;
import android.app.NotificationManager;
import android.os.Bundle;
import androidx.appcompat.app.AppCompatActivity;
public class NotificationActivity extends AppCompatActivity {
@Override
protected void onCreate(Bundle savedInstanceState) {
super.onCreate(savedInstanceState);
setContentView(R.layout.activity_notification);
NotificationManager notificationManager=(NotificationManager) getSystemService(NOTIFICATION_SERVICE);
notificationManager.cancel(1);//主动调用cancel关闭通知,注意id要对应
}
}
|
8.1.2 通知的进阶技巧
NotificationCompat.Builder中提供了非常丰富的API来让我们创建出更加多样的通知效果,从中选一些比较常用的API来进行学习。先来看看setSound()方法,它可以在通知发出的时候播放一段音频。
setSound()方法接收一个Uri参数,所以在指定音频文件的时候还需要先获取到音频文件对应的URI。比如说,每个手机的/system/media/audio/ringtones目录下都有很多的音频文件,我们可以从中随便选一个音频文件,那么在代码中就可以这样指定:
1
2
3
|
Notification notification = new NotificationCompat.Builder(MainActivity.this,"default")
.setSound(Uri.fromFile(new File("/system/media/audio/ringtones/music.mp3")))
.build();
|
我们还可以使用.setVibrate()方法,在通知到来的时候让手机进行振动。需要传入一个长整型的数组,用于设置手机静止和振动的时长,以毫秒为单位。
下标为0的值表示手机静止的时长,下标为1的值表示手机振动的时长,下标为2的值又表示手机静止的时长,以此类推。所以,如果想要让手机在通知到来的时候立刻振动1秒,然后静止1秒,再振动1秒,代码就可以写成:
1
2
3
4
|
Notification notification = new NotificationCompat.Builder(MainActivity.this,"default")
...
.setVibrate(new long[] {0,1000,1000,1000})
.build();
|
以上代码在Android 8.0后无效,由**NotificationChannel#setVibrationPattern(long[])**代替setVibrate
并且无法指定震动频率,等价于enableVibration(true),实际上震动为系统默认
1
2
3
4
5
6
7
8
|
if (Build.VERSION.SDK_INT >= Build.VERSION_CODES.O) {
String channelId = "default";
String channelName = "默认通知";
NotificationChannel notificationChannel=new NotificationChannel(channelId,channelName,NotificationManager.IMPORTANCE_HIGH);
notificationChannel.enableVibration(true);
notificationChannel.setVibrationPattern(new long[]{1000,1000,1000,1000,1000,1000});
manager.createNotificationChannel(notificationChannel);
}
|
不过,想要控制手机振动还需要声明权限。因此,我们还得编辑AndroidManifest.xml文件,加入如下声明:
1
|
<uses-permission android:name="android.permission.VIBRATE"/>
|
下面我们来看一下如何在通知到来时控制手机LED灯的显示。现在的手机基本上都会前置一个LED灯,当有未接电话或未读短信,而此时手机又处于锁屏状态时,LED灯就会不停地闪烁,提醒用户去查看
我们可以使用setLights()方法来实现这种效果,setLights()方法接收3个参数:
- 第一个参数用于指定LED灯的颜色
- 第二个参数用于指定LED灯亮起的时长,以毫秒为单位
- 第三个参数用于指定LED灯暗去的时长,也是以毫秒为单位
所以,当通知到来时,如果想要实现LED灯以绿色的灯光一闪一闪的效果,就可以写成:
1
2
3
|
Notification notification = new NotificationCompat.Builder(MainActivity.this,"default")
.setLights(Color.GREEN,1000,1000)
.build();
|
如果你不想进行那么多繁杂的设置,也可以直接使用通知的默认效果,它会根据当前手机的环境来决定播放什么铃声,以及如何振动,写法如下:
1
2
3
|
Notification notification = new NotificationCompat.Builder(MainActivity.this,"default")
.setDefaults(NotificationCompat.DEFAULT_ALL)
.build();
|
注意,以上所涉及的这些进阶技巧都要在手机上运行才能看得到效果,模拟器是无法表现出振动以及LED灯闪烁等功能的
在Android8.0以后,使用如下代码替代
1
2
|
notificationChannel.enableLights(true);
notificationChannel.setLightColor(Color.GREEN);
|
8.1.3 通知的高级功能
继续观察NotificationCompat.Builder这个类,你会发现里面还有很多API是我们没有使用过的
setStyle()方法,这个方法允许我们构建出富文本的通知内容,也就是说通知中不光可以有文字和图标,还可以包含更多的东西setStyle()方法接收一个NotificationCompat.Style参数,这个参数就是用来构建具体的富文本信息的,如长文字、图片等
在开始使用setStyle()方法之前,我们先来做一个试验吧,之前的通知内容都比较短,如果设置成很长的文字会是什么效果呢?
1
2
3
4
|
Notification notification = new NotificationCompat.Builder(MainActivity.this,"default")
.setContentTitle("My notification")
.setContentText("Learn how to build notifications,send and sync data, and use voice actions.Get the official Android IDE and developer tools to build apps for Android.")
.build();
|
现在重新运行程序并触发通知,效果如下,过长文本会被省略

1
|
setStyle(new NotificationCompat.BigPictureStyle().bigPicture(BitmapFactory.decodeResource(getResources(),R.drawable.img)))
|
另外
- PRIORITY_DEFAULT 表示默认的重要程度,和不设置效果是一样的
- PRIORITY_MIN 表示最低的重要程度,系统可能只会在特定的场景才显示这条通知,比如用户下拉状态栏的时候
- PRIORITY_LOW 表示较低的重要程度,系统可能会将这类通知缩小,或改变其显示的顺序,将其排在更重要的通知之后
- PRIORITY_HIGH 表示较高的重要程度,系统可能会将这类通知放大,或改变其显示的顺序,将其排在比较靠前的位置
- PRIORITY_MAX 表示最高的重要程度,这类通知消息必须要让用户立刻看到,甚至需要用户做出响应操作 具体写法如下
1
2
3
|
Notification notification = new NotificationCompat.Builder(MainActivity.this,"default")
.setPriority(NotificationCompat.PRIORITY_MAX)
.build();
|
这里我们将通知的重要程度设置成了最高,表示这是一条非常重要的通知,要求用户必须立刻看到
8.2 调用摄像头和相册
8.2.1 调用摄像头拍照
8.2.2 从相册中选择图片
8.3 播放多媒体文件
8.3.1 播放音频
8.3.2 播放视频
第9章 使用网络技术
作为开发者,我们需要考虑如何利用网络来编写出更加出色的应用程序,像QQ、微博、微信等常见的应用都会大量使用网络技术。本章主要学习如何在手机端使用HTTP协议和服务器端进行网络交互,并对服务器返回的数据进行解析,这也是Android中最常使用到的网络技术
9.1 WebView的用法
比如说,要求在应用程序里展示一些网页。加载和显示网页通常都是浏览器的任务,但是需求里又明确指出,不允许打开系统浏览器,而我们当然也不可能自己去编写一个浏览器出来,这时应该怎么办呢?
Android早就已经考虑到了,并提供了一个WebView控件,借助它就可以在自己的应用程序里嵌入一个浏览器,从而非常轻松地展示各种各样的网页。WebView的用法也是相当简单,下面我们就通过一个例子来学习一下吧。新建项目Chapter9_Web,修改activity_main.xml:
1
2
3
4
5
6
7
8
9
|
<?xml version="1.0" encoding="utf-8"?>
<LinearLayout xmlns:android="http://schemas.android.com/apk/res/android"
android:layout_width="match_parent"
android:layout_height="match_parent">
<WebView
android:layout_width="match_parent"
android:layout_height="match_parent"
android:id="@+id/web_view"/>
</LinearLayout>
|
在布局文件中使用到了一个新的控件:WebView。这个控件用来显示网页的,给它设置了一个id,并让它充满整个屏幕。然后修改MainActivity中的代码,如下所示:
1
2
3
4
5
6
7
8
9
10
11
12
13
14
15
16
17
18
19
|
package com.example.webviewtest;
import androidx.appcompat.app.AppCompatActivity;
import android.os.Bundle;
import android.webkit.WebView;
import android.webkit.WebViewClient;
public class MainActivity extends AppCompatActivity {
@Override
protected void onCreate(Bundle savedInstanceState) {
super.onCreate(savedInstanceState);
setContentView(R.layout.activity_main);
WebView webView=(WebView) findViewById(R.id.web_view);
webView.getSettings().setJavaScriptEnabled(true);//支持js脚本
webView.setWebViewClient(new WebViewClient());//保证web页面在当前webview显示,而非打开系统浏览器
webView.loadUrl("https://www.baidu.com");
}
}
|
MainActivity中,首先使用findViewById()方法获取到了WebView的实例,然后调用WebView的getSettings()方法可以去设置一些浏览器的属性,这里只是调用了setJavaScriptEnabled()方法来让WebView支持JavaScript脚本
接下来,调用了WebView的setWebViewClient()方法,并传入了一个WebViewClient的实例。这段代码的作用是,当需要从一个网页跳转到另一个网页时,我们希望目标网页仍然在当前WebView中显示,而不是打开系统浏览器。
最后一步,调用WebView的loadUrl()方法,并将网址传入,即可展示相应网页的内容
注意: 由于本程序使用到了网络功能,而访问网络是需要声明权限的,因此需要加入权限声明,如下所示
1
2
3
4
5
6
7
8
9
|
<?xml version="1.0" encoding="utf-8"?>
<manifest xmlns:android="http://schemas.android.com/apk/res/android"
xmlns:tools="http://schemas.android.com/tools">
<uses-permission android:name="android.permission.INTERNET"/>
<application
android:usesCleartextTraffic="true"
...>
</application>
</manifest>
|
运行效果如下

9.2 使用HTTP协议访问网络
如果说真的要去深入分析HTTP协议,可能需要花费整整一本书的篇幅。这里只需要稍微了解一些就足够了,它的工作原理特别简单,就是客户端向服务器发出一条HTTP请求,服务器收到请求之后会返回一些数据给客户端,然后客户端再对这些数据进行解析和处理就可以了。
比如,上一节中使用到的WebView控件,其实也就是我们向服务器发起了一条HTTP请求,接着服务器分析出我们想要访问的页面,于是会把该网页的HTML代码进行返回,然后WebView再调用手机浏览器的内核对返回的HTML代码进行解析,最终将页面展示出来。
简单来说,WebView已经在后台帮我们处理好了发送HTTP请求、接收服务响应、解析返回数据,以及最终的页面展示这几步工作,不过由于它封装得实在是太好了,反而使得我们不能那么直观地看出HTTP协议到底是如何工作的。因此,接下来就让我们通过手动发送HTTP请求的方式,来更加深入地理解一下这个过程。
9.2.1 使用HttpURLConnection
过去,Android上发送HTTP请求一般有两种方式:HttpURLConnection和HttpClient
由于HttpClient存在API数量过多、扩展困难等缺点,在Android 6.0系统中,HttpClient被完全移除,此功能被正式弃用,因此本小节我们学习现在官方建议使用的HttpURLConnection的用法
首先需要获取到HttpURLConnection的实例,一般只需new出一个URL对象,传入目标的网络地址,然后调用openConnection()方法即可
1
2
|
URL url = new URL("http://baidu.com");
HttpURLConnection connection = (HttpURLConnection)url.openConnection();
|
在得到了HttpURLConnection的实例之后,可以设置一下HTTP请求所使用的方法。常用的方法主要有两个:GET和POST。GET表示希望从服务器那里获取数据,而POST则表示希望提交数据给服务器。写法如下
1
|
connection.setRequestMethod("GET");
|
接下来,就可以进行一些自由的定制了,比如设置连接超时、读取超时的毫秒数,以及服务器希望得到的一些消息头等。这部分内容根据自己的实际情况进行编写,示例写法如下:
1
2
|
connection.setConnectTimeout(8000);
connection.setReadTimeout(8000);
|
之后再调用getInputStream()方法就可以获取到服务器返回的输入流了,剩下的任务就是对输入流进行读取,如下所示:
1
|
InputStream in = connection.getInputStream();
|
最后,可以调用disconnect()方法将这个HTTP连接关闭掉,如下所示:
1
|
connection.disconnect();
|
下面通过一个具体的例子来真正体验一下HttpURLConnection的用法。修改activity_main.xml,如下所示:
1
2
3
4
5
6
7
8
9
10
11
12
13
14
15
16
17
18
19
|
<?xml version="1.0" encoding="utf-8"?>
<LinearLayout xmlns:android="http://schemas.android.com/apk/res/android"
android:orientation="vertical"
android:layout_width="match_parent"
android:layout_height="match_parent">
<Button
android:layout_width="match_parent"
android:layout_height="wrap_content"
android:id="@+id/send_request"
android:text="Send Request"/>
<ScrollView
android:layout_width="match_parent"
android:layout_height="match_parent">
<TextView
android:layout_width="match_parent"
android:layout_height="wrap_content"
android:id="@+id/response_text"/>
</ScrollView>
</LinearLayout>
|
使用了一个新的控件:ScrollView,它是用来做什么的呢?由于手机屏幕的空间一般都比较小,有些时候过多的内容一屏是显示不下的,借助ScrollView控件的话,我们就可以以滚动的形式查看屏幕外的那部分内容。另外,布局中还放置了一个Button和一个TextView, Button用于发送HTTP请求,TextView用于将服务器返回的数据显示出来。接着修改MainActivity中的代码
1
2
3
4
5
6
7
8
9
10
11
12
13
14
15
16
17
18
19
20
21
22
23
24
25
26
27
28
29
30
31
32
33
34
35
36
37
38
39
40
41
42
43
44
45
46
47
48
49
50
51
52
53
54
55
56
57
58
59
60
61
62
63
64
65
66
67
68
69
70
71
72
73
74
75
76
77
78
79
80
81
82
83
|
package com.example.chapter9_web;
import androidx.appcompat.app.AppCompatActivity;
import android.os.Bundle;
import android.view.View;
import android.widget.Button;
import android.widget.TextView;
import java.io.BufferedReader;
import java.io.IOException;
import java.io.InputStream;
import java.io.InputStreamReader;
import java.io.Reader;
import java.net.HttpURLConnection;
import java.net.URL;
public class MainActivity extends AppCompatActivity implements View.OnClickListener{
TextView responseText;
@Override
protected void onCreate(Bundle savedInstanceState) {
super.onCreate(savedInstanceState);
setContentView(R.layout.activity_main);
Button sendRequest =(Button) findViewById(R.id.send_request);
responseText=(TextView) findViewById(R.id.response_text);
sendRequest.setOnClickListener(this);
}
@Override
public void onClick(View view) {
if (view.getId()==R.id.send_request){
sendRequestWithHttpURLConnection();
}
}
private void sendRequestWithHttpURLConnection(){
new Thread(new Runnable() {
@Override
public void run() {
HttpURLConnection connection=null;
BufferedReader reader=null;
try {
URL url=new URL("http://www.baidu.com");
connection=(HttpURLConnection) url.openConnection();
connection.setRequestMethod("GET");
connection.setConnectTimeout(8000);
connection.setReadTimeout(8000);
InputStream in =connection.getInputStream();
//下面对获取到的输入流进行读取
reader=new BufferedReader(new InputStreamReader(in));
String line;
StringBuilder response=new StringBuilder();
while ((line =reader.readLine())!=null){
response.append(line);
}
showResponse(response.toString());
}catch (Exception e){
e.printStackTrace();
}finally {
if (reader!=null){
try {
reader.close();
}catch (IOException e){
e.printStackTrace();
}
}
if (connection!=null){
connection.disconnect();
}
}
}
}).start();
}
private void showResponse(final String response){
runOnUiThread(new Runnable() {
@Override
public void run() {
responseText.setText(response);
}
});
}
}
|
在Send Request按钮的点击事件里调用了sendRequestWithHttpURLConnection()方法,在这个方法中先是开启了一个子线程,然后在子线程里使用HttpURLConnection发出一条HTTP请求,请求的目标地址就是百度的首页。接着利用BufferedReader对服务器返回的流进行读取,并将结果传入到了showResponse()方法中。
而在showResponse()方法里则是调用了一个runOnUiThread()方法,然后在这个方法的匿名类参数中进行操作,将返回的数据显示到界面上。为什么要用这个runOnUiThread()方法呢?因为Android不允许在子线程中进行UI操作,需要通过这个方法将线程切换到主线程,再更新UI元素
运行效果如下,返回的html文件以文本形式展现

服务器返回给我们的就是这种HTML代码,只是通常情况下浏览器都会将这些代码解析成漂亮的网页后再展示出来。
那么如果是想要提交数据给服务器应该怎么办呢?只需要将HTTP请求的方法改成POST,并在获取输入流之前把要提交的数据写出即可。注意每条数据都要以键值对的形式存在,数据与数据之间用“&”符号隔开,比如说我们想要向服务器提交用户名和密码,就可以这样写(类似url中的get方法传参形式)
1
2
3
|
connection.setRequestMethod("POST");
DataOutputStream outputStream = new DataOutputStream(connection.getOutputStream()) ;
outputStream.writeBytes("username=admin&&password=123456");
|
9.2.2 使用OkHttp
当然,我们并不是只能使用HttpURLConnection,完全没有任何其他选择,事实上在开源盛行的今天,有许多出色的网络通信库都可以替代原生的HttpURLConnection,而其中OkHttp无疑是做得最出色的一个。
OkHttp是由Square公司开发的,这个公司在开源事业上面贡献良多,除OkHttp外,还开发了Picasso、Retrofit等著名的开源项目。OkHttp不仅在接口封装上面做得简单易用,就连在底层实现上也是自成一派,比起原生的HttpURLConnection,可以说是有过之而无不及,现在已经成了广大Android开发者首选的网络通信库。那么本小节我们就来学习一下OkHttp的用法,OkHttp项目地址:https://github.com/square/okhttp
在使用OkHttp之前,我们需要先在项目中添加OkHttp库的依赖。编辑app/build.gradle文件,在dependencies闭包中添加如下内容:
1
|
implementation("com.squareup.okhttp3:okhttp:4.12.0")
|
添加上述依赖会自动下载两个库,一个是OkHttp库,一个是Okio库,后者是前者的通信基础。
下面我们来看一下OkHttp的具体用法,首先需要创建一个OkHttpClient的实例,如下所示:
1
|
OkHttpClient client = new OkHttpClient();
|
接下来,如果想要发起一条HTTP请求,就需要创建一个Request对象,通过url()方法来设置目标的网络地址
1
2
3
|
Request request = new Request.Builder()
.url("https://www.baidu.com")
.build();
|
之后,调用OkHttpClient的newCall()方法创建一个Call对象,并调用它的execute()方法发送请求并获取服务器返回的数据,写法如下:
1
|
Response response = client.newCall(request).execute();
|
其中,Response对象就是服务器返回的数据了,我们可以使用如下写法来得到返回的具体内容:
1
|
String responseData = response.body().string();
|
如果是发起一条POST请求会比GET请求稍微复杂一点,我们需要先构建出一个RequestBody对象来存放待提交的参数,如下所示:
1
2
3
4
|
RequestBody requestBody = new FormBody.Builder()
.add("username","admin")
.add("password","123456")
.build();
|
然后,在Request.Builder中调用一下post()方法,并将RequestBody对象传入:
1
2
3
4
|
Request request = new Request.Builder()
.url("http://www.baidu.com")
.post(requestBody)
.build();
|
接下来的操作就和GET请求一样了,调用execute()方法来发送请求并获取服务器返回的数据即可。
书中后面所有网络相关的功能我们都将会使用OkHttp来实现,到时候再进行进一步的学习。那么现在我们先把NetworkTest这个项目改用OkHttp的方式再实现一遍吧。由于布局部分完全不用改动,所以现在直接修改MainActivity中的代码,如下所示:
1
2
3
4
5
6
7
8
9
10
11
12
13
14
15
16
17
18
|
private void sendRequestWithOkHttp(){
new Thread(new Runnable() {
@Override
public void run() {
try {
OkHttpClient okHttpClient=new OkHttpClient();
Request request=new Request.Builder()
.url("https://www.baidu.com")
.build();
Response response=okHttpClient.newCall(request).execute();
String responseData=response.body().string();
showResponse(responseData);
}catch (Exception e){
e.printStackTrace();
}
}
}).start();
}
|
这里并没有做太多的改动,只是添加了一个sendRequestWithOkHttp()方法,并在Send Request按钮的点击事件里去调用这个方法。在这个方法中同样还是先开启了一个子线程,然后在子线程里使用OkHttp发出一条HTTP请求,请求的目标地址还是百度的首页,OkHttp的用法也正如前面所介绍的一样。
最后仍然还是调用了showResponse()方法来将服务器返回的数据显示到界面上。重新运行一下程序,点击SendRequest按钮后,测试结果OK,由此证明,使用OkHttp来发送HTTP请求的功能也已经成功实现了。
9.3 解析XML格式数据
通常情况下,每个需要访问网络的应用程序都会有一个自己的服务器,我们可以向服务器提交数据,也可以从服务器上获取数据。不过这个时候就出现了一个问题,这些数据到底要以什么样的格式在网络上传输呢?随便传递一段文本肯定是不行的,因为另一方根本就不会知道这段文本的用途是什么。因此,一般我们都会在网络上传输一些格式化后的数据,这种数据会有一定的结构规格和语义,当另一方收到数据消息之后就可以按照相同的结构规格进行解析,从而取出他想要的那部分内容。
在网络上传输数据时最常用的格式有两种:XML和JSON,下面我们就来一个一个地进行学习,本节首先学习一下如何解析XML格式的数据。在开始之前我们还需要先解决一个问题,就是从哪儿才能获取一段XML格式的数据呢?这里我们学习搭建一个最简单的Web服务器,在这个服务器上提供一段XML文本,然后我们在程序里去访问这个服务器,再对得到的XML文本进行解析。
搭建Web服务器其实非常简单,有很多的服务器类型可供选择,这里使用kali linux虚拟机运行apatch服务器,保证虚拟机直连物理网络,和手机wifi处于同一网段
1
2
|
systemctl start apache2
systemctl status apache2
|
接下来创建一个get_data.xml
1
2
3
4
5
6
7
8
9
10
11
12
13
14
15
16
17
|
<apps>
<app>
<id>1</id>
<name>Google Maps</name>
<version>1.0</version>
</app>
<app>
<id>2</id>
<name>Chrome</name>
<version>2.1</version>
</app>
<app>
<id>3</id>
<name>Google Play</name>
<version>2.3</version>
</app>
</apps>
|
移动到/var/www/html/路径下(该路径为linux下apache服务器默认的网页根目录)
1
|
sudo mv get_data.xml /var/www/html/
|
主机可访问xml文件即可
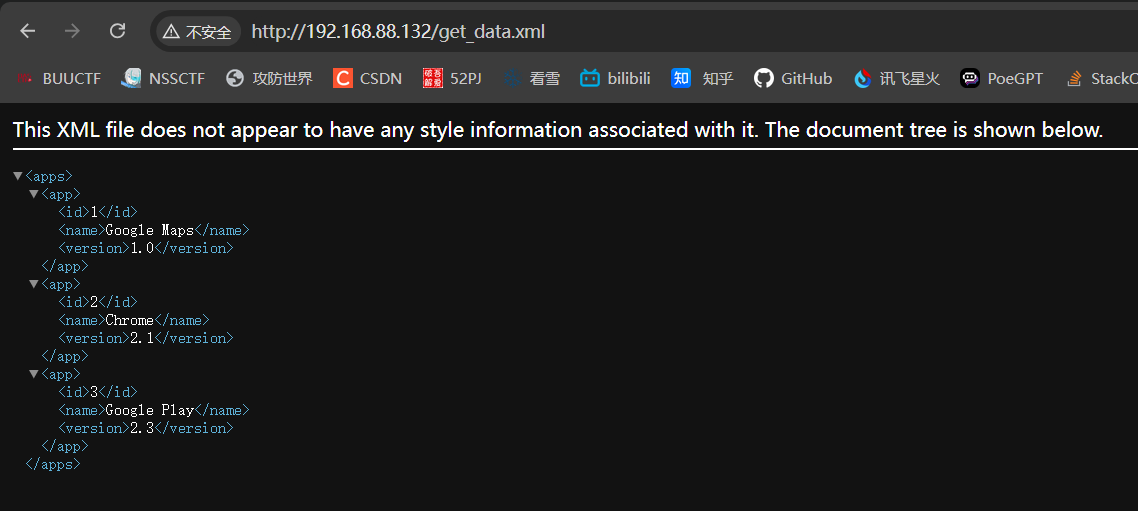
准备工作结束,接下来开始解析xml数据
9.3.1 Pull解析方式
继续使用Chapter9_Web项目,修改MainActivity
1
2
3
4
5
6
7
8
9
10
11
12
13
14
15
16
17
18
19
20
21
22
23
24
25
26
27
28
29
30
31
32
33
34
35
36
37
38
39
40
41
42
43
44
45
46
47
48
49
50
51
52
53
54
55
56
57
58
59
60
61
62
63
64
65
66
67
68
69
70
71
72
|
private void parseXMLWithPull(String xmlData){
try {
//通过Xml解析工厂获取实例
XmlPullParserFactory xmlPullParserFactory=XmlPullParserFactory.newInstance();
XmlPullParser xmlPullParser=xmlPullParserFactory.newPullParser();
//为解析器提供xml流
xmlPullParser.setInput(new StringReader(xmlData));
//获取事件的类型
int eventType=xmlPullParser.getEventType();
String id="" ;
String name="";
String version="";
//直到文件尾
while (eventType!=XmlPullParser.END_DOCUMENT){
String nodeName=xmlPullParser.getName();
//用switch对不同事件进行处理
switch (eventType){
//开始读标签,通过解析器的getName方法获得标签名进行比较
case XmlPullParser.START_TAG:{
if ("id".equals(nodeName)){
//获取节点内容
id=xmlPullParser.nextText();
}else if ("name".equals(nodeName)){
name=xmlPullParser.nextText();
}else if ("version".equals(nodeName)){
version=xmlPullParser.nextText();
}
break;
}
//标签结束,进行打印
case XmlPullParser.END_TAG:{
if ("app".equals(nodeName)){
Log.d("MainActivity","id is "+id);
Log.d("MainActivity","name is "+name);
Log.d("MainActivity","version is "+version);
}
break;
}
default:
break;
}
//解析下一个元素
eventType=xmlPullParser.next();
}
} catch (Exception e){
e.printStackTrace();
}
}
private void sendRequestWithOkHttp(){
new Thread(new Runnable() {
@Override
public void run() {
try {
OkHttpClient okHttpClient=new OkHttpClient();
Request request=new Request.Builder()
.url("http://192.168.88.132/get_data.xml")
.build();
Log.d("MainActivity","Get Response Successed!Parsing XML....");
Response response=okHttpClient.newCall(request).execute();
String responseData=response.body().string();
parseXMLWithPull(responseData);
}catch (Exception e){
e.printStackTrace();
}
}
}).start();
}
|
运行效果如下
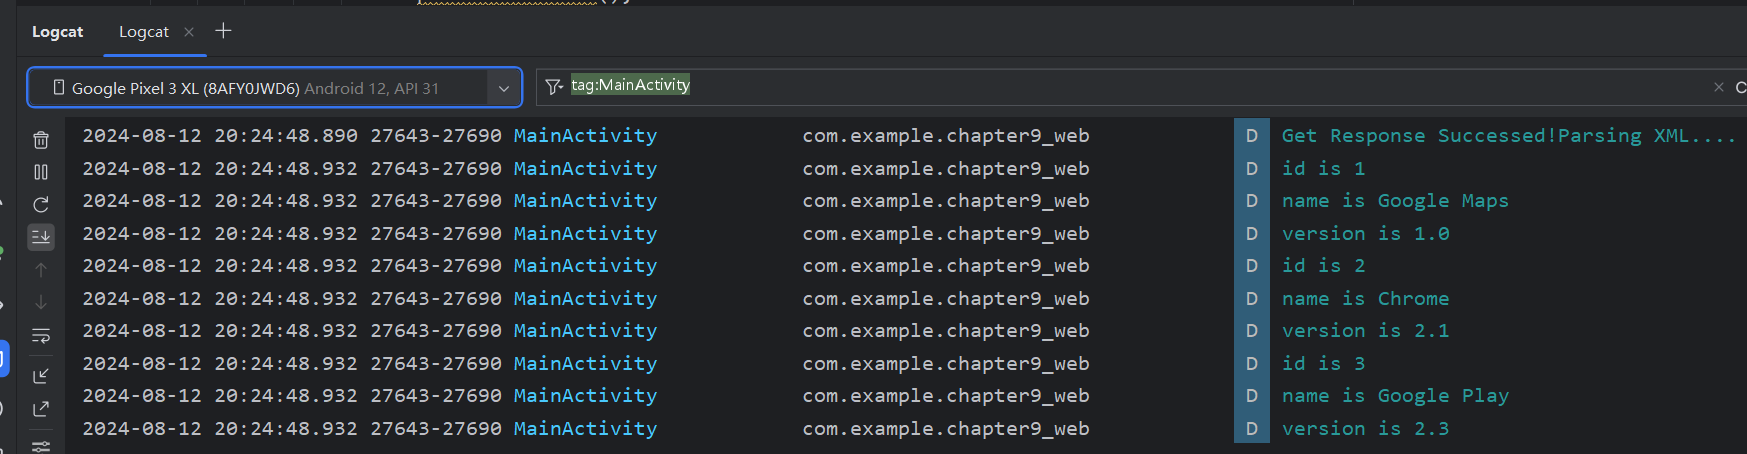
在得到了服务器返回的数据后,调用parseXMLWithPull()方法解析服务器返回的数据parseXMLWithPull()方法中的代码,首先要获取到一个XmlPullParserFactory的实例,并借助这个实例得到XmlPullParser对象,然后调用XmlPullParser的setInput()方法将服务器返回的XML数据设置进去就可以开始解析了。
解析的过程也非常简单,通过getEventType()可以得到当前的解析事件,然后在一个while循环中不断地进行解析,如果当前的解析事件不等于XmlPullParser.END_DOCUMENT,说明解析工作还没完成,调用next()方法后可以获取下一个解析事件。
在while循环中,我们通过getName()方法得到当前节点的名字,如果发现节点名等于id、name或version,就调用nextText()方法来获取节点内具体的内容,每当解析完一个app节点后就将获取到的内容打印出来。
9.3.2 SAX解析方式
Pull解析方式虽然非常好用,但它并不是我们唯一的选择。SAX解析也是一种特别常用的XML解析方式,虽然它的用法比Pull解析要复杂一些,但在语义方面会更加清楚。通常情况下我们都会新建一个类继承自DefaultHandler,并重写父类的5个方法,如下所示:
1
2
3
4
5
6
7
8
9
10
11
12
13
14
15
16
17
18
19
20
21
22
23
24
25
26
27
28
29
30
31
32
|
package com.example.networktest;
import org.xml.sax.Attributes;
import org.xml.sax.SAXException;
import org.xml.sax.helpers.DefaultHandler;
public class ContentHandler extends DefaultHandler {
@Override
public void startDocument() throws SAXException {
super.startDocument();
}
@Override
public void startElement(String uri, String localName, String qName, Attributes attributes) throws SAXException {
super.startElement(uri, localName, qName, attributes);
}
@Override
public void characters(char[] ch, int start, int length) throws SAXException {
super.characters(ch, start, length);
}
@Override
public void endElement(String uri, String localName, String qName) throws SAXException {
super.endElement(uri, localName, qName);
}
@Override
public void endDocument() throws SAXException {
super.endDocument();
}
}language-java复制代码
|
startDocument()方法会在开始XML解析的时候调用;
startElement()方法会在开始解析某个节点的时候调用;
characters()方法会在获取节点中内容的时候调用;
endElement()方法会在完成解析某个节点的时候调用;
endDocument()方法会在完成整个XML解析的时候调用。
其中,startElement()、characters()和endElement()这3个方法是有参数的,从XML中解析出的数据就会以参数的形式传入到这些方法中。需要注意的是,在获取节点中的内容时,characters()方法可能会被调用多次,一些换行符也被当作内容解析出来,我们需要针对这种情况在代码中做好控制。那么下面就让我们尝试用SAX解析的方式来实现和上一小节中同样的功能吧。新建一个ContentHandler类继承自DefaultHandler,并重写父类的5个方法,如下所示:
1
2
3
4
5
6
7
8
9
10
11
12
13
14
15
16
17
18
19
20
21
22
23
24
25
26
27
28
29
30
31
32
33
34
35
36
37
38
39
40
41
42
43
44
45
46
47
48
49
50
51
52
53
54
55
56
57
58
|
package com.example.networktest;
import android.util.Log;
import org.xml.sax.Attributes;
import org.xml.sax.SAXException;
import org.xml.sax.helpers.DefaultHandler;
public class ContentHandler extends DefaultHandler {
private String nodeName;
private StringBuilder id;
private StringBuilder name;
private StringBuilder version;
@Override
public void startDocument() throws SAXException {
id=new StringBuilder();
name =new StringBuilder();
version=new StringBuilder();
}
@Override
public void startElement(String uri, String localName, String qName, Attributes attributes) throws SAXException {
//记录当前节点名字
nodeName=localName;
}
@Override
public void characters(char[] ch, int start, int length) throws SAXException {
//根据当前的节点名判断内容添加到哪一个StringBUilder对象中
if ("id".equals(nodeName)){
id.append(ch,start,length);
}
else if ("name".equals(nodeName)){
name.append(ch,start,length);
}else if ("version".equals(nodeName)){
version.append(ch,start,length);
}
}
@Override
public void endElement(String uri, String localName, String qName) throws SAXException {
if ("app".equals(localName)){
Log.d("ContentHandler","id is + "+id.toString().trim());
Log.d("ContentHandler","name is + "+name.toString().trim());
Log.d("ContentHandler","version is + "+version.toString().trim());
//最后将StringBuilder清空
id.setLength(0);
name.setLength(0);
version.setLength(0);
}
}
@Override
public void endDocument() throws SAXException {
super.endDocument();
}
}language-java复制代码
|
可以看到,我们首先给id、name和version节点分别定义了一个StringBuilder对象,并在startDocument()方法里对它们进行了初始化。
每当开始解析某个节点的时候,startElement()方法就会得到调用,其中localName参数记录着当前节点的名字,这里我们把它记录下来。
接着在解析节点中具体内容的时候就会调用characters()方法,我们会根据当前的节点名进行判断,将解析出的内容添加到哪一个StringBuilder对象中。
最后在endElement()方法中进行判断,如果app节点已经解析完成,就打印出id、name和version的内容。
需要注意的是,目前id、name和version中都可能是包括回车或换行符的,因此在打印之前我们还需要调用一下trim()方法,并且打印完成后还要将StringBuilder的内容清空掉,不然的话会影响下一次内容的读取。
接下来的工作就非常简单了,修改MainActivity中的代码,如下所示:
1
2
3
4
5
6
7
8
9
10
11
12
13
14
15
16
17
18
19
20
21
22
23
24
25
26
27
28
29
30
31
32
|
private void ParseXmlWithSAX(String xmldata){
try {
SAXParserFactory saxParserFactory=SAXParserFactory.newInstance();
XMLReader xmlReader=saxParserFactory.newSAXParser().getXMLReader();
ContentHandler handler=new ContentHandler();
//将ContentHandler的实例设置到xmlReader中
xmlReader.setContentHandler(handler);
//开始解析
xmlReader.parse(new InputSource(new StringReader(xmldata)));
}catch (Exception e){
e.printStackTrace();
}
}
private void sendRequestWithOkHttp(){
new Thread(new Runnable() {
@Override
public void run() {
try {
OkHttpClient okHttpClient=new OkHttpClient();
Request request=new Request.Builder()
.url("http://10.0.2.2/get_data.xml")
.build();
Response response=okHttpClient.newCall(request).execute();
String responseData=response.body().string();
ParseXmlWithSAX(responseData);
}catch (Exception e){
e.printStackTrace();
}
}
}).start();
}
|
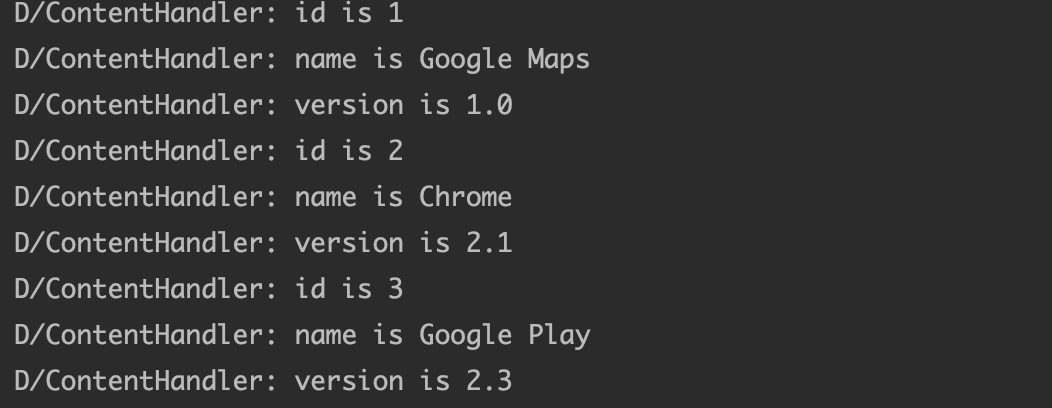
在得到了服务器返回的数据后,我们这次去调用parseXMLWithSAX()方法来解析XML数据。parseXMLWithSAX()方法中先是创建了一个SAXParserFactory的对象,然后再获取到XMLReader对象,接着将我们编写的ContentHandler的实例设置到XMLReader中,最后调用parse()方法开始执行解析就好了。
9.4 解析JSON格式数据
比起XML, JSON的主要优点在于它的体积更小,在网络上传输的时候可以更省流量,
但缺点在于,它的语义性较差,看起来不如XML直观。
新建get_data.json并推送至http服务根目录
1
2
3
|
[{"id":"5","version":"5.5","name":"Clash of Clans"},
{"id":"6","version":"7.0","name":"Boom Beach"},
{"id":"7","version":"3.5","name":"Clash Royale"}]
|
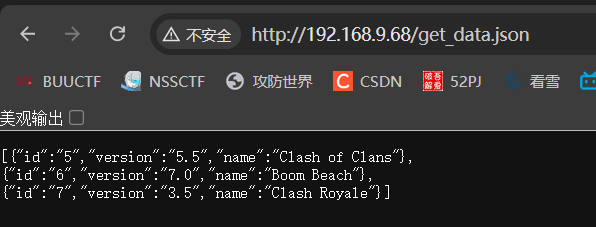
9.4.1 使用JSONObject
类似地,解析JSON数据也有很多种方法,可以使用官方提供的JSONObject,也可以使用谷歌的开源库GSON。另外,一些第三方的开源库如Jackson、FastJSON等也非常不错。本节中我们就来学习一下前两种解析方式的用法。修改MainActivity中的代码,如下所示:
1
2
3
4
5
6
7
8
9
10
11
12
13
14
15
16
17
18
19
20
21
22
23
24
25
26
27
28
29
30
31
32
33
34
|
private void parseJSONWithJSONObject(String jsonData){
try {
JSONArray jsonArray=new JSONArray(jsonData);
for (int i = 0; i < jsonArray.length(); i++) {
JSONObject jsonObject=jsonArray.getJSONObject(i);
String id =jsonObject.getString("id");
String name =jsonObject.getString("name");
String version=jsonObject.getString("version");
Log.d("MainActivity" ,"id is "+id);
Log.d("MainActivity" ,"name is "+name);
Log.d("MainActivity" ,"version is "+version);
}
}catch (Exception e){
e.printStackTrace();
}
}
private void sendRequestWithOkHttp(){
new Thread(new Runnable() {
@Override
public void run() {
try {
OkHttpClient okHttpClient=new OkHttpClient();
Request request=new Request.Builder()
.url("http://192.168.88.132/get_data.json")
.build();
Response response=okHttpClient.newCall(request).execute();
String responseData=response.body().string();
parseJSONWithJSONObject(responseData);
}catch (Exception e){
e.printStackTrace();
}
}
}).start();
}
|
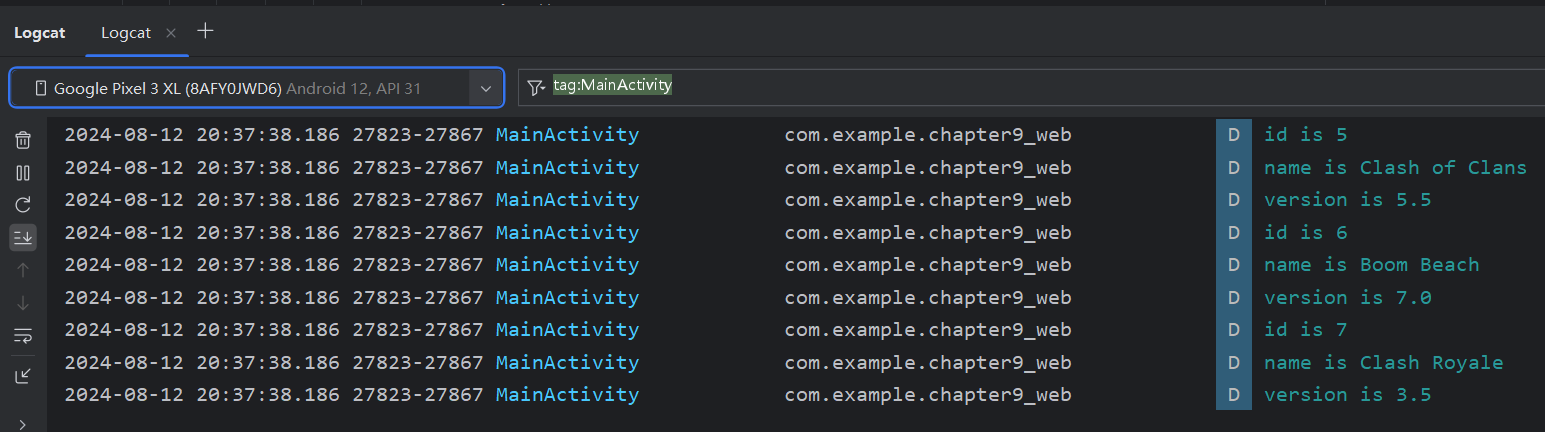
9.4.2 使用GSON
谷歌提供的GSON开源库可以让解析JSON数据的工作变得非常简单,想要使用这个功能必须要在项目中添加GSON库的依赖。编辑app/build.gradle文件,在dependencies闭包中添加如下内容:
1
|
implementation 'com.google.code.gson:gson:2.9.0'
|
GSON库可以将一段JSON格式的字符串自动映射成一个对象,从而不需要我们再手动去编写代码进行解析了。比如说一段JSON格式的数据如下所示:
1
|
{"name":"Tom","age":20}
|
我们定义一个Person类,并加入name和age这两个字段,然后只需简单地调用如下代码就可以将JSON数据自动解析成一个Person对象了:
1
2
|
Gson gson = new Gson();
Person person = gson.fromJson(jsonData,Person.class);
|
如果需要解析的是一段JSON数组会稍微麻烦一点,我们需要借助TypeToken将期望解析成的数据类型传入到fromJson()方法中,如下所示:
1
|
List<Person> appList = gson.fromJson(gsonData,new TypeToken<List<Person>>(){}.getType());
|
基本的用法就是这样,下面就让我们来真正地尝试一下吧。首先新增一个App类,并加入id、name和version这3个字段,如下所示:
1
2
3
4
5
6
7
8
9
10
11
12
13
14
15
16
17
18
19
20
21
22
23
24
25
26
27
28
29
30
31
|
package com.example.chapter9_web;
public class App {
private String id;
private String name;
private String version;
public String getId() {
return id;
}
public String getName() {
return name;
}
public String getVersion() {
return version;
}
public void setId(String id) {
this.id = id;
}
public void setName(String name) {
this.name = name;
}
public void setVersion(String version) {
this.version = version;
}
}
|
然后修改MainActivity中的代码,如下所示:
1
2
3
4
5
6
7
8
9
10
11
12
13
14
15
16
17
18
19
20
21
22
23
24
25
26
27
28
29
|
private void parseJSONWithGSON(String jsonData){
Gson gson=new Gson();
List<App> appList =gson.fromJson(jsonData,new TypeToken<List<App>>(){}.getType());
for (App app:appList
) {
Log.d("MainActivity","GSON id is "+app.getId());
Log.d("MainActivity","GSON name is "+app.getName());
Log.d("MainActivity","GSON version is "+app.getVersion());
}
}
private void sendRequestWithOkHttp(){
new Thread(new Runnable() {
@Override
public void run() {
try {
OkHttpClient okHttpClient=new OkHttpClient();
Request request=new Request.Builder()
.url("http://10.0.2.2/get_data.json")
.build();
Response response=okHttpClient.newCall(request).execute();
String responseData=response.body().string();
parseJSONWithGSON(responseData);
}catch (Exception e){
e.printStackTrace();
}
}
}).start();
}
|
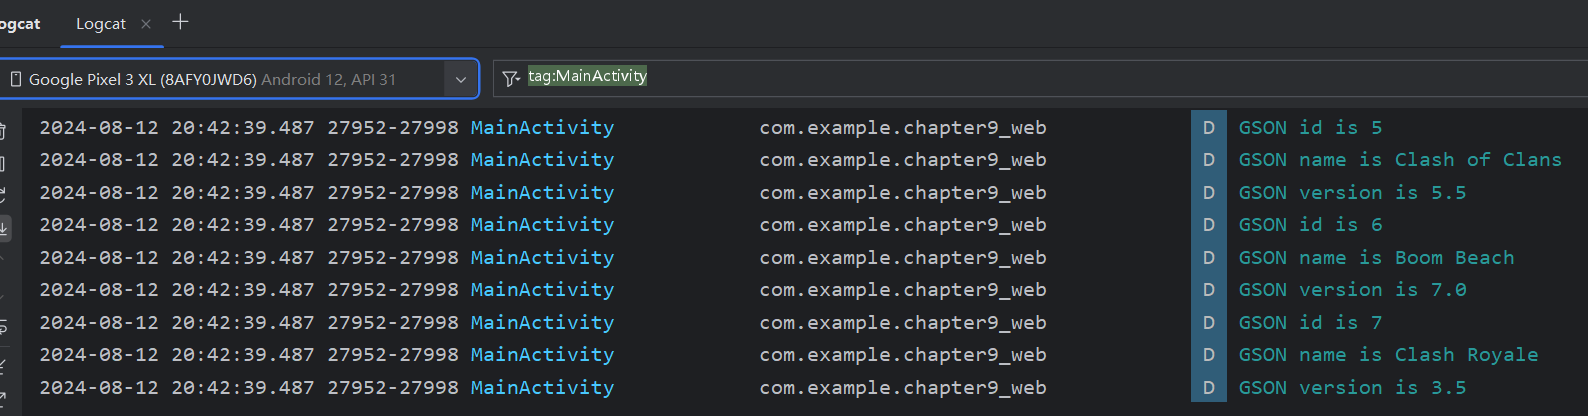
9.5 网络编程最佳实践
之前我们的写法其实是很有问题的。因为一个应用程序很可能会在许多地方都使用到网络功能,而发送HTTP请求的代码基本都是相同的,如果我们每次都去编写一遍发送HTTP请求的代码,这显然是非常差劲的做法。
通常情况下我们应该将这些通用的网络操作提取到一个公共的类里,并提供一个静态方法,当想要发起网络请求的时候,只需简单地调用一下这个方法即可。比如使用如下的写法
1
2
3
4
5
6
7
8
9
10
11
12
13
14
15
16
17
18
19
20
21
22
23
24
25
26
27
28
29
30
31
32
33
34
35
36
37
38
39
|
package com.example.chapter9_web;
import java.io.BufferedReader;
import java.io.InputStream;
import java.io.InputStreamReader;
import java.net.HttpURLConnection;
import java.net.MalformedURLException;
import java.net.URL;
public class HttpUtils {
public static String sendHttpRequest(String address) {
HttpURLConnection httpURLConnection = null;
try {
URL url =new URL(address);
httpURLConnection=(HttpURLConnection) url.openConnection();
httpURLConnection.setConnectTimeout(8000);
httpURLConnection.setRequestMethod("GET");
httpURLConnection.setReadTimeout(8000);
httpURLConnection.setDoInput(true);
httpURLConnection.setDoOutput(true);
InputStream in=httpURLConnection.getInputStream();
BufferedReader bufferedReader=new BufferedReader(new InputStreamReader(in));
StringBuilder response=new StringBuilder();
String line;
while ((line = bufferedReader.readLine())!=null){
response.append(line);
}
return response.toString();
}catch (Exception e){
e.printStackTrace();
return e.getMessage();
}finally {
if (httpURLConnection!=null){
httpURLConnection.disconnect();
}
}
}
}
|
每当发起一条http请求时可以直接调用
1
2
|
String address = "http://www.baidu.com"
String response = HttpUtil.sendHttpRequest(address);
|
需要注意,网络请求通常属于耗时操作,而sendHttpRequest()方法的内部并没有开启线程,这样就有可能导致在调用sendHttpRequest()方法的时候使得主线程被阻塞住(收到请求后再继续执行剩余代码),可以在sendHttpRequest()方法内部开启一个线程解决这个问题吗?
答案是不行,如果我们在sendHttpRequest()方法中开启了一个线程来发起HTTP请求,那么服务器响应的数据是无法进行返回的,所有的耗时逻辑都是在子线程里进行的,sendHttpRequest()方法会在服务器还没来得及响应的时候就执行结束了,当然也就无法返回响应的数据了。
那么遇到这种情况时应该怎么办呢?其实解决方法并不难,只需要使用Java的回调机制就可以了,下面就让我们来学习一下回调机制到底是如何使用的。首先需要定义一个接口,比如将它命名成HttpCallbackListener,代码如下所示
1
2
3
4
5
6
|
package com.example.chapter9_web;
public interface HttpCallbackListener {
void onFinish(String response);//当服务器成功响应时调用
void onError(Exception e);//出现网络错误时调用
}
|
可以看到,我们在接口中定义了两个方法,onFinish()方法表示当服务器成功响应我们请求的时候调用,onError()表示当进行网络操作出现错误的时候调用。这两个方法都带有参数,onFinish()方法中的参数代表着服务器返回的数据,而onError()方法中的参数记录着错误的详细信息。接着修改HttpUtil中的代码,如下所示
1
2
3
4
5
6
7
8
9
10
11
12
13
14
15
16
17
18
19
20
21
22
23
24
25
26
27
28
29
30
31
32
33
34
35
36
37
38
39
40
41
42
43
44
45
|
package com.example.chapter9_web;
import java.io.BufferedReader;
import java.io.InputStream;
import java.io.InputStreamReader;
import java.net.HttpURLConnection;
import java.net.MalformedURLException;
import java.net.URL;
public class HttpUtils {
public static void sendHttpRequest(final String address,final HttpCallbackListener listener) {
new Thread(new Runnable() {
@Override
public void run() {
HttpURLConnection httpURLConnection = null;
try {
URL url =new URL(address);
httpURLConnection=(HttpURLConnection) url.openConnection();
httpURLConnection.setConnectTimeout(8000);
httpURLConnection.setRequestMethod("GET");
httpURLConnection.setReadTimeout(8000);
httpURLConnection.setDoInput(true);
httpURLConnection.setDoOutput(true);
InputStream in=httpURLConnection.getInputStream();
BufferedReader bufferedReader=new BufferedReader(new InputStreamReader(in));
StringBuilder response=new StringBuilder();
String line;
while ((line = bufferedReader.readLine())!=null){
response.append(line);
}
if (listener!=null){
listener.onFinish(response.toString());
}
}catch (Exception e){
if (listener!=null){
listener.onError(e);
}
}finally {
if (httpURLConnection!=null){
httpURLConnection.disconnect();
}
}
}
}).start();
}}
|
首先给sendHttpRequest()方法添加了一个HttpCallbackListener参数,并在方法的内部开启了一个子线程,然后在子线程里去执行具体的网络操作。
注意: 子线程中无法通过return语句返回数据,因此这里我们将服务器响应的数据传入了HttpCallbackListener的onFinish()方法中,如果出现了异常就将异常原因传入到onError()方法中。
现在sendHttpRequest()方法接收两个参数了,因此我们在调用它的时候还需要将HttpCallbackListener的实例传入,如下所示
1
2
3
4
5
6
7
8
9
10
|
HttpUtils.sendHttpRequest(address,new HttpCallbackListener(){
@Override
public void onFinish(String response) {
//在这里根据返回内容执行具体的逻辑
}
@Override
public void onError(Exception e) {
//在这里对异常情况进行处理
}
});
|
这样的话,当服务器成功响应的时候,我们就可以在onFinish()方法里对响应数据进行处理了。类似地,如果出现了异常,就可以在onError()方法里对异常情况进行处理。如此一来,我们就巧妙地利用回调机制将响应数据成功返回给调用方了。
不过你会发现,上述使用HttpURLConnection的写法总体来说还是比较复杂的,那么使用OkHttp会变得简单吗?答案是肯定的,而且要简单得多,下面我们来具体看一下。在HttpUtil中加入一个sendOkHttpRequest()方法,如下所示:
1
2
3
4
5
6
7
|
public static void sendOkHttpRequest(String addrss,okhttp3.Callback callback){
OkHttpClient client=new OkHttpClient();
Request request=new Request.Builder()
.url(addrss)
.build();
client.newCall(request).enqueue(callback);
}
|
可以看到,sendOkHttpRequest()方法中有一个okhttp3.Callback参数,这个是OkHttp库中自带的一个回调接口,类似于我们刚才自己编写的HttpCallbackListener。
在client.newCall()之后没有像之前那样一直调用execute()方法,而是调用了一个enqueue()方法,并把okhttp3.Callback参数传入。OkHttp在enqueue()方法的内部已经帮我们开好子线程了,然后会在子线程中去执行HTTP请求,并将最终的请求结果回调到okhttp3.Callback当中。那么我们在调用sendOkHttpRequest()方法的时候就可以这样写:
1
2
3
4
5
6
7
8
9
10
11
|
HttpUtil.sendOkHttpRequest("http://www.baidu.com",new okhttp3.Callback(){
@Override
public void onResponse(Call call,Response response) throws IOException {
//得到服务器返回的具体内容
String responseData = response.body().string();
}
@Override
public void onFailure(Call call,IOException e) {
//在这里对异常情况进行处理
}
});
|
由此可以看出,OkHttp的接口设计得确实非常人性化,它将一些常用的功能进行了很好的封装,使得我们只需编写少量的代码就能完成较为复杂的网络操作。当然这并不是OkHttp的全部,后面我们还会继续学习它的其他相关知识。
另外需要注意的是,不管是使用HttpURLConnection还是OkHttp,最终的回调接口都还是在子线程中运行的,因此我们不可以在这里执行任何的UI操作,除非借助runOnUiThread()方法来进行线程转换。至于具体的原因,我们很快就会在下一章中学习到了。
第10章 探究服务
10.1 服务是什么
服务(Service)是 Android 中实现程序后台运行的解决方案,它非常适合去执行那些不需要
和用户交互而且还要求长期运行的任务。服务的运行不依赖于任何用户界面,即使程序被切换到
后台,或者用户打开了另外一个应用程序,服务仍然能够保持正常运行。
不过需要注意的是,服务并不是运行在一个独立的进程当中的,而是依赖于创建服务时所在
的应用程序进程。当某个应用程序进程被杀掉时,所有依赖于该进程的服务也会停止运行。
另外,也不要被服务的后台概念所迷惑,实际上服务并不会自动开启线程,所有的代码都是
默认运行在主线程当中的。也就是说,我们需要在服务的内部手动创建子线程,并在这里执行具
体的任务,否则就有可能出现主线程被阻塞住的情况。那么本章的第一堂课,我们就先来学习一
下关于 Android 多线程编程的知识。
10.2 Android多线程编程
10.2.1 线程的基本用法
Android多线程和Java多线程编程类似
-
继承Thread类并重写run()方法
1
2
3
4
5
6
|
class MyThread extends Thread{
@Override
public void run(){
//线程逻辑
}
}
|
使用只需new出实例并调用start()方法运行
1
2
|
MyThread myThread=new MyThread();
myThread.start();
|
-
实现Runnable接口定义线程
继承Thread类的方式耦合性较高,所以更多情况下使用Runnable实现
1
2
3
4
5
6
|
class MyThread implements Runnable{
@Override
public void run(){
//具体逻辑
}
}
|
启动线程
1
2
|
MyThread myThread=new MyThread();
new Thread(myThread).start();
|
-
Runnable+匿名类
无需专门定义类
1
2
3
4
5
6
|
new Thread(new Runnable(){
@Override
public void run(){
//具体逻辑
}
}).start();
|
10.2.2 在子线程中更新UI
和许多其他GUI库类似,Android的UI也是线程不安全的,想要更新UI元素则必须在主线程进行,否则会出现异常.
但在某些情况下,我们必须在子线程执行耗时任务,再根据任务结果更新相应UI组件,对于这种情况,Android提供了一套异步消息处理机制用于解决问题
创建项目Chapter10_Service
布局如下
1
2
3
4
5
6
7
8
9
10
11
12
13
14
15
16
17
18
19
|
<?xml version="1.0" encoding="utf-8"?>
<RelativeLayout xmlns:android="http://schemas.android.com/apk/res/android"
android:layout_width="match_parent"
android:layout_height="match_parent">
<Button
android:id="@+id/change_text"
android:layout_width="match_parent"
android:layout_height="wrap_content"
android:text="Change Text"
/>
<TextView
android:id="@+id/text"
android:layout_width="wrap_content"
android:layout_height="wrap_content"
android:layout_centerInParent="true"
android:textSize="20sp"/>
</RelativeLayout>
|
MainActivity
1
2
3
4
5
6
7
8
9
10
11
12
13
14
15
16
17
18
19
20
21
22
23
24
25
26
27
28
29
30
31
32
33
34
35
36
37
38
39
40
41
42
43
44
45
46
47
|
package com.example.chapter10_service;
import android.os.Bundle;
import android.os.Handler;
import android.os.Message;
import android.view.View;
import android.widget.Button;
import android.widget.TextView;
import androidx.appcompat.app.AppCompatActivity;
public class MainActivity extends AppCompatActivity implements View.OnClickListener {
public static final int UPDATE_TEXT=1;//用于表示更新动作
private TextView text;
private Handler handler=new Handler(){
@Override
public void handleMessage(Message msg){
switch (msg.what){
case UPDATE_TEXT:
//接收到消息后执行UI更新逻辑
text.setText("Nice to meet you!");
break;
default:
break;
}
}
};
@Override
protected void onCreate(Bundle savedInstanceState) {
super.onCreate(savedInstanceState);
setContentView(R.layout.activity_main);
text=findViewById(R.id.text);
Button changeText=findViewById(R.id.change_text);
changeText.setOnClickListener(this);
}
@Override
public void onClick(View v){
new Thread(new Runnable() {
@Override
public void run() {
Message message=new Message();
message.what=UPDATE_TEXT;
handler.sendMessage(message);//发送更新UI的message对象
}
}).start();
}
}
|
代码解析:
- 定义整型常量UPDATE_TEXT表示更新TextView动作.新增Handler对象并重写父类handleMessage()方法,对message进行处理,执行UI更新逻辑
- ChangeText按钮用于发送UI更新的message(android.os.Message)
- handler在主线程中运行
运行效果如下,点击按钮后成功更新text内容
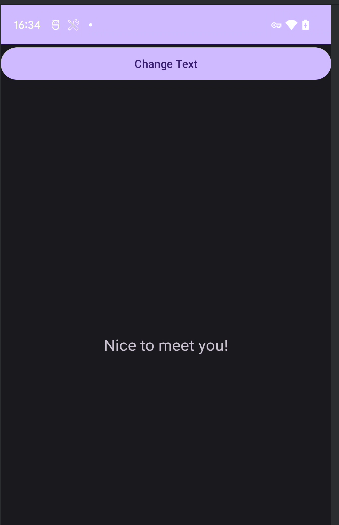
10.2.3 解析异步消息处理机制
Android的异步消息处理主要由4部分组成: Message,Handler,MessageQueue,Looper
-
Message
是在线程间传递的消息,可在内部携带少量信息,用于不同线程交换数据
除上小节使用的what字段外,还可使用arg1,arg2携带一些整形数据,obj字段携带Object对象
-
Handler
用于发送和处理消息
发送消息使用Handler.sendMessage(), 经过一系列处理最终消息会传递到Handler.handleMessage()方法中
-
MessageQueue
消息队列用于存放所有通过Handler发送的消息,这部分消息一直存在于消息队列等待处理.每个线程只会有一个MessageQueue对象
-
Looper
是每个线程中的MessageQueue的管家,调用Looper.loop()后进入无限循环,每当发现MessageQueue存在消息便会取出并传递到Handler.handlerMessage()中
每个线程只有一个Looper对象
异步消息处理流程:
- 主线程中创建Handler对象,重写handleMessage()方法
- 子线程需要进行UI操作时创建Message对象并通过Handler发送
- 消息被添加到主线程MessageQueue中,由Looper取出消息并分发到Handler.handleMessage()
- 执行handleMessage处理逻辑
一条消息经过流转后从子线程进入主线程,从而更新UI
示意图如下
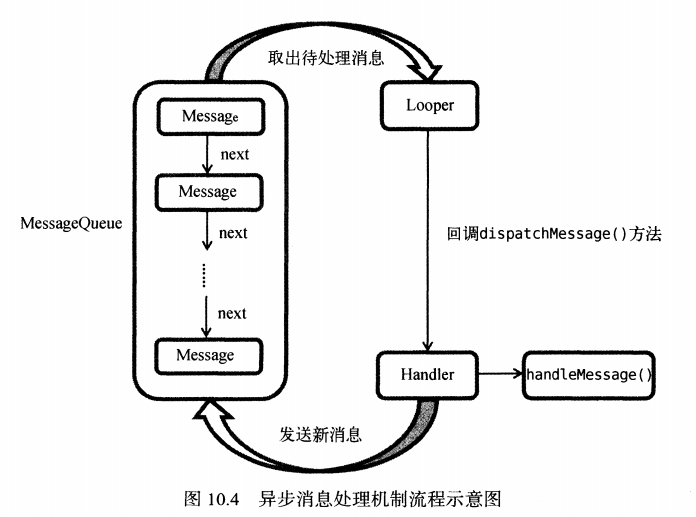
在之前使用的runOnUiThread()方法实际为一个异步消息处理机制的接口封装,背后原理正是如此
10.2.4 使用AsyncTask
为了更方便的在子线程中对UI进行操作,Android提供了其它工具如AsyncTask
AsyncTask的原理基于异步消息处理机制,只是做了较好的封装
基本用法:
AsyncTask是一个抽象类,必须创建子类继承,继承时可指定3个泛型参数
-
Params
执行AsyncTask时需要传入的参数,可于后台任务中使用
-
Progress
后台任务执行时,如果需要显示当前进度,则使用此处指定的泛型为进度单位
-
Result
任务执行完毕后,如果需要返回结果,则使用此处指定的泛型作为返回类型
因此,一个最简单的自定义AsyncTask写法如下
参数1指定为Void表示不需要传入参数
参数2指定为Integer表示进度单位为整型
参数3指定为Boolean表示使用布尔型返回结果
1
2
3
|
class DownloadTask extends AsyncTask<Void,Integer,Boolean>{
...
}
|
目前的自定义任务为空任务,不能执行任何实际操作,还需要重写以下方法:
-
onPreExecute()
在后台任务执行前调用,用于界面初始化,如显示进度条对话框等
-
doInBackground(Params…)
该方法的所有代码都会在子线程运行,应该在这里处理所有耗时任务
任务完成可以通过return返回执行结果,如果AsyncTask参数3指定Void则不需要返回结果
注意: 该方法中不可以进行UI操作,若需要更新UI元素例如反馈当前任务进度,可以调用publishProgress(Progress…)完成
-
onProgressUpdate(Progress…)
该方法的参数类型和AsyncTask的参数2类型一致
当后台任务调用了publishProgress(Progress…)后,onProgressUpdate(Progress…)会很快被调用
该方法携带的参数是后台任务中传递来的,该方法中可以进行UI操作,利用参数值更新界面元素
-
onPostExecute(Result)
后台任务执行完毕并通过return返回时,调用该方法.
返回数据作为参数传递到该方法,可利用返回数据进行UI操作
例如提醒任务执行结果,关闭进度条对话框等
综上,一个比较完整的自定义AsyncTask代码如下
1
2
3
4
5
6
7
8
9
10
11
12
13
14
15
16
17
18
19
20
21
22
23
24
25
26
27
28
29
30
31
32
33
34
35
36
37
38
39
40
41
42
43
44
45
46
47
48
|
package com.example.chapter10_service;
import android.app.ProgressDialog;
import android.os.AsyncTask;
import android.widget.Toast;
public class DownloadTask extends AsyncTask<Void,Integer,Boolean> {
ProgressDialog progressDialog;
@Override
protected void onPreExecute() {
progressDialog.show();//显示进度对话框
}
@Override
protected Boolean doInBackground(Void... voids) {
try{
while(true){
int downloadPercent=doDownload();//虚构方法
publishProgress(downloadPercent);
if(downloadPercent>=100){
break;
}
}
}catch (Exception e){
return false;
}
return true;
}
@Override
protected void onProgressUpdate(Integer... values) {
//更新下载进度
progressDialog.setMessage("Download"+values[0]+"%");
}
@Override
protected void onPostExecute(Boolean result) {
progressDialog.dismiss();//关闭进度对话框
//提示下载结果
if(result){
Toast.makeText(progressDialog.getContext(),"Download Succeeded" ,Toast.LENGTH_LONG).show();
}
else {
Toast.makeText(progressDialog.getContext(),"Download Failed" ,Toast.LENGTH_LONG).show();
}
}
}
|
在这个 DownloadTask中,我们在 doInBackground()方法里去执行具体的下载任务。这个方法里的代码都是在子线程中运行的,因而不会影响到主线程的运行。
注意这里虚构了一个doDownload()方法,这个方法用于计算当前的下载进度并返回,我们假设这个方法已经存在了在得到了当前的下载进度后,下面就该考虑如何把它显示到界面上了
由于doInBackground()方法是在子线程中运行的,在这里肯定不能进行UI操作,所以我们可以调用publishProgress()方法并将当前的下载进度传进来,这样onProgressupdate()方法就会很快被调用,在这里就可以进行UI操作了
当下载完成后,doInBackground()方法会返回一个布尔型变量,这样onPostExecute()方法就会很快被调用,这个方法也是在主线程中运行的。然后在这里我们会根据下载的结果来弹出相应的 Toast提示,从而完成整个 DownloadTask任务。
简单来说,使用 AsyncTask的诀窍就是,在 doInBackground()方法中执行具体的耗时任务在onProgressupdate()方法中进行U操作,在onPostExecute()方法中执行一些任务的收尾工作。
如果想要启动这个任务,只需编写以下代码即可
1
|
new DownloadTask().execute();
|
以上就是 AsyncTask的基本用法,怎么样,是不是感觉简单方便了许多?我们并不需要去考虑异步消息处理机制,也不需要专门使用一个 Handler来发送和接收消息,只需要调用一下publishProgress()方法,就可以轻松地从子线程切换到线程。
注意: AsyncTask在Android11+ (API30)被废弃,参考AsyncTask
10.3 服务的基本用法
10.3.1 定义一个服务
右键项目包>New>Service>Service新建服务
exported表示是否允许当前程序外的其他程序访问该服务
enabled表示是否启用该服务
观察service代码
1
2
3
4
5
6
7
8
9
10
11
12
13
14
15
|
package com.example.chapter10_service;
import android.app.Service;
import android.content.Intent;
import android.os.IBinder;
public class MyService extends Service {
public MyService() {
}
@Override
public IBinder onBind(Intent intent) {
throw new UnsupportedOperationException("Not yet implemented");
}
}
|
MyService继承自Service类,拥有唯一一个抽象方法onBind()
处理事件的逻辑需要重写其他方法:
- onCreate() 服务创建时调用
- onStartCommand() 每次服务启动时调用
- onDestroy() 服务销毁时调用
1
2
3
4
5
6
7
8
9
10
11
12
13
14
15
16
17
18
19
20
21
22
23
24
|
package com.example.chapter10_service;
import android.app.Service;
import android.content.Intent;
import android.os.IBinder;
public class MyService extends Service {
......
@Override
public void onCreate() {
super.onCreate();
}
@Override
public int onStartCommand(Intent intent, int flags, int startId) {
return super.onStartCommand(intent, flags, startId);
}
@Override
public void onDestroy() {
super.onDestroy();
}
......
}
|
通常,如果希望服务启动就立刻执行某个动作,可以将逻辑写在onStartCommand(), 服务销毁时应该在onDestroy()回收不再使用的资源
另外,每个服务都需要在AndroidManifest中注册才可以生效(四大组件的共有特点)
1
2
3
4
5
6
7
8
9
10
11
12
13
14
|
<?xml version="1.0" encoding="utf-8"?>
<manifest xmlns:android="http://schemas.android.com/apk/res/android"
xmlns:tools="http://schemas.android.com/tools">
<application>
...
<service
android:name=".MyService"
android:enabled="true"
android:exported="true">
</service>
...
</application>
</manifest>
|
10.3.2 启动和停止服务
启动和停止服务可以借助Intent实现
修改activity_main.xml 添加两个按钮用于启停服务
1
2
3
4
5
6
7
8
9
10
11
12
13
14
15
16
|
<?xml version="1.0" encoding="utf-8"?>
<LinearLayout xmlns:android="http://schemas.android.com/apk/res/android"
android:orientation="vertical"
android:layout_width="match_parent"
android:layout_height="match_parent">
<Button
android:id="@+id/start_service"
android:layout_width="match_parent"
android:layout_height="wrap_content"
android:text="Start Service"/>
<Button
android:id="@+id/stop_service"
android:layout_width="match_parent"
android:layout_height="wrap_content"
android:text="Stop Service"/>
</LinearLayout>
|
修改MainActivity
1
2
3
4
5
6
7
8
9
10
11
12
13
14
15
16
17
18
19
20
21
22
23
24
25
26
27
28
29
30
31
32
33
34
35
36
37
38
39
|
package com.example.chapter10_service;
import android.content.Intent;
import android.os.Bundle;
import android.os.Handler;
import android.os.Message;
import android.view.View;
import android.widget.Button;
import android.widget.TextView;
import androidx.appcompat.app.AppCompatActivity;
public class MainActivity extends AppCompatActivity implements View.OnClickListener {
@Override
protected void onCreate(Bundle savedInstanceState) {
super.onCreate(savedInstanceState);
setContentView(R.layout.activity_main);
Button startService=findViewById(R.id.start_service);
Button stopService=findViewById(R.id.stop_service);
startService.setOnClickListener(this);
stopService.setOnClickListener(this);
}
@Override
public void onClick(View v){
switch (v.getId()){
case R.id.start_service:
Intent startIntent=new Intent(this,MyService.class);
startService(startIntent);//启动服务
break;
case R.id.stop_service:
Intent stopIntent=new Intent(this, MyService.class);
stopService(stopIntent);//停止服务
default:
break;
}
}
}
|
修改MyService,添加log
1
2
3
4
5
6
7
8
9
10
11
12
13
14
15
16
17
18
19
20
21
|
public class MyService extends Service {
private static final String TAG="MyService";
@Override
public void onCreate() {
super.onCreate();
Log.d(TAG,"onCreate executed");
}
@Override
public int onStartCommand(Intent intent, int flags, int startId) {
Log.d(TAG,"onStartCommand executed");
return super.onStartCommand(intent, flags, startId);
}
@Override
public void onDestroy() {
super.onDestroy();
Log.d(TAG,"onDestroy executed");
}
......
}
|
运行程序测试,点击start service可以发现服务确实成功创建
可在settings>developer options>running services找到服务
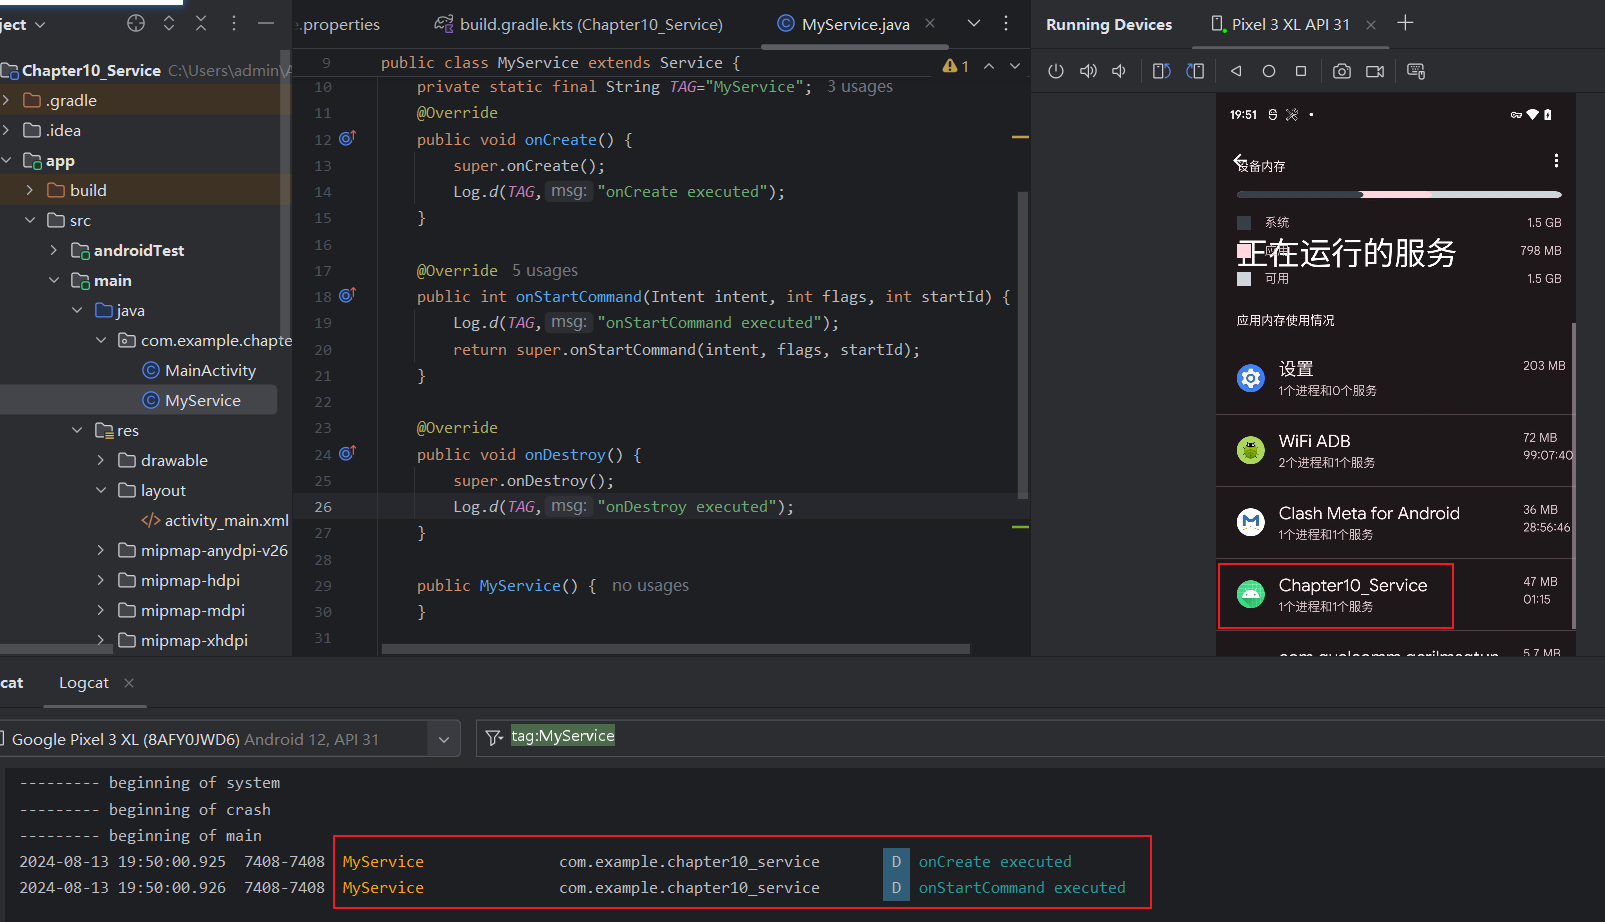
onCreate()和onStartCommand()的区别:
onCreate()在服务第一次创建时调用,onStartCommand()在每次启动服务时调用
注: 此处创建是指调用startService,重复点击start service会产生一条onCreate和多条onStartCommand日志,服务销毁后则需要重新创建并非从始至终只调用一次onCreate
10.3.3 活动和服务进行通信
活动和服务的通信可以通过onBind()方法实现
比如: 我们希望在MyService提供一个下载功能,在活动中决定何时开始下载以及随时查看下载进度,可以创建一个专门的Binder对象对下载功能进行管理
修改MyService代码
1
2
3
4
5
6
7
8
9
10
11
12
13
14
15
16
17
18
19
20
21
22
23
24
25
26
|
package com.example.chapter10_service;
import android.app.Service;
import android.content.Intent;
import android.os.Binder;
import android.os.IBinder;
import android.util.Log;
public class MyService extends Service {
private static final String TAG="MyService";
private DownloadBinder mBinder=new DownloadBinder();
class DownloadBinder extends Binder {
public void startDownload(){
Log.d(TAG,"StartDownload executed");
}
public int getProgress(){
Log.d(TAG,"GetProgress executed");
return 0;
}
}
@Override
public IBinder onBind(Intent intent) {
return mBinder;
}
......
}
|
此处创建了DownloadBinder类继承Binder,内部提供开始下载和查看下载进度方法,仅做模拟打印日志,创建DownloadBinder实例之后在onBinder返回该实例即可
下面看看如何在活动中调用服务的方法
修改activity_main,添加两个按钮用于绑定和解绑服务
1
2
3
4
5
6
7
8
9
10
|
<Button
android:id="@+id/bind_service"
android:layout_width="match_parent"
android:layout_height="wrap_content"
android:text="Bind Service"/>
<Button
android:id="@+id/unbind_service"
android:layout_width="match_parent"
android:layout_height="wrap_content"
android:text="Unbind Service"/>
|
当活动和服务绑定后,就可以调用服务里的Binder提供的方法
修改MainActivity
1
2
3
4
5
6
7
8
9
10
11
12
13
14
15
16
17
18
19
20
21
22
23
24
25
26
27
28
29
30
31
32
33
34
35
36
37
38
39
40
41
42
43
44
45
46
47
48
49
50
51
52
53
54
55
56
57
58
59
60
61
62
63
64
|
package com.example.chapter10_service;
import android.content.ComponentName;
import android.content.Intent;
import android.content.ServiceConnection;
import android.os.Bundle;
import android.os.IBinder;
import android.view.View;
import android.widget.Button;
import androidx.appcompat.app.AppCompatActivity;
public class MainActivity extends AppCompatActivity implements View.OnClickListener {
private MyService.DownloadBinder downloadBinder;
private ServiceConnection connection=new ServiceConnection() {
@Override
public void onServiceConnected(ComponentName componentName, IBinder service) {
downloadBinder=(MyService.DownloadBinder)service;
downloadBinder.startDownload();
downloadBinder.getProgress();
}
@Override
public void onServiceDisconnected(ComponentName componentName) {
}
};
@Override
protected void onCreate(Bundle savedInstanceState) {
super.onCreate(savedInstanceState);
setContentView(R.layout.activity_main);
Button startService=findViewById(R.id.start_service);
Button stopService=findViewById(R.id.stop_service);
Button bindService=findViewById(R.id.bind_service);
Button unbindService=findViewById(R.id.unbind_service);
startService.setOnClickListener(this);
stopService.setOnClickListener(this);
bindService.setOnClickListener(this);
unbindService.setOnClickListener(this);
}
@Override
public void onClick(View v){
switch (v.getId()){
case R.id.start_service:
Intent startIntent=new Intent(this,MyService.class);
startService(startIntent);//启动服务
break;
case R.id.stop_service:
Intent stopIntent=new Intent(this, MyService.class);
stopService(stopIntent);//停止服务
break;
case R.id.bind_service:
Intent bindIntent=new Intent(this, MyService.class);
bindService(bindIntent,connection,BIND_AUTO_CREATE);//绑定服务
break;
case R.id.unbind_service:
unbindService(connection);//解绑服务
break;
default:
break;
}
}
}
|
代码解析:
-
ServiceConnection匿名类
重写onServiceConnected和onServiceDisconnected方法,分别在活动绑定和解除绑定时调用.
-
onServiceConnected
向下转型获取DownloadBinder实例,调用startDownload()和getProgress()
-
调用bindService()绑定
参数3传入BIND_AUTO_CREATE表示活动和服务绑定后自动创建服务,即自动调用MyService.onCreate(),但onStartCommand()不执行
运行效果如下,点击Bind Service后分别调用onCreate,StartDownload,GetProgress

任何一个服务在整个程序范围内都是通用的,可以和任意活动绑定,并且绑定完成后都可以获得相同的DownloadBinder实例
10.4 服务的生命周期
之前我们学习过了活动以及碎片的生命周期, 类似地,服务也有自己的生命周期,前面我们使用到的 onCreate()、onStartCcommand()、onBind()和onDestroy()等方法都是在服务的生命周期内可能回调的方法。
一旦在项目的任何位置调用了Context的startService()方法,相应的服务就会启动起来并回调 onStartCommand()方法。如果这个服务之前还没有创建过,onCreate()方法会先于onStartCommand()方法执行。
服务启动了之后会一直保持运行状态,直到stopService()或stopSelf()方法被调用。注意,虽然每调用一次 startService()方法,onStartCommand()就会执行一次,但实际上每个服务都只会存在一个实例。所以不管你调用了多少次 startService()方法,只需调用一次 stopService()或stopSelf()方法,服务就会停止下来了。
另外,还可以调用 Context的 bindservice()来获取一个服务的持久连接,这时就会回调服务中的 onBind()方法。类似地,如果这个服务之前还没有创建过,onCreate()方法会先于onBind()方法执行。之后,调用方可以获取到onBind()方法里返回的 IBinder 对象的实例,这样就能自由地和服务进行通信了。只要调用方和服务之间的连接没有断开,服务就会一直保持
运行状态。
当调用了 startService()方法后,又去调用stopService()方法,这时服务中的onDestroy()方法就会执行,表示服务已经销毁了。类似地,当调用了bindService()方法后又去调用 unbindservice()方法,onDestroy()方法也会执行,这两种情况都很好理解。但是
需要注意,我们是完全有可能对一个服务既调用了startService()方法,又调用了bindService()方法的,这种情况下该如何才能让服务销毁掉呢?根据 Android系统的机制,一个服务只要被启动或者被绑定了之后,就会一直处于运行状态,必须要让以上两种条件同时不满足,服务才能被销毁。所以,这种情况下要同时调用stopService()和unbindService()方法onDestroy()方法才会执行。
10.5 服务的更多技巧
10.5.1 使用前台服务
服务几乎都是在后台运行的,但服务的系统优先级比较低,当内存不足时可能会回收掉后台正在运行的服务
如果希望服务可以一直运行不会由于内存不足等原因导致回收,可以使用前台服务
前台服务和普通服务的最大区别在于: 一直有一个正在运行的图标在系统状态栏,下拉状态栏可以看到详细信息,类似于通知效果
来看看如何创建一个前台服务,修改MyService代码
1
2
3
4
5
6
7
8
9
10
11
12
13
14
15
16
17
18
19
20
21
22
23
24
25
26
27
28
29
30
31
32
33
34
35
36
37
38
39
40
41
42
43
44
|
package com.example.chapter10_service;
import android.annotation.SuppressLint;
import android.app.Notification;
import android.app.NotificationChannel;
import android.app.NotificationManager;
import android.app.PendingIntent;
import android.app.Service;
import android.content.Intent;
import android.graphics.BitmapFactory;
import android.os.Binder;
import android.os.Build;
import android.os.IBinder;
import android.util.Log;
import androidx.core.app.NotificationCompat;
public class MyService extends Service {
......
@Override
public void onCreate() {
super.onCreate();
Log.d(TAG,"onCreate executed");
Intent intent=new Intent(this, MainActivity.class);
PendingIntent pendingIntent=PendingIntent.getActivity(this,0,intent, PendingIntent.FLAG_IMMUTABLE);
NotificationManager notificationManager= (NotificationManager) getSystemService(NOTIFICATION_SERVICE);
//使用channel创建通知
if (Build.VERSION.SDK_INT >= Build.VERSION_CODES.O) {
String channelId = "default";
String channelName = "默认通知";
NotificationChannel notificationChannel= new NotificationChannel(channelId, channelName, NotificationManager.IMPORTANCE_HIGH);
notificationManager.createNotificationChannel(notificationChannel);
}
Notification notification=new NotificationCompat.Builder(this,"default")
.setContentTitle("This is content text")
.setContentText("This is content text")
.setWhen(System.currentTimeMillis())
.setSmallIcon(R.mipmap.ic_launcher)
.setLargeIcon(BitmapFactory.decodeResource(getResources(),R.mipmap.ic_launcher_round))
.build();
startForeground(1,notification);//通过该方法创建前台服务
}
......
}
|
这里只修改了onCreate(), 创建Notification对象后通过startForeground()使得MyService变成前台服务
另外需要修改Manifest声明权限,从上到下分别为通知权限,前台服务权限(Android9+),特定前台服务权限(Android14+)
并使用android:foregroundServiceType属性指定前台服务的具体类型(Android14+), 参考请求前台服务权限
1
2
3
4
5
6
7
8
9
10
11
12
13
14
15
16
17
|
<?xml version="1.0" encoding="utf-8"?>
<manifest xmlns:android="http://schemas.android.com/apk/res/android"
xmlns:tools="http://schemas.android.com/tools">
<uses-permission android:name="android.permission.POST_NOTIFICATIONS" />
<uses-permission android:name="android.permission.FOREGROUND_SERVICE"/>
<uses-permission android:name="android.permission.FOREGROUND_SERVICE_MEDIA_PLAYBACK"/>
<application>
<service
android:name=".MyService"
android:enabled="true"
android:exported="true"
android:foregroundServiceType="mediaPlayback"
>
</service>
</application>
</manifest>
|
运行效果,成功启动前台服务,可在通知栏查看

10.5.2 使用IntentService
服务中的代码默认运行在主线程中,如果在服务中处理耗时逻辑容易出现ANR(Application Not Responding)
所以这个时候需要使用Android的多线程编程,我们应该在每个服务的具体方法中开启线程处理耗时逻辑,因此一个标准服务可以写成如下形式
1
2
3
4
5
6
7
8
9
10
11
12
13
14
|
public class MyService extends Service{
...
@Override
public int onStartCommand(Intent intent, int flags, int startId) {
new Thread(new Runnable() {
@Override
public void run() {
//处理具体逻辑
stopSelf();//执行完毕自动停止服务
}
}).start();
return super.onStartCommand(intent, flags, startId);
}
}
|
虽然这种写法并不复杂,但总有程序员忘记开启线程或者忘记调用stopSelf()
为了更简单的创建一个异步,自动停止的服务,Android提供了IntentService类解决这两个问题
1
2
3
4
5
6
7
8
9
10
11
12
13
14
15
16
17
18
19
20
21
22
23
24
25
|
package com.example.chapter10_service;
import android.app.IntentService;
import android.content.Intent;
import android.util.Log;
import androidx.annotation.Nullable;
public class MyIntentService extends IntentService {
public MyIntentService(){
super("MyIntentService");//调用父类构造函数
}
//实现该抽象方法,处理耗时逻辑,该方法在子线程中运行
@Override
protected void onHandleIntent(@Nullable Intent intent) {
//打印当前线程id
Log.d("MyIntentService","Thread id is"+Thread.currentThread().getId());
}
@Override
public void onDestroy() {
super.onDestroy();
Log.d("MyIntentService", "onDestroy executed");
}
}
|
其中onHandleIntent()抽象方法在子线程中运行,为印证在此处打印线程id
接下来修改activity_main,添加按钮用于启动MyIntentService
1
2
3
4
5
|
<Button
android:id="@+id/start_intent_service"
android:layout_width="match_parent"
android:layout_height="wrap_content"
android:text="Start IntentService"/>
|
修改MainActivity,打印主线程id
1
2
3
4
5
6
7
8
9
10
11
12
13
14
15
16
17
18
19
|
@Override
protected void onCreate(Bundle savedInstanceState){
...
Button startIntentService=findViewById(R.id.start_intent_service);
startIntentService.setOnClickListener(this);
}
@Override
public void onClick(View v){
switch (v.getId()){
......
case R.id.start_intent_service:
//打印主线程id
Log.d("MainActivity","Thread id is"+Thread.currentThread().getId());
Intent intentService=new Intent(this, MyIntentService.class);
startService(intentService);
default:
break;
}
}
|
最后,到Manifest文件注册服务
1
2
3
4
|
<service android:name=".MyIntentService"
android:enabled="true"
android:exported="true"
/>
|
运行效果如下,显然MyIntentService.onHandleIntent()运行在子线程,并且自动执行onDestroy(),说明执行完毕自动停止服务
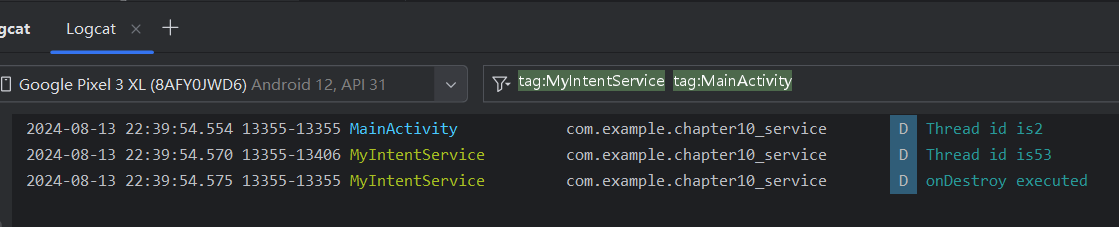
10.6 服务的最佳实践-完整版的下载示例
添加项目所需依赖 okhttp3
1
|
implementation("com.squareup.okhttp3:okhttp:4.12.0")
|
定义回调接口用于对下载过程中的各种状态进行监听和回调
新建DownloadListener接口
1
2
3
4
5
6
7
|
public interface DownloadListener {
void onProgress(int progress);//通知当前下载进度
void onSuccess(); //通知下载成功事件
void onFailed(); //通知下载失败事件
void onPaused(); //通知下载暂停事件
void onCanceled(); //通知下载取消事件
}
|
新建DownloadTask继承自AsyncTask
1
2
3
4
5
6
7
8
9
10
11
12
13
14
15
16
17
18
19
20
21
22
23
24
25
26
27
28
29
30
31
32
33
34
35
36
37
38
39
40
41
42
43
44
45
46
47
48
49
50
51
52
53
54
55
56
57
58
59
60
61
62
63
64
65
66
67
68
69
70
71
72
73
74
75
76
77
78
79
80
81
82
83
84
85
86
87
88
89
90
91
92
93
94
95
96
97
98
99
100
101
102
103
104
105
106
107
108
109
110
111
112
113
114
115
116
117
118
119
120
121
122
123
124
125
126
127
128
129
130
131
132
133
134
135
136
137
138
139
140
141
142
143
144
145
146
147
148
149
150
151
152
153
154
155
156
157
158
159
160
161
162
163
|
package com.example.chapter10_service;
import android.os.AsyncTask;
import android.os.Environment;
import java.io.File;
import java.io.IOException;
import java.io.InputStream;
import java.io.RandomAccessFile;
import okhttp3.OkHttpClient;
import okhttp3.Request;
import okhttp3.Response;
//AsyncTask
//参数1 执行AysncTask时传入1个字符串参数给后台任务
//参数2 使用int作为进度显示单位
//参数3 使用int反馈执行结果
public class DownloadTask extends AsyncTask<String,Integer,Integer> {
//定义常量用于表示下载状态
public static final int TYPE_SUCCESS=0;
public static final int TYPE_FAILED=1;
public static final int TYPE_PAUSED=2;
public static final int TYPE_CANCELED=3;
private DownloadListener listener;
private boolean isCanceled=false;
private boolean isPaused=false;
private int lastProgress;
//传入listener实例,用于回调处理下载状态
public DownloadTask(DownloadListener listener){
this.listener=listener;
}
//暂停下载
public void pauseDownload(){
isPaused=true;
}
//取消下载
public void cancelDownload(){
isCanceled=true;
}
//后台任务执行前调用,用于界面初始化,显示进度条对话框等
@Override
protected void onPreExecute() {
super.onPreExecute();
}
//更新下载进度
@Override
protected void onProgressUpdate(Integer... values){
int progress=values[0];//当前下载进度
if(progress>lastProgress) {
listener.onProgress(progress);
lastProgress = progress;
}
}
//通知下载结果
@Override
protected void onPostExecute(Integer status){
switch(status){
case TYPE_SUCCESS:
listener.onSuccess();
break;
case TYPE_FAILED:
listener.onFailed();
break;
case TYPE_PAUSED:
listener.onPaused();
break;
case TYPE_CANCELED:
listener.onCanceled();
break;
default:
break;
}
}
//获取目标资源文件大小
private long getContentLength(String downloadUrl) throws IOException{
OkHttpClient client=new OkHttpClient();
Request request=new Request.Builder()
.url(downloadUrl).build();
Response response=client.newCall(request).execute();
if(response!=null&&response.isSuccessful()){
long contentLength=response.body().contentLength();
response.close();
return contentLength;
}
return 0;
}
//后台执行具体的下载逻辑 (子线程运行,处理耗时逻辑)
@Override
protected Integer doInBackground(String... params) {
InputStream inputStream=null;
RandomAccessFile savedFile=null;
File file=null;
try{
long downloadedLength=0;//记录下载文件长度
String downloadUrl=params[0];//下载的url地址
String fileName=downloadUrl.substring(downloadUrl.lastIndexOf("/"));//下载文件名
//指定下载到sd卡的download目录
String directory= Environment.getExternalStoragePublicDirectory(Environment.DIRECTORY_DOWNLOADS).getPath();
file=new File(directory+fileName);//创建file对象
if(file.exists()){
//如果存在下载文件则读取已下载字节数,用于后续断点续传
downloadedLength=file.length();
}
long contentLength=getContentLength(downloadUrl);//获取下载文件总长度
if(contentLength==0){
return TYPE_FAILED;//长度为零说明文件有问题
}
else if(contentLength==downloadedLength){
return TYPE_SUCCESS;//文件已经下载完毕,无需重复下载
}
OkHttpClient client=new OkHttpClient();
Request request=new Request.Builder()
//断点下载,指定从哪个字节开始下载
.addHeader("RANGE","bytes="+downloadedLength+"-")//header用于指定从哪个字节开始下载
.url(downloadUrl)
.build();
Response response=client.newCall(request).execute();
if(response!=null){
inputStream=response.body().byteStream();
savedFile=new RandomAccessFile(file,"rw");
savedFile.seek(downloadedLength);//跳过已下载字节
byte[] bytes=new byte[1024];
int total=0;
int len;
while((len=inputStream.read(bytes))!=-1){
//循环读取文件字节,直到下载完毕或者用户点击暂停/取消
if(isCanceled){
return TYPE_CANCELED;
}
else if(isPaused){
return TYPE_PAUSED;
}
else{
total+=len;
savedFile.write(bytes,0,len);//保存文件并更新下载进度
int progress=(int)((total+downloadedLength)*100/contentLength);
publishProgress(progress);//通知更新进度
}
}
response.body().close();
return TYPE_SUCCESS;
}
}catch (Exception e){
e.printStackTrace();
}finally {
try{
if(inputStream!=null){
inputStream.close();
}
if(savedFile!=null){
savedFile.close();
}
if(isCanceled&&file!=null){
file.delete();
}
}catch (Exception e){
e.printStackTrace();
}
}
return TYPE_FAILED;
}
}
|
新建DownloadService 调用DownloadTask进行下载
1
2
3
4
5
6
7
8
9
10
11
12
13
14
15
16
17
18
19
20
21
22
23
24
25
26
27
28
29
30
31
32
33
34
35
36
37
38
39
40
41
42
43
44
45
46
47
48
49
50
51
52
53
54
55
56
57
58
59
60
61
62
63
64
65
66
67
68
69
70
71
72
73
74
75
76
77
78
79
80
81
82
83
84
85
86
87
88
89
90
91
92
93
94
95
96
97
98
99
100
101
102
103
104
105
106
107
108
109
110
111
112
113
114
115
116
117
118
119
120
121
122
123
124
125
126
127
128
129
130
131
|
package com.example.chapter10_service;
import android.app.Notification;
import android.app.NotificationChannel;
import android.app.NotificationManager;
import android.app.PendingIntent;
import android.app.Service;
import android.content.Intent;
import android.graphics.BitmapFactory;
import android.os.Binder;
import android.os.Build;
import android.os.Environment;
import android.os.IBinder;
import android.widget.Toast;
import androidx.core.app.NotificationCompat;
import java.io.File;
public class DownloadService extends Service {
private DownloadTask downloadTask;
private String downloadUrl;
//Service创建具体的listener实例,再传递给task用于回调结果
private DownloadListener listener=new DownloadListener() {
//显示下载进度
@Override
public void onProgress(int progress) {
getNotificationManager().notify(1,getNotification("Downloading...",progress));
}
//下载成功时关闭前台服务通知,并创建下载成功通知
@Override
public void onSuccess() {
downloadTask=null;//关闭任务
stopForeground(true);//关闭通知
getNotificationManager().notify(1,getNotification("Download success",-1));
Toast.makeText(DownloadService.this,"Download success",Toast.LENGTH_SHORT).show();
}
//下载失败时关闭前台服务通知,创建下载失败通知
@Override
public void onFailed() {
downloadTask=null;
stopForeground(true);
getNotificationManager().notify(1,getNotification("Download Failed",-1));
Toast.makeText(DownloadService.this,"Download Failed",Toast.LENGTH_SHORT).show();
}
@Override
public void onPaused() {
downloadTask=null;//关闭下载任务?
Toast.makeText(DownloadService.this,"Download Paused",Toast.LENGTH_SHORT).show();
}
@Override
public void onCanceled() {
downloadTask=null;
stopForeground(true);
Toast.makeText(DownloadService.this,"Download Canceled",Toast.LENGTH_SHORT).show();
}
};
public DownloadService() {
}
//binder用于活动和服务通信
private DownloadBinder mBinder=new DownloadBinder();
@Override
public IBinder onBind(Intent intent){
return mBinder;
}
class DownloadBinder extends Binder{
public void startDownload(String url){
if(downloadTask==null){
downloadUrl=url;
downloadTask=new DownloadTask(listener);
downloadTask.execute(downloadUrl);
startForeground(1,getNotification("Downloading...",0));
Toast.makeText(DownloadService.this,"Downloading...",Toast.LENGTH_SHORT).show();
}
}
public void pauseDownload(){
if(downloadTask!=null){
downloadTask.pauseDownload();
}
}
public void cancelDownload(){
if(downloadTask!=null){
downloadTask.cancelDownload();
}
else{
if(downloadUrl!=null){
//取消下载时将文件删除,并关闭通知
String fileName=downloadUrl.substring(downloadUrl.lastIndexOf("/"));
String directory= Environment.getExternalStoragePublicDirectory(Environment.DIRECTORY_DOWNLOADS).getPath();
File file=new File(directory+fileName);
if(file.exists()){
file.delete();//删除文件
}
}
}
}
}
//获取通知管理器
private NotificationManager getNotificationManager(){
return (NotificationManager) getSystemService(NOTIFICATION_SERVICE);
}
private Notification getNotification(String title,int progress){
Intent intent=new Intent(this, MainActivity.class);
PendingIntent pendingIntent=PendingIntent.getActivity(this,0,intent, PendingIntent.FLAG_IMMUTABLE);
NotificationManager notificationManager=getNotificationManager();
if (Build.VERSION.SDK_INT >= Build.VERSION_CODES.O) {
String channelId = "download"; //通道名称
String channelName = "下载通知";
notificationManager.createNotificationChannel(new NotificationChannel(channelId, channelName, NotificationManager.IMPORTANCE_HIGH));
}
NotificationCompat.Builder builder=new NotificationCompat.Builder(this,"download");
builder.setSmallIcon(R.mipmap.ic_launcher);
builder.setLargeIcon(BitmapFactory.decodeResource(getResources(),R.mipmap.ic_launcher));
builder.setContentIntent(pendingIntent);
builder.setContentTitle(title);
if(progress>0){
//progress>0时才需要显示进度
builder.setContentText(progress+"%");
//参数1 最大进度
//参数2 当前进度
//参数3 是否使用模糊进度条
builder.setProgress(100,progress,false);
}
return builder.build();
}
}
|
修改布局
1
2
3
4
5
6
7
8
9
10
11
12
13
14
15
16
17
18
19
20
21
22
|
<?xml version="1.0" encoding="utf-8"?>
<LinearLayout xmlns:android="http://schemas.android.com/apk/res/android"
android:orientation="vertical"
android:layout_width="match_parent"
android:layout_height="match_parent">
<Button
android:id="@+id/start_download"
android:layout_width="match_parent"
android:layout_height="wrap_content"
android:text="Start Download"/>
<Button
android:id="@+id/pause_download"
android:layout_width="match_parent"
android:layout_height="wrap_content"
android:text="Pause Download"/>
<Button
android:id="@+id/cancel_download"
android:layout_width="match_parent"
android:layout_height="wrap_content"
android:text="Cancel Download"/>
</LinearLayout>
|
修改MainActivity
1
2
3
4
5
6
7
8
9
10
11
12
13
14
15
16
17
18
19
20
21
22
23
24
25
26
27
28
29
30
31
32
33
34
35
36
37
38
39
40
41
42
43
44
45
46
47
48
49
50
51
52
53
54
55
56
57
58
59
60
61
62
63
64
65
66
67
68
69
70
71
72
|
package com.example.chapter10_service;
import android.content.ComponentName;
import android.content.Intent;
import android.content.ServiceConnection;
import android.content.pm.PackageManager;
import android.os.Bundle;
import android.os.IBinder;
import android.view.View;
import android.widget.Button;
import androidx.appcompat.app.AppCompatActivity;
import androidx.core.app.ActivityCompat;
import androidx.core.content.ContextCompat;
public class MainActivity extends AppCompatActivity implements View.OnClickListener {
private DownloadService.DownloadBinder downloadBinder;
private ServiceConnection connection=new ServiceConnection() {
@Override
public void onServiceConnected(ComponentName componentName, IBinder service) {
downloadBinder=(DownloadService.DownloadBinder)service;
}
@Override
public void onServiceDisconnected(ComponentName componentName) {
}
};
@Override
protected void onCreate(Bundle savedInstanceState) {
super.onCreate(savedInstanceState);
setContentView(R.layout.activity_main);
Button startDownload=findViewById(R.id.start_download);
Button pauseDownload=findViewById(R.id.pause_download);
Button cancelDownload=findViewById(R.id.cancel_download);
startDownload.setOnClickListener(this);
pauseDownload.setOnClickListener(this);
cancelDownload.setOnClickListener(this);
Intent intent=new Intent(this,DownloadService.class);
startService(intent);//启动服务
bindService(intent,connection,BIND_AUTO_CREATE);//绑定服务
//Manifest要加上android.才能正常
if(ContextCompat.checkSelfPermission(MainActivity.this,android.Manifest.permission.WRITE_EXTERNAL_STORAGE)!= PackageManager.PERMISSION_GRANTED){
ActivityCompat.requestPermissions(MainActivity.this,new String[]{android.Manifest.permission.WRITE_EXTERNAL_STORAGE},1);
}
}
@Override
public void onClick(View v){
if(downloadBinder==null){
return;
}
switch (v.getId()){
case R.id.start_download:
String url="http://xiazai-fd.zol-img.com.cn/g2/M00/0A/02/ChMlWl6dLvqIL3dzAAFdhCttZSUAAOd9QIjQ7YAAV2c133.jpg";
downloadBinder.startDownload(url);
break;
case R.id.pause_download:
downloadBinder.pauseDownload();
break;
case R.id.cancel_download:
downloadBinder.cancelDownload();
break;
default:
break;
}
}
@Override
protected void onDestroy() {
super.onDestroy();
unbindService(connection);
}
}
|
Others
Gradle
官方仓库https://services.gradle.org/distributions/
参考文章
Android Studio 配置Gradle
史上最全Android build.gradle配置详解(小结)
gradle-wrapper.properties中各属性的含义
AS的项目所用的Gradle由{your project}/gradle/wrapper/gradle-wrapper.properties文件决定,其内容如下
1
2
3
4
5
6
|
#Tue Jul 09 15:29:34 CST 2024
distributionBase=GRADLE_USER_HOME # distributionBase+Path=解压后的gradle.zip路径
distributionPath=wrapper/dists
distributionUrl=https\://services.gradle.org/distributions/gradle-8.7-bin.zip
zipStoreBase=GRADLE_USER_HOME # zipStoreBase+Path=下载的gradle.zip文件存储路径
zipStorePath=wrapper/dists
|
Gradle可供多个项目共享,默认存储路径如下:
1
2
|
Linux: ~/.gradle/wrapper/dists
Windows:C:\users\{user name}\.gradle\wrapper\dists
|
AS打开某个工程时,首先读取gradle-wrapper.properties,从而得知该工程需要哪个版本gradle,再去GRADLE_USER_HOME文件夹查看是否存在该版本的gradle,不存在则下载
ViewBinding
ViewBinding可以直接绑定layout与activity,获取binding后可直接访问组件,省去通过findViewById之类的操作
首先在gradle.build文件中打开ViewBinding功能
1
2
3
4
5
6
7
|
android{
...
viewBinding{
enabled=true
}
...
}
|
假设活动为MainActivity.java,布局为activity_main.xml
在Activity.java中创建binding成员
该类根据布局名称自动生成,如test_layout.xml生成TestLayoutBinding,即layoutName+Binding
1
|
private ActivityMainBinding binding;
|
在onCreate方法中进行布局绑定
1
2
|
binding=ActivityMainBinding.inflate(getLayoutInflater());
setContentView(binding.getRoot());
|
获取到binding后,可以直接通过binding.访问布局中的各个组件